Powerplus Supertilt Plus Manuale utente

POWER PLUS MOBILITY
1214 Kamato Road, Mississauga, Ontario, L4W 1Y1
Tel: (905) 614 0333 Toll Free (855) 614 0333 Fax: (905) 614 0435
WWW.POWERPLUSMOBILITY.COM

Valued Customer,
Thank you for purchasing a Power Plus Mobility product.
At Power Plus Mobility we manufacture top quality
“Canadian Made” products. Your wheelchair should
provide you with many years of service, but like any piece
of equipment, it will require proper care and service for it
to perform efficiently.
Your satisfaction is necessary and important to us and we
want to guarantee it.
However we suggest you regularly inspect your chair,
checking for loose fasteners, excess play and damage. We
also strongly recommend that regular maintenance be done
by your servicing dealer.
Please complete your “Warranty registration card” and
return it to us at Power Plus Mobility.
Also please read this manual to help you understand the
proper operation, safety and maintenance of your new
chair. If you have any difficulties or require additional
information contact your dealer or our customer service
department at Power Plus Mobility.

LIMITED WARRANTY
Power Plus Mobility guarantees all parts of our wheelchair to be
free of defects in workmanship and materials for a period of one
year from the date of purchase. “Wear” items such as tires, tubes,
armpads and upholsteries are excluded from this warranty.
In addition the frame is guaranteed to be free of defects in
workmanship and material (to the original owner) for a period of
5 years.
This warranty is invalid if the chair has been damaged by
accident, misuse, neglect, improper application, unauthorized
service repair or the addition of non-factory approved
accessories.
Power Plus Mobility will repair or replace defective parts as
required. A return authorization must be obtained and the parts
returned to us freight prepaid, within the warranty period.
Labour and freight charges incurred for replacements or repairs
are not covered.

MAINTENANCE GUIDE
Your wheelchair is designed to give you many years of trouble-free
use with proper care. Some servicing can be done at home, but we
recommend that periodic maintenance be performed at your dealer.
Service frequency depends strongly on the type of use and your
dealer can best advise you on the time interval.
CLEANING
All chrome or powder coated parts can be cleaned with a mild
non-abrasive cleaner such as window cleaner. Stubborn spots or
rust can be removed with automotive chrome cleaner.
The arms and nylon upholstery should be cleaned with a mild soap
and water solution. Both should be rinsed well with clean water to
remove all soap residues. The molded wheels and casters should
also be cleaned with a mild soap and water solution.
LUBRICATION
Your wheelchair has been made with low friction plastic,
chromoly, aluminum and polished chrome to reduce friction and
wear. However a light use of thin lubricant, such as WD40 or
silicone spray will reduce friction and wear, making your chair
easier to use.
SAFETY AND HANDLING
The safe handling of your chair depends on understanding the
purpose and function of your particular wheelchair model.
Recognizing the chairs’ limitations will increase your confidence
level.
LEANING
Leaning should be avoided when possible, as this weight transfer
will reduce your chair’s stability. When leaning forward or
sideways make sure the casters are turned in the direction you are
leaning as this will lengthen the wheel base, increasing stability.
Also make sure the wheel locks are engaged, to prevent your chair
from rolling.

MANOUVERING RAMPS, CURBS, STAIRS
Lean forward in chair, putting weight over front casters when
going up inclines. When going on descending inclines do so slowly
by controlling your speed using the handrims and not the wheel.
To mount a curb use the tipping method, pull the chair backwards
and over the curb. To descend a curb do your tipping and either
pull yourself down backwards or roll yourself forward and down
very slowly.
It is a definite no-no to use your chair on an escalator, find the
nearest elevator instead. Going up or down stairs should be done
with at least two attendants at all times.
TRANSFERRING IN A WHEELCHAIR
Attendant assistance is recommended to stabilize the chair and
help in lifting you, if necessary. Transfers are best accomplished by
following these guidelines:
Use a chair with detachable or flip back arm.
Position your chair as close as possible to the transfer object and
engage your wheel locks to prevent movement.
Try to transfer to objects of the same height or close to.

REAR WHEELS
Your wheels are made of injection molded nylon and will not rust. They are
also fitted with sealed precision bearings (7) which require no lubrication.
However they may need occasional adjustments, due to wear under normal
use. Too much side play or looseness or squeaking from your wheel means
it needs to be checked. In most cases, tightening of the axle bolt (2) will
rectify this condition. Should squeaking of looseness continue to exist after
adjustment, the bearings might have to be changed. See your servicing
dealer for assistance.
# Description Quantity
1 Wheel 2
2 Axle Bolt 2
3 Axle Receiver 2
4 Axle Plate 2
5 Axle Receiver
Nut
2
6 Hub Cap 2
7 Precision Bearing 4
3 4
5
7
2 6
1
7

TIRES
The standard tires on your chair are solid, maintenance free urethane. These tires
are reliable, long lasting and provide a very comfortable ride. However, if your
chair is equipped with pneumatic tires, they must be regularly checked for wear
and proper inflation. Air pressure should not exceed 40psi. Remember heated air
expands, and a wheel with 40psi in warm weather will greatly increase outdoors
or in the trunk of a car in the hot sun.
WHEEL LOCKS
The position of the wheel lock is pre-set at the factory to provide you with the
safest performance. However, with tire and brake shoe (3) wear, they may have
to be occasionally adjusted to ensure safety.
To adjust, loosen the bracket bolts (5) and slide brake assembly (2) towards
wheel. Ensure that the brake holds securely but does not require too much effort
to be applied. Then tighten the bracket bolt, securing assembly at the appropriate
position. Although lubrication is not necessary, a light application can enhance
performance.
Number Description Quantity
1 Tires 2
2 Bracket Bolt 2
3 Brake Shoe 2
4 Brake Handle 2
5 Bracket Bolt 4
6 Bracket Bolt Key 2
5
6
2
4
3
1

CASTERS
Your casters are made of injection molded nylon and will not rust.
They are also fitted with sealed precision bearings (10) which
require no lubrication.
Axle Adjustment on the caster
bearings, although not critical, may
also improve the performance. The
axle nut should be adjusted to
produce a smooth free running
caster without side play. Again do
not over tighten as this will damage
the bearings.
If fluttering or pulling is
experienced, your stem bearings
(9) may need adjustment or
replacements. To adjust flip chair
back onto its push handle and
remove the dust caps (1) on the
caster sockets. Tighten the fork
stem nut (2) clockwise while
holding the caster assembly.
Check for smooth easy turning
without side or end plays while
adjusting, do not over tighten as
this may damage the bearings.
Number Description Quantity
1 Dust Cap 2
2 ½” Lock Nut 4
3 Fork Stem 2
4 Caster Fork 2
5 5/16” x 2 ¾” Bolt 2
6 5/16” x 1/8” Plastic
Washer
4
7 5/16” Lock Nut Thin 2
8 Caster 2
9 Stem Bearing 4
10 Sealed Bearing 4 2
9
7
3
4
1
2
5
8 10
6

ANTI-TIPPERS
Your Anti-Tippers are used to prevent your chair from tipping over
while in tilt. These can be removed. However, they must never be removed
when using chair.
To remove Anti-Tippers:
Loosen the bolt (1) and remove it from the frame
To adjust the Anti-Tipper height:
Pull on (4) while moving (2) to your desired position release (4) to
lock into place
*Please adjust your Anti-Tippers to a safe height (maximum 2” from the
ground). Whenever the seat height is adjusted by wheels the Anti-Tipper
height must be adjusted as well.
# Description Quantity
1 Bolt 1
2 Height Extension
Tube
1
3 Housing 1
4 Locking Pin 1
5 Anti-Tipper Wheel 1
4
1
2
3
5

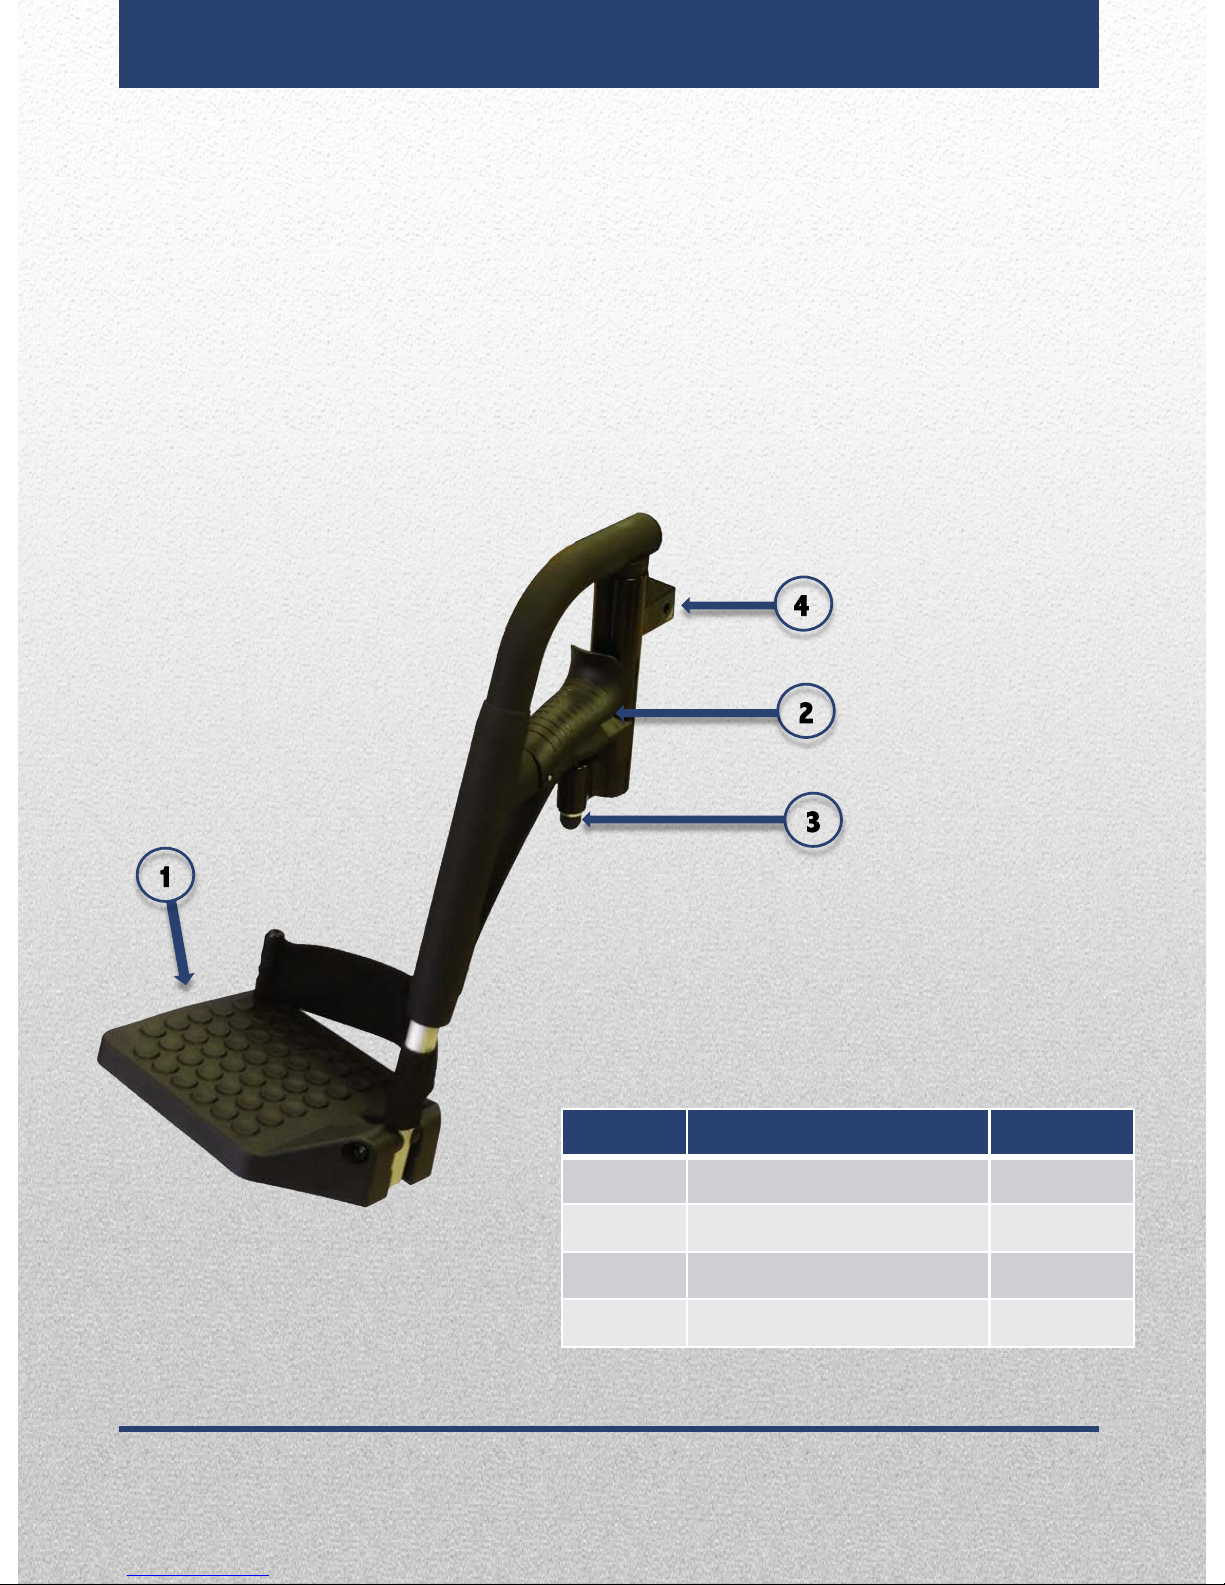
FOOTREST
The footrest on your chair is designed to swing away and removes
easily. To swing away, remove feet from the footplate (1) and fold
footplates up. Then push the release handle (2) on the footrest
locking mechanism. It will swing to the side of your chair, and
could then be removed by lifting it straight up and off the locating
pins (3). To replace hold footrest at the side of your chair, locate
onto mounting pins, allowing it to drop all the way in, and then
push forward until it locks into place.
Number Description Quantity
1 Foot Plate 2
2 Release Handle 2
3 Mounting Pins 4
4 Footrest Extension Tube 2
1
4
2
3
Indice
Altri manuali Powerplus sedia a rotelle