Prepac GSCW-0708-2K Manuale utente

CONTACT US FIRST
1-877-PREPAC1
1-877-773-7221
Mon - Fri 7am - 4pm PST
10am - 7pm EST
For help with assembly
If you have received a damaged or defective
part or are missing hardware.
We will process replacement parts in 2 business
days or less. Parts are shipped via UPS Ground or
mail.
Before you call please:
1) Record the following information from the
shipping label on the outside of the box.
You will need it for warranty purposes:
Ship To Name
Sales Order Number
2) Note the product model number.
3) Review the contents of your shipment to
determine what you are missing.
•
•
36” Wide
Large Storage Cabinet
Model # GSCW-0708-2K
Online Option
Fill out the Replacement Parts Order form in the Product
Support section of our website: www.prepacmfg.com
Assembly Instructions
2 Person Installation Required
DATE STAMP
LB-0737
2014-05-21
Scan the
QR code
to view an
installation
video for
this product
Required Tools
stud
finder
3/16th inch drill bit
Prepac Manufacturing Ltd.
6705 Dennett Place
Delta, BC V4G 1N4
Page 2 of 20
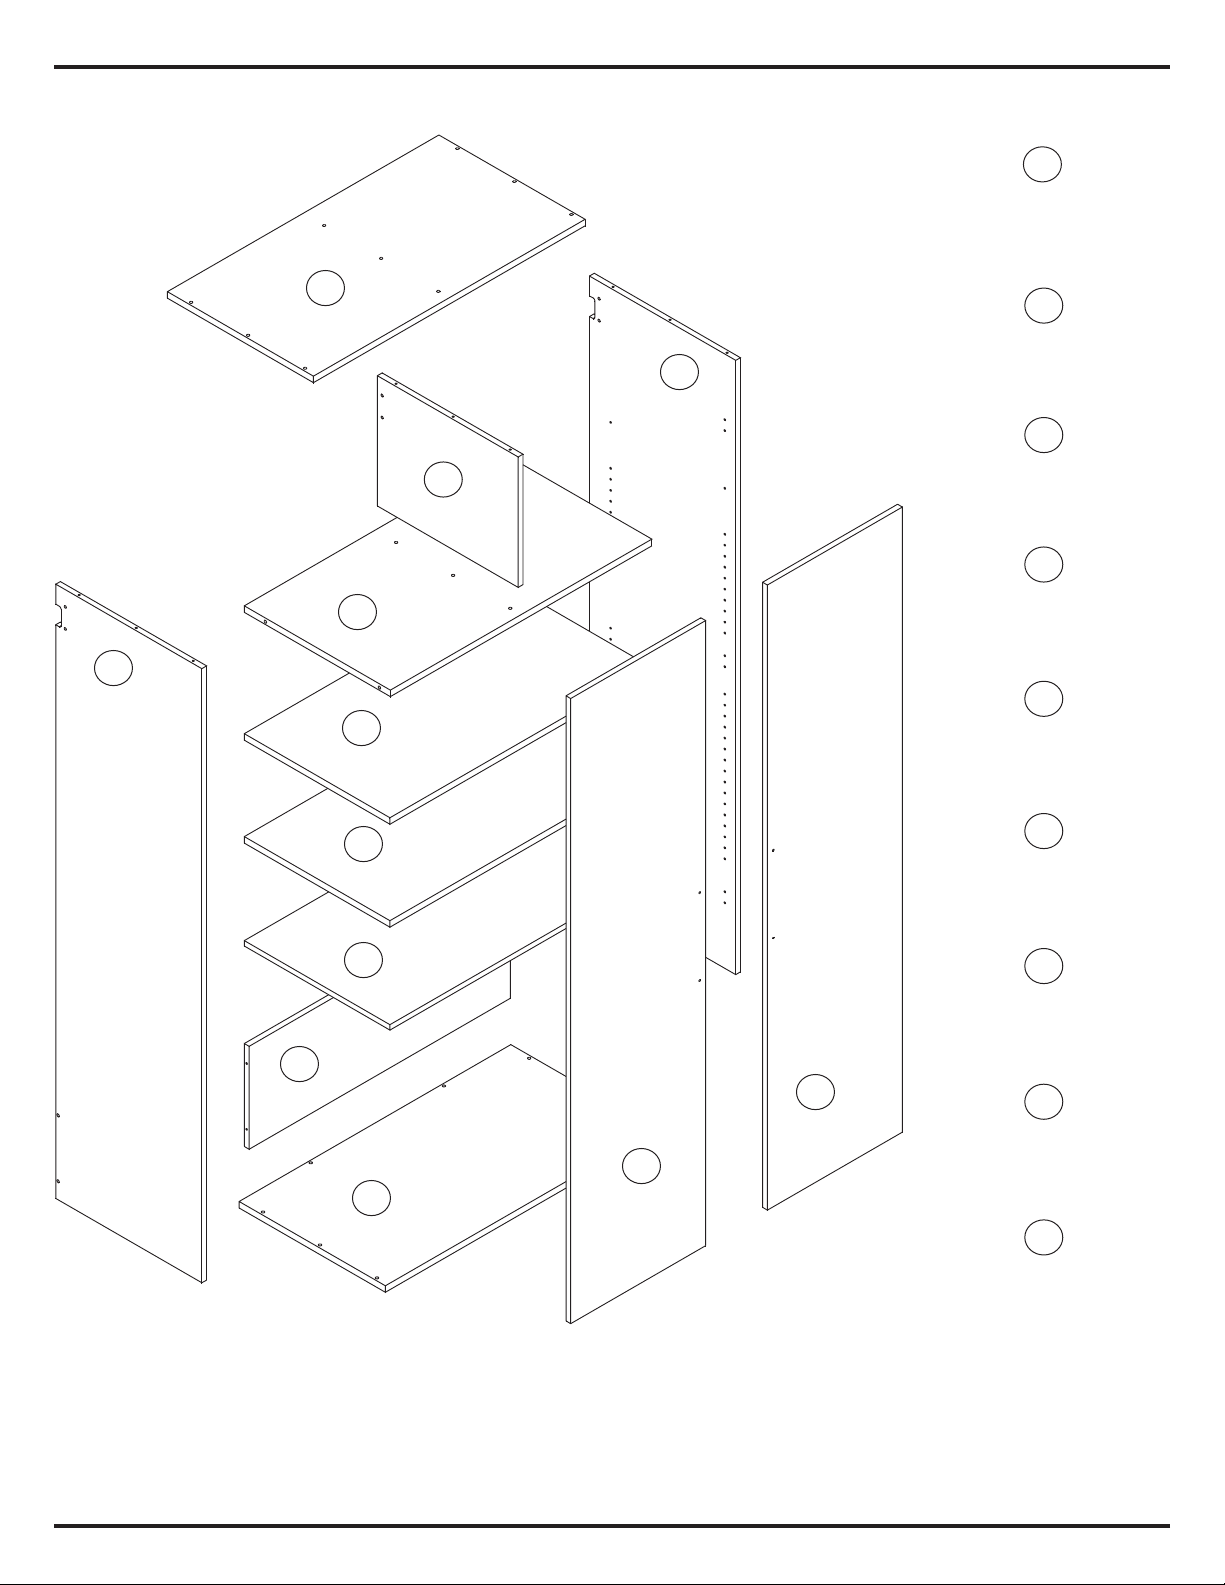
Top (1)
Dessus
TP-10049-G gray / gris
Gable (1)
Pignon
GA-10053-G gray / gris
Left Side (1)
Côté gauche
SL-10052-G gray / gris
Right Side (1)
Côté droit
SR-10052-G gray / gris
Fixed Shelf (1)
étagère fixe
SH-10051-G gray / gris
Adjustable Shelves (3)
étagère ajustable
SF-10036-G gray / gris
Bottom Stabilizer (1)
Renforcement inférieur
ST-10063-G gray / gris
Bottom Shelf (1)
étagère ajustable
BT-10039-G gray / gris
Doors (2)
porte
DR-10033-G gray / gris
C3
C1
C4
C6
C5
C8
C9
C2
C7
Cabinet Parts
C3
C1
C4
C6
C5
C8
C9
C2
C7
C6
C6
C9
Parts are not labelled but are easy to identify.
Les pièces ne sont pas étiquetés mais sont faciles à identifier.

Page 3 of 20
3’’ Wood Screw (3)
Vis à bois 3 pouces
RM-0835
Allen Key (1)
Clef “Allen”
RM-0313
Allen Key Bit (1)
Clef“Allen” mèche
RM-0923
Euro Hinge (6)
Euro charnière
RM-0016
Hinge Plate with screws (6)
Plaque de charnière avec
les vis
RM-0018
Nylon Lock Nut (6)
Écrous de
blocage en nylon
RM-0837
Rail Hook (3)
Crochet de
suspension
RM-0834
30 mm Bolt (6)
Boulons 30 mm
RM-0836
Confirmat Screw (24)
Vis Confirmat
RM-0001
Metal Dowel Pins (12)
Goujons de métal
RM-0014
#6 - 5/8” Phillips Head
Wood Screws (8)
Vis de bois no. 6 5/8 po.
tête cruciforme
RM-0004
15mm Zinc Cam (4)
Cames zinc
RM-0103
24mm Green
Twister Dowel (4)
goujons verts à
visser
RM-0501
Hardware
Metal Rail (1)
Rail métallique
RM-0904
Metal Connecting Brace (1)
Raccordement métallique
renfort
RM-0905
Metal Pull & Screw Set (2)
Poignée métallique & Jeu de vis
RM-0906
BEFORE YOU BEGIN
Identify ALL parts and hardware to
ensure everything is included.
AVANT DE COMMENCER
Identifier toutes les pièces et le matériel afin de
s’assurer que tout est inclus.

Page 4 of 20
1a
1b
C2
C2
C5
Rail Hook
Crochet de
suspension
Bolt
Boulon
Nylon Lock Nut
Écrous de
blocage en nylon
Confirmat Screw
Vis Confirmat
Attach Rail Hooks to the Gable (C2)
as shown. Use wrench to tighten nuts.
Fixez les crochets de suspension au
pignon comme montre. Utilisez uneUtilisez une
clef pour serrer les écrous
Attach Fixed Shelf (C5) to Gable (C2)
with Confirmat Screws
Fixez l’étagère fixe (C5) aux pignons
(C2) avec les Vis Confirmat

Page 5 of 20
2a
2b
2c
Green Twister
Dowel
Goujons verts
à visser
C3
C4
2a
2b
2c
Attach Rail Hooks to the Left (C3) & Right (C4) Sides as you did in Step 1. Use wrench to tighten nuts
Fixez les crochets de suspension aux côtés gauche (C4) et de droite (C5) comme étape 1. Utiliser une clef pouraux côtés gauche (C4) et de droite (C5) comme étape 1. Utiliser une clef pour
serrer les écrous
Insert green twister dowels into Left (C3) & Right (C4) Sides
Insérez les goujons verts à visser aux côtés gauche (C3) et droite (C4)
Attach hinge plates to Left (C3) & Right (C4) Sides
Fixez les plaques de charnière aux côtés gauche (C3) et droite (C4)côtés gauche (C3) et droite (C4)

Page 6 of 20
3
Tightening Cams
Pour serrer les cames
Unlocked Locked
Turn 210°
Déverrouillées Verrouiller en tournant
210 degrés vers la droite
Insert cams with the
opening facing toward
the hole for the twister
dowel.
Insérez les cames
dans l’ouverture faisant
face au trou du goujon
à visser.
C3
C4
C5
Insert cams into the Fixed Shelf (C5), then attach to Left (C3) and Right (C4) Sides and tighten cams.
Insérer des cames dans l’étagère fixe (C5), puis attachez aux côtés gauche (C4) et (C5) droit. Serrez les cames.

Page 7 of 20
STEP 3 Estimated Time: 10 minutes
4a
4b Attach Bottom Stabilizer (C7) to Left (C3)
and Right (C4) Sides with Confirmat Screws
Fixez le renforcement inferière (C7) aux côtés
gauche (C3) et droit (C4) avec les Vis Confirmat
Confirmat Screw
Vis Confirmat
Confirmat Screw
Vis Confirmat
Attach Top (C1) to Left (C3) and Right (C4) Sides and Gable (C2) with Confirmat Screws
Fixez le dessus (C1) aux côtés gauche (C3) et droit (C4) et au pignon (C2) avec les Vis Confirmat
C1
C7
C3
C4
C3
C4
C2

Page 8 of 20
5a
5b
Attach Bottom Shelf (C8) to Left (C3) and Right (C4) Sides with Confirmat Screws
Fixez l’étagère inférieure (C8) vers la gauche (C3) et droit (C4) côtés avec vis Confirmat
Attach hinges to doors (C9) with
#6 - 5/8” Wood Screws Fixez les
charnières de portes (C9) avec
vis de bois no. 6 5/8 po.
Attach hinges to doors (C9) with screws provided.
Do not attach doors to cabinets yet.
Fixez les poignées de portes (C9) avec les vis fournies.
Ne fixez pas les portes d’armoires encore.
Confirmat Screw
Vis Confirmat
5c
C8
C3
C4
C9
#6 - 5/8” Wood Screws
Vis de bois no. 6 5/8 po.

Page 9 of 20
Before you begin:
Make sure you have the following
tools and hardware:
• stud finder
• power screwdriver or drill
• 3/16th inch drill bit
• pencil
• Tape measure
• Level
• Hack saw *
*Optional: Use a hacksaw to cut
the Metal Hanging Rail to the
desired length.
Each cabinet comes with:
• One - 38 inch Metal Hanging Rail
• 1 Connecting Brace
• Three wood screws
Installing Hang Ups Garage Cabinets
2 people required
Read through all installation
steps before beginning
IMPORTANT:
Securely mounting the rails is critical
for a proper installation.
The hardware and instructions provided are for walls built
with drywall or sheetrock and WOOD STUDS positioned
16 inches apart. If you wish to hang product on other
types of walls, please contact your local hardware store
for the appropriate wall mounting hardware.
When using multiple Rails, a Connecting Brace is
fastened across two adjoining rails to provide additional
support between studs.
Pour suspendre les armoire au
mur, vous aurez besoin de 2
personnes
Lisez bien toutes les étapes de cette
installation avant d’entamer la tâche.
Pour visionner le vidéo décrivant l’installation
rangement de garage de suspension, consultez
la page de Soutien Produits sur notre site web :
www.prepacmfg.com/content/assembly
ou balayez le code de QR à gauche
L’AIDE EN LIGNE
ONLINE HELP
To see a how-to installation video, click on
“How to Install Prepac’s Garage Storage
Collection” on the Assembly page in the
Support section of our website:
www.prepacmfg.com/content/assembly
or scan the QR code at right
IMPORTANT :
fixation sécurisée des rails est critique
pour une installation correcte.
Le matériel et les instructions sont fournies pour construire
des murs de plâtre ou plâtre et goujons en bois placé 16
cm l’un de l’autre. Si vous souhaitez suspendre produit sur
d’autres types de murs, veuillez contactez votre magasin
de matériel informatique local pour le matériel de fixation
murale.
Lors de l’utilisation de plusieurs rails, une connexion le ren-
fort est fixé entre deux rails adjacents pour offrir un soutien
supplémentaire entre les goujons.
Avant de commencer :
Assurez-vous que vous disposez des
outils suivants et matériel:
• goujon finder
• tournevis électrique ou percer
• 3/16ème pouces foret
• crayon
• ruban à mesurer
• niveau
• scie à métaux *
*Facultatif : Utilisez une scie à métaux
pour couper le métal Rail de suspen-
sion à la longueur désirée.
Chaque armoire est livré avec :
• Un - 38 pouces suspension métallique Rail •
• 1 connexion renfort
• Trois vis à bois
3/16th inch drill bit

Page 10 of 20
Accrocher une seule
armoire 36 po.
Hanging a Single
36” Cabinet
Si vous installez un seul cabinet uniquement,
assurez-vous que le rail métallique couvre 3
goujons et centre le cabinet partout les goujons.
If you are installing one cabinet only, make sure the
metal rail covers 3 studs and center the cabinet
across the studs.
Indice


