PROMULTIS PM-TS55A/32/HD Manuale utente

55" HD 32 TOUCH LED SCREEN
INSTRUCTION MANUAL
Before connecting, operating or adjusting this product, please read the manual completely.
Please keep this manual for future reference.

CONTENTS
Important Information 1
Important Safety Precautions 2
Identication of Controls 4
Remote Control 6
Connections 7
Basic Operations 9
Operating the Side Menu 10
User Menu List 11
UBoard 15
Annotation 16
WhiteBoard 17
USB multi media player 18
Troubleshooting 19
Specications 20

1
IMPORTANT INFORMATION
If the screen is not positioned in a stable location, it can be potentially hazardous
due to falling. Many injuries, particularly to children, can be avoided by taking simple
precautions such as:
● Use cabinets or stands recommended by the manufacturer of the screen.
● Only use furniture that can safely support the screen.
● Ensure the screen is not hanging over the edge of the supporting furniture.
● Do not place the screen on tall furniture (for example, cupboards or bookcases)
without anchoring both the furniture and the screen to a suitable support.
● Do not position the screen on cloth or place any material between the screen and
supporting furniture.
● Increase children’s awareness of danger caused by falling down of the screen, or
being hurt by bumping into the screen.
● Do not use immediately after moving from a low temperature to high temperature
environment, as this causes condensation, which may result in re, electric shock, or
other hazards.
● To avoid possible condensation it is recommended to not use the device within 24
hours after its arrival, to avoid possible condensation.
Warning:
To prevent the spread of fire, keep candlesor other open flames away from the
screen the times.

2
IMPORTANT SAFETY PRECAUTIONS
CAUTION
RISK OF ELECTRIC SHOCK
DO NOT OPEN!
This symbol indicates that dangerous voltage
instituting a risk of electric shock is present
within this unit.
This symbol indicates that there are important
operation and maintenance instructions in the
literature accompanying the appliance.
Electricity may cause personal injuries and property
damage if handled improperly. The screen has been
engineered and manufactured with the highest priority on
safety. But IMPROPER USE CAN RESULT IN POTENTIAL
ELECTRIC SHOCK OR FIRE HAZARD. In order to prevent
potential danger, please observe the following instructions
when installing, operating and cleaning the product. To
ensure your safety and prolong the service life of your
screen, please read the following precautions carefully
before using the product.
1. Read these instructions---All operating instructions
must be read and understood before the product is
used.
2. Keep these instructions---These safety and operating
instructions must be kept in a safe place for future
reference.
3. Note all warnings---All warnings on the product and in
the instruction manual must be observed closely.
4. Follow all instructions---All operating instructions must
be followed.
5.Attachments---Only use attachments/accessories
specied by the manufacturer. Do not use attachments
which are not recommended by the manufacturer. Use
of improper attachments can result in accidents.
6. Power source---This product is intended to be supplied
with a listed power supply indicated on the marking
label. If you are not sure of the type of power supply at
your location, consult your product dealer or local power
company. For added protection for this product during a
lightning storm, or when it is left unattended and unused
for a long period of time, unplug it from the wall outlet
and disconnect the cable system.
7.Power cord protection---Protect the power cord from
being walked on or pinched particularly at plugs, wall
outlet, and the point where they exit from the device.
NOTE: Where the mains plug or an appliance coupler is
used as the disconnected device, the disconnected
device shall remain readily operable.
8. Overloading---Do not overload wall outlets, extension
cords, or convenience receptacles on other equipment
as this can result in a risk of re or electric shock.
9. Entering of objects and liquids---Never insert an
object into the product through vents or openings.
High voltages are present in the product and inserting
an object can cause electric shock and/or short circuit
internal parts. For the same reason, do not spill water or
liquid on the product.
10.Servicing---Refer all servicing to qualified service
personnel. Servicing is required when the device has
been damaged in any way, such as the power-supply
cord or plug is damaged, liquid has been spilled,
objects have fallen into the device, the device has been
exposed to rain or moisture, does not operate normally
or has been dropped.
11.Damage requiring service---If any of the following
conditions occurs, unplug the power cord from the
AC outlet and request a qualied service technician to
perform repairs.
a. When the power cord or plug is damaged.
b. When liquid is spilled on the product or when objects
have fallen into the product.
c. When the product has been exposed to rain or water.
d. When the product does not operate properly as
described in the operating instructions.
Do not touch the controls other than those described
in the operating instructions. Improper adjustment of
controls not described in the instructions can cause
damage, which often requires extensive adjustment
work by a qualied technician.
e. If the product has been dropped or the cabinet has
been damaged in any way.
f. When the product displays an abnormal condition
or exhibits a distinct change in performance. Any
noticeable abnormality in the product indicates that the
product needs servicing.
12. Replacement parts---In case the product needs
replacement parts, make sure that the service person
uses replacement parts specied by the manufacturer,
or those with the same characteristics and performance
as the original parts. Use of unauthorized parts can
result in re, electric shock and/or other danger.
13. Safety checks---Upon completion of service or repair
work, request the service technician to perform safety
checks to ensure that the product is in proper operating
condition.
14. Wall or ceiling mounting---When mounting the
device on a wall or ceiling, be sure to install the
product according to the method recommended by the
manufacturer. This is a safety issue.
15. Stand---Use only with the trolley, stand or wall mount
specified through CE/UL/GS safety certificate. or sold
with the device. Do not place the product on an unstable
trolley, stand. Placing the product on an unstable base
can cause the product to fall, resulting in possible
serious injuries as well as damage to the device.
16.Careful move---When a trolley is used, be cautious
when moving the trolley/device combination to avoid
injury from the device tipping over. Sudden stops,
excessive force and uneven floor surfaces can cause
the product to fall from the trolley.
Careful move and be careful please, point of strength
should not in display screen.
Never attempt to move the screen unless the AC power
cord has been disconnected.
17.Do not use this device near water---for example, near
a bathtub, washbowl, kitchen sink, laundry tub, in a wet
basement or near a swimming pool, and the like.

3
The apparatus should not be exposed to dripping or
splashing liquids and that no objects lled with liquids,
such as vases, shall be placed on the apparatus.
Do not use immediately after moving from a low
temperature to high temperature environment, as this
causes condensation, which may result in re, electric
shock, or other hazards.
18.Clean only with dry cloth---Unplug the device from
the power before cleaning. Do not use liquid cleaners or
aerosol cleaners. Use a soft cloth for cleaning.
19.Ventilation---Do not block any ventilation openings.
Install the screen in accordance with the manufacturer
instructions. Do not cover or block these vents and
openings since insufficient ventilation can cause
overheating and/or shorten the life of the product. This
product is not designed for built-in installation; therefore
do not place the product in an enclosed space such as
a bookcase or rack, unless proper ventilation is provided
or the manufacturer’s instructions are followed.
It should have interspace around the product and the
wider it has the heat dissipation is better. Suggest
up>10cm, around>10cm and back >2.5cm.
20.Heat sources---Do not install near any heat sources
such as radiators, heat registers, stoves, or other device
(including ampliers) that produce heat.
21.Panel protection---The display panel used in this
product is made of glass. Therefore, it can break when
the product is dropped or impacted upon by other
objects. Be careful not to be injured by broken glass
pieces in case the display panel breaks.
Do not use hard or sharp object to take place of special
pen when write in the screen.
Wipe the screen from one side to the other carefully till it
looks completely clean. Do not ailing in all directions.
22.Pixel defect---The display panel is a very high
technology product, giving you fine detailed pictures.
Occasionally, a few non-active pixels may appear on
the screen as a xed point of blue, green or red. Please
note that this does not affect the performance of your
product.
WARNING: For continued safety, device with class I
construction shall be connected to a mains socket outlet
with a protective earthing connection.
IMPORTANT SAFETY PRECAUTIONS
About Location/Environment
Do not use in hot and cold rooms (locations)
● When the unit is used in rooms (locations) with low temperature,
the picture may leave trails or appear slightly delayed. This is
not a malfunction. The unit will recover when the temperature
returns to normal.
● Do not leave the unit in a hot or cold location. Also, do not leave
the unit in a location exposed to direct sunlight to near a heater
or in high humidity, as this may cause the cabinet to deform and
the screen to malfunction and aect the screen’s performance.
● Environment condition:
Operating temperature: 5°C – 35°C
Operating humidity: 20% – 80% (no moisture condensation)
Storage temperature: -15°C – 45°C
Storage humidity: 10% – 80%
Atmospheric pressure: 86 kPa ~106 kPa
About After-Image
The extended use of xed image program material can cause a
permanent after-image on the screen.
This background image is viewable on normal programs in the
form of a stationary xed image. This type of irreversible screen
deterioration can be limited by observing the following steps:
A. Reduce the brightness/contrast setting to a minimum viewing
level.
B. Do not display the xed image for extended periods of time.
C. Turn the power o when the display is not in actual use.
Important Information Regarding Use of Video Games,
Computers, Captions or Other Fixed Image Displays.
● Do not allow a still picture to be displayed for an extended
period of time, as this can cause a permanent after-image to
remain on the screen.Examples of still pictures include logos,
video games, computer images, teletext and images displayed
in 4:3 mode.
CAUTIONS:
●The permanent after-image on the screen resulting from fixed
image use is not an operating defect and as such is not covered
by the warranty.
●This product is not designed to display xed images for extended
periods of time.
● It is not advised to put the screen in portrait mode because this
will aect the warranty.
Cleaning and Maintenance
To clean this unit, wipe with a soft, dry cloth.
Clean the cabinet with a soft, lint-free cloth. If the cabinet is
especially dirty, moisten a soft, lint-free cloth in a weak detergent
Solution, squeeze the excess moisture from the cloth, then wipe
the cabinet with the cloth. Use a clean cloth to dry the cabinet.
● Use eyeglass cleaner to remove stubborn dirt from the screen.
● Never use alcohol, paint thinner or benzine to clean this device.
Carrying or Moving the screen
● When you move the screen , hold the frame of the screen .
● Be aware of the danger or harm which may caused by carrying
or moving the screen , as the bezel is very thin.
● When transporting, do not subject the unit to shocks or vibration,
or excessive force.
Environmental Protection
Waste electrical products should not be disposed of
with household waste. Please recycle where facilities
exist. Check with your Local Authority or retailer for
recycling advice.

4
IDENTIFICATION OF CONTROLS
Power Indicator & Remote Sensor
1
2
3
10
4
5
6
7 8 9
1USB(3.0)(for camera) Connect USB devices to this port for OPS or Android.
Notes: Please open the dust cover before being used.
2Fuse 10A 250V
3AC IN Plug the AC cord into this jack and into a power outlet.
(AC 100-240V 50/60Hz)
4Power Switch Push ( I ) to connect the power, push (O) to cut o the power.
Note: Don’t cover the power switch.
5Extension module Slot Insert an extension module (Optional).
6OPS module slot Insert an OPS module (Optional).
7USB C Full - featured Type C.
8USB 3.0 Connect USB devices to this port.
9TOUCH OUT 3
Connect an external device to support touch control of the external device on
the screen.
Note: Touch out 3 corresponds to the HDMI 3.
10 HDMI IN 3 Connect an HDMI or DVI device to this jack.

5
IDENTIFICATION OF CONTROLS
The terms HDMI and HDMI High-Definition Multimedia Interface, and the HDMI Logo are
trademarks or registered trademarks of HDMI Licensing LLC in the United States and other
countries.
1
2
3
4
5
7
8 9 10 11
6
12
1HDMI OUT Connect a monitor to this port, output of the currently screen.
2HDMI IN 1/2 Connect an HDMI or DVI device to this jack.
HDMI IN 1(ARC): Connect an ARC-enabled home theater receiver to this jack.
3DP(DisplayPort) INPUT Connect an external device to DP out jack.
4USB 2.0 Connect USB devices to this port for Android.
5TOUCH OUT 1/2
Connect an external device to support touch control of the external device on
the screen.
Note: Touch out 1 corresponds to the HDMI 1, Touch out 2 corresponds to the
HDMI 2, DP or VGA.
6WiFi module slot Insert a WiFi module.
7Switches the screen power on or standby.
8PC IN Connect the video/audio of a computer to these ports.
9S/PDIF digital audio output Connect a digital sound system to this jack.
10 Connect headphones to this jack. The monitor is the current audio output.
11 RS232 For remote control, service and other uses.
12 LAN IN 1/2 Connects the external network or the router.

6
REMOTE CONTROL
NOTES:
● This operation manual provides a description based on operating functions with the remote control.
● In dierent mode, some buttons may have dierent function.
Switch the screen power on or o
Display or exit input source menu
Set up the sleep timer
Takes a screenshot and stores the data onto
your connected USB storage device.If there is
no USB storage, the screenshot will be stored
on the built-in storage.
Return to OPS PC desktop
Volume up/down
Display desktop (Home page) on the screen
To confirm or enter a sub-menu or toggle
between options during menu operation.
Use Arrow buttons to navigate in on-screen
menu
Display or exit the setting menu screen
0-9 number buttons
Mute the sound
Page up/down in OPS PC mode
Switch to VGA mode
Switch to HDMI mode
Display or exit the current program information
Display OPS on the screen
Note: If no OPS, this button has no function.
Freeze the content displayed on the screen
Control buttons for OPS PC
Control buttons for OPS PC
Return to previous menu or exit the on-screen
menu

7
100-240V~50/60Hz
CONNECTIONS
Cautions Before Connecting
● When connecting an external device to the screen, make sure that the screen and the external device are turned o.
● Check the plugs at the ends of the cables to make sure that they are the correct type before plugging them into the
jacks on the screen.
● Make sure that all plugs are securely inserted into the jacks. Loose connections can result in image or color problems.
● The illustration of the external device may be dierent depending on your model.
● Refer to the operating manual of the external device as well.
Connect TOUCH OUT with USB cable to PC USB port.
Connect PC with VGA cable, HDMI cable or DP cable. Please choose the proper method of connection based on your device. (Only
for PC, HDMI, DP signal)
Touch out 1 corresponds to the HDMI 1, Touch out 2 corresponds to the HDMI 2, DP or VGA.
Note: After installation of the driver, it can control the external computer by native touch control.
PC, etc.
Serial port cable
Network connection
Digital sound system
Audio input devices
Before using headphones, adjust
the device volume to avoid
excessive volume, as hearing
damage may result.
HDMI cable
USB cable
Audio cable
PC, etc.
VGA devices
Monitor
HDMI cable
S/PDIF cable
Headphone cable
VGA cable
USB cable
PC, etc.
USB devices
HDMI devices HDMI cable
Network cable
DP devices DP cable
PC, etc.
USB cable
USB cable
8
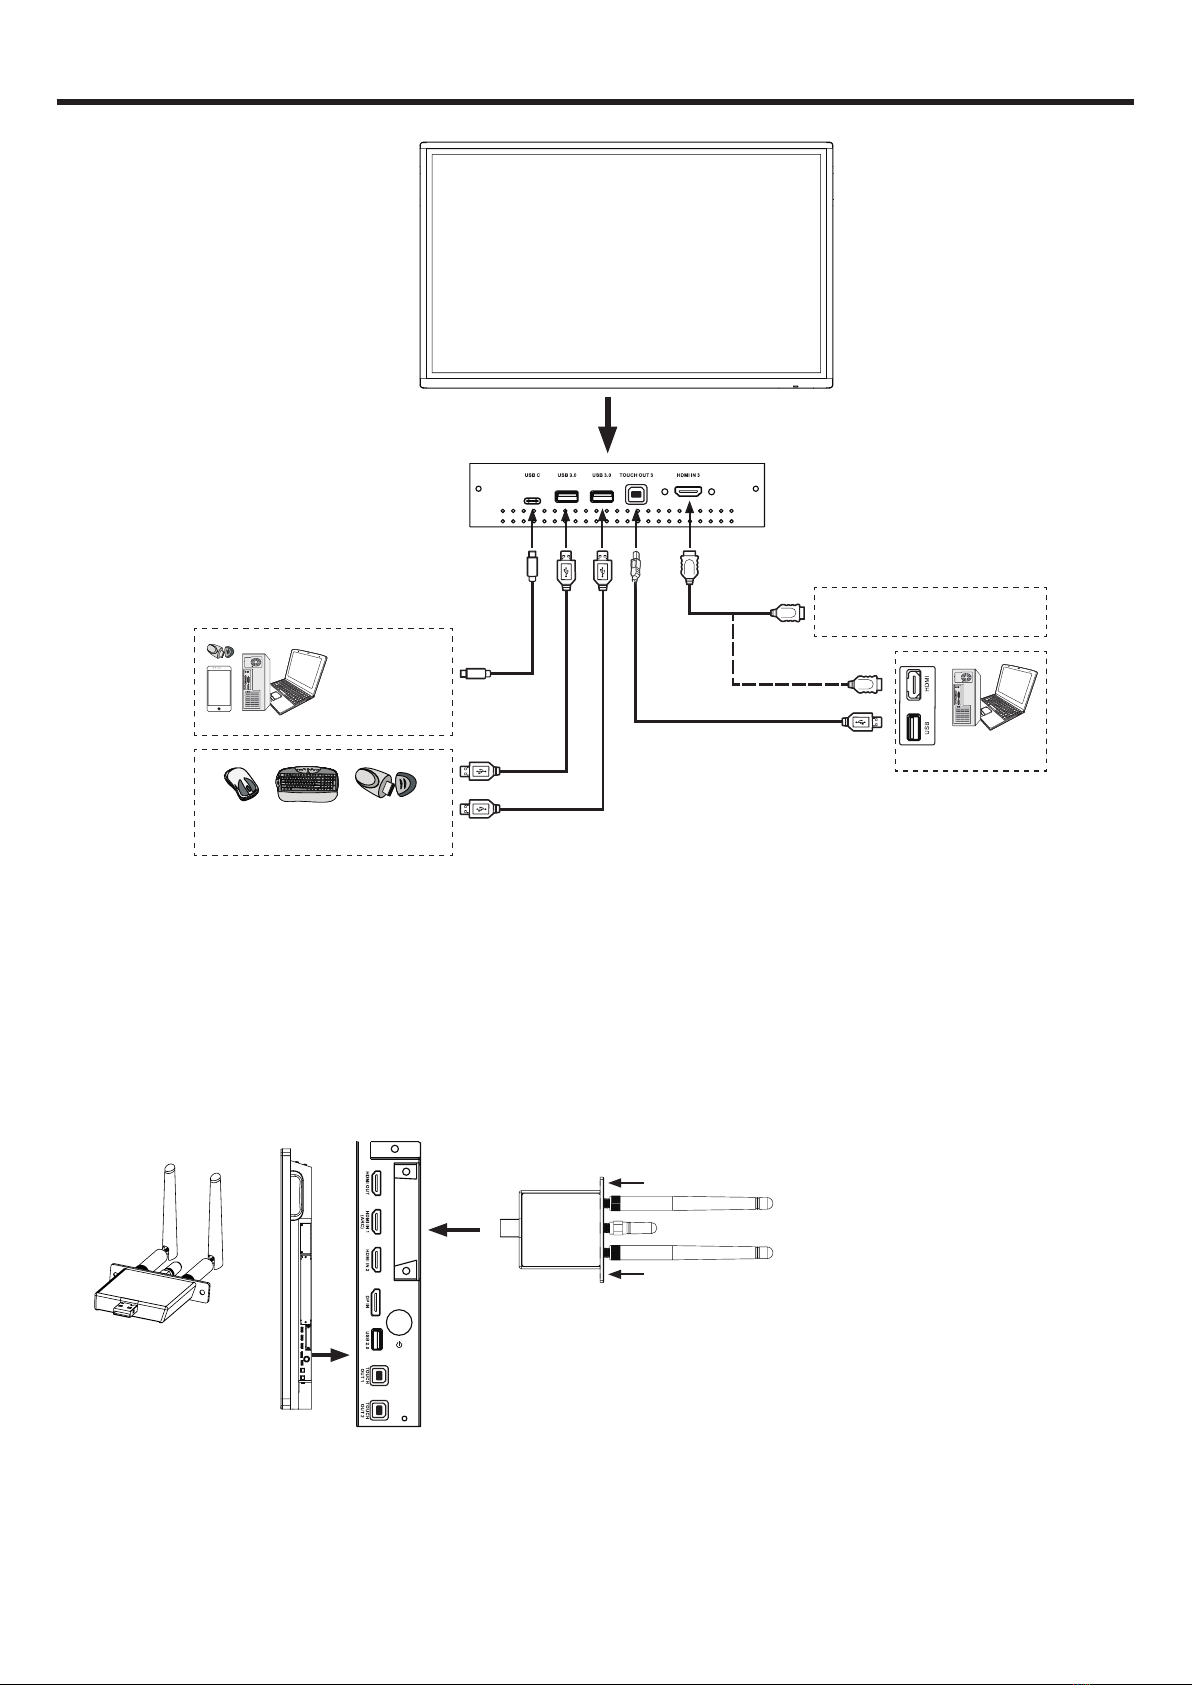
CONNECTIONS
WiFi module instructions
Installation instructions
● Tighten the WiFi antenna in clockwise direction.
● Unscrew the screws and take out the bae-plate on the
your device.
● Insert the WiFi module to the slot along the track on both
sides. Fasten the WiFi module with two screws.
WiFi
module slot
Screw
Screw
USB cable
USB devices
HDMI devices
HDMI cable
USB Type C
devices
USB cable
USB cable
Type C cable
PC, etc.
Connect TOUCH OUT with USB cable to PC USB port.
Connect PC with VGA cable, HDMI cable or DP cable. Please choose the proper
method of connection based on your device. (Only for PC, HDMI, DP signal)
Touch out 3 corresponds to the HDMI 3.
Note: After installation of the driver, it can control the external computer by native
touch control.
Indice
Altri manuali PROMULTIS Pannello touch


