Pyramid 2500 Manuale utente

pyramidtimesystems.com
Auto Aligning Time Clock
User Guide
Pro
PM
24
PM
24

AUTO ALIGNING TIME CLOCK INSTRUCTIONS
Model 2500/2650
Copyright Information
© 2016 Pyramid Time Systems, LLC. All rights reserved.
Reproduction, adaptation or translation without prior written permission is prohibited,
except as allowed under the copyright laws.
The information contained herein is subject to change without notice.
The only warranties for Pyramid Time Systems products are set forth in the express
warranty statements accompanying such products. Nothing herein should be construed
as constituting an additional warranty. Pyramid Time Systems shall not be liable for
technical or editorial errors or omissions contained herein.

AUTO ALIGNING TIME CLOCK INSTRUCTIONS
Model 2500/2650
1pyramidtimesystems.com TABLE OF CONTENTS
TABLE OF CONTENTS
PRODUCT OVERVIEW . . . . . . . . . . . . . . . . . . . . . . . 2
FEATURES . . . . . . . . . . . . . . . . . . . . . . . . . . . . 2
CONTENTS . . . . . . . . . . . . . . . . . . . . . . . . . . . 3
WALL MOUNTING . . . . . . . . . . . . . . . . . . . . . . . 4
PROGRAMMING . . . . . . . . . . . . . . . . . . . . . . . 5-10
AUTOMATIC COLUMN ADVANCE . . . . . . . . . . . . . . . . . 9
CHANGING A SETTING . . . . . . . . . . . . . . . . . . . . . 9
DELETING A SETTING . . . . . . . . . . . . . . . . . . . . . . 9
TIME CARD & PRINT FORMAT . . . . . . . . . . . . . . . . . . 11
USING THE CLOCK . . . . . . . . . . . . . . . . . . . . . . . 12
REPLACING RIBBON CARTRIDGE . . . . . . . . . . . . . . . . . 13
TROUBLESHOOTING & PRINT ADJUST . . . . . . . . . . . . . . 14
MASTER RESET. . . . . . . . . . . . . . . . . . . . . . . . . 14
ACCESSORIES & CUSTOMER SUPPORT . . . . . . . . . . . . . . 15
SPECIFICATIONS . . . . . . . . . . . . . . . . . . . . . . . . 16
WARRANTY . . . . . . . . . . . . . . . . . . . . . . . . . . 17
ESPAÑOL . . . . . . . . . . . . . . . . . . . . . . . . . . 18-34
FRANÇAIS . . . . . . . . . . . . . . . . . . . . . . . . . . 35-51

AUTO ALIGNING TIME CLOCK INSTRUCTIONS
Model 2500/2650
2888.479.7264PRODUCT OVERVIEW & FEATURES
Thank you for choosing the 2500/2650Pro Auto Aligning Time Clock! The 2500/2650Pro
stays on top of employee arrival time, breaks & departure time. The 6-column time
card accommodates up to 3 In & Out punch intervals for lunch or breaks. Simple set-up,
simple operation & a compact design makes this time clock the perfect t for small
workplaces!
Please read through this User Guide for simple set-up & operation.
PRODUCT OVERVIEW
AUTO ALIGNING TIME CLOCK : FEATURES
Employee Capacity Unlimited
Card Alignment
Top
Ribbon Ink Color Black
Display Time backlit LCD screen
Printing Format
Hour & minutes
Printing Dot matrix
Automatic Time Reset Short months, Leap Year & USA Daylight Saving Time
Battery Back-Up
Safeguards data & settings for up to 30 days
without power
Tamper-Proof Security lock protects against costly time theft
Warranty 1-Year manufacturer's limited warranty

AUTO ALIGNING TIME CLOCK INSTRUCTIONS
Model 2500/2650
3pyramidtimesystems.com CONTENTS
CONTENTS
WHAT YOU WILL NEED
KNOW YOUR SERIAL #
2500/2650Pro Auto Aligning
Time Clock 42415
Time Cards
2650Pro (25)
2500 (100)
2500/2650pro User Guide
Security
Keys (2)
Tape Measure Pencil Phillips Head
Screw Driver Power Drill
(Optional)
IMPORTANT:
Please write down serial #
located on back of time
clock before mounting.
Write your
serial # here:
s
SAMPLE
PM
24
pyramidtimesystems.com
10 Pocket
Time Card Rack
(included with 2500 model)
Auto Aligning Time Clock
User Guide
Pro
Pro
PM
24
PM
24

AUTO ALIGNING TIME CLOCK INSTRUCTIONS
Model 2500/2650
4 WALL MOUNTING 888.479.7264
DESKTOP SET UP
WALL MOUNTING
Remove time clock from carton & place on a at, level surface.
Plug unit into AC wall outlet.
Select a location convenient to employees
clocking IN & OUT. Be sure power outlet is
within 5 feet of mounting location.
Use masking tape to hold mounting template
on wall, making certain template is positioned
so bottom of time clock is approximately
45 inches from oor.
Drill holes using template as a guide.
Remove template from wall & install #10 screws,
leaving approximately 3/16 inch of screws
exposed. For sheetrock walls, use plastic
anchors.
Hang time clock on wall, aligning keyholes on the
rear with screw heads. Press downward on time
clock until it lowers onto screws.
Plug unit into AC wall outlet.
It is recommended to remove the clock from
bracket to complete programming set up which
begins on page 5.
2
2
3
4
5
6
1
1
Model 2500/2650Pro
7

PROGRAMMING
AUTO ALIGNING TIME CLOCK INSTRUCTIONS
Model 2500/2650
5pyramidtimesystems.com
PROGRAMMING
Use the key to unlock & remove top/front cover.
SETTING Activates SETTING Mode (right) or
Operation Mode (left)
+Next setting or adjust setting
-Previous setting or adjust setting
ENTER Save current or new settings and advance to
next function
BACK Previous setting or value
CLEAR Default setting or value
RESET
Reset time clock hardware settings.
Does not reset program settings.
BUTTONS
PM
24
Setting
Enter Back Clear
Reset
+
IN OUT IN OUT IN OUT
Enter Back Clear
Reset
+
Setting
01 Indicates active setting mode or function
DISPLAY/BUTTONS
Setting
Enter Back Clear
Reset
+

AUTO ALIGNING TIME CLOCK INSTRUCTIONS
Model 2500/2650
6 PROGRAMMING 888.479.7264
PROGRAMMING
To activate setting mode, slide the black “SETTING” switch to the right.
In SETTING mode, Press “ENTER” to begin “01” setting mode.
The default setting is 2016. Press “ENTER”
To change the year, press “+” or “-” to advance to current year.
Press “ENTER” to conrm.
The setting mode advances to “02”.
Continue to next steps or slide the SETTING switch to the
left to exit setting mode.
4
2
5
6
3
1
In SETTING mode, Press “ENTER” to begin “02” setting mode.
Press “+” or “-” to advance to current month.
Press “ENTER” to conrm.
Press “+” or “-” to advance to current date.
Press “ENTER” to conrm.
The setting mode advances to “03”.
Continue to next steps or slide the SETTING switch to the
left to exit setting mode.
4
2
5
6
7
3
1
02-SET DATE
IN OUT IN OUT IN OUT
Enter Back Clear
Reset
+
Setting
01-SET YEAR
02-SET DATE

AUTO ALIGNING TIME CLOCK INSTRUCTIONS
Model 2500/2650
7pyramidtimesystems.com PROGRAMMING
04-SET TIME
In SETTING mode, Press “ENTER” to begin “04” setting mode.
Press “+” or “-” to subtract or advance hour.
Press “ENTER” to conrm.
Press “+” or “-” to subtract or advance minute.
Press “ENTER” to conrm.
The setting mode advances to “05”.
Continue to next steps or slide the SETTING switch to the
left to exit setting mode.
4
2
5
6
3
1
7
This function sets the time clock to display and print time in either
AM/PM (12 hour) or Military time.
In SETTING mode, Press “ENTER” to begin “03” setting mode.
Press “ENTER” to select “12” for AM/PM or “+” and “ENTER”
to select “24” for Military time.
The setting mode advances to “04”.
Continue to next steps or slide the SETTING switch to the
left to exit setting mode.
4
2
3
1
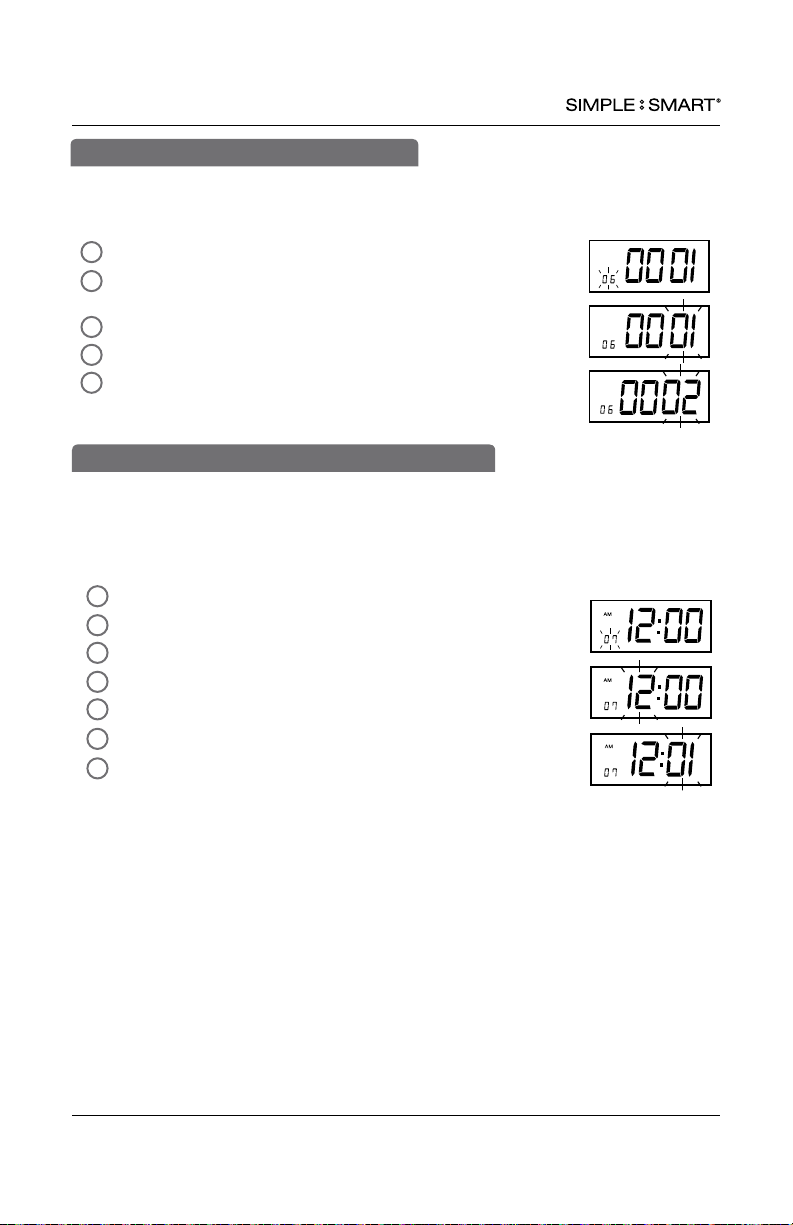
03-SET PRINT & DISPLAY TIME FORMAT
This function sets how the minutes will print on the time card.
In SETTING mode, Press “ENTER” to begin “05” setting mode.
Press “+” or “-” to select desired printing mode.
01-standard minutes (60 minute format)
02-minutes in hundredths (ie. 12:45 will print as 12:75)
Press “ENTER” to conrm setting.
The setting mode advances to “06”.
Continue to next steps or slide the SETTING switch to the
left to exit setting mode.
4
2
5
3
1
05-SET MINUTE PRINT FORMAT

AUTO ALIGNING TIME CLOCK INSTRUCTIONS
Model 2500/2650
8 PROGRAMMING 888.479.7264
5
This feature sets the time clock to automatically adjust the time for
USA Daylight Saving Time.
In SETTING mode, Press “ENTER” to begin “06” setting mode.
Press “+” or “-” to select desired Daylight Saving Time mode.
01-Automatic DST, 02-No DST
Press “ENTER” to conrm setting.
The setting mode advances to “07”.
Continue to next steps or slide the SETTING switch
to the left to exit setting mode.
2
1
4
3
06-SET DAYLIGHT SAVING TIME
This function allows you to set the time of the day the time clock will advance to the
next day/row on the time card (default setting 12am). For example, if your company
has a shift beginning at 8am, it is recommended to set the row advance time for 6am to
ensure employees punching in will have all in/out punches in the same row on the time
card.
In SETUP mode, Press “ENTER” to begin “07” setting mode.
Press “+” or “-” to subtract or advance hour.
Press “ENTER” to conrm.
Press “+” or “-” to subtract or advance minute.
Press “ENTER” to conrm.
The setting mode advances to “08”.
Continue to next steps or slide the SETUP switch to the
right to exit setting mode.
4
2
5
6
3
1
7
07-SET AUTOMATIC DAY/ROW ADVANCE TIME
Questo manuale è adatto per i seguenti modelli
1
Indice
Lingue:
Altri manuali Pyramid Orologio marcatempo

Pyramid
Pyramid TimeTrax EZ 41302 Manuale utente

Pyramid
Pyramid 3800 Manuale utente

Pyramid
Pyramid TIMETRAX EZ PPDLAUBKN Manuale utente

Pyramid
Pyramid SMART SITE 3600SS Manuale utente

Pyramid
Pyramid 3000HD Manuale utente

Pyramid
Pyramid TIMETRAX EZ Manuale utente

Pyramid
Pyramid TimeTrax Bio Ethernet Manuale utente


