Qoltec 7971 Manuale utente

Installation and
Operation Manual
HAND-FREE COLOR
VIDEO DOORPHONE

1
2
3
4
5
7
10
12
14
15
15
1. Brief introduction
2. Functions
3. Descriptions as illustrated
4. Preparations before installation
5. Installation
6. Wire connection
7. Operation
8. Operation and explanation of remote control
9. Note
10. Trouble shooting
11. Specifications
TABLE OF CONTENTS

1
1. Brief introduction
Thanks for using our products, the four wire system video doorphone is a luxury
used to villas for safety. It used advanced technology and newest chipset, which
improves the stability of the system and far distance. The system has the function
such as: hand-free surveillance, visible phone, volume adjustable, lock control,
infrared vigil, two audio/video input, Insert a card for storing image, video or
explorering pictures, auto turn off and so on. The system has multi tie-in function such
as one camera to one monitor, one to two, one to three, two to one and two to two.
,
Which satisfied by customer s require for different villa.
The products is faddish, goodliness, generous, thinner and hanging on the wall,
portable, take less place, when as a adornment. The function is dependable and easy
to use, it is the perfect family burglarproof facility and widely used in unitary flat, villa,
office and public building, which is the best present for your friend.
For the sake of your safety, please use series burglarproof facility! It will make
your life safe and easy!

2. Functions
2
High solution picture
Using the high resolution camera and 8 inch TFT LCD color digital screen.
The resolution is 800ˇRGBˇ600. The picture is clear, nice, colorful and
steady.
Powerful function
Hand-free surveillance, auto display while calling, visible phone, volume
adjustable, lock control, infrared vigil, two audio/video intput, Auto switching,
recognise inputing AV channels, Storing Image,Motion detect, Mp3 player.
Hand-free phone
While calling by the visitor, you only need to press Hand-free button and
then communicate with the visitor. You no need to take the phone by hand,
easy to use.
Conveniency in installation
It is very simple to install, easily using and maintain.
Thinner for hanging on the wall
Faddish, thinner for hanging on the wall, generous, portable, take less
place, which as an adornment.
Multi Connection
The system can be installed in multi tie-in manners as one camera to one
monitor, one to two, one to three, two to one and two to two. It can satisfy
the kinds of villa.
Security
Infrared vigil: the system also can watch anything and see the visitor clearly
at night. Sure who is there before unlock, which is safer.

3
3. Descriptions as illustrated
2. Camera
Call button
When the visitor presses this button, the
visitor's picture will be displayed on the
monitor and a sound of music will remind
you the visitor's coming.
Pinhole lens of the Camera
Loud Speaker
Microphone
for communication with the
indoor monitor The lens can transmit the picture of
the visitor to the monitor
Infrared light tube
The in-set Infrared light tube
enable you to distinguish the
visitor under the insufficientlight
1. Indoor-monitor
AV1 Input
AV2 Input
Every household
intercom button
Monitor/answer
button
Unlock button
Microphone
Loudspeaker
Screen
SD Card
Communication volume adjust
Brightness adjust
Video (Yellow)
Audio (white)
Audio/Video wire
Ring volume adjust
Chord ring choose button
Remote control receiver

4
3. Descriptions as illustrated
3. Remote Control
Exit
MP3
MP4
AV1-AV2
Picture/video capture/OK
M/DETECT
Screen power
Zoom in
Unlock
Rotation
Detele
Menu
Volume
/
MP3MP4
AV1-AV2
4. Preparations before installation
Check the pack
Indoor monitor Camera Camera accessory Monitor bracket
Operation manual
AC adapter Screw
Installation and
Operation Manual
HAND-FREE COLOR
VIDEO DOORPHONE
Remote Control
A/V cable and
connection wire

5
1. System diagram
AC:110-240V~
Camera
2 wire
Electric
Lock
4 wire
2 wire
Indoor monitor
145cmˇ160CM
2. Installation of the monitor
The optimum height of the monitor for installation
is 145 cmˇ160cm from the centre of the screen
of themonitor to the ground. (This data provides
to consult only)
Please follow the below steps before installation:
1. Take two bolts fix the bottom
piece on the wall and then install
the monitor
2. Push indoor unit to mount
bracket from the top dowm.
In case to pull out the indoor unit, please follow the step 1 and 2.
Monitor
Wall
5. Installation

6
Positioning
5. Installation
50cm
50cm
53ˇ
66ˇ
3. Installation of the camera
about 180cm
about 110cm
about 80cm
Notice:
Do not install the camera on the places under the sunshine. If the street
light or other light reflect at the back of the visitor, you need to install lamps
to make the picture more clearer.
(2)Surface mount type (3)Bevel-surface mount type
Wall
Wall
Wall
(1)Flush mount type

7
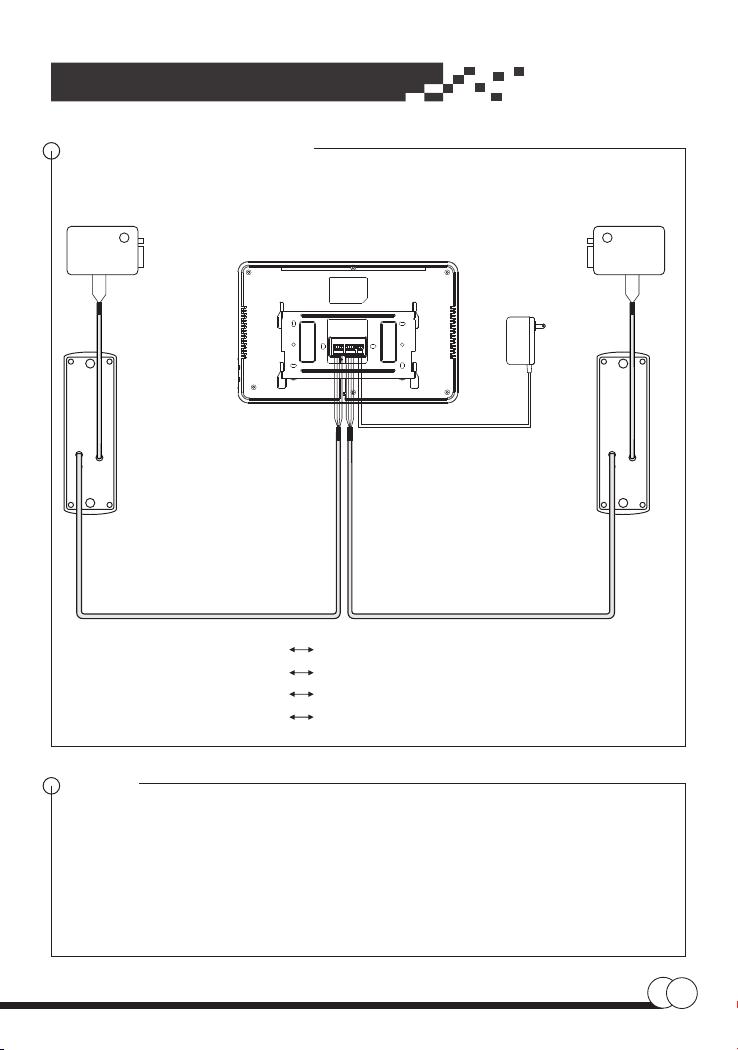
6. Wire connection
1. Diagram of one to one
2. Diagram of one to two
Electric
Lock
GBlack wire for ground wire
AWhite wire for audio wire
VYellow wire for video wire
B+ Red wire for power wire
Monitor 1
Monitor 2
+13.5V
GND
AC:110-240V~
Monitor
Black
G
White
A
Yellow
V
Red
B+
Black
G
White
A
Yellow
V
Red
B+
Black
G
White
A
Yellow
V
Red
B+
Electric
Lock
Camera
+13.5V
GND
AC:110-240V~
+13.5V
GND
AC:110-240V~
Camera
GBlack wire for ground wire
AWhite wire for audio wire
VYellow wire for video wire
B+ Red wire for power wire
8
+13.5V
GND
AC:110-240V~
6. Wire connection
3. Diagram of two to one
Camera 2
Camera 1
Electric
Lock 1
Electric
Lock 2
GBlack wire for ground wire
AWhite wire for audio wire
VYellow wire for video wire
B+ Red wire for power wire
Notice
1. Before install, please plug off the power supply cord. And plug the power
supply cord after installation.
2. The length connecting wire between the camera and the monitor must be less
than 50 metres.
3. For the clear picture, it is recommended to use the copper wire of
2
4ˇ0.75mm .
Monitor
Black
G
White
A
Yellow
V
Red
B+
Black
G
White
A
Yellow
V
Red
B+
Indice


