
RCA LED42A45RQ Manuale utente

-ODEL.UMBER
,%$!21
0ART.O2.'
0LEASEREGISTERYOURPRODUCTATWWWRCACOM
English
0LEASEKEEPYOURSALESRECEIPTANDKEEPTHERECORDOF
THESERIALNUMBERANDTHEDATEOFPURCHASEINORDERTO
RECEIVEWARRANTYPARTSANDSERVICE
4HESERIALNUMBERISLOCATEDATTHEBACKOFTHE46
,%$,#$46
5SERS-ANUAL
Español

English-1
Child Safety Guide

English-2
Child Safety Guide ........................................................................................................................................
Table of Contents
Caution and Warning ...................................................................................................................................
.....................................................................................................................................................
......................................................................................................................................
..................................................................................................................................
......................................................................................................................................
..................................................................................................................................
....................................................................................................................................
....................................................................................................................................
......................................................................................................................
4
1
FCC Notice 4
Preparation for Your New TV
Check Accessories 7
7
Setup TV Table Stand 7
Select TV Location 7
Connection and Using 7
TV Stand Installation 8
Safety Precautions 5,6
.................................................................................................................................................
.................................................................................................................................................
.......................................................................................................................................
...............................................................................................................................................
..........................................................................................................................................
....................................................................................................................................................
......................................................................................................................................
..................................................................................................................................
.................................................................................................................................
.............................................................................................................................
.................................................................................................................
......................................................................................................................................
..............................................................................................................................
......................................................................................................................................
...............................................................................................................................
...................................................................................................................................
.........................................................................................................................................
.................................................................................................................................
..................................................................................................................................
.............................................................................................................................
...................................................................................................................
...............................................................................................................
......................................................................................................................
........................................................................
..........................................................................
...............................................................................................
..............................................................................................
.................................................................................................................
.................................................................................................................
TV Signal Connection 9
Cable Connections 10
Side Panel Connections
TV Jacks Explanation
Side Keypad and Front Panel
11
11
12
13
14
14
15
16
Connecting AV Composite Video device (Good Video Quality)
Connecting YPbPr Component device (Better Video Quality)
Initial Setup 19
19
19
Menu Language
Signal Type
19
Auto Channel Search
Connecting HDMI device (Best Video Quality)
Connecting a Computer
How to Obtain Various Kinds of Input Sources
Basic Operations 20
20
20
20
20
21
Turning On and Off
Choosing TV Channel
Selecting Input Source
Adjusting TV Stand Angle
Channel Bar
21
21
Adjusting Volume
EPG (Electronic Program Guide)
16
16
Side Panel Buttons
Front Panel
Remote Control Instructions 17
17
17
Inserting Batteries in the Remote
Learning about Remote Control 18
18Remote Control Buttons
Remote Control Reception Angle

English-3
Table of Contents
OSD Menu Operations ..............................................................................................................................
..............................................................................................................................
..........................................................................................................................................
...........................................................................................................................
.................................................................................................................
.................................................................................................................
.....................................................................................................................
.............................................................................................................................................
.............................................................................................................................................
.............................................................................................................................................
......................................................................................................
...........................................................................................................................................
...........................................................................................................................................
.................................................................................................................................................
22
22
22
24
25
26
30
32
33
34
36
Adjust the OSD Screen
Picture Menu
Sound Menu
Channel Menu
Parental Menu
Frequently Asked Questions (FAQs)
Troubleshooting
V-Chip Rating Explanations
36
36
37
US V-Chip Rating System
Canadian English Rating System
Canadian French Rating System
Setup Menu
Others Menu
.............................................................................................................
Wall Mounting Unit Specification 38
..................................................................................................................................
Product Specification 39
42-82
..........................................................................................................................................
Warranty Card 40,41
41
..............................................................................................................................................................
End
.........................................................................................................................
Spanish User’ Manual

English-4
WARNING: TO REDUCE THE RISK OF FIRE OR ELECTRIC SHOCK, DO NOT EXPOSE THIS APPLIANCE TO RAIN
OR MOISTURE.
CAUTION: CHANGES OR MODIFICATIONS NOT EXPRESSLY APPROVED BY THE PARTY RESPONSIBLE FOR
COMPLIANCE WITH THE FCC RULES COULD AVOID THE USERS AUTHORITY TO OPERATE THIS
EQUIPMENT.
Caution: To reduce the risk of electric shock, do not remove cover or back. No user-serviceable parts inside.
Refer servicing to qualified service personnel.
CAUTION
RISK OF ELECTRIC SHOCK
DO NOT OPEN
Caution and Warning
FCC Notice
The lightning flash with arrowhead
symbol, within an equilateral triangle
is intended to alert the user to the
presence of uninsulated dangerous
voltage within the product enclosure
that may be of sufficient magnitude to
consitute a risk of electric shock.
The exclamation point within an
equilateral triangle is intended to
alert the user to the presence of
important operating and maintenance
(servicing) instructions in the literature
accompanying the TV.
FCC Information
This equipment has been tested and found to comply with the limits for a Class B digital device, pursuant to Part 15 of the
FCC rules. These limits are designed to provide reasonable protection against harmful interference in a residential installation.
This equipment generates, uses and can radiate radio frequency energy and, if not installed and used in accordance with
the instructions, may cause harmful interference to radio Communications. However, there is no Guarantee that interference
will not occur in a particular installation. If this equipment does cause harmful interference to radio or television reception,
which can be determined by turning the equipment off and on, the user is encouraged to try to correct the interference by
one or more of the following measures:
- Reorient or relocate the receiving antenna.
- Increase the separation between the equipment and the receiver.
- Connect the equipment into an outlet on a circuit different from that to which the receiver is connected.
- Consult the dealer or an experienced radio/TV technician for help.

5
English-
1. Read these instructions.
2. Keep these instructions.
3. Heed all warnings.
4. Follow all instructions.
5. Do not use this apparatus near water. For example, do not use near a laundry tub, in a wet basement, or near a swimming
pool, and the like.
6. Clean only with dry cloth.
7. Do not block any ventilation openings. Install in accordance with the manufacturer’s instructions. Slots and openings in
the cabinet back or bottom are provided for ventilation, to ensure reliable operation of the TV and to protect it from
overheating. These openings must not be blocked or covered. The openings should never be blocked by placing the TV
on a bed, sofa, rug, or other similar surface.
8. Do not install near any heat sources such as radiators, heat registers, stoves, or other apparatus (including amplifiers) that
produce heat.
9. Do not defeat the safety purpose of the polarized or grounding-type plug. A polarized plug has two blades with on wider
than the other. A grounding-type plug has two blades and a third grounding prong. The wide blade or the third prong is
provided for your safety. If the provided plug does not fit into your outlet, consult an electrician for replacement of the
obsolete outlet.
10. Protect the power cord from being walked on or pinched particularly at plugs, convenience receptacles, and the point
where they exit from the apparatus.
11. Only use attachments/accessories specified by the manufacturer.
12. Use only with cart, stand, tripod, bracket, or table specified by the manufacturer, or sold with the
apparatus. When a cart is used, use caution when moving the cart/apparatus combination to
avoid injury from tip-over. A TV and cart combination should be moved with care. Quick stops,
excessive force, and uneven surfaces may cause the TV and cart combination to overturn.
13. Unplug this apparatus during lightning storms or when unused for long periods of time. For added protection for this TV
receiver during a lightning storm, or when it is left unused for long periods of time, unplug it from the wall outlet and
disconnect antenna or cable system. This will prevent damage to the TV due to lightning and power line surges.
14. Refer all servicing to qualified service personnel. Servicing is required when the apparatus has been damaged in any way,
such as power-supply cord or plug is damaged, liquid has been spilled or objects have fallen into the apparatus, the
appratus has been exposed to rain or moisture, does not operate normally, or has been dropped.
15. This TV should be operated only from the type of power supply indicated on the rating label. If customer is not sure the
type of power supply in your home, consult your appliance dealer or local power company. For TV remote control battery
power, refer to the operating instructions.
16. The TV set shall not be exposed to dripping or splashing. No objects filled with liquids, such as vases, shall be placed on
the TV set.
17. Never push objects of any kind into this TV through openings as they may touch dangerous voltage or other electrical
parts that could result in fire or electric shock. Never spill liquid of any kind into the TV.
18. Unplug the TV from the wall outlet before cleaning. Do not use liquid or aero cleaners. Use a damp cloth for cleaning.
19. This TV should never be placed near or over a radiator or heat resource. This TV should not be placed in a built-in
installation such as a bookcase or rack unless proper ventilation is provided or the manufacturer's instructions have been
adhered to.
20. Do not place this TV on an unstable cart, stand, tripod, bracket, or table. The TV may fall, causing serious injury to
someone, and serious damage to the appliance.
21. Do not attempt to service this TV by yourself because opening or removing covers may expose you to dangerous high
voltage or other hazards. Refer all servicing to qualified service personnel.
22. This device complies with Part 15 of the FCC Rules. Operation is subject to the following two conditions: (1) this device
may not cause harmful interference, and (2) this device must accept any interference received, including interference
that may cause undesired operation.
Safety Precautions
English-6
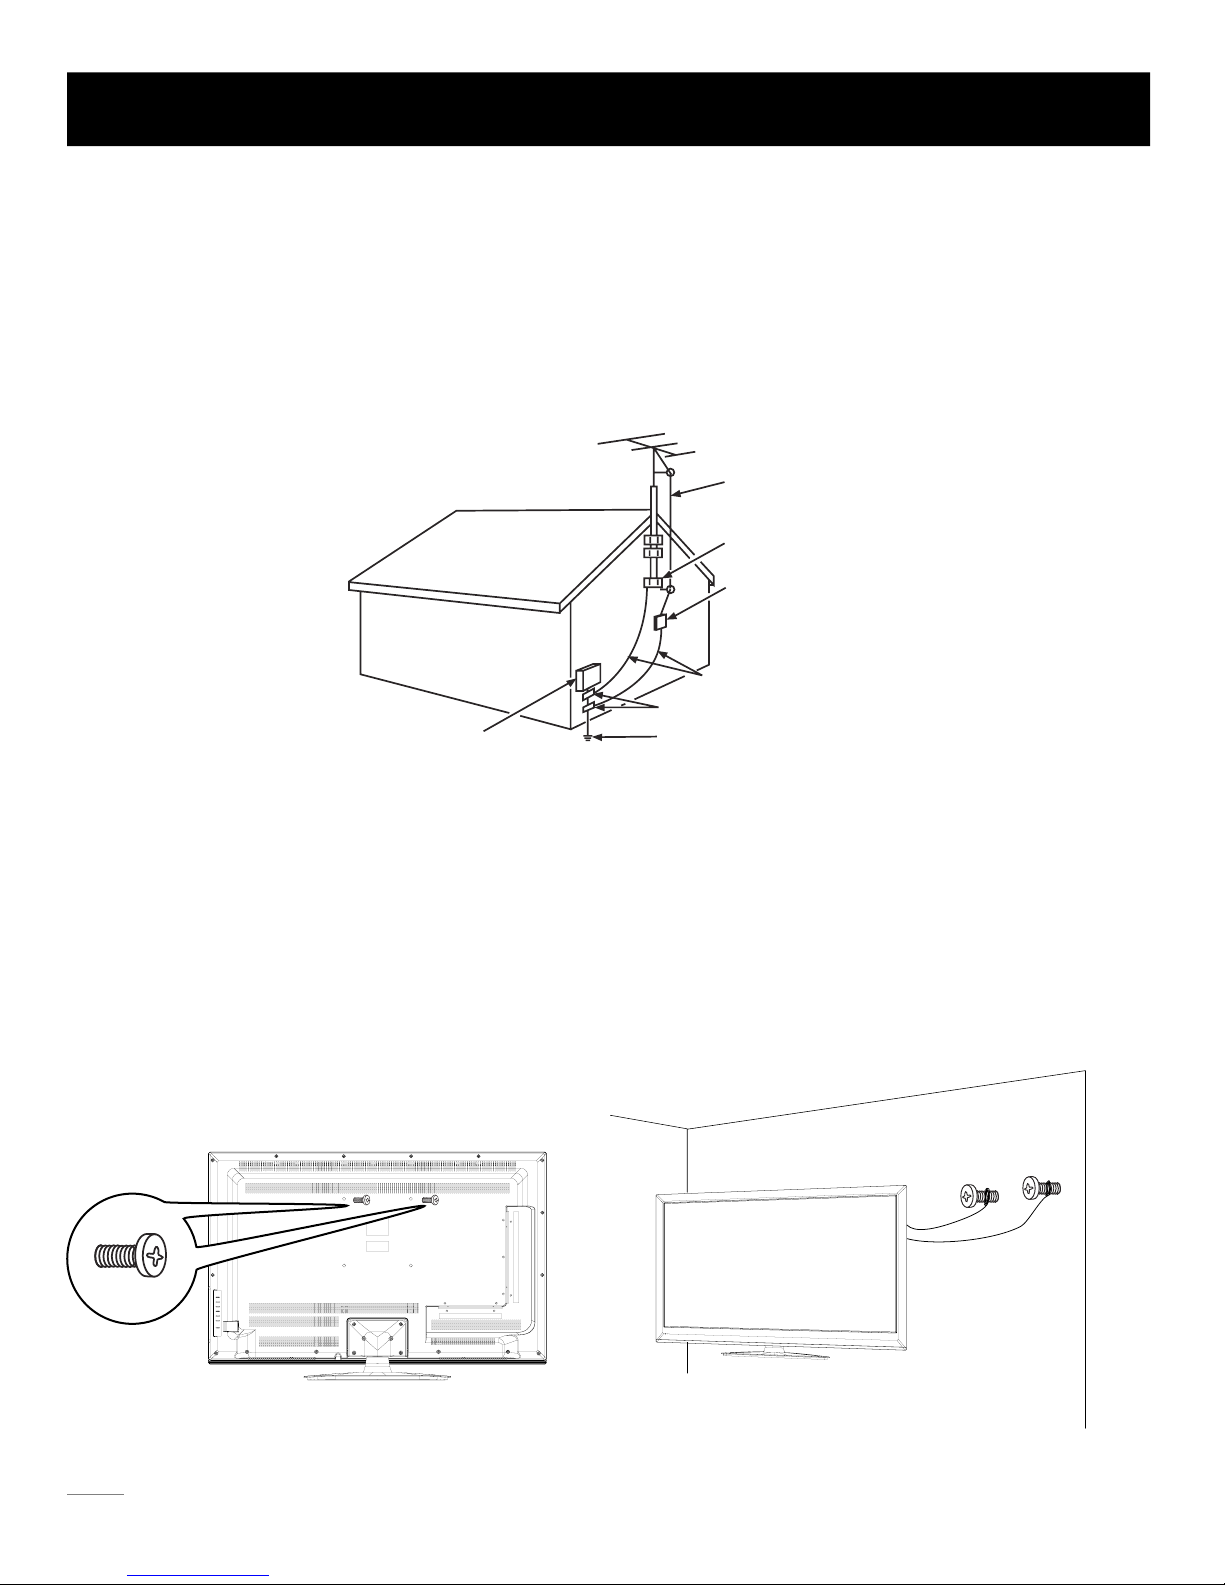
25. If an outside antenna or cable system is connected to the TV, be sure the antenna or cable system is grounded to provide
some protection against voltage surges and built-up static charges. Section 810 of the National Electrical Code,
ANSI/NFPA NO.70, provides information with respect to proper grounding of the mast and supporting structure,
grounding of the lead-in wire to an antenna discharge unit, size of grounding conductors, location of antenna discharge
unit, connection to grounding electrodes, and requirements for the grounding electrodes. (See Diagram Figure A.)
24. To reduce the risk of electric shock, the grounding of center pin of plug must be maintained.
Safety Strap
Caution: Pushing, pulling or climbing on the TV may cause the TV falling. Do not let chlidren climb or hang on the TV.
Always place the TV on a sturdy, level, sable surface that can hold the weight of TV. And if possible, secure the TV according
to the instruction below (Note: The fastening components such as screws are not supplied with TV).
Step one: Insert the M6 mounting screws into the upper two wall mounting screw holes and fasten them (Figure A).
Step two: Insert anchors to wall and connect the bolts and anchors with ropes or chains (Figure B).
Safety Precautions
ANTENNA
LEAD IN
WIRE
GROUND CLAMP
GROUNDING CONDUCTORS
(NEC SECTION 810-21)
GROUND CLAMPS
POWER SERVICE GROUNDING
ELECTRODE SYSTEM
(NEC ART 250, PARTH)
ELECTRIC SERVICE
EQUIPMEN T
ANTENNA
DISCHARGE UNIT
(NEC SECTION 810-20)
Diagram Figure A
23. WARNING: To prevent injury, this apparatus must be securely attached to the floor/wall in accordance with the
installation instructions.
Figure A Figure B
M6 Screws
Wall

#FGPSF5VSOJOH0O57
$IFDL"DDFTTPSJFT
$IFDLUIFBDDFTTPSJFTUIBUBSFQBDLFEXJUIZPVS57
4FMFDU57-PDBUJPO
4FMFDUBnBUTUBCMFUBCMFUPMPDBUFZPVS57TFU1MFBTFGPMMPXUIF4BGFUZ*OTUSVDUJPOTXIFOMPDBUJOHUIF57
4FUVQ575BCMF4UBOE
1MFBTFSFGFSUP574UBOE*OTUBMMBUJPOHVJEFJOOFYUQBHFUPDBSSZPVUTUBOEJOTUBMMJOH
$POOFDUJPOBOE6TJOH
"GUFSQMBDJOHZPVS57QSPQFSMZZPVDBODPOOFDUUIF57XJUIQPXFSTVQQMZBOEDBCMFDPNQPOFOUT'PSGVSUIFSJOGPSNBUJPOTFFQBHF
UPQBHF
3&.05&$0/530- 57#0550.4$3&84
5)Ȧ.0'5745"/%
%0$6.&/54
1SFQBSBUJPOGPS:PVS/FX57
"""#"55&3*&4
5#YNNQDT
1BSU345#%
1"35/03&21
CH LI ST
.
PICTURE
SOUND
64&34
(6*%&
3&.05&$0/530-
(6*%&
26*$,45"35
(6*%&
2EMOTE#ONTROL'UIDE
0ROGRAM9OUR5NIVERSAL#ABLE
OR3ATELLITE2EMOTE#ONTROLTO
/PERATE9OUR.EW2#!46
)FYOUWOULDLIKETOPROGRAMYOUROTHER
HOUSEHOLDREMOTECONTROLSTOYOURNEW2#!
TELEVISIONPLEASECONSULTTHE5SERS-ANUAL
SUPPLIEDBYYOUR#ABLEOR3ATELLITEPROVIDER
4HE#ABLEOR3ATELLITEPROVIDERS5SERS-ANUALS
SHOULDINCLUDEINSTRUCTIONSONHOWTOPROGRAM
THEIRREMOTETOYOURTELEVISION
"ELOWISALISTOF2#!CODESFORTHEMOST
COMMON#ABLEAND3ATELLITEPROVIDERS
5SETHE2#!CODETHATISASSOCIATEDWITHYOUR
#ABLEOR3ATELLITEPROVIDERIFAPPLICABLE
)FTHE2#!CODEASSOCIATEDWITHYOUR#ABLEOR
3ATELLITEPROVIDERISNOTLISTEDABOVEIFTHECODE
ABOVEDOESNOTWORKORIFYOUCANNOTLOCATETHE
INSTRUCTIONSFORPROGRAMMINGYOURHOUSEHOLD
REMOTETOYOURTELEVISIONCALLYOURLOCAL#ABLEOR
3ATELLITEPROVIDERSCUSTOMERSERVICECENTER
$)2%#46
4IME7ARNER#ABLE
#OMCAST
#OX#OMMUNICATIONS
$ISH.ETWORK
&IOS6ERIZON
4HISISFOR53CUSTOMERS
CHLIST
.
PICTURE
SOUND
PartNo.:RN4142G030
-ODEL.UMBER
,%$!21
0ART.O2.'
0LEASEREGISTERYOURPRODUCTATWWWRCACOM
Eng lis h
0LEASEKEEPYOURSALESRECEIPTANDKEEPTHERECORDOF
THESERIALNUMBERANDTHEDATEOFPURCHASEINORDERTO
RECEIVEWARRANTYPARTSANDSERVICE
4HESERIALNUMBERISLOCATEDATTHEBACKOFTHE46
,%$,#$46
5SERS-ANUAL
Esp año l
English-7
/PUF"CPWFBDDFTTPSJFTBSFTVCKFDUUPDIBOHFXJUIPVUOPUJDF

TV Stand Installation
English-8
TV LED42A45RQ is packaged with the bottom of TV stand separated from the cabinet. To setup the bottom of TV table
stand, please carry out the installation according to the instructions below.
Step One
Place the TV faced down on a soft cloth or cushion to prevent the LED LCD panel from being damaged.
Note:
1. The LED LCD panel is easy to scratch, so please choose an absolutely flat surface to place the TV, and use soft cloth or
cushion to protect the TV panel. Do not put TV on table directly.
2. Always unplug the AC cord first when installing or removing the stand.
Step Two
Take the bottom of stand. Please align the six holes of the bottom and six screwholes of the neck, then insert the bottom
to the neck like the picture exactly .
Step Three
Insert six M4 screws (which are totally the same) and tighten them.
Please refer to the picture given below:
RS01TB412D
Pedestal Screws Quantity Part #
6pcsTB 4 x 12mm
The bottom view of the TV ( TV panel faces down)
ANT/
CABLE
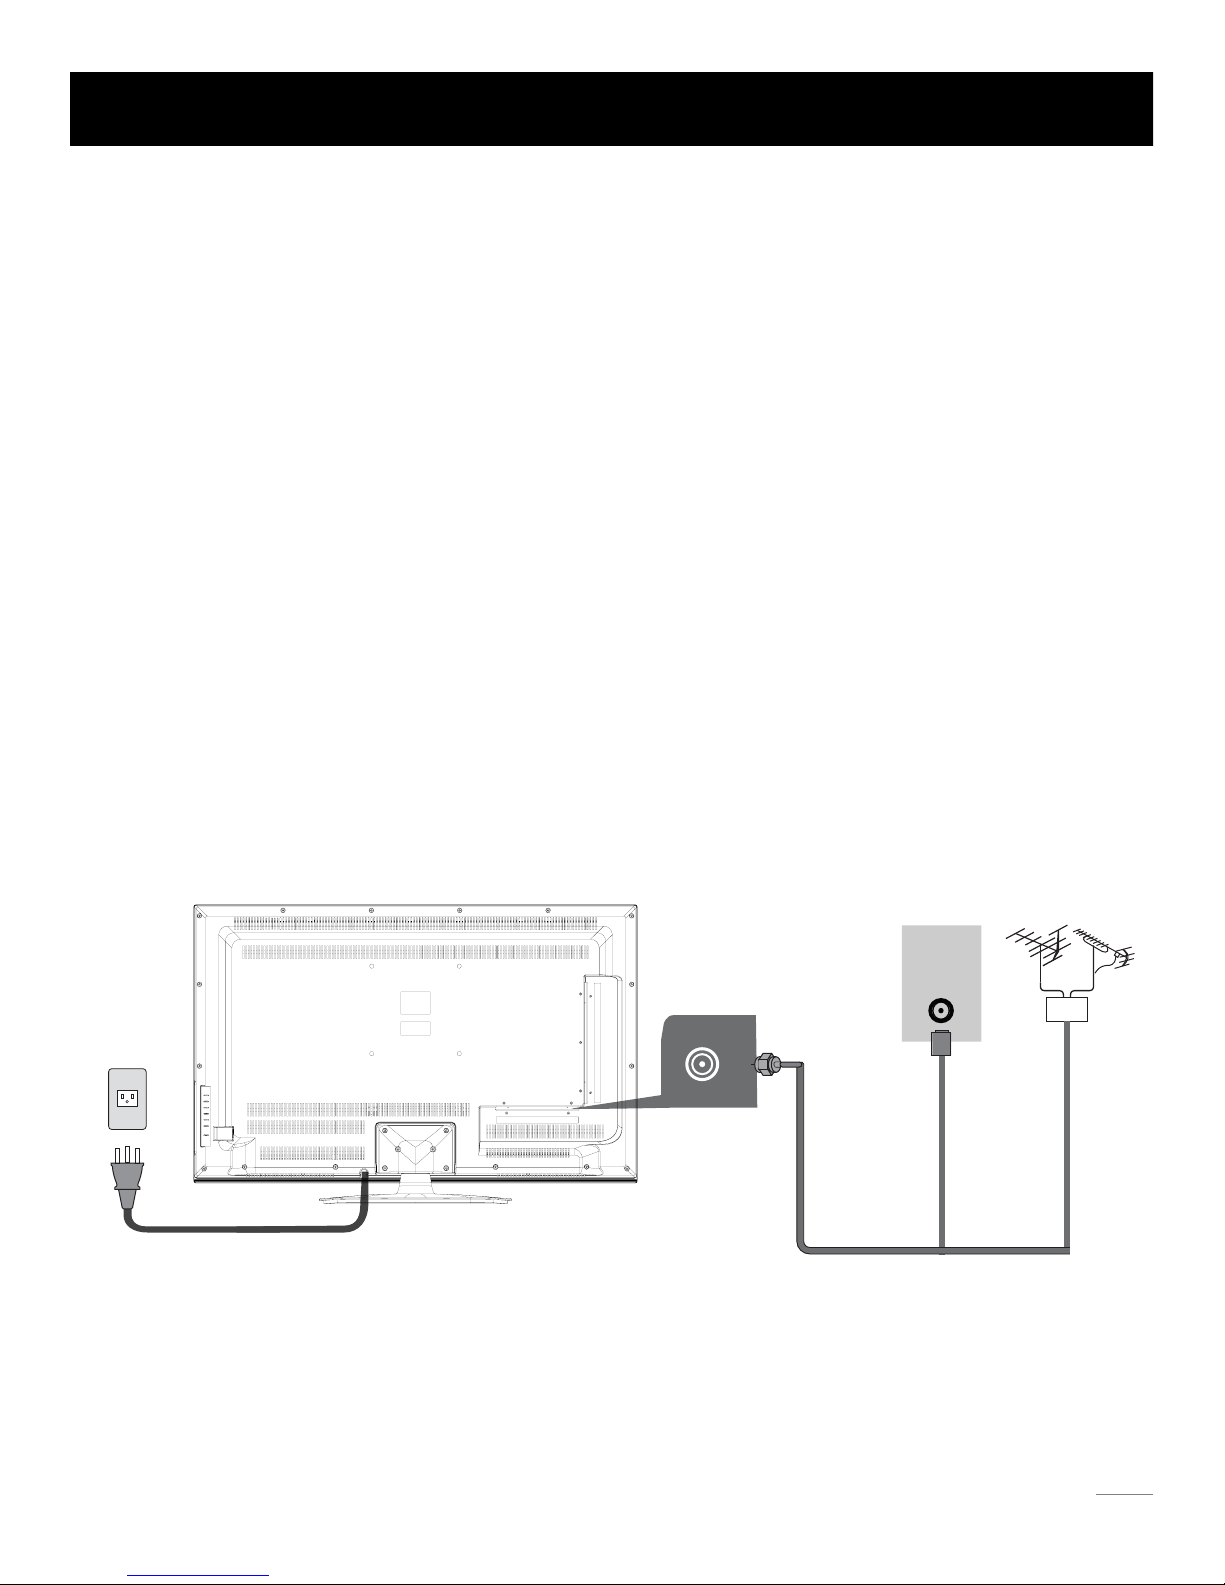
The first step in connecting your TV is obtaining the signal. Your TV LED42A45RQ has a side panel, which allows you to receive
analog and/or digital television channels via ANT/CABLE jack.
Before connecting your TV, determine using an antenna or a cable service to obtain the signal.
A. Antenna
Connect the antenna to TV via coaxial cable on ANT/CABLE jack of the side panel. You are ready to receive air local digital and
analog channels.
B. Cable TV service
Connect the cable TV wall jack to TV via coaxial cable on ANT/CABLE jack of the side panel. You are ready to receive off-air local
digital and analog channels.
C. Set-Top Box
If you use a set-top box, you may need to call your cable company or satellite service provider, which use a special connection,
please refer to the user’s guide of set-top box.
Note: Do not plug the AC cord until you have accomplished all the connections.
AC Power Cord
(Connect after all the other connections are done.)
AC
110V/60Hz
AntennaCable TV
Or
TV Signal Connection
WALL
OUTLET
English-9
Altri manuali per LED42A45RQ
4
Indice
Lingue:
Altri manuali RCA TV LCD

RCA
RCA L1800 Manuale utente

RCA
RCA L46FHD35 Manuale utente

RCA
RCA 46LB45RQ Manuale utente

RCA
RCA LED52B55R120Q Manuale utente

RCA
RCA LED65G55R120Q Manuale utente

RCA
RCA 22LB45RQD Manuale utente

RCA
RCA L40FHD41 Manuale utente

RCA
RCA L26WD12 Manuale utente

RCA
RCA LED42B45RQ Manuale utente

RCA
RCA L42WD22 Manuale utente

RCA
RCA LED55G55R120Q Manuale utente

RCA
RCA L19WD20 - 19" LCD TV Guida rapida

RCA
RCA L22HD41 - 22" LCD TV Guida rapida

RCA
RCA L19WD20 - 19" LCD TV Guida utente

RCA
RCA 26LB33RQ Manuale utente

RCA
RCA LRK32G30RQD Manuale utente

RCA
RCA 37LA30RQ Manuale utente

RCA
RCA 32LA30RQ Manuale utente

RCA
RCA Scenium LCDX2722W Manuale utente

RCA
RCA L26HD31R Manuale utente


