
red lighting Classe L5 Manuale utente


Classe LS 60 v1.0
- 1 -
Contents
1. FEATURES..................................................................................................................................................- 2 -
2. FIXTURE OVERVIEW..............................................................................................................................- 3 -
3. SAFETY INSTRUCTIONS........................................................................................................................- 3 -
3.1) Important safety warns....................................................................................................................- 3 -
3.2) GENERAL GUIDELINES..............................................................................................................- 4 -
4. INSTALLATION INSTRUCTIONS..........................................................................................................- 5 -
4.1) Mounting the device.........................................................................................................................- 5 -
5. DMX-512 control connection......................................................................................................................- 8 -
6. DMX-512 connection with DMX terminator............................................................................................- 9 -
7. Projector DMX start address selection......................................................................................................- 9 -
8. Control Board............................................................................................................................................- 10 -
8.1 FUNCTION MODE.........................................................................................................................- 11 -
9.1.1 Set DMXAddress..................................................................................................................- 11 -
8.1.2 Value Display.........................................................................................................................- 12 -
8.1.3 Set to slave.............................................................................................................................- 12 -
8.1.4Auto Program........................................................................................................................- 12 -
8.1.5 Music control.........................................................................................................................- 12 -
8.2 Information.......................................................................................................................................- 12 -
8.2.1 Time information..................................................................................................................- 12 -
8.2.2 Temperature Info..................................................................................................................- 13 -
8.2.3 Software version ...................................................................................................................- 13 -
8.3PERSONALITY.................................................................................................................................- 14 -
8.3.1Status setting..........................................................................................................................- 14 -
8.3.2 Fans Control..........................................................................................................................- 16 -
9.3.3 Display settings .....................................................................................................................- 16 -
9.3.4 Temperature C/F...................................................................................................................- 16 -
9.3.5 Initial effect ...........................................................................................................................- 17 -
9.3.6 Restore Default .....................................................................................................................- 17 -
8.4 Reset-functions.................................................................................................................................- 17 -
8.5 Effect Adjust......................................................................................................................................- 17 -
8.5.1 Test channel...........................................................................................................................- 17 -
8.5.2 Manual control......................................................................................................................- 17 -
8.5.3 Calibrate values....................................................................................................................- 18 -
8.6 Users mode set ..................................................................................................................................- 18 -
8.6.1 User mode..............................................................................................................................- 18 -
8.6.2 Preset User mode..................................................................................................................- 18 -
8.7 Edit program.....................................................................................................................................- 18 -
8.7.1 Select program......................................................................................................................- 18 -
8.7.2 Edit program.........................................................................................................................- 18 -
8.7.3 Edit scenes.............................................................................................................................- 18 -
8.7.4Auto scenes rec......................................................................................................................- 18 -
9. INSTRUCTIONS ON USE:......................................................................................................................- 21 -
10. ERROR MESSAGE................................................................................................................................- 23 -
11. CLEANINGAND MAINTENANCE.....................................................................................................- 24 -
12. TECHNICALSPECIFICATIONS.........................................................................................................- 25 -

Classe LS 60 v1.0
- 2 -
Thank you for your patronage. We are confident that our excellent products and service can
satisfy you.
In order to install , operate, and maintain the lighting safety and correctly. We suggest that the
installation and operation should be done by the verified technician and follow the instruction
strictly.
INTRODUCTION:
Thank you for having chosen this professional led moving head.
You will see you have acquired a powerful and versatile device.
Unpack the device. Inside the box you should find:
1. One XLR connection cable
2. One omega clamps
3. One safety rope
4. Manual
Please check carefully that there is no damage caused by transportation. Should there be any,
consult your dealer and don’t install this device.
1. FEATURES
·LED type: SST-90
·Extremely Long Life: 100,000 hr and lower power consumption
·3 DMX channel mode: 12/14/16 channels
·3 operational modes: DMX-512, Master/Slave & Sound Active
·630°or540° pan / 270° tilt (8-bit)
·Strobe effect with 1-13 flashes per second and pulse effect
·Color wheels:8dichroic filters plus open, rainbow-effect with adjustable speed in both
directions
·Rotation gobo: 7 interchangeable, rotating gobos plus open
·Prism and prism rotating , with 16 prism macros
·Linear dimmer in precise speed from 0% ~ 100%
·Friendly blue LCD display
·Rechargeable Back up Battrty for Display
·Preset program: 7 built in programs can be called up via DMX controller
·Fan automatically adjust speed according to the LED temperature
·Software-upload by optional accessory via DMX line

Classe LS 60 v1.0
- 3 -
2. FIXTURE OVERVIEW
3. SAFETY INSTRUCTIONS
3.1) Important safety warns
This device has left the factory in perfect condition. In order to maintain this condition and to
ensure a safe operation, it is absolutely necessary for the user to follow the safety instructions and
warning notes written in this user manual.
1: Lens
2: Display
3: Mode/Esc-button
4: Up-button
5: Down-button
6: Enter-button
7: Microphone
8: 3-Pin DMX out
9: 3-DMX in
10: 5-Pin DMX out
11: 5-DMX in
12: Power switch
13: Fuse
14: Power supply

Classe LS 60 v1.0
- 4 -
Important:
Damages caused by the disregard of this user manual are not subject to warranty. The
dealer will not accept liability for any resulting defects or problems.
If the device has been exposed to temperature changes due to environmental changes, do not
switch it on immediately. The arising condensation could damage the device. Leave the device
switched off until it has reached room temperature.
This device falls under protection-class I. Therefore it is essential that the device be earthed.
The electric connection must carry out by qualified person.
Make sure that the available voltage is not higher than stated at the end of this manual.
Make sure the power cord is never crimped or damaged by sharp edges. If this would be the case,
replacement of the cable must be done by an authorized dealer.
Always disconnect from the mains, when the device is not in use or before cleaning it. Only
handle the power cord by the plug. Never pull out the plug by tugging the power cord.
During initial start-up some smoke or smell may arise. This is a normal process and does not
necessarily mean that the device is defective, it should decrease gradually.
Please don't project the beam onto combustible substances.
If the external flexible cable or cord of this luminaire is damaged, it shall be exclusively replaced
by the manufacturer or his service agent or a similar qualified person in order to avoid a hazard.
Please be aware that damages caused by manual modifications to the device are not subject
to warranty. Keep away from children and non-professionals.
3.2) GENERAL GUIDELINES
This device is a lighting effect for professional use on stages, in discotheques, theatres, etc., the
device was designed for indoor use only.
This fixture is only allowed to be operated with the max alternating current which stated in the
technical specifications in the last page of this manual.
Lighting effects are not designed for permanent operation. Consistent operation breaks may
ensure that the device will serve you for a long time without defects.

Classe LS 60 v1.0
- 5 -
Do not shake the device.Avoid brute force when installing or operating the device.
While choosing the installation-spot, please make sure that the device is not exposed to extreme
heat, moisture or dust. Please don't project the beam onto combustible substances.The minimum
distance between light-output from the projector and the illuminated surface must be more than
0.5 meter.
If you use the quick lock cam in hanging up the fixture, please make sure the quick lock fasteners
turned in the quick lock holes correctly.
Operate the device only after having familiarized with its functions. Do not permit operation by
persons not qualified for operating the device. Most damages are the result of unprofessional
operation.
Please use the original packaging if the device is to be transported.
For safety reasons, please be aware that all modifications on the device are forbidden.
If this device will be operated in any way different to the one described in this manual, the
product may suffer damages and the guarantee becomes void. Furthermore, any other operation
may lead to short-circuit, burns, electric shock, lamp explosion, crash, etc.
4. INSTALLATION INSTRUCTIONS
4.1) Mounting the device
The applicable temperature for the lighting is between -25°C to 45°C. Do not use the lighting
under or above the temperature.
The installation of the effect has to be built and constructed in a way that it can hold 10 times the
weight for 1 hour without any harming deformation.
The installation must always be secured with a secondary safety attachment, e.g. an appropriate
safety rope.
Never stand directly below the device when mounting, removing or servicing the fixture.
The operator has to make sure the safety relating and machine technical installations are approved
by an expert before taking the device into operation for the first time.
These installations have to be approved by a skilled person once a year.
Overhead mounting requires extensive experience, including amongst others calculating
working load limits, installation material being used, and periodic safety inspection of all
installation material and the device. If you lack these qualifications, do not attempt the
installation yourself. Improper installation can result in bodily injury.
Classe LS 60 v1.0
- 6 -
Theelectric connection must only be carried out by a qualified electrician.
Before mounting make sure that the installation area can hold a minimum point load of 10 times
the device’s weight.
Connect the fixture to the mains with the power plug.
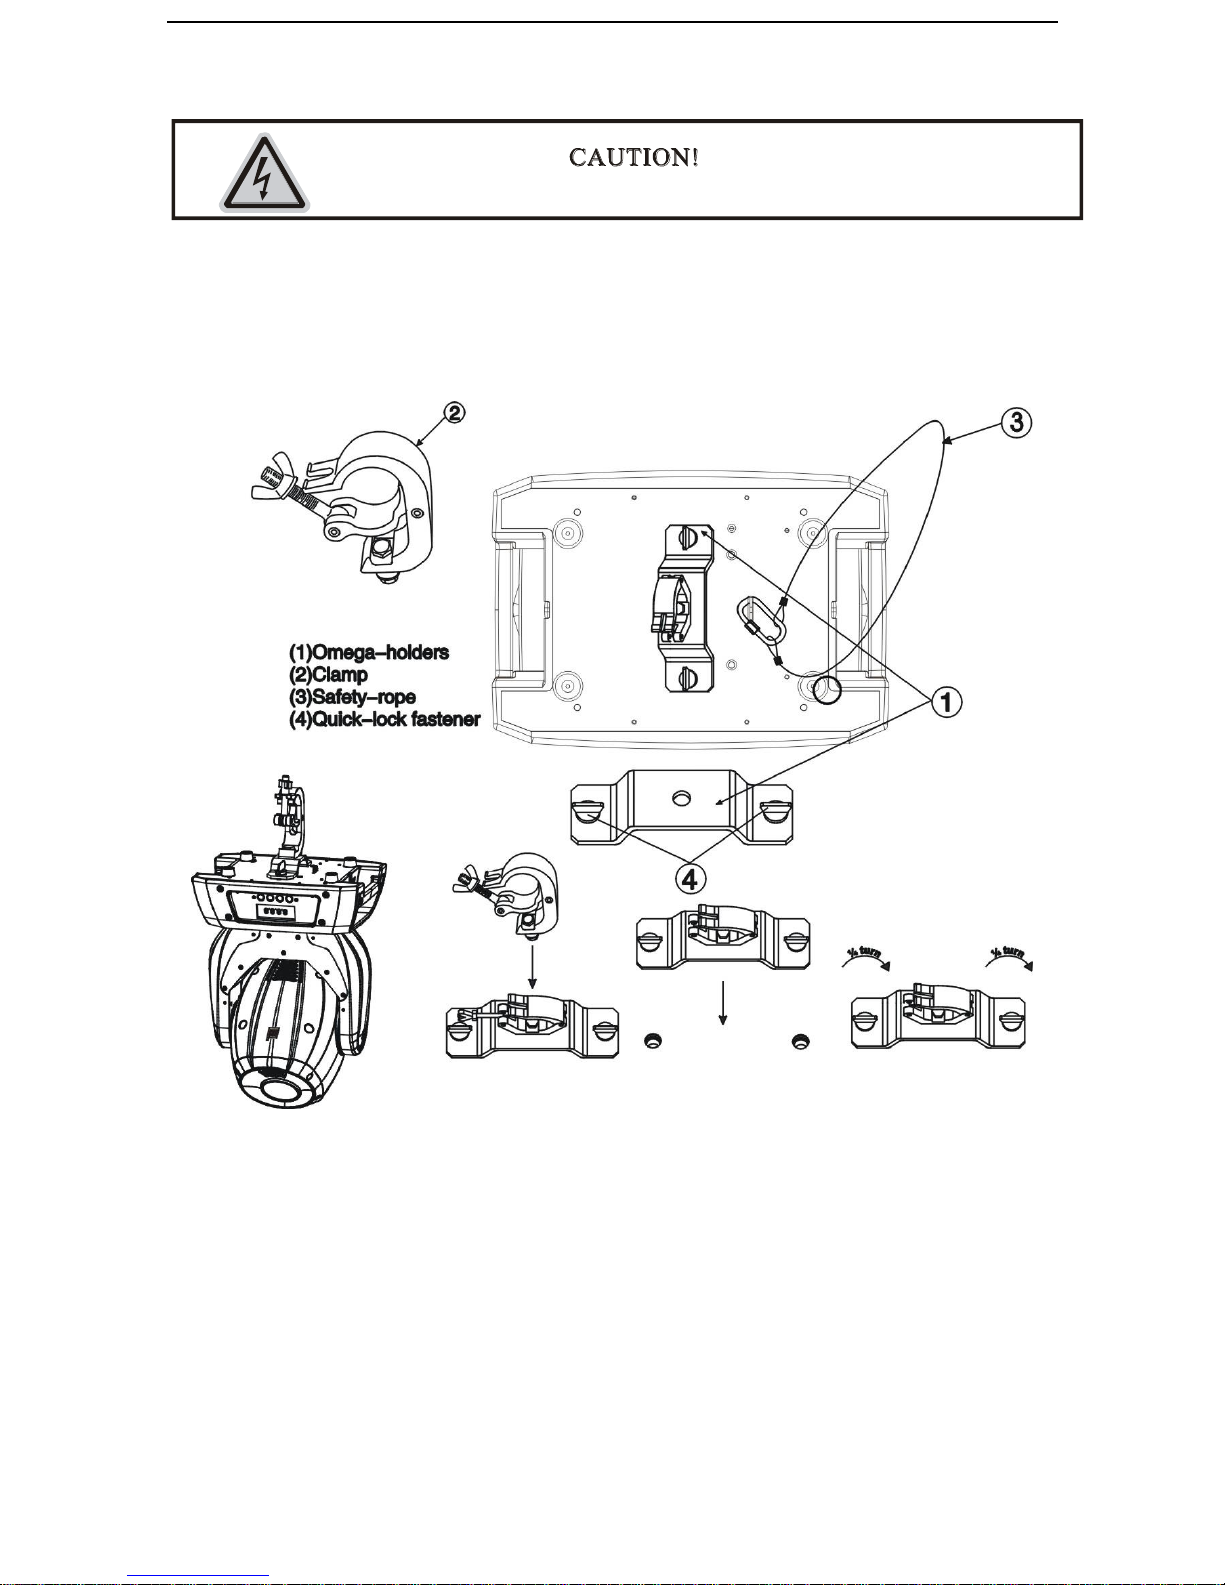
Installation via the Omega holders
a) Fixed the clamp on the bracket by tighten up the M12 screw on the bracket to the Ф13 hole in
the middle of the bracket.
b) Insert the quick-lock fasteners of the first Omega holder into the respective holes on the
bottom of the device. Tighten the quick-lock fasteners fully clockwise.
c) Install the second Omega holder.
d) Pull the safety-rope through the holes on the bottom of the base and over the trussing system
or a safe fixation spot. Insert the end in the carabine and tighten the safety screw.
Notice: this step is quite important to ensure that the fixture will not drop out by the
damage of the clamp.

Classe LS 60 v1.0
- 7 -
Dimensional Drawings:

Classe LS 60 v1.0
- 8 -
Layout Drawings:
Mounting points
Be sure this fixture is kept at least 0.5m away from any flammable materials (decoration etc.).
Always use and install the supplied safety cable as a safety measure to prevent accidental damage
and/or injury in the event the clamp fails.
Overhead mounting requires extensive experience, including amongst others calculating working
load limits, a fine knowledge of the installation material being used, and periodic safety
inspection of all installation material and the fixture. If you lack these qualifications, do not
attempt the installation yourself. Improper installation can result in bodily injury.
5. DMX-512 control connection
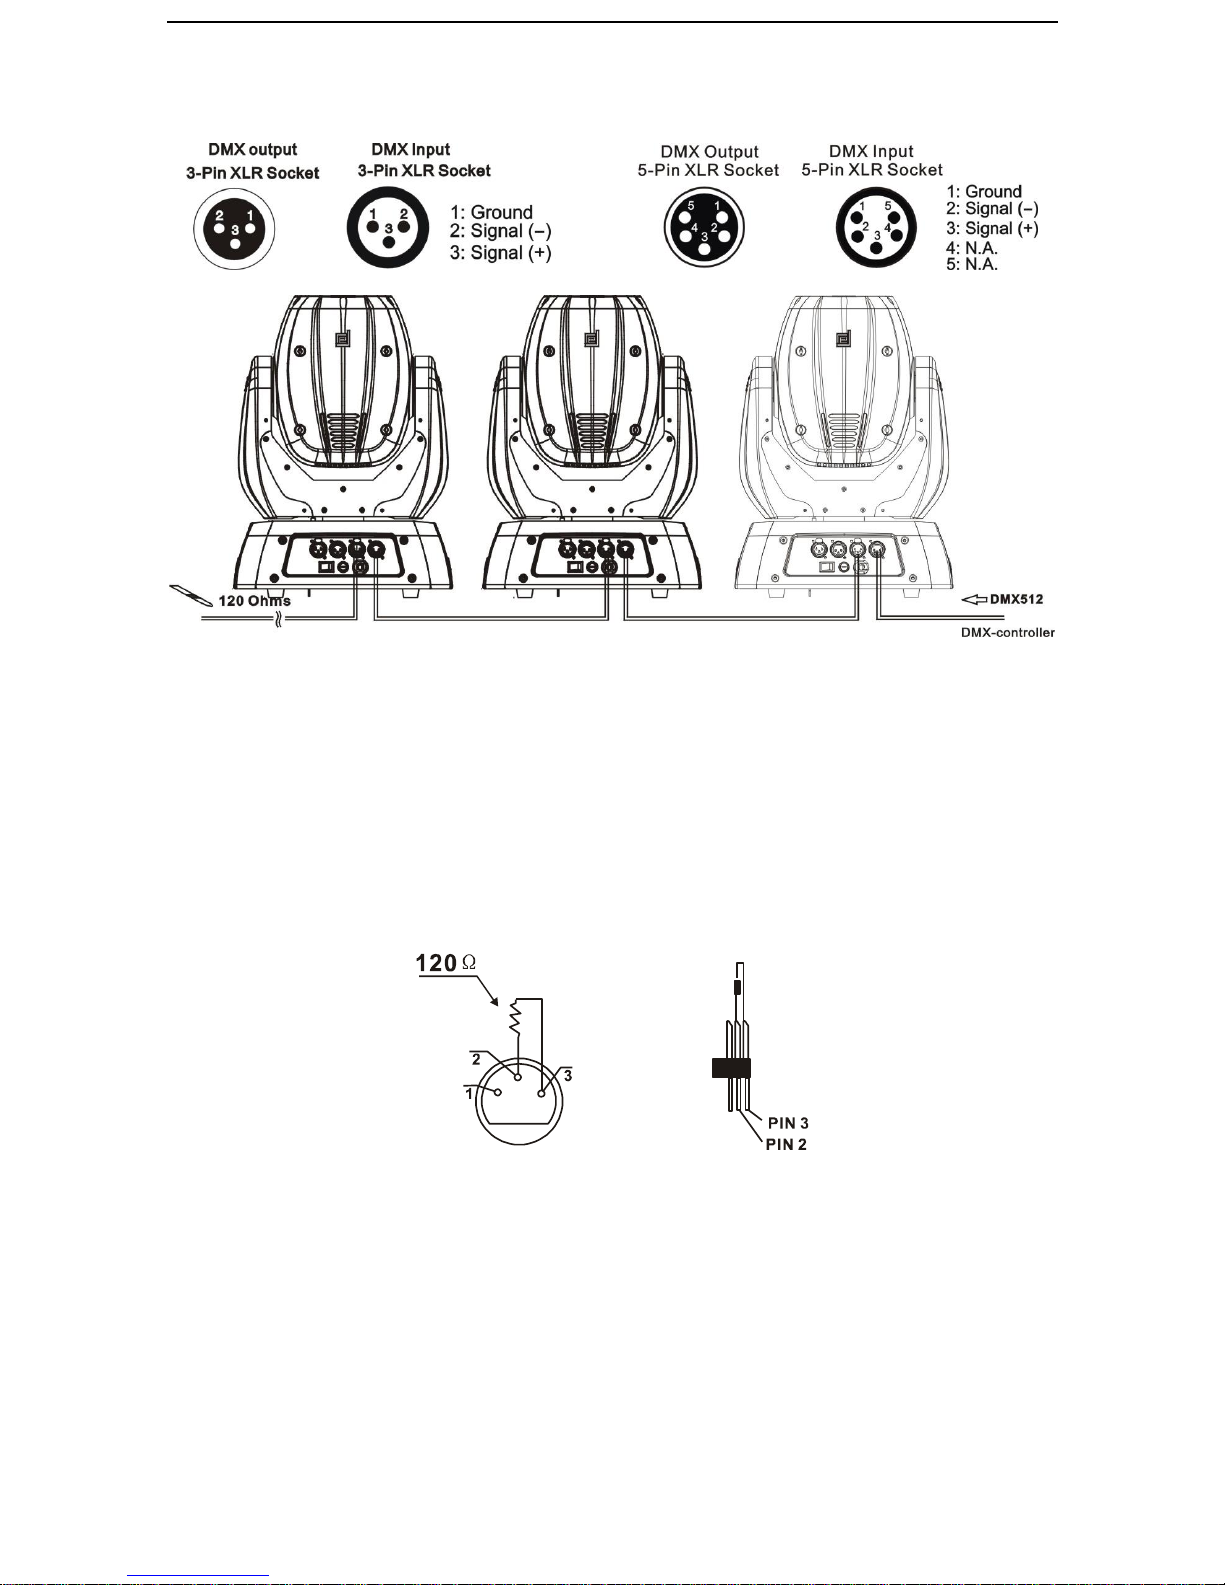
Connect the provided XLR cable to the female 3-pin XLR output of your controller and the other
side to the male 3-pin XLR input of the moving head. You can chain multiple
Moving head together through serial linking. The cable needed should be two core, screened
cable with XLR input and output connectors. Please refer to the diagram below.
Classe LS 60 v1.0
- 9 -
Address 29 Address15 Address 1
6. DMX-512 connection with DMX terminator
For installations where the DMX cable has to run a long distance or is in an electrically noisy
environment, such as in a discotheque, it is recommended to use a DMX terminator. This helps in
preventing corruption of the digital control signal by electrical noise. The DMX terminator is
simply an XLR plug with a 120 Ω resistor connected between pins 2 and 3,which is then plugged
into the output XLR socket of the last fixture in the chain. Please see illustrations below.
7. Projector DMX start address selection
All fixtures should be given a DMX starting address when using a DMX signal, so that the
correct fixture responds to the correct control signals. This digital starting address is the channel
number from which the fixture starts to “listen” to the digital control information sent out from
the DMX controller. The allocation of this starting address is achieved by setting the correct
number on the display located on the base of the device.
You can set the same starting address for all fixtures or a group of fixtures, or make different
address for each fixture individually.
Indice
Altri manuali red lighting Attrezzatura di illuminazione


