Rikon Power Tools 70-1218VS Manuale utente

70-1218VS
www.rikontools.com
70-1218VSM1
12" x 18" Midi Lathe
Operator’s Manual
Record the serial number and date of purchase in your manual for future reference.
The serial number can be found on the specication label on the rear of your machine.
Serial Number: _________________________ Date of purchase: _________________________
For technical support or parts questions, email [email protected] or call toll free at (877)884-5167

2
TABLE OF CONTENTS
SPECIFICATIONS
NOTE: The specications, photographs, drawings and information in this manual represent the current model
when the manual was prepared. Changes and improvements may be made at any time, with no obligation on
the part of Rikon Power Tools, Inc. to modify previously delivered units. Reasonable care has been taken to
ensure that the information in this manual is correct, to provide you with the guidelines for the proper safety,
assembly and operation of this machine.
Motor ........................................................................................ 3/4 HP, DC, TEFC
Motor Speed (no load).......................................................................... 2,500 RPM
Volts, Phase ........................................................................................ 120 V, 1 Ph
Amps, Hertz ....................................................................................... 4.5 A, 60 Hz
Swing Over Bed ............................................................................... 12” (305 mm)
Swing Over Tool Rest Base........................................................ 9-1/16” (230 mm)
Distance Between Centers............................................................... 18” (457 mm)
Speeds ............................................................................................................... 3
Speed Ranges .............................. 450 - 1,100 / 960 - 2,400 / 1,400 - 3,500 RPM
Spindle Rotation ....................................................... Forward Only (C-Clockwise)
Spindle Nose Threading.......................................................................... 1” x 8 TPI
Headstock Taper ............................................................................................ MT-2
Tailstock Taper ............................................................................................... MT-2
Hole Through Drive Spindle ........................................................ 7/16” (11.5 mm)
Hole Through Tailstock ...................................................................... 3/8” (10 mm)
Tailstock Ram Travel ............................................................................ 2" (50 mm)
Tool Rest Post Diameter ................................................................... 1” (25.4 mm)
Overall Size (LxWxH)................. 37-3/4” x 9-3/4” x 16-1/4” (960 x 247 x 413 mm)
Cast Base Size (LxW) ............................................... 30” x 7-3/8” (762 x 188 mm)
Net Weight .................................................................................... 70.5lbs. (32 kg)
Specications.................................................................................................................. 2
Safety Instructions ........................................................................................................ 3 - 6
Getting To Know Your Machine ........................................................................................... 7
Contents of Package ...................................................................................7 - 8
Installation .....................................................................................................8
Assembly ............................................................................................................ 9 - 10
Adjustments........................................................................................................ 11 - 14
Operation .................................................................................................................. 14
Maintenance ......................................................................................... 15
Electricals & Wiring Diagram .....................................................................................5 & 15
Troubleshooting .......................................................................................................... 16
Accessories ........................................................................................................................ 17
Warranty ................................................................................................................. 17
Parts Diagram ........................................................................................................... 18
Parts List ........................................................................................................... 19

3
SAFETY SYMBOLS
IMPORTANT! Safety is the single most important consideration in the operation of this equipment. The following
instructions must be followed at all times. Failure to follow all instructions listed below may result in electric shock,
re, and/or serious personal injury.
There are certain applications for which this tool was designed. We strongly recommend that this tool not be modied
and/or used for any other application other than that for which it was designed. If you have any questions about its
application, do not use the tool until you have contacted us and we have advised you.
SAFETY INSTRUCTIONS
GENERAL SAFETY
KNOW YOUR POWER TOOL. Read the owner’s manual
carefully. Learn the tool’s applications, work capabilities,
and its specic potential hazards.
BEFORE USING YOUR MACHINE
To avoid serious injury and damage to the tool, read and
follow all of the Safety and Operating Instructions before
operating the machine.
1. Some dust created by using power tools contains
chemicals known to the State of California to cause cancer,
birth defects, or other reproductive harm.
Some examples of these chemicals are:
- Lead from lead-based paints.
- Crystalline silica from bricks, cement, and other
masonry products.
- Arsenic and chromium from chemically treated lumber.
Your risk from these exposures varies, depending on how
often you do this type of work. To reduce your exposure to
these chemicals: work in a well ventilated area and work
with approved safety equipment, such as those dust masks
that are specially designed to lter out microscopic
particles.
2. READ the entire Owner’s Manual. LEARN how to use
the tool for its intended applications.
3. GROUND ALL TOOLS. If the tool is supplied with a 3
prong plug, it must be plugged into a 3-contact electrical
receptacle. The 3rd prong is used to ground the tool and
provide protection against accidental electric shock. DO
NOT remove the 3rd prong. See Grounding Instructions
on the following pages.
4. AVOID A DANGEROUS WORKING ENVIRONMENT.
DO NOT use electrical tools in a damp environment or
expose them to rain.
5. DO NOT use electrical tools in the presence of
ammable liquids or gasses.
6. ALWAYS keep the work area clean, well lit, and
organized. DO NOT work in an environment with oor
surfaces that are slippery from debris, grease, and wax.
7. KEEP VISITORS AND CHILDREN AWAY. DO NOT
permit people to be in the immediate work area,
especially when the electrical tool is operating.
8. DO NOT FORCE THE TOOL to perform an operation
for which it was not designed. It will do a safer and
higher quality job by only performing operations for
which the tool was intended.
9. WEAR PROPER CLOTHING. DO NOT wear loose
clothing, gloves, neckties, or jewelry. These items can
get caught in the machine during operations and pull the
operator into the moving parts. The user must wear a
protective cover on their hair, if the hair is long, to
prevent it from contacting any moving parts.
10. CHILDPROOF THE WORKSHOP AREA by
removing switch keys, unplugging tools from the
electrical receptacles, and using padlocks.
11. ALWAYS UNPLUG THE TOOL FROM THE
ELECTRICAL RECEPTACLE when making adjust-
ments, changing parts or performing any maintenance.
SAFETY ALERT SYMBOL: Indicates DANGER, WARNING, or CAUTION. This symbol may be used
in conjunction with other symbols or pictographs.
Indicates an imminently hazardous situation, which, if not avoided, could result in death or
serious injury.
Indicates a potentially hazardous situation, which, if not avoided, could result in death or serious
injury.
Indicates a potentially hazardous situation, which, if not avoided, could result in minor or
moderate injury.
NOTICE: Shown without Safety Alert Symbol indicates a situation that may result in property damage.

4
SAFETY INSTRUCTIONS
16. NEVER LEAVE A RUNNING TOOL UNATTENDED.
Turn the power switch to the “OFF” position. DO NOT
leave the tool until it has come to a complete stop.
17. DO NOT STAND ON A TOOL. Serious injury could
result if the tool tips over, or you accidentally contact the
tool.
18. DO NOT store anything above or near the tool where
anyone might try to stand on the tool to reach it.
19. MAINTAIN YOUR BALANCE. DO NOT extend
yourself over the tool. Wear oil resistant rubber soled
shoes. Keep oor clear of debris, grease, and wax.
20. MAINTAIN TOOLS WITH CARE. Always keep tools
clean and in good working order. Keep all blades and tool
bits sharp, dress grinding wheels and change other
abrasive accessories when worn.
21. EACH AND EVERY TIME, CHECK FOR DAMAGED
PARTS PRIOR TO USING THE TOOL. Carefully check
all guards to see that they operate properly, are not dam-
aged, and perform their intended functions. Check for
alignment, binding or breaking of moving parts. A guard
or other part that is damaged should be immediately
repaired or replaced.
22. DO NOT OPERATE TOOL WHILE TIRED, OR
UNDER THE INFLUENCE OF DRUGS, MEDICATION
OR ALCOHOL.
23. SECURE ALL WORK. Use clamps or jigs to secure
the work piece. This is safer than attempting to hold the
work piece with your hands.
24. STAY ALERT, WATCH WHAT YOU ARE DOING,
AND USE COMMON SENSE WHEN OPERATING A
POWER TOOL.
A moment of inattention while operating power tools may
result in serious personal injury.
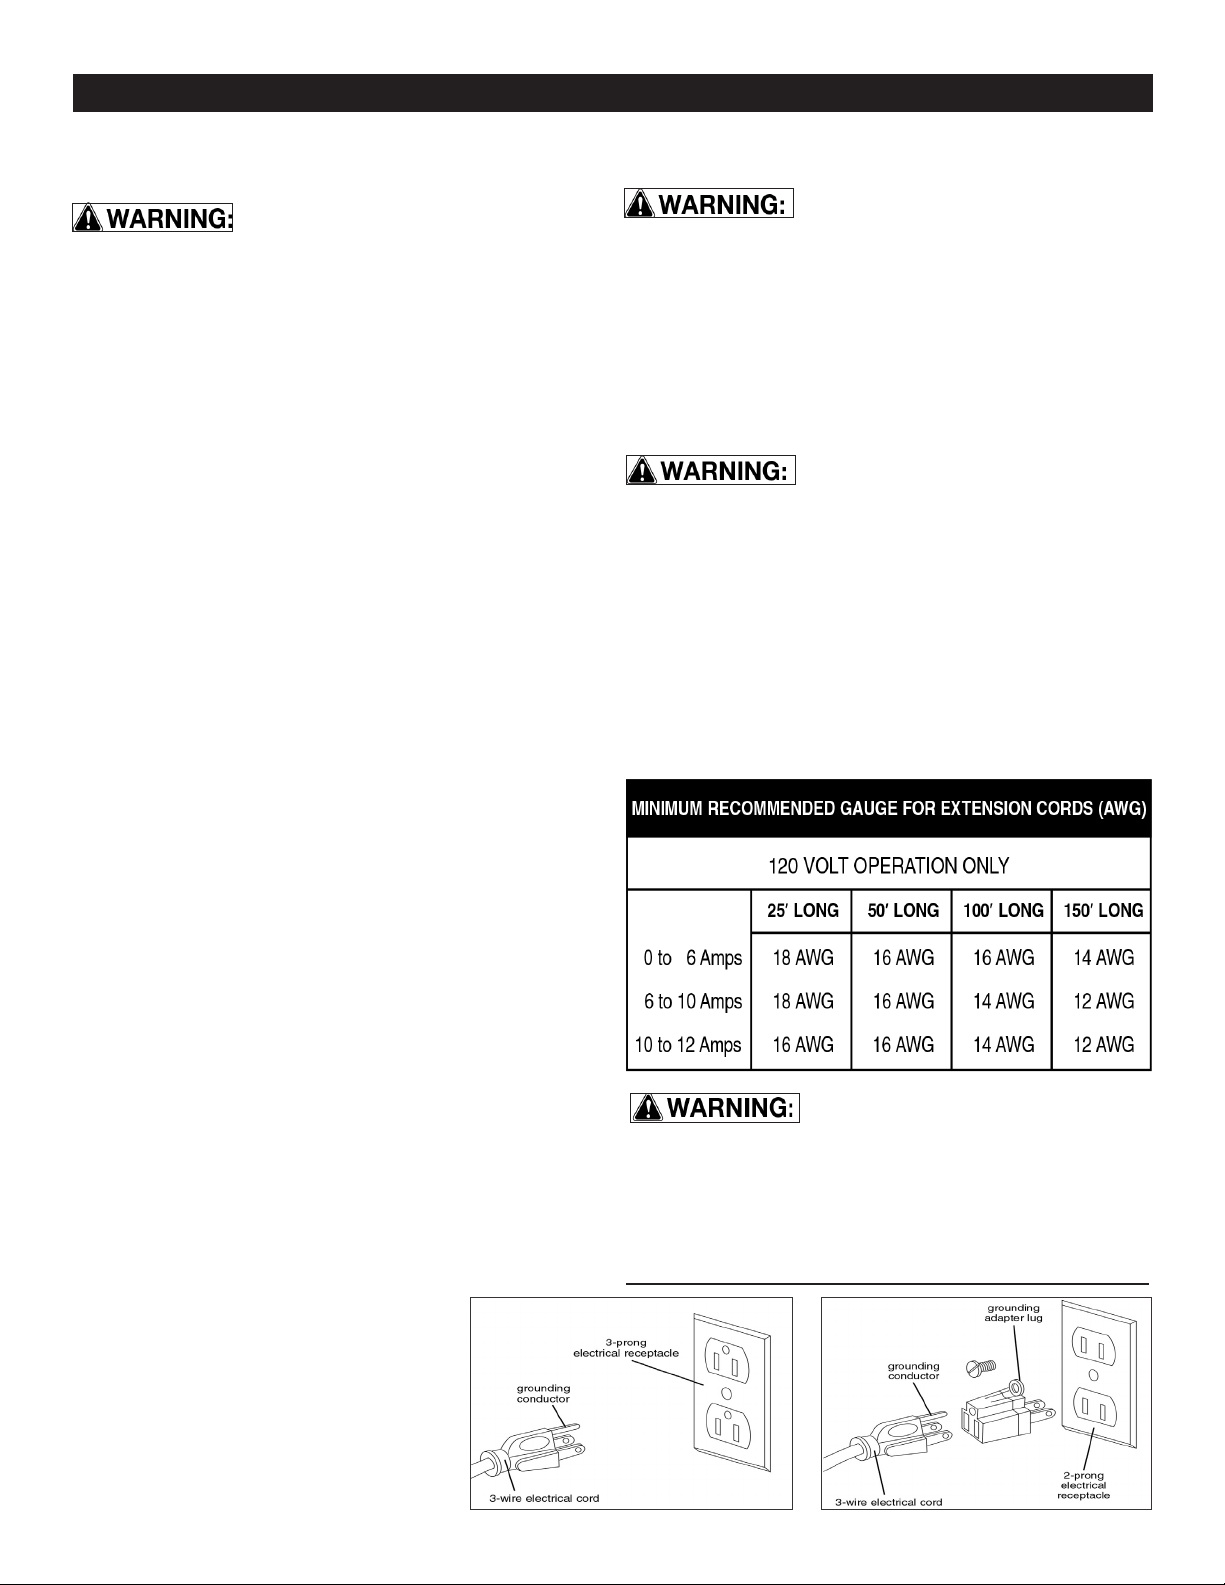
26. USE A PROPER EXTENSION CORD IN GOOD
CONDITION. When using an extension cord, be sure to
use one heavy enough to carry the current your product
will draw. The table on the following page shows the cor-
rect size to use depending on cord length and nameplate
amperage rating. If in doubt, use the next heavier gauge.
The smaller the gauge number, the larger diameter of the
extension cord. If in doubt of the proper size of an exten-
sion cord, use a shorter and thicker cord. An undersized
cord will cause a drop in line voltage resulting in a loss of
power and overheating.
USE ONLY A 3-WIRE EXTENSION CORD THAT HAS
A 3-PRONG GROUNDING PLUG AND A 3-POLE
RECEPTACLE THAT ACCEPTS THE TOOL’S PLUG.
27. ADDITIONAL INFORMATION regarding the safe and
proper operation of this product is available from:
• Power Tool Institute
1300 Summer Avenue
Cleveland, OH 44115-2851
www.powertoolinstitute.org
• National Safety Council
1121 Spring Lake Drive
Itasca, IL 60143-3201
www.nsc.org
• American National Standards Institute
25 West 43rd Street, 4th Floor
New York, NY 10036
www.ansi.org
• ANSI 01.1 Safety Requirements for
Woodworking Machines and the
U.S. Department of Labor regulations
www.osha.gov
28. SAVE THESE INSTRUCTIONS. Refer to them
frequently and use them to instruct others.
25. ALWAYS WEAR A DUST MASK TO PREVENT
INHALING DANGEROUS DUST OR AIRBORNE
PARTICLES, including wood dust, crystalline silica dust
and asbestos dust. Direct particles away from face and
body. Always operate tool in well ventilated area and
provide for proper dust removal. Use dust collection
system wherever possible. Exposure to the dust may
cause serious and permanent respiratory or other injury,
including silicosis (a serious lung disease), cancer, and
death. Avoid breathing the dust, and avoid prolonged
contact with dust. Allowing dust to get into your mouth
or eyes, or lay on your skin may promote absorption of
harmful material. Always use properly tting NIOSH/OSHA
approved respiratory protection appropriate for the dust
exposure, and wash exposed areas with soap and water.
12. KEEP PROTECTIVE GUARDS IN PLACE AND IN
WORKING ORDER.
13. AVOID ACCIDENTAL STARTING. Make sure that
the power switch is in the “OFF” position before plugging
in the power cord to the electrical receptacle.
14. REMOVE ALL MAINTENANCE TOOLS from the
immediate area prior to turning “ON” the machine.
15. USE ONLY RECOMMENDED ACCESSORIES. Use
of incorrect or improper accessories could cause serious
injury to the operator and cause damage to the tool. If in
doubt, check the instruction manual that comes with that
particular accessory.

5
SAFETY INSTRUCTIONS
THE USE OF AN EXTENSION CORD
WITH THIS MACHINE IS NOT RECOMMENDED. For
best power and safety, plug the machine directly into a
dedicated, grounded electrical outlet that is within the
supplied cord length of the machine.
If an extension cord needs to be used, it should only be
for a limited operation of the machine. The extension
cord should be as short as possible in length, and have
a minimum gauge size of 14AWG.
Check extension cords before each
use. If damaged replace immediately. Never use a tool
with a damaged cord, since touching the damaged
area could cause electrical shock, resulting in serious
injury.
Use a proper extension cord. Only use cords listed by
Underwriters Laboratories (UL). Other extension cords can
cause a drop in line voltage, resulting in a loss of power
and overheating of tool. When operating a power tool out-
doors, use an outdoor extension cord marked “W-A” or “W”.
These cords are rated for outdoor use and reduce the risk
of electric shock.
DO NOT MODIFY ANY PLUG. If it will not t the electrical
receptacle, have the proper electrical receptacle installed
by a qualied electrician.
IMPROPER ELECTRICAL CONNECTION of the
equipment grounding conductor can result in risk of
electric shock. The conductor with the green insulation
(with or without yellow stripes) is the equipment ground-
ing conductor. DO NOT connect the equipment grounding
conductor to a live terminal if repair or replacement
of the electric cord or plug is necessary.
CHECK with a qualied electrician or service personnel if
you do not completely understand the grounding
instructions, or if you are not sure the tool is properly
grounded when installing or replacing a plug.
USE ONLY A 3-WIRE EXTENSION CORD THAT HAS
THE PROPER TYPE OF A 3-PRONG GROUNDING PLUG
THAT MATCHES THE MACHINE’S 3-PRONG PLUG AND
ALSO THE 3-POLE RECEPTACLE THAT ACCEPTS THE
TOOL’S PLUG. *
REPLACE A DAMAGED OR WORN CORD
IMMEDIATELY.
This tool is intended for use on a circuit that has an
electrical receptacle as shown in FIGURE A. It shows a
3-wire electrical plug and electrical receptacle that has
a grounding conductor. If a properly grounded electrical
receptacle is not available, an adapter as shown in
FIGURE B can be used to temporarily
connect this plug to a 2-contact ungrounded
receptacle. The adapter has a rigid lug
extending from it that MUST be connected
to a permanent earth ground, such as a
properly grounded receptacle box.
THIS ADAPTER IS PROHIBITED IN
CANADA.
IN THE EVENT OF A MALFUNCTION OR BREAKDOWN,
grounding provides the path of least resistance for electric
current and reduces the risk of electric shock. This tool
is equipped with an electric cord that has an equipment
grounding conductor and requires a grounding plug (not
included). The plug MUST be plugged into a matching elec-
trical receptacle that is properly installed and grounded in
accordance with ALL local codes and ordinances.
THIS 120V TOOL MUST BE GROUND-
ED WHILE IN USE TO PROTECT THE OPERATOR FROM
ELECTRIC SHOCK.
EXTENSION CORDS
Keep the extension cord clear of
the working area. Position the cord so that it will not
get caught on lumber, tools or other obstructions while
you are working with your power tool.
* Canadian electrical codes require extension cords
to be certied SJT type or better.
** The use of an adapter in Canada is not acceptable.
FIG. B
FIG. A
ELECTRICAL SAFETY

6
SAFETY INSTRUCTIONS
CALIFORNIA PROPOSITION 65 WARNING:
WARNING: Drilling, sawing, sanding or machining wood products can expose you to wood dust, a
substance known to the State of California to cause cancer. Avoid inhaling wood dust or use a dust mask or
other safeguards for personal protection. For more information go to www.P65Warnings.ca.gov/wood.
This owner’s manual is not a teaching aid and is intended to show
assembly, adjustments, and general use.
SPECIFIC SAFETY INSTRUCTIONS FOR WOOD LATHES
1. Do not operate this machine until you have read all of the following instructions.
2. Do not attempt to operate this machine until it is completely assembled.
3. Do not turn ON this machine if any pieces are damaged or missing.
4. This machine must be properly grounded.
5. If you are not familiar with the operation of the machine, obtain assistance from a qualied person.
6. Always wear approved, safety protective eye wear and hearing protection when operating this machine.
7. Always wear a dust mask and use adequate dust collection and proper ventilation.
8. Do not wear loose clothing or jewelry when operating this machine. Keep long hair tied back.
9. Always make sure the power switch is in the OFF position prior to plugging in the machine.
10. Always make sure the power switch is in the OFF position and the machine is unplugged when doing any
cleaning, assembly, setup operation, or when not in use.
11. Use only sharp lathe tools. Dull tools can damage your work and are unsafe to use.
12. When turning between centers, make sure the headstock and tailstock are snug against the work piece.
13. When face plate turning, rough-cut the work close to the finished shape before screwing it to the face plate.
14. Never jam tools into the work piece or take too big of a cut.
15. Make sure there are no loose knots, nails, staples, dirt or foreign objects in the work piece to be turned.
16. Wood should not be warped, cracked or have improperly made or cured glue joints.
17. Test spin the work piece to ensure that it does not hit the lathe bed or tool rest before turning on the lathe.
18. Start the lathe at slow speeds to check the settings, then increase the speed to your desired level for working.
19. Low speeds are best for roughing stock, and for long or large diameter work pieces.
20. If excessive vibration occurs, stop the lathe to check the work piece settings between centers or on face plates.
21. For sanding or applying finishes, remove the tool rest from the machine. Use low speeds to avoid heat build-up.
22. Never stop the machine by grabbing the work piece, faceplate or hand wheel. Let the machine stop on its own.
23. The use of any accessories or attachments not recommended may cause injury to you and damage your
machine.
24. Remove material or debris from the work area. Keep the oor and work area neat and clean.
25. Keep these instructions for future reference.
This machine is intended for the shaping, smoothing and finishing of solid woods and composite materials
made specifically for lathe work. The permissible work piece dimensions must be observed (see Technical
Specification). Any other use not as specified, including modification of the machine or use of parts not tested
and approved by the equipment manufacturer, can cause unforeseen damage and invalidate the warranty.
ATTENTION: Use of this lathe still presents risks that cannot be eliminated by the manufacturer. Therefore, the
user must be aware that wood working machines are dangerous if not used with care and all safety precautions
are adhered to.

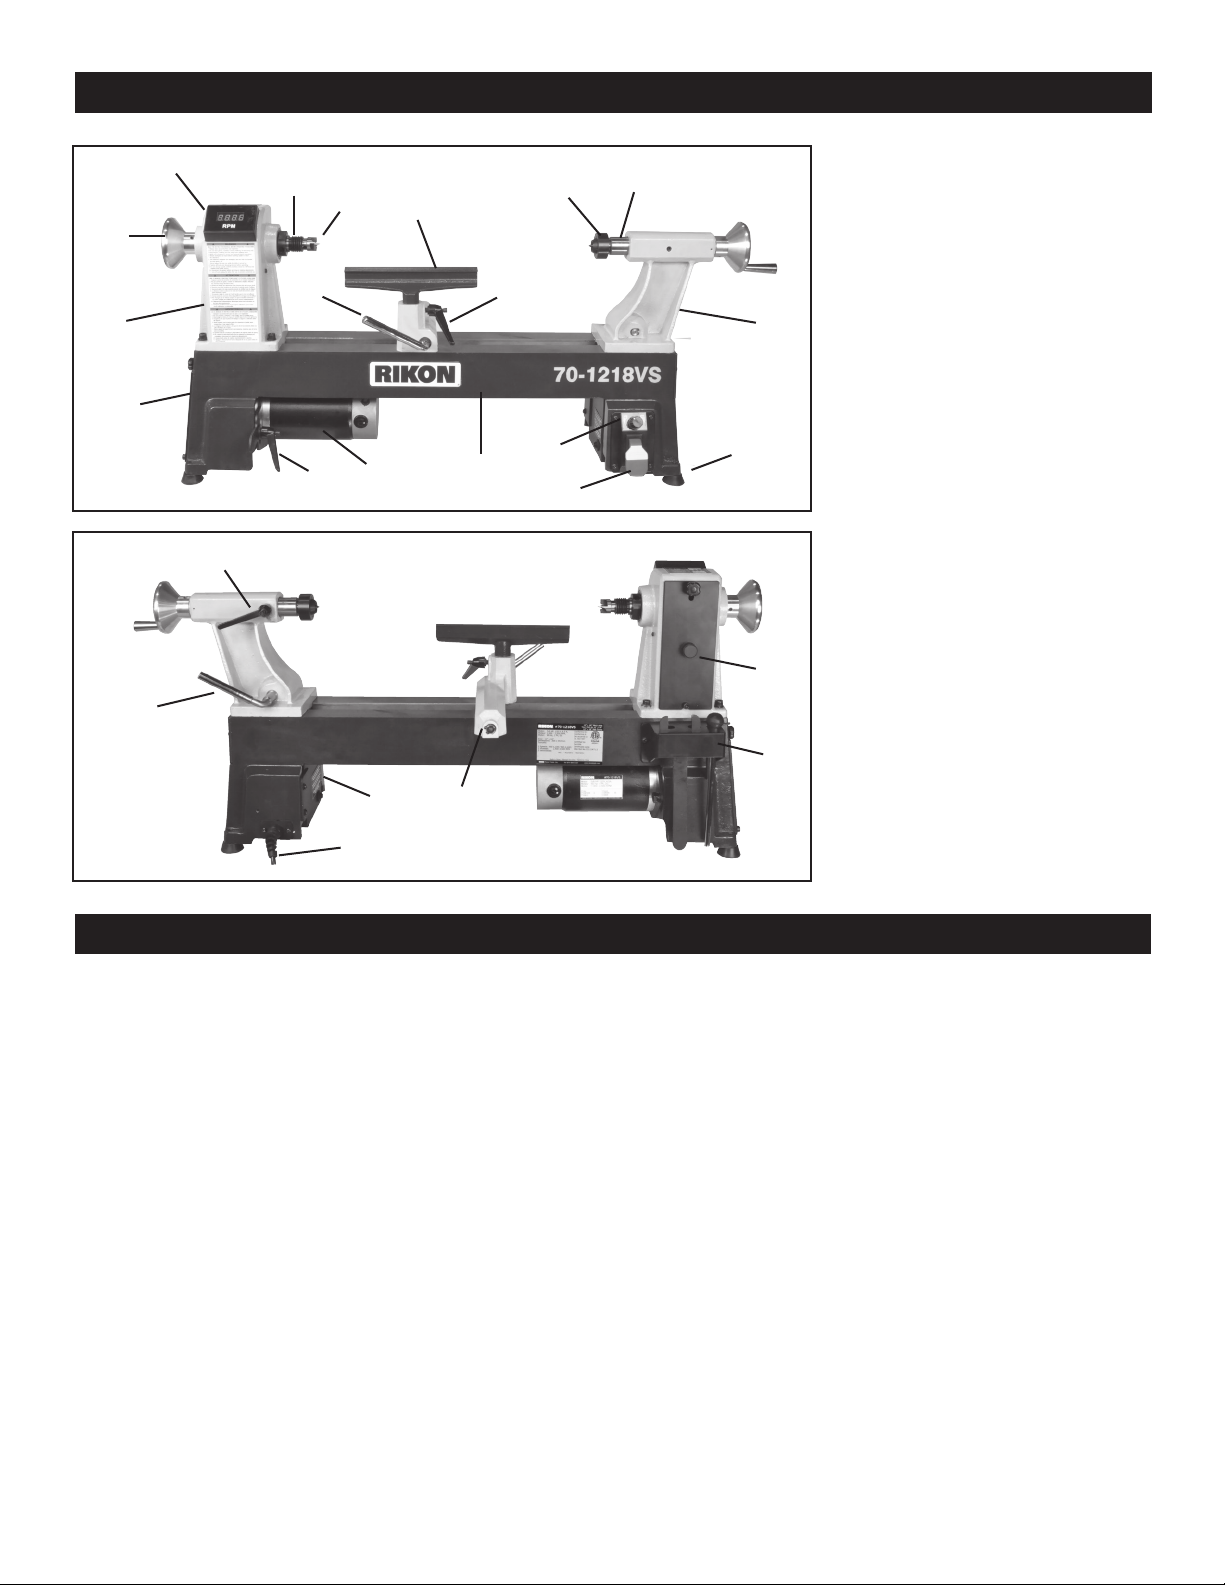
GETTING TO KNOW YOUR MACHINE
CONTENTS OF PACKAGE
7
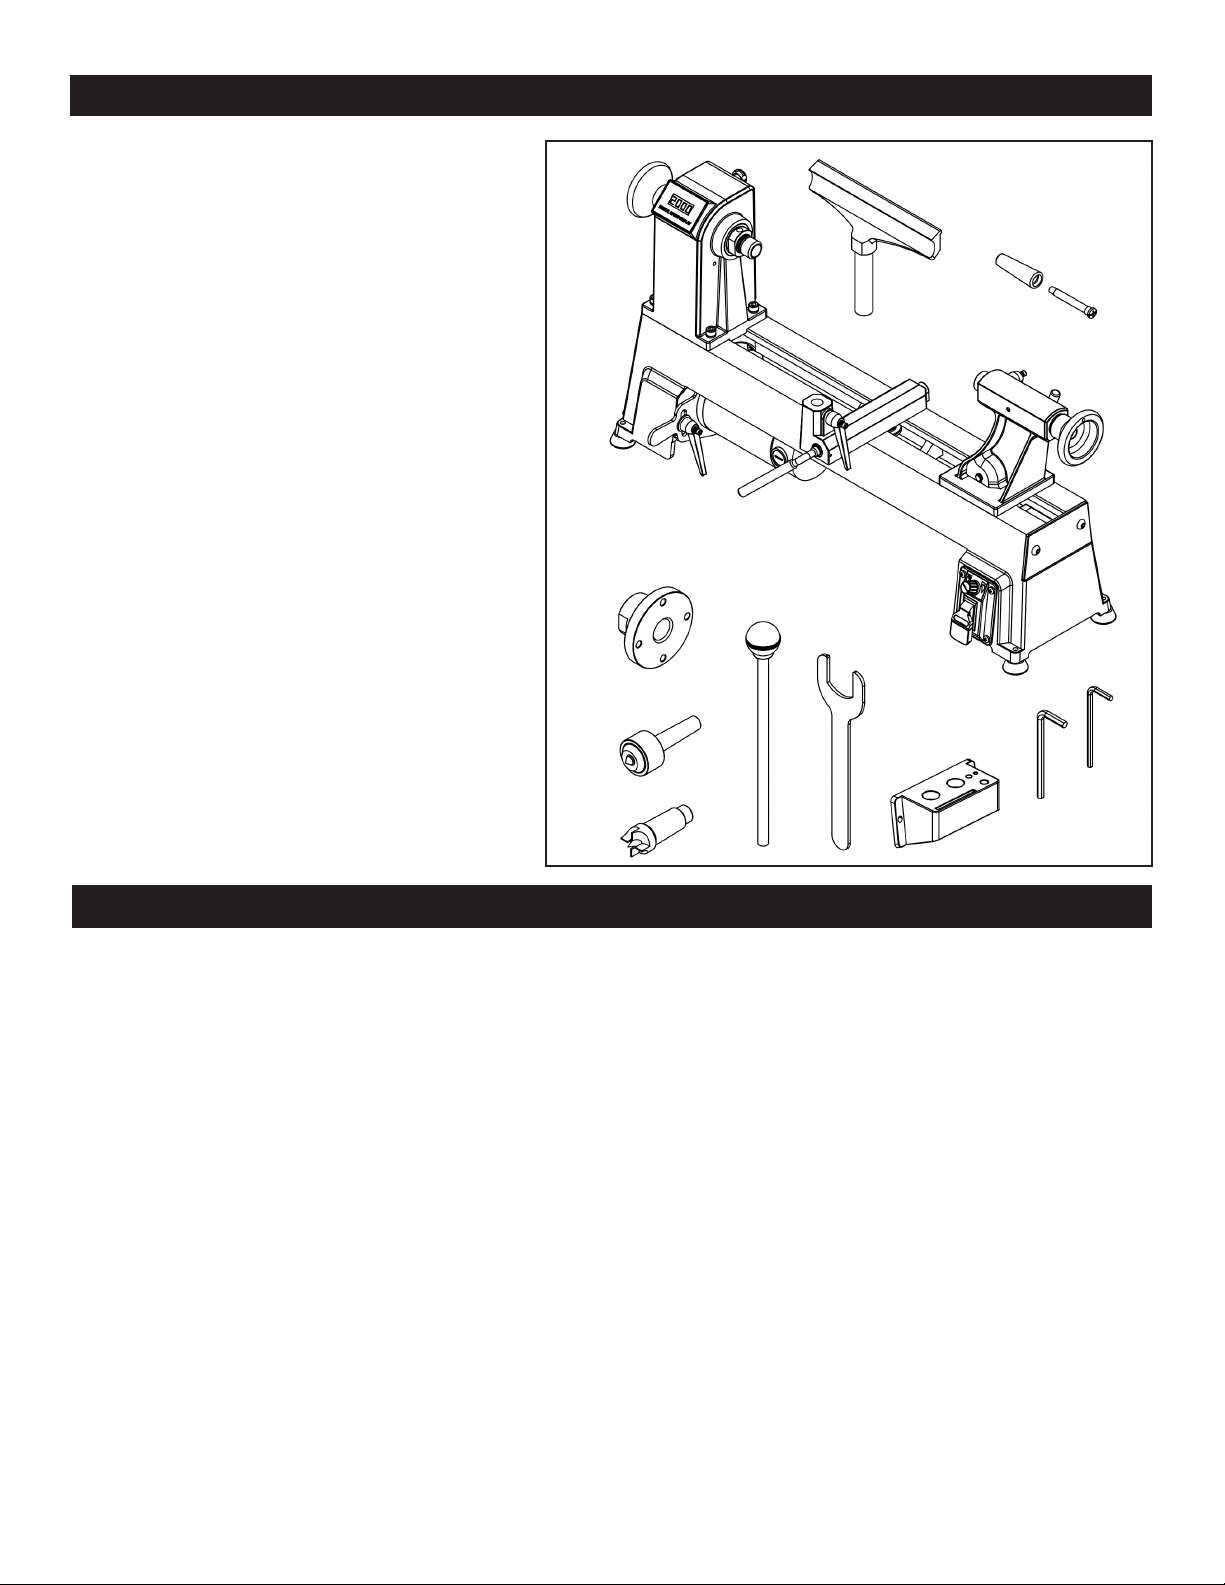
Model #70-1218VS Midi Lathe is shipped complete in one box.
UNPACKING AND CLEAN-UP
1. Carefully remove all contents from the shipping carton. Compare the contents with the list of
contents to make sure that all of the items are accounted for, before discarding any packing material.
Place parts on a protected surface for easy identication and assembly. If any parts are missing or broken,
please call RIKON Customer Service (877-884-5167) as soon as possible for replacements. DO NOT turn
your machine ON if any of these items are missing. You may cause injury to yourself or damage to the
machine.
2. Report any shipping damage to your local distributor. Take photographs for any possible insurance
claims.
3. Clean all rust protected surfaces with ordinary house hold type grease or spot remover. Do not use;
gasoline, paint thinner, mineral spirits, etc. These may damage painted surfaces.
4. Apply a coat of paste wax to the lathe bed to prevent rust. Wipe all parts thoroughly with a clean dry
cloth.
5. Set packing material and shipping carton aside. Do not discard until the machine has been set up and
is running properly.
J
A Headstock
B Spindle hand wheel
C Digital LED RPM Display
D Spindle, 1” x 8 TPI Thread
E Spur center, MT2
F Tool rest base locking lever
G Tool rest, 8”
H Tool rest locking lever
I Live center, MT2
J Tailstock spindle (RAM, quill)
K Tailstock hand wheel
L Tailstock
M Rubber feet
N On / O safety switch
O Spindle speed control dial
P Lathe bed
Q Motor
R Motor mount & pivot lever
S Motor pulley & cover
T Tailstock spindle lock
U Spindle pulley & cover
V Tool holder
W Tool rest base (Banjo)
X Motor reset button
Y Electric cord & plug
Z Tailstock locking lever
B
A
F
D
C
E
O
V
J
H
G
I
Z
S
K
L
M
U
N
P
T
RQ
K
Y
XW
REAR
VIEW
FRONT
VIEW

CONTENTS OF PACKAGE
INSTALLATION
TOOLS NEEDED FOR ASSEMBLY
- Slotted Screwdriver
LIST OF LOOSE PARTS
1. When moving the lathe, DO NOT use
the headstock assembly, motor, tool rest or
tailstock assembly as this may damage the
machine. Hold under the lathe’s bed to lift
and move the machine.
2. The lathe is supplied with rubber feet for use
on a bench. To permanently mount the machine
on a bench, use the four threaded mounting
holes in lathe’s base. Remove the rubber feet
and insert 1” to 1-1/4” thick spacers (washers,
bushings, wood strips) under the lathe, then bolt
the machine down with M8x1.25 bolts (mounting
hardware is not provided).
NOTE: The TEFC motor requires 1” extra space
below the bed to allow airflow and room to pivot
the motor down for belt changes.
For mounting on a stand, the spacers may not
be needed if the motor can swing free below the
bed casting when mounted on the stand plate.
3. For best power and safety, the lathe should
be plugged directly into a dedicated grounded
electrical outlet that is within the supplied cord
length of the machine. The use of an extension
cord is not recommended.
4. Align the machine so there is ample space in
front and in back for working and moving around
it. Locate it so any turning debris or kickback will
not face aisles, doorways, or other work areas
that bystanders may be in. Do not locate or use
the machine in damp or wet conditions.
5. Make sure that the machine is level. If
possible, secure it to a bench or its stand to the
floor with lag screws (not supplied). This will
reduce any possible vibration during use.
MOVING & INSTALLING THE LATHE
8
A Lathe Bed with headstock, tailstock,
tool rest base & motor assemblies
B Tool rest 8”
C Handle for tailstock hand wheel
D Handle screw
E Faceplate 3”
F Live center
G Spur center
H Knockout bar
I Wrench
J Tool holder
K 5mm hex wrench
L 3mm hex wrench
B
A
C
F
D
E
J
H
G
I
K
L

9
ASSEMBLY
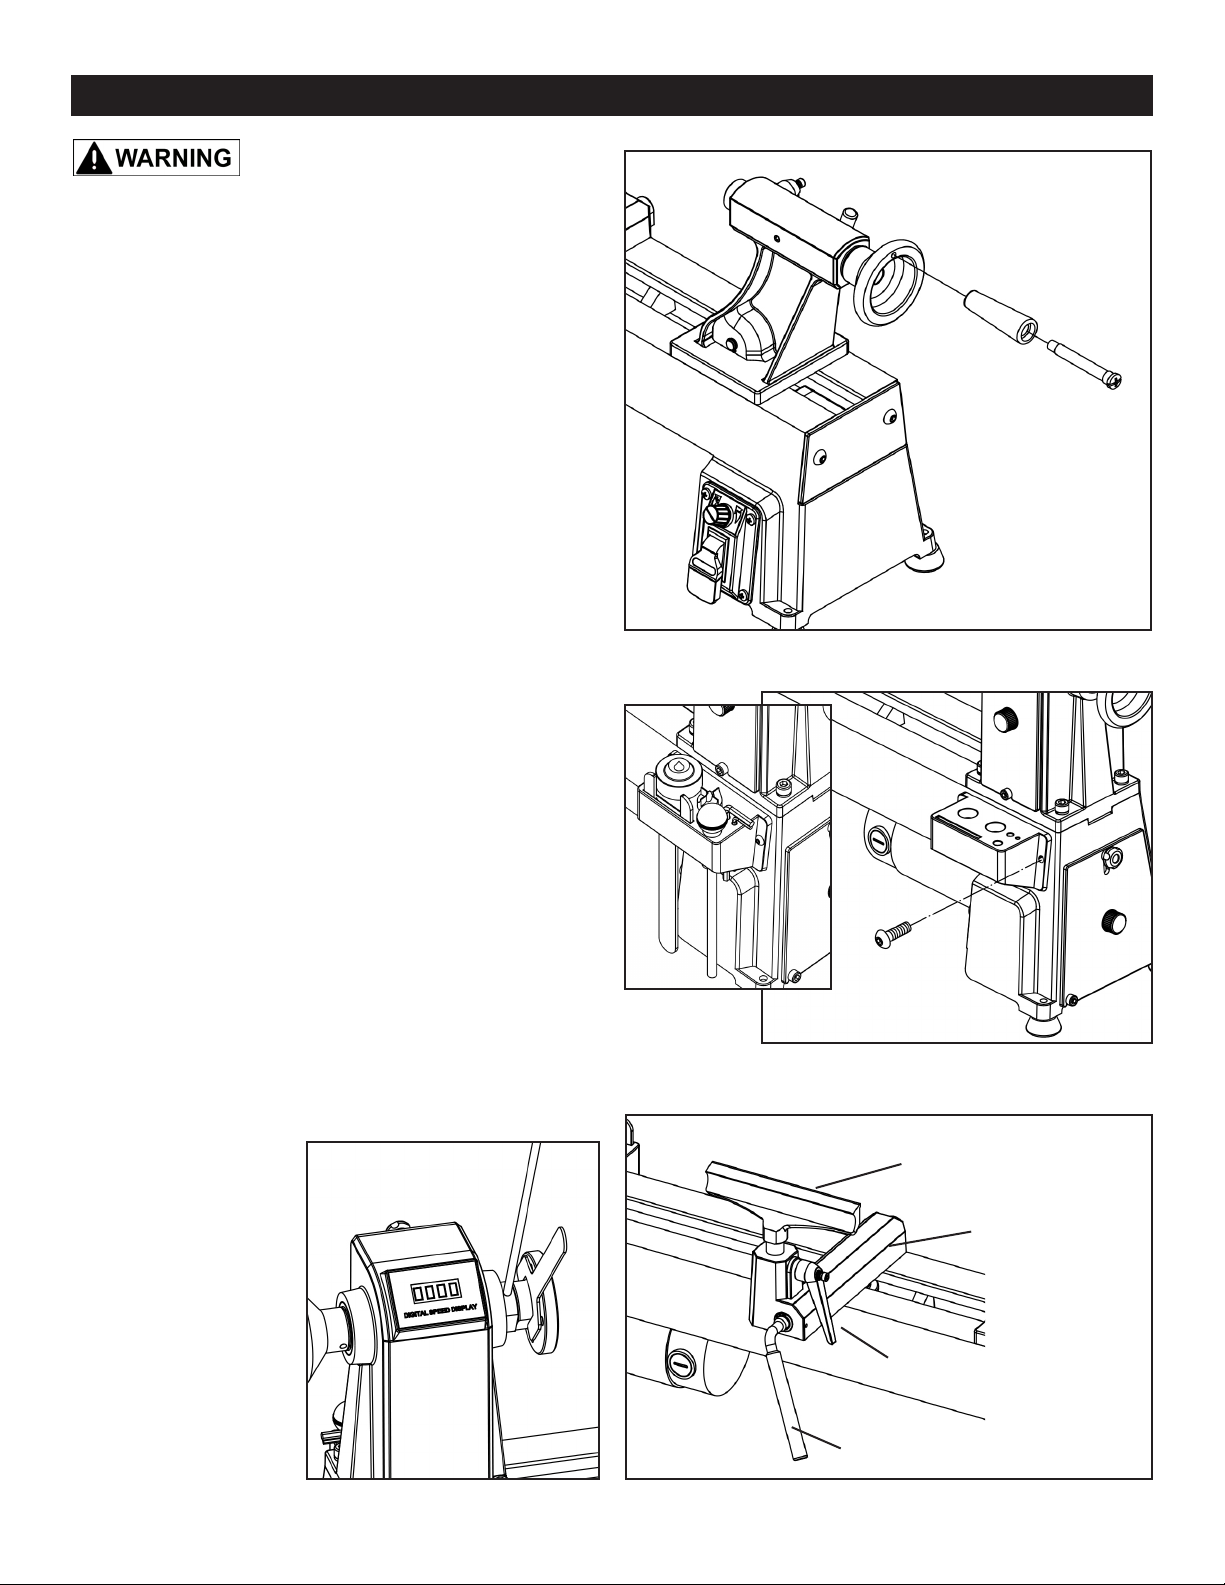
FIG. 1
FIG. 2
FIG. 3
INSTALL THE TOOL REST
1. Loosen the locking lever on the side of the tool
rest base, and insert tool rest post into the base.
2. Adjust the tool rest’s height up or down to your
desired position, and then secure The tool rest
base in place with is locking lever. FIG. 3.
FIG. 4
B
INSTALL THE TAILSTOCK HANDLE
1. With a slotted screwdriver (not supplied)
attach the tailstock Handle (A) to the hand wheel
with the Screw provided (B). FIG. 1.
THE MACHINE MUST NOT BE
PLUGGED IN AND THE POWER SWITCH MUST BE IN THE
OFF POSITION UNTIL ALL ADJUSTMENTS ARE COMPLETE.
Tool Rest Locking Handle
Tool Rest Base
Tool Rest Base Locking Lever
A
B
INSTALL THE TOOL HOLDER
1. At the rear of the lathe behind the headstock,
unscrew the two pan head screws that have been
pre-installed there from the factory.

2. Install the Tool Holder to the base with these
two screws. FIG. 2.
The holder is formed to store and provide easy
access to the tools and centers used for turning.
Tool Rest
Rear of Lathe
Behind the Headstock
INSTALLING/REMOVING THE FACEPLATE
1. Mount the Face-
plate (A) by screwing
it clockwise onto the
1” x 8TPI spindle
threads.
2. Tighten or loosen
the faceplate by using
the Knockout Bar (B)
to hold the spindle,
and Wrench (C) on
the rear of the face
plate. FIG. 4.
A
B
C
Tailstock on
Right End of Lathe Bed
Headstock

10
ASSEMBLY
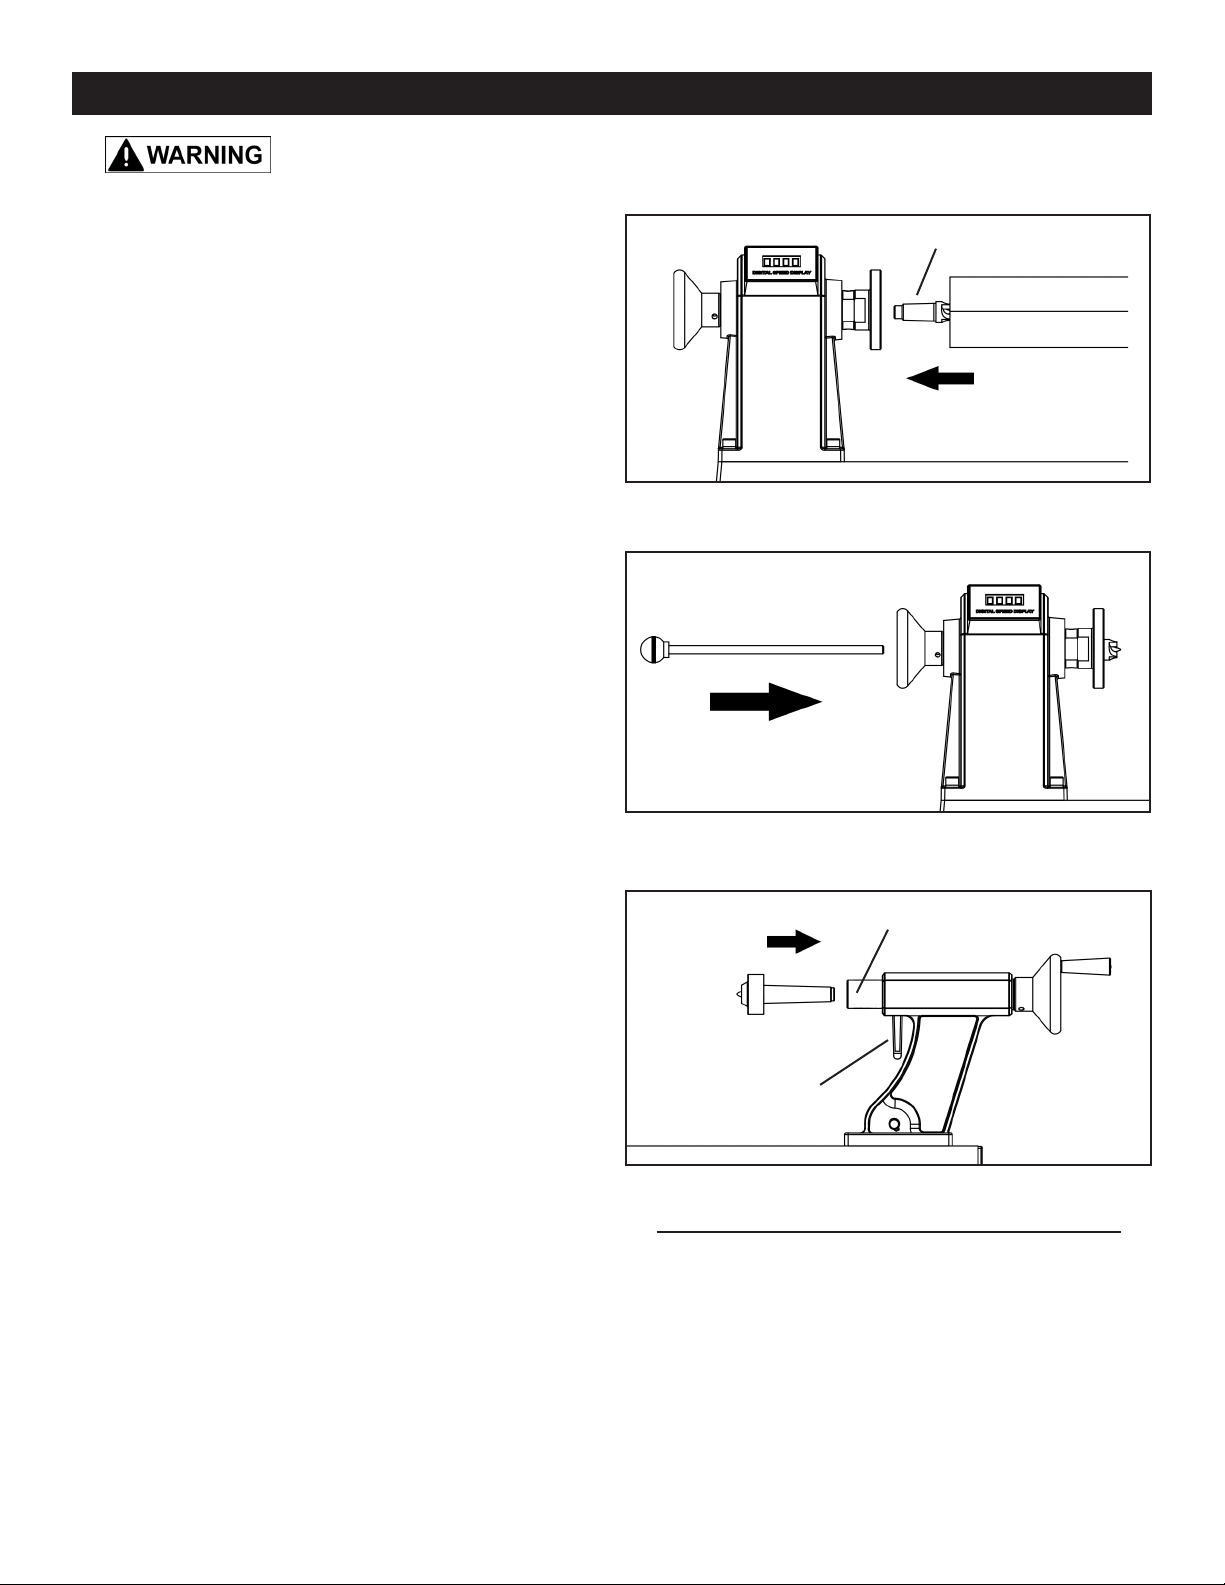
INSTALL THE SPUR CENTER
Insert the spur center into the headstock spindle.
The spur center has a No. 2 Morse Taper shank,
that matches the taper on the inside of the
headstock spindle for a secure, friction t. FIG. 5.
Make sure that the mating surfaces of the spur
center and spindle tapers are smooth and clean.
NOTE: Illustrations show the face plate on the
spindle along with the spur center. For best tool
positioning while working, it is advised to remove
the face plate when spindle turning.
REMOVING THE SPUR CENTER
The Knockout Bar is used to remove the spur
center from the headstock spindle.
Insert the knockout bar into the spindle hole at
opposite side from spur center. The knockout bar
is then used to hit the back end of the spur center
to release it from the spindle. Carefully hold the
spur center as it is knocked out of the spindle, so
that it does not y out and get damaged, or injure
your hand. FIG. 6.
INSTALL THE LIVE CENTER
1. Rotate the tailstock Hand Wheel clockwise a
few times to advance the Quill out of the tailstock.
2. Insert the Live Center into the tailstock Quill/
Spindle. This center and also the quill have
No. 2 Morse Tapers. Make sure that the mating
surfaces of both are smooth and clean. FIG. 7.
REMOVING THE LIVE CENTER
To remove live center from the tailstock spindle,
loosen the tailstock spindle’s Locking Handle
and rotate the hand wheel counterclockwise to
retract spindle into the body of the tailstock. The
live center will automatically be pushed out of
the spindle. Carefully hold the live center as it is
pushed out of the spindle, so that it does not fall
out and get damaged, or injure your hand.
THE MACHINE MUST NOT BE PLUGGED IN AND THE POWER SWITCH
MUST BE IN THE 'OFF' POSITION UNTIL ASSEMBLY IS COMPLETE.
FIG. 5
FIG. 6
FIG. 7
Headstock
Tailstock
Headstock
Spur Center
Work Piece
Knockout Bar
Live Center
Quill / Tailstock Spindle
The knockout bar can also be used to release the
live center from the tailstock. Insert the knockout
bar into the spindle hole at opposite end from
live center. The knockout bar is then used to hit
the back end of the live center to release it from
the spindle. Carefully hold the live center as it is
knocked out of the spindle, so that it does not y
out and get damaged, or injure your hand.
Locking Handle
Indice
Altri manuali Rikon Power Tools Tornio

Rikon Power Tools
Rikon Power Tools 70-1824VSR Manuale utente

Rikon Power Tools
Rikon Power Tools 79-100VS Manuale utente

Rikon Power Tools
Rikon Power Tools Woodfast 70-450 Manuale utente

Rikon Power Tools
Rikon Power Tools 70-100 Manuale utente

Rikon Power Tools
Rikon Power Tools 70-220VSR Manuale utente

Rikon Power Tools
Rikon Power Tools 70-100 Manuale utente

Rikon Power Tools
Rikon Power Tools 70-306 Manuale utente

Rikon Power Tools
Rikon Power Tools 70-200EVS Manuale utente

Rikon Power Tools
Rikon Power Tools 70-1420VSR Manuale utente

Rikon Power Tools
Rikon Power Tools 70-150VSR Manuale utente