Ritek QuattroDrive Manuale utente
SD/MMC/MS SM
CF/MD
User Manual
ENGLISH
QuattroDrive


i
Contents
Introduction ............................................................................. 1
About the Remote Control .................................................... 1
Getting Started ........................................................................ 4
Cable Connections ............................................................... 4
Connecting the Power ...................................................... 4
.......................................................................................... 4
Standalone Connection .................................................... 4
Connecting to Headphones or a Stereo System .............. 4
Connecting to a TV or Projector ....................................... 5
Connecting to a Computer................................................ 5
Inserting Flash Memory Cards.............................................. 6
Inserting and Removing a CD............................................... 6
Turning the QuattroDrive On ................................................ 7
Installing Drivers ................................................................... 7
Using QuattroDrive ................................................................. 8
Using the OSD Setup Menus................................................ 8
Navigating the Menus....................................................... 8
Adjusting the TV Settings ................................................. 9
Setting the OSD Language............................................. 10
GENERAL SETUP ......................................................... 11
SPEAKER SETUP.......................................................... 12
AUDIO SETUP ............................................................... 13
PREFERENCES............................................................. 15
DISC SETUP .................................................................. 18
Switching between Flash Memory Cards and a CD ........... 18
Using the Remote Control .............................................. 18
Using the Buttons on the QuattroDrive........................... 18
Copying Files to the Computer ........................................... 19
Copying from a Flash Memory Card............................... 19
Copying from a CD ......................................................... 19
Listening to Music ............................................................... 19

ii
Viewing and Editing Media Files .........................................20
Viewing files with the SMART NAVI Menu .....................20
Viewing files without the SMART NAVI Menu ................21
Using the Slide Show...................................................... 22
Playing a VCD or DVD........................................................ 23
Basic Functions ..............................................................23
Programming the Playing Order of Audio or Video CDs. 25
Going to a Particular DVD Chapter.................................25
Repeating Chapters/Tracks ...........................................26
Writing (Burning) Files to a CD ........................................... 26
Writing from a Flash Memory Card.................................26
Disk Spanning................................................................. 28
Writing from the Computer..............................................28
Erasing a CD-RW ...........................................................28
Appendix ................................................................................ 29
Error Codes.........................................................................29
Quick Start Guide................................................................29
RESET CVBS NTSC ......................................................29
SET PAL ......................................................................... 29
Introduction
1
Introduction
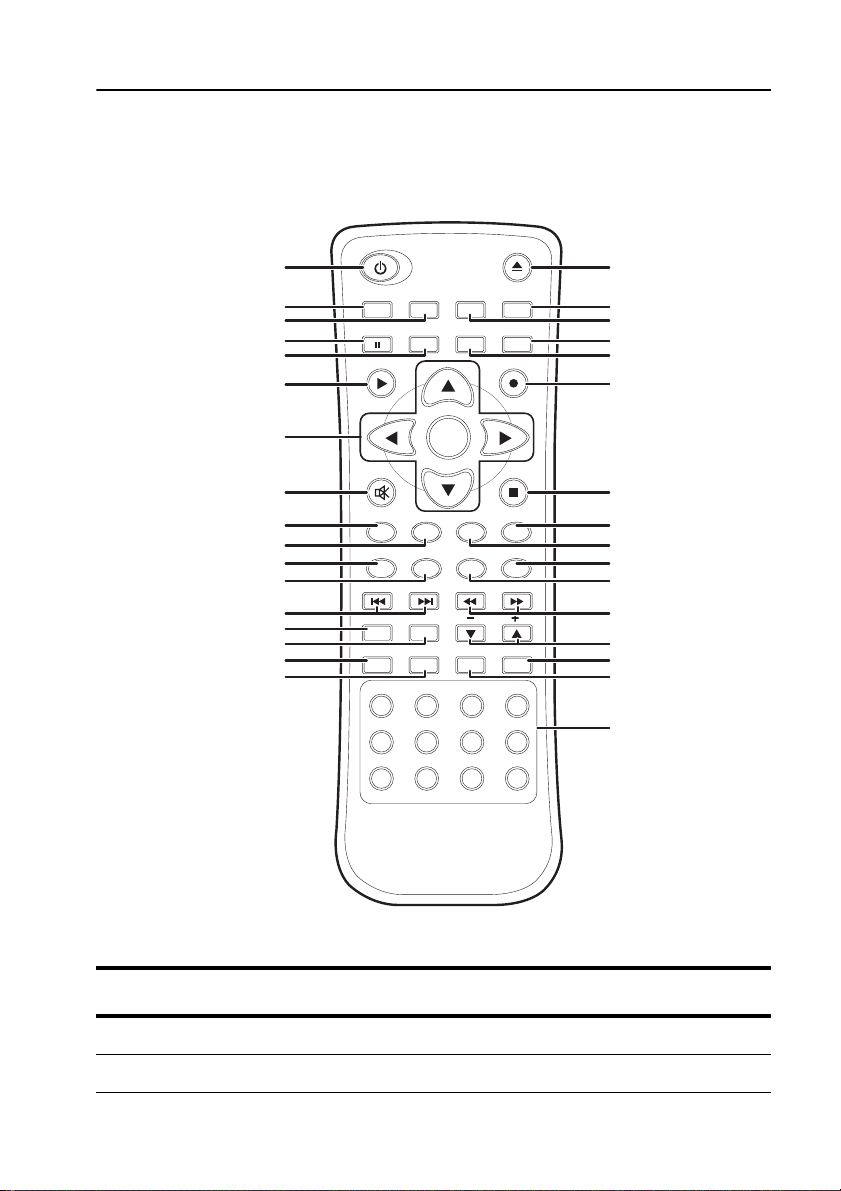
About the Remote Control
Below is a description of the remote control’s buttons:
MODE
PAUSE PBC ZOOM AUDIO
COPY
ENTER
MUTE STOP
STEPSLOW
SUBTITLE
PROGRAM
SHUFFLE
REPEAT
123 4
567 8
9 0 +10 -/--
REP A-B CLEAR MENU
SETUP
RANDOM L/R GOTO
FFFRNEXTPREV
RESUME
PLAY
ANGLE TITLE
OSD
1
2
3
4
5
6
7
8
9
10
11
12
13
14
15
16
17
1
8
1
9
2
0
21
22
2
3
2
4
2
5
2
6
2
7
2
8
2
9
3
0
31
32
3
3
Button Function
1. POWER ON/OFF Turns the PhotoStorage on and off.
2. MODE Switches between the CD and a flash card.

About the Remote Control
2
3. OSD
The On Screen Display (OSD) displays the status bar
at the top of the screen that includes playback and
remaining time for both the title and the chapter of the
current multimedia.
4. PAUSE Pauses playback of movies or music.
5. PBC
If a video CD has “Playback control” (PBC) written on
its disc, it means that particular scenes or information
can be selected for interactive viewing. Press this
button to use this feature.
6. PLAY Starts playback of multimedia files or CDs.
7. MENU CONTROL
BUTTONS
Used for navigating and entering menus.
8. MUTE Disables the sound during playback.
9. SUBTITLE Changes the language of the DVD’s subtitles.
10. RESUME Used only in conjunction with the STEP button (25).
Steps back through a movie one frame at a time.
11. PROGRAM Displays a screen where you can program the
playback of an audio CD.
12. RANDOM Not used.
13. PREV/NEXT Skips to the previous or next chapter of a DVD/VCD
or track in the case of an audio CD, respectively.
14. SHUFFLE Shuffles music tracks for random playback.
15. SETUP Used for setting various options of the PhotoStorage.
16. REPEAT Cycles through repeating of the current chapter/track,
repeating of the whole CD/DVD, and no repeat.
17. REP A-B Marks the start (A) and end (B) points for repeated
playback.
18. EJECT Ejects the disk.
Button Function

Introduction
3
19. TITLE
Displays the DVD’s title screen where you can set
various settings such as language and sound
preferences. Use the MENU CONTROL buttons (7) to
navigate around the screen.
20. ANGLE
Some DVD movies have images shot at different
camera angles. Use this to select which angle you
want to watch it from. This only works if there is an
angle mark on the DVD and you have selected “ON”
for angle mark in the GENERAL SETUP.
21. AUDIO Selects the language for the DVD’s audio output.
22. ZOOM Cycles through three zoom levels: 1.5x, 2x, 3x, and
zoom off.
23. COPY Copyies (burns) files from the Flash Memory Card to
the CD-RW.
24. STOP Stops the playback of movies or music.
25. STEP Steps through a movie one frame at a time. Press
PLAY (6) to resume normal play.
26. SLOW Cycles through 1/2x, 1/4x, and 1/8x of normal
playback speed.
27. GO TO Skips to a desired chapter.
28. L/R Not used.
29. FR/FF Cycles through 2, 4, 6, and 8 times normal playback
speeds for fast reverse and fast forward respectively.
30. VOLUME
CONTROLS
Controls the volume level.
31. MENU Displays a menu for playing a DVD and obtaining the
playback status.
32. CLEAR Deletes numbers for GO TO play, repeated play,
programed play and security codes.
33.
NUMBER
BUTTONS
(0 ~ 9, 10+)
Selects a track or menu/submenu.
Button Function
Cable Connections
4
Getting Started
Cable Connections
The following descriptions show how to make the various connections.
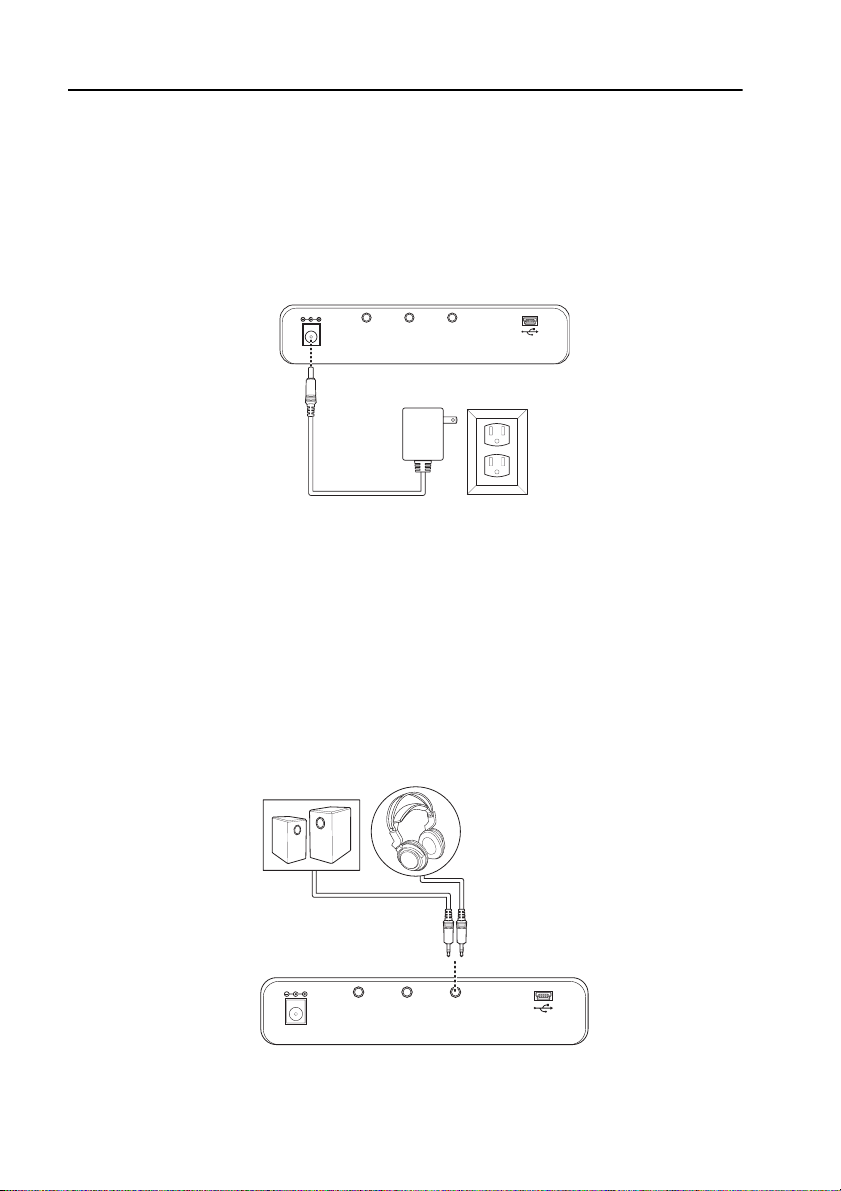
Connecting the Power
Plug the DC power adaptor into a wall socket then connect the DC power adap-
tor to QuattroDrive DC IN 5V socket as shown in the diagram.
Standalone Connection
Without any connections, QuattroDrive can only be used for burning CD-CD-RW
as a way to back up your files from a flash memory card.
Connecting to Headphones or a Stereo System
There are two ways in which you can make a connection for listening to music.
• Connect your headphone cable into the AUDIO socket on the
QuattroDrive.
• Connect the audio cable from the AUDIO socket on the QuattroDrive
to the audio input sockets on your stereo.
AUDIO/OPTICAL
COMPONENT
DC IN 5V
VIDEO/SVIDEO
AUDIO/OPTICAL
COMPONENT
DC IN 9V
VIDEO/SVIDEO
Getting Started
5
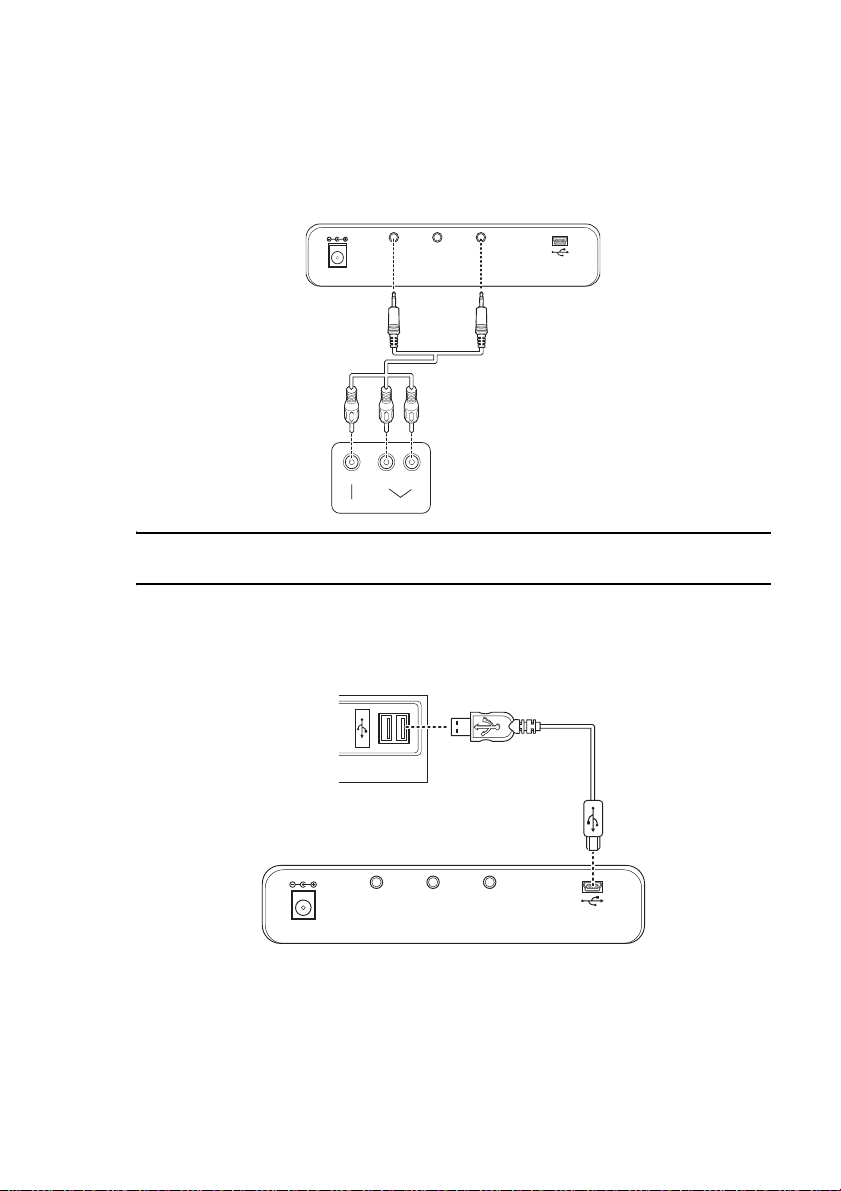
Connecting to a TV or Projector
Follow these steps to connect the QuattroDrive to a television or projector.
1. Connect the audio cable (red and white plugs) from the AUDIO socket to
the audio IN socket of your TV or stereo system.
2. Connect the AV cable (yellow plug) from the QuattroDrive VIDEO socket to
the VIDEO IN socket of the TV or projector.
NOTE: The audio cable leading to the QuattroDrive has two black bands on the
connector; the video cable has only one black band on the connector.
Connecting to a Computer
Follow these steps to connect the QuattroDrive to a computer
1. Connect the USB cable from the QuattroDrive USB port to the USB port on
the back of the computer.
2. A “New hardware found” screen appears. Follow the instructions on the
screen and restart your computer when prompted.
If you have Windows 98, you will need to install the drivers as described in In-
stalling Drivers on page 7.
Once the drivers have been installed, a CD drive icon and up to three removable
hard drive icons will appear in My Computer on the desktop.
AUDIO/OPTICALCOMPONENT
DC IN 9V
VIDEO/SVIDEO
LR
Audio inVideo in
AUDIO/OPTICAL
COMPONENT
DC IN 9V
VIDEO/SVIDEO
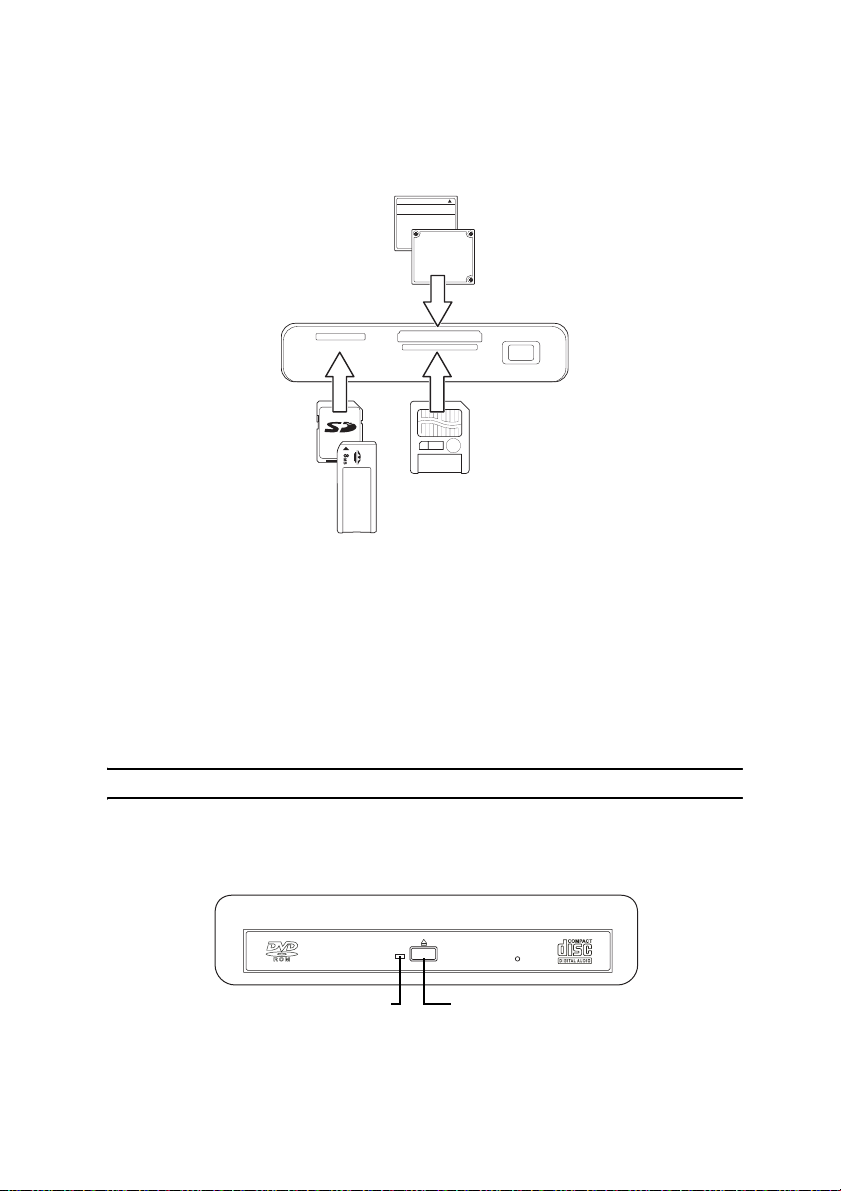
Inserting Flash Memory Cards
6
Inserting F lash Memory Ca rds
QuattroDrive supports a number of different card types. The following instruc-
tions explain how to insert a Flash Memory Card.
1. Position the Flash Memory Card in the direction shown in the diagram.
2. Make sure that the card is being inserted into the correct slot.
• Left slot is for MS, MS Pre, MS Duo, SD and MMC cards
• Middle top slot is for CF and MD cards
• Middle below slot is for SM cards
3. Making sure that the card is oriented correctly – all cards will have a direc-
tion arrow indicated – push the card in until it locks in place. A slight
amount of resistance will be felt as the card is seated. This is normal.
To remove a Flash Memory Card, grasp the end firmly between your thumb and
index finger and pull the card from the slot.
NOTE: Only one Flash Memory Card can be used at any one time.
Inserting and Removing a CD
1. Press the eject button at the front of the QuattroDrive.
2. Insert or remove a CD/DVD from the QuattroDrive and close the drive.
SD/MMC/MS SM
OP/MD
16MBID
CompactFlash
64 MB
1GB
MicrodriveTM
Eject Button
CD-R/W LED
Indice


