
Romer Optics EZ PUSH-TO Manuale utente

1
EZ PUSH TO MANUAL
www.romer-optics.com
EZ PUSH-TO MANUAL
romer-optics.com
2
Living Apart,
Sharing the Sky

3
CONTENTS
1. EZ PUSH TO Introduction and Specification 4
2. Hardware and Software Installation 6
Parts Lists 6
Drilling Layout 7
Hardware Installation 8
3. Layout of AZ / ALT Encoder Module 13
4. Q / A and Troubleshooting 14

4
1. EZ PUSH TO Introduction
EZ PUSH TO is the first product to integrate smart phone
app and built in high accuracy encoders in the Dobsonian.
Through wireless connection, you could browse entire deep
sky leisurely, or even search the faint comet when it visits
us at early stage.
The electronics installed on the Dobsonian is exposed
outdoors to enhance the wireless data transferring. All the
parts is designed to against humidity, and there is an
automatic fuse to protect the power supply. The
construction is made of durable metal and removable for
convenient storage. It looks very simple, but is precisely
manufactured and inspected one by one manually.
The installation is very straightforward, just put on the
azimuth and altitude encoder modules on the Dobsonian
base in a minute. Connect BT with phone, waiting the GPS
location and time. Then put your phone on the base
bottom, and turn around to adjust the level. The app
would collect the earth magnetic flux data and gravity
information in every direction. In seconds, the system is
initialized.
When pushing the telescope toward the target, both
azimuth and altitude encoder magnets rotate and are
sensed. Only when the magnets rotate circularly, the
encoders could achieve best accuracy. Therefore, lots of
customized parts in EZ PUSH TO kit are designed to
improve the base construction stability and telescope
pointing accuracy.
This is EZ push to, and certainly designed only for naked eye
observing. Don’t ask me why it is not kind of encyclopedia.
We did not build the star map for research or let you to
enjoy all the colorful pictures when you zoom in the map.
In contrast, the star map is designed to assist you watching
and searching the real sky. The map is concise, but
completed with Messier/NGC /Herschel catalogue, double
and binary stars, comets and small bodies, and magnitude
9.5 stars (110,000 stars). EZ PUSH TO features lots amazing
interfaces, such as roaming in the deep sky. EZ PUSH TO
absolutely bring you to reach the real deep sky at your
backyard, or in your family camping.

5
Specification
1. Azimuth and Altitude Encoders Resolution: 0.1°(The resolution is 0.08°,
but displayed as 0.1°)
2. System Accuracy: ~ 0.5°(single star alignment), < 0.2°(multi-stars
alignment)
3. Mobile Phone System: Android 4.4 and 720P display or above
4. Compatible Brand / Telescope: GSO / Dobsonian Telescope
5. Solar System / more than 1000 small bodies / 110 Messier & 7840 NGC
/ Herschel 400 Catalogue / more than 110,000 Stars(magnitude 9.5)/
More than 100 Double & Binary Stars etc. (Updated from Internet)
6. Connection: Dual Module Bluetooth 2.0/4.0
7. Power: DC 5V ~15V Automatically, Standard DC (DC-USB cable included)
8. GPS Location: Supported by Phone App
9. Level Meter: Supported by Phone App, Custom Designed Algorithm to
Ensure the Level Bias Less Than 0.2°

6
2. Hardware Installation
Parts Listing
1. Main Column
2. Main Column Cover
3. Bearing for Main Column
4. Bearing Cover
5. Screw Nut of Main Column
6. Azimuth Encoder Magnet
7. Magnetic Pads for Modules
8. Washers for Encoder Magnet
9. Screws
10. Thin Rubber Pad(Single Glue)
11. Thick Rubber Pad(Double Glue)
12. Data wire
13. Power DC- USB Cable
14. Altitude Side Cover
Notice: 3(Bearing for Main Column) & 4(Bearing
Cover) are not included in EZ PUSH TO kit. They
belong to original parts of your Donsonian.
Azimuth Module (Left)
Altitude Module (Right)

7
Left: Azimuth and Altitude Encoders (Encoder Magnet Alignment Plate Included)
Right: Main board with MCU and Bluetooth
In order to install encoder modules on the Dob, you need to drill holes before screwing
the parts. The drilling locations are shown on the under picture.

8
Hardware Installation
1 Turn over to the bottom of Dobsonian
base to install the Main Column (part #1).
2 Fix the Main Column with 3 small
screws (part #件9) with proper torque.
3 Turn back to the upper side of
Dobsonian base
4 Install the Main Column Cover (part #2)
into the central hole. Make sure the cover
is installed tightly and matched.

9
5 Put on the Bearing(part #3), then put on Bearing Cover (part #4)
6Tighten the bearing Gently with Main
Column Nut(part #5)
7 Screw the Magnetic pads for azimuth module (part #7 & 9). After finishing, stick the
thick rubber pads (part #11). Do not remove the upper tape at this moment.
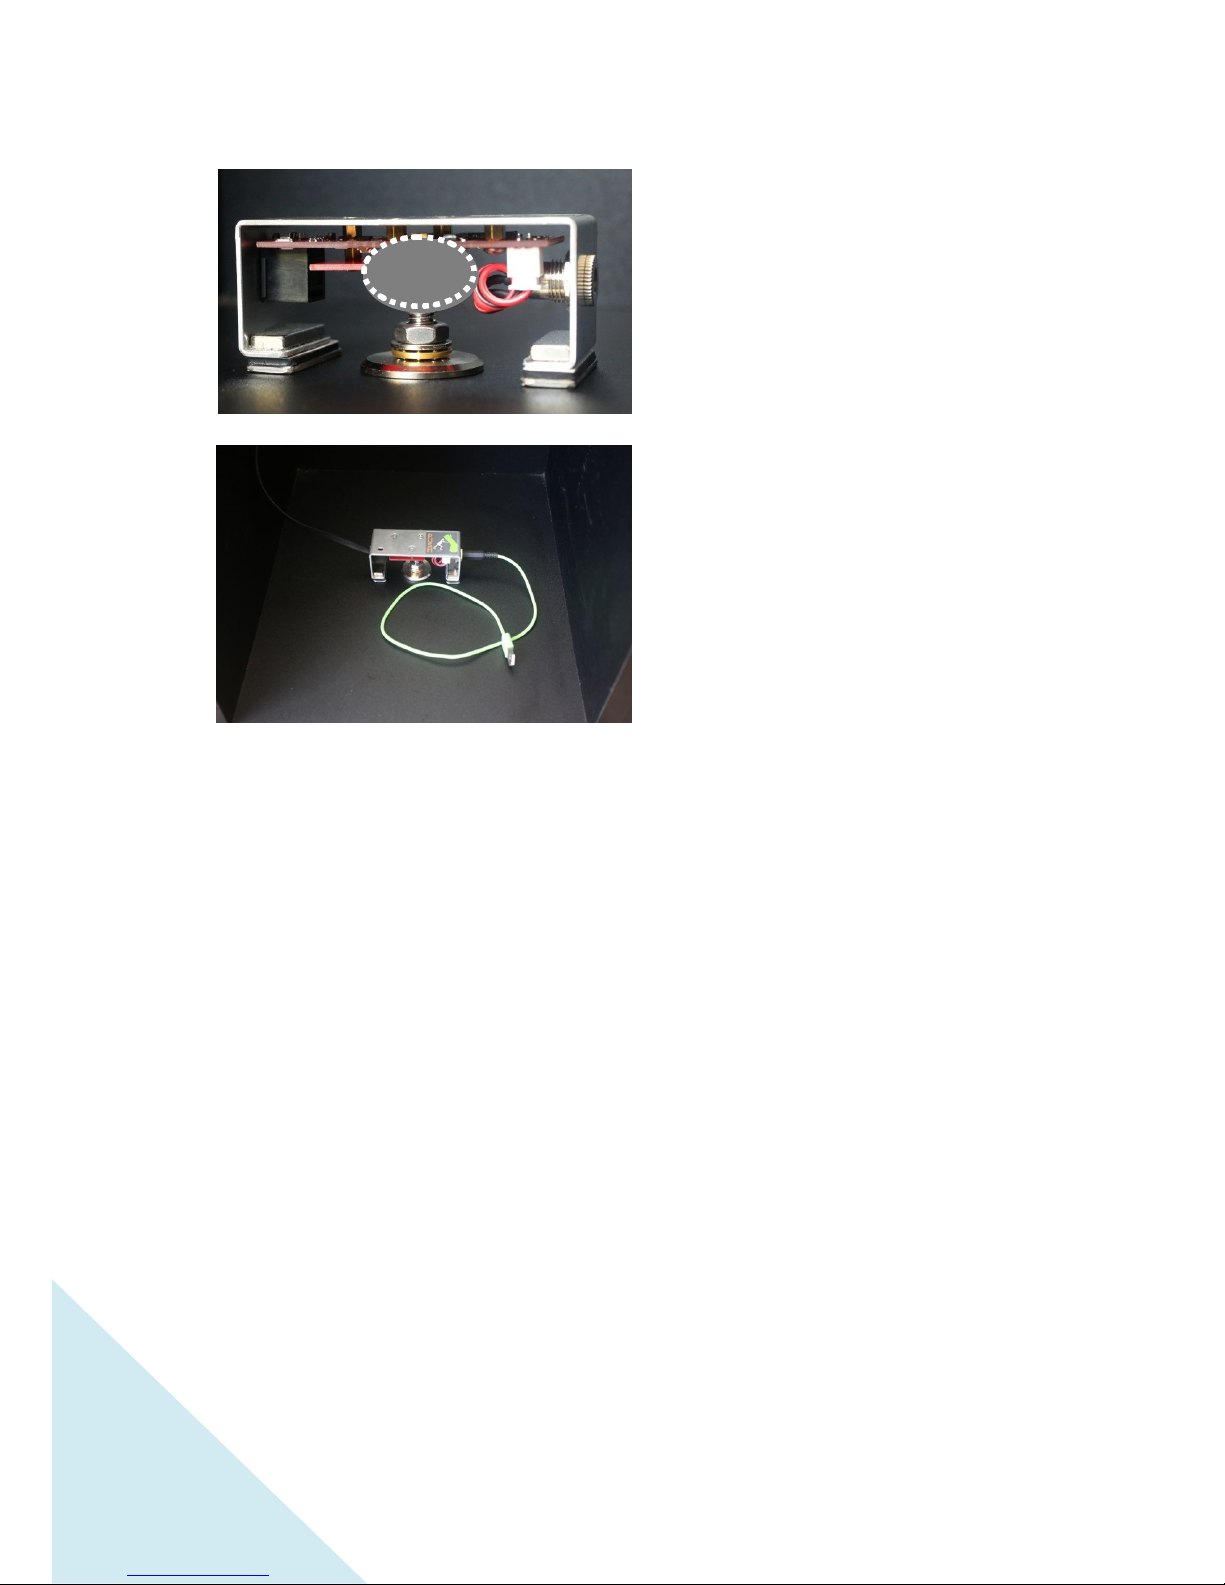
8Install the azimuth encode magnet (part #6). Insert several washers (part #8) to
make the magnet inside the zone where the azimuth encoder could sense.
Tip: The quantity of the encoder washers should be adjusted as following guidance.
10
Make sure the head of Encoder Magnet
little passing through the Encoder
Alignment Plate. If not, put more or take
away the magnet washers to adjust its
height.
9 After confirmation, remove the upper
tape on the thick rubber pad. Then, stick
the whole azimuth module to complete the
azimuth installation. The power plug is on
the right side, and the data plug is on the left
side.


