RTMOTION MK3.x Series Manuale utente

RTMOTION MK3.x
Lens Control System
User Guide
REVISION: 2014-04-22 (#18)
rtmotion.com/knowledge

M K 3 . x e n s C o n t r o l S y s t e m
1 MK3.x ens Control System
Table of Contents
1. MK3.x ens Control System.........................................................................2
2. Quick Start Guide .........................................................................................3
Initial Setup............................................................................................................................ 3
Camera Run/Stop................................................................................................................. 3
3. System Overview..........................................................................................4
T eory of Operation............................................................................................................ 4
Usage C art........................................................................................................................... 6
4. Components..................................................................................................7
MK3.x Controller .................................................................................................................. 8
MK3.x Receiver................................................................................................................... 13
MK3.x Motor........................................................................................................................ 15
Slave Controller – T umbw eel...................................................................................17
5. AUX Port (MK3.1 Receiver only)................................................................18
6. Updating Firmwares...................................................................................20
7. Menu Tree....................................................................................................26
8. Technical Reference....................................................................................30
Compatibility Guidance.................................................................................................. 30
Pin-Outs................................................................................................................................ 30
Sizes & Weig ts................................................................................................................... 34
9. Quick Troubleshooting..............................................................................36
10. Usage and Care.........................................................................................38
Usage & Environment...................................................................................................... 38
Accidental Damage.......................................................................................................... 38
11. Warranty and Servicing...........................................................................39
12/24 Mont WARRANTY................................................................................................ 39
Info & Troubles ooting.................................................................................................... 40
2

Q u i c k S t a r t G u i d e
2 Quick Start Guide
Initial Setup
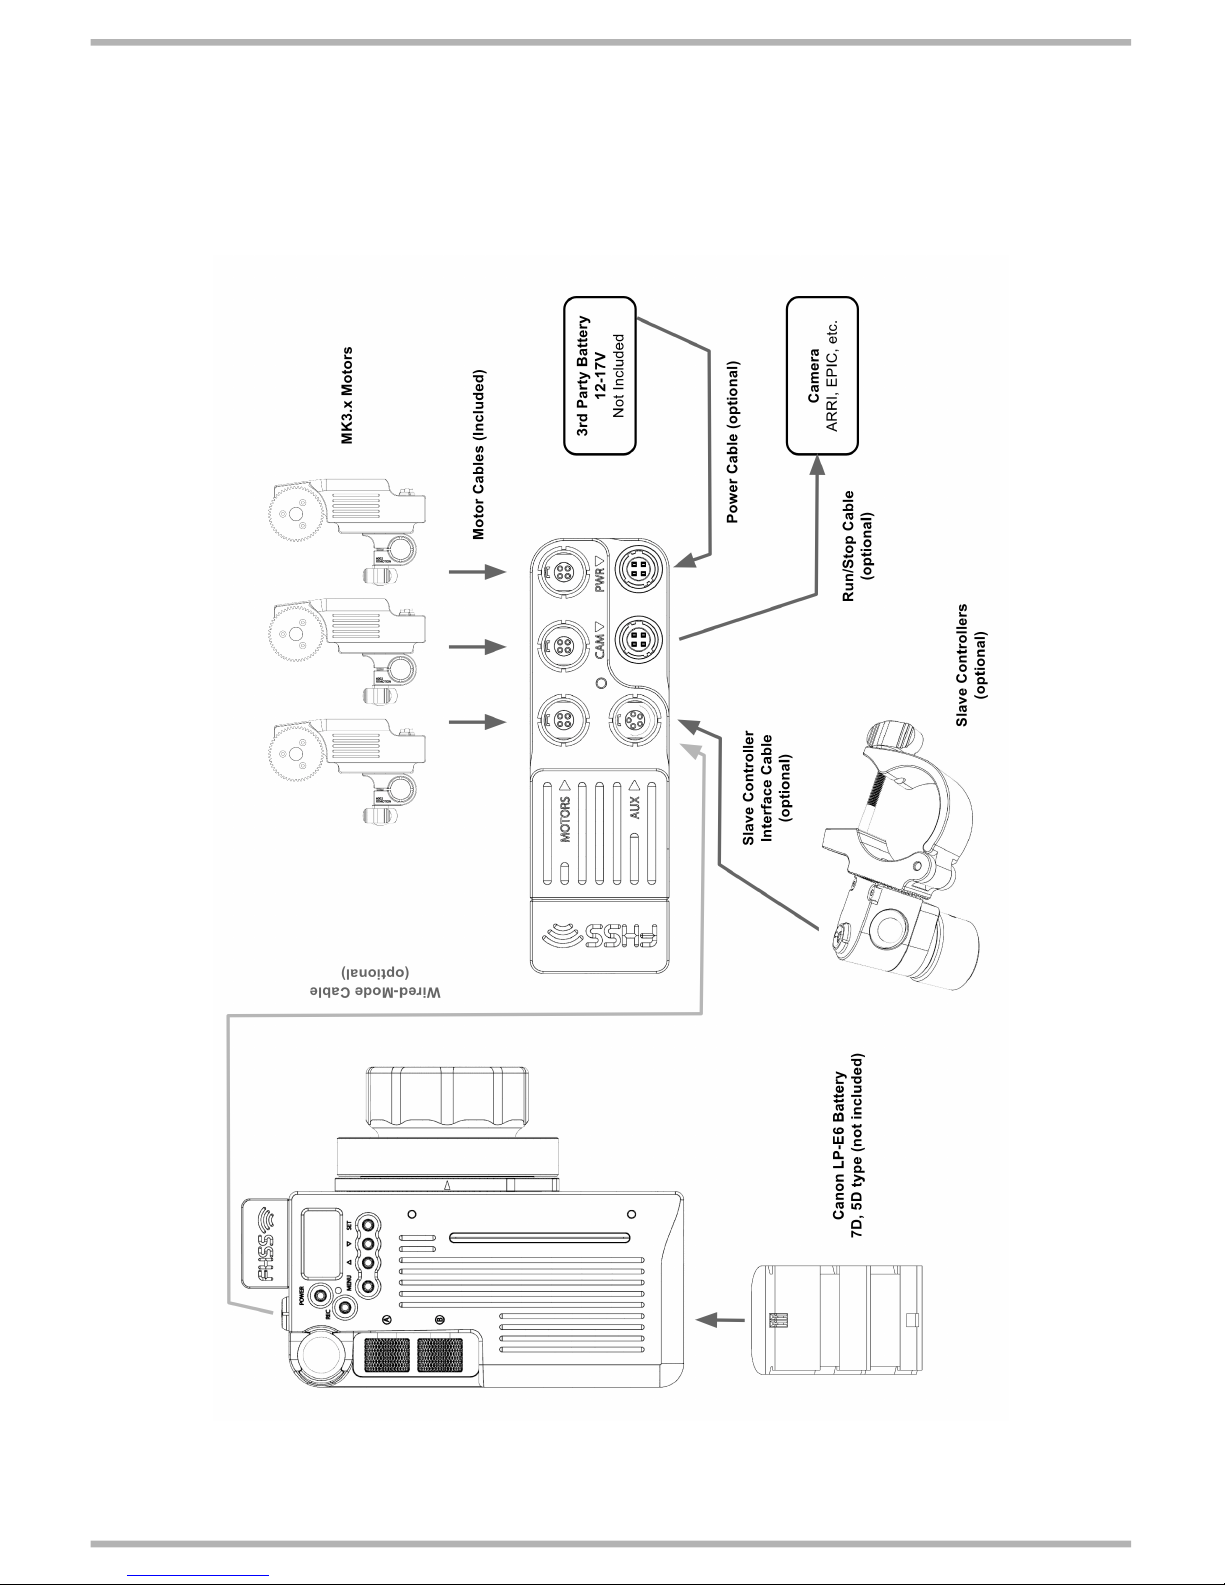
1 Plug 12-17V into the RECEIVER's “PWR” port.
The ideal source is a ~14.8V battery, such as 4S ithium cells.
If the voltage is over ~17.5V or polarity is reversed, the Receiver will block the
dangerous voltage and not start.
2 Affix one or more MOTORS to the rods/ lens.
Each motor is factory-set to a certain class (Focus, Iris, Zoom) and labelled
accordingly. You can re-assign motor classes via the menu.
3 Plug the motors into the RECEIVER unit.
The motor port that the motors attach to isn't important. The motors will begin
calibrating.
4 Put a Canon P-E6 battery in the Hand Unit and hold down
the PWR button.
Camera Run/Stop
1 Connect the appropriate Run/Stop cable from the CAM
port on the Receiver to your Camera.
2 Enter the Controller’s MENU, Select CAMERA, then select
which camera you have connected.
3 You can now Run/Stop the camera with the REC button.
3

S y s t e m O v e r v i e w
3 System Overview
Introduction
T e RTMOTION MK3.x Lens Control System is optimised for ig -end Wireless
and Wired remote control of Cinema and Still camera lenses.
T e range is specifically designed to enable a low-cost entry point (single
motor), wit a broad expansion capability.
A large number of accessories are in development to furt er expand on t e
range's capability (gimbal controllers, underwater controllers, etc.), and we
always welcome feedback on ow we can better serve your needs.
Theory of Operation
Smart Motors
T e MK3 MOTOR units are intelligent smart motors, wit built-in electronics
w ic andle all seeking and calibration be aviour. W en powered up, t e
motor will find t e lens end-stops and learn t e c aracteristics of t e attac ed
lens. It does all of t is wit out any elp from t e Receiver or Controller.
Eac motor remembers its CLASS (focus, iris, zoom), and its RESPONSE
(normal, fast, slow). You can t erefore plug any motor into any Receiver port.
To re-configure a motor, you need to use t e CONTROLLER menus.
Since t e motors ave t eir own intelligence, t ey need only a small 4-pin
lemo cable for operation.
4

S y s t e m O v e r v i e w
Receiver Unit
Offloading some electronics into t e smart motors as enabled us to
dramatically s rink t e Receiver in size. It andles only NETWORKING and
CAMERA INTERFACE operations. T is as enabled a system wit low cost,
ig flexibility and very small size.
Controller (Hand Unit)
T e Controller is t e main brain of t e unit. Via its OLED screen it also andles
t e remote-configuration of t e Receiver and Motor.
Wireless
RF3 Generation
From MK3.1 onwards, devices include our latest RF3-Generation wireless
modules. We strive to stay at t e forefront of performance, and t erefore we
ave jumped at t e opportunity to offer w at we believe is t e longest range,
most interference-immune wireless solution on t e market. FCC and CE
certification is of course retained, and we are now rig t up to t e legal limit.
Accessories
Slave Controllers
Slave Controllers are simple (affordable) devices—suc as joysticks,
t umbw eels, record buttons—w ic rely on external electronics to function.
To use a Slave Controller, you need to attac it to an RTMOTION device wit an
AUX socket. For example, RECEIVER MK3.1.
Smart Controllers
Smart Controllers contain electronics, and t erefore do not require a
Controller or Receiver. You need only POWER and a MOTOR. Our range of
smart controllers are estimated for s ipping in late 2013.
5

S y s t e m O v e r v i e w
Usage Chart
6

C o m p o n e n t s
4 Components
Table of Contents
MK3.x Controller .................................................................................................................. 8
MK3.x Receiver................................................................................................................... 13
MK3.x Motor........................................................................................................................ 15
Slave Controller – T umbw eel...................................................................................17
7

M K 3 . x C o n t r o l l e r
MK3.x Controller
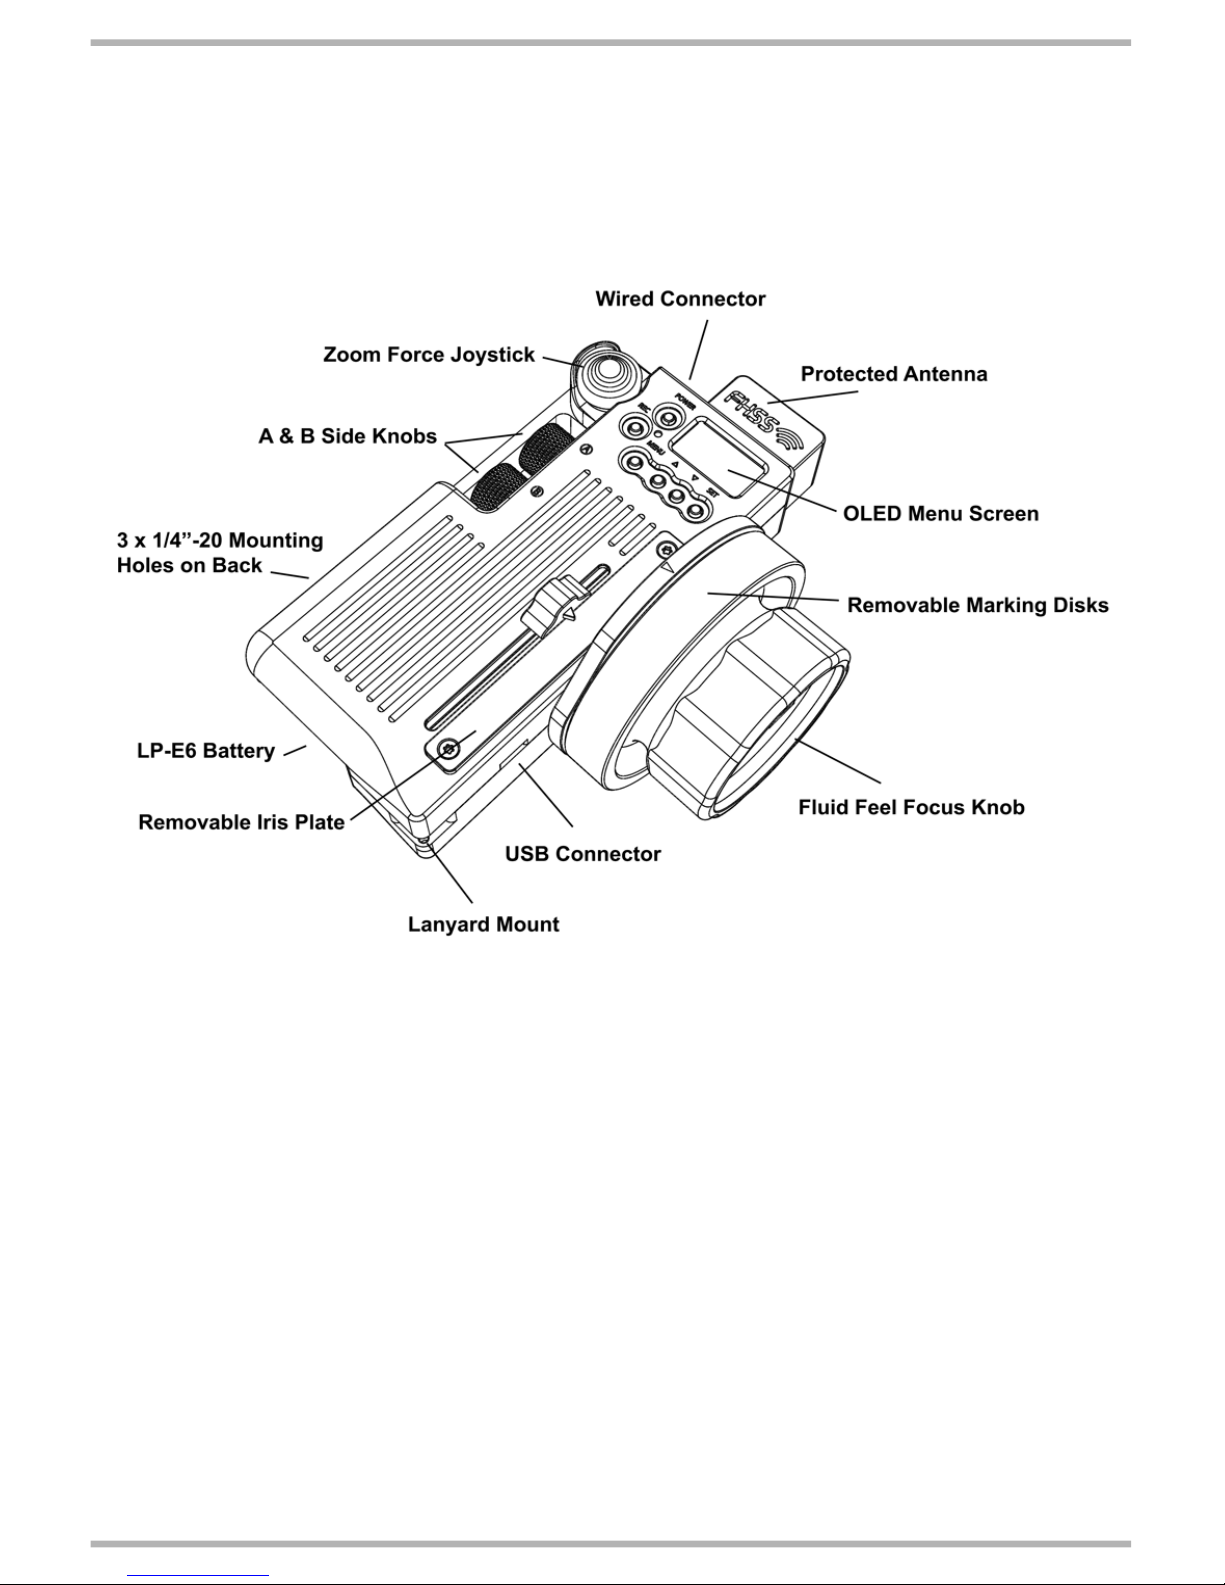
T e MK3.x CONTROLLER gives from 3 to 6 axis control.
Note: Picture shows MK31/Z variant with optional Force Zoom Joystick.
Configurations
Any INPUT (Large knob, Side Knob A, etc.) can be assigned to any ENS AXIS.
For example, an MK3/B “Basic” controller can be configured so t at t e MAIN
KNOB controls Focus, SIDE KNOB A controls Iris, and SIDE KNOB B controls
Convergence.
All variants are capable of simultaneously controlling at least 3 axis, so are
effectively “FIZ” and “3D” capable.
8

M K 3 . x C o n t r o l l e r
T ere are owever significant ergonomic advantages to industry standard
controls, so for fine control it is recommended t at t e Force Joystick is used
for Zoom, and t e Slider is used for IRIS.
MK3.1 Variants
MK3.1 versions have RF3 wireless modules. See section page 30.
1 MK3.1/S, “Stereo”. 4 AXIS CONTRO
Large Focus Knob, Slider, 2x Side Knobs (A and B).
2 MK3.1/Z, “FIZ”. 6 AXIS CONTRO
Large Focus Knob, Slider, Force Joystick (X/Y), 2x Side Knobs (A and B).
MK3.0 Variants
MK3.0 versions have RF2 wireless modules. See section page 30.
1 MK3/B, “Basic”. 3 Axis Control
Large Focus Knob, 2x Side Knobs (A and B).
2 MK3/S, “Stereo”. 4 AXIS CONTRO
Large Focus Knob, Slider, 2x Side Knobs (A and B).
3 MK3/Z, “FIZ”. 6 AXIS CONTRO
Large Focus Knob, Slider, Force Joystick (X/Y), 2x Side Knobs (A and B).
9

M K 3 . x C o n t r o l l e r
Operation
1 Power On
Hold down t e POWER button for 2 seconds to turn t e unit ON / OFF.
2 Camera Run/ Stop
Press t e REC button to start recording. Press REC again to stop recording.
Note: you must use the correct Run/Stop cable for your camera and select the correct
option in MENU / CAMERA.
3 Status ED
OFF – Unit is OFF ORANGE – No Connection GREEN – Unit is Connected
B UE – Wired Mode RED – Camera Running PURP E – Please Wait
4 PC Mode / Bootloader
Turn off t e Controller. Hold down t e SET button. Keep SET eld, and also
old down t e POWER button. T e Status LED will go Orange, and t e screen
display: “PC MODE”. You can now connect t e controller to a PC and it will
s ow as a USB device.
5 Battery / Power
T e Controller takes a CANON TYPE LP-E6 BATTERY, as used in t e Canon 5D,
7D, etc.
It can also run from t e MICRO USB connector (5V). Please note, minimum is
approx 4.65V- some laptops, etc. don't provide quite enoug voltage.
6 Factory Reset
Enter t e MENU / ADVANCED / FAC RESET.
S ort-cut: You can also old POWER and press MENU.
10
Altri manuali RTMOTION Controllori