Saga SAGA-420I Manuale utente

SAGA-420I SAGA-720I/IP SAGA-1350I/IP
SAGA-420II/IIP SAGA-720II/IIP SAGA-1350II/IIP
SAGA-1800II/IIP

Specialized in developing,designing and manufacturing kinds of vinyl cutter
Congratulations on purchasing saga cutting plotter
NOTICE:
We reserve the right to modify the information contained in this user
manual at any time without prior notice ;un-authorized modification,copying
distribution is prohibited.All comments,queries or suggestion concerning this
manual please consult us.
Please read this guide carefully.It tell you how to prepare your cutting
plotter for production use in a few easy steps.We do not assume any liability
for direct or indirect damage that occurs due to the use of this product.
Precautions:
Please read these instructions and precautionary notes carefully before using
the machine for the first time .
● Don’t place magnetic objects near the cutting head as even contact pressure
can’t otherwise be guaranteed.
●Don’t unplug the connection to the computer lead line when the plotter is
running ,may cause damage to plotter.
●Please release the pressure contact rollers when not in use by flipping the
pressure levers up.
●Please keep your hands or other parts of the body far form carriage when
using the machine.
●Never open the machine case and don’t attempt to modify the machine.
●Avoid liquid spills and metal objects entering the interior of the cutter.
●Insure the power supply is grounded.
●Ensure the main power supply(220V/110V)doesn’t fluctuate by more than
±10%.In case of main power fluctuation,use a voltage stabilizer.
●Unplug the power lead during long periods of inactivity.
●Keep your hands well away from the blade holder while a carriage job is
running!
●Always cancel the active job before adjusting the blade holder!
●Keep cutting plotter away from children,and never leave the machine or
machine parts unattended when Plugged-in.
●Whenever never touch the tips of drag blade to avoid injury.
●Please set up the machine on a stable base to avoid danger of falling.
●Never run the machine during a thunder storm;lighting could damage or
destroy the machine.
●No matter when you don’t use hand move the carriage, in order to avoid
damage to the machine.
配

Specialized in developing,designing and manufacturing kinds of vinyl cutter
2.What’s in the box
Please check immediately to ensure that you have received the following
articles:
●Cutting plotter
●Cutting plotter stand (dismantled)
●Power Lead
●USB connection Lead
●RS-232connection Lead
●Bladeholder
●Pen holderandpen
●Safety fuse
●3 Drag blade
●CD with software and drivers.
●1Spanner ,1 hex key
业研发,设计,生产制造伺服,步进刻字机
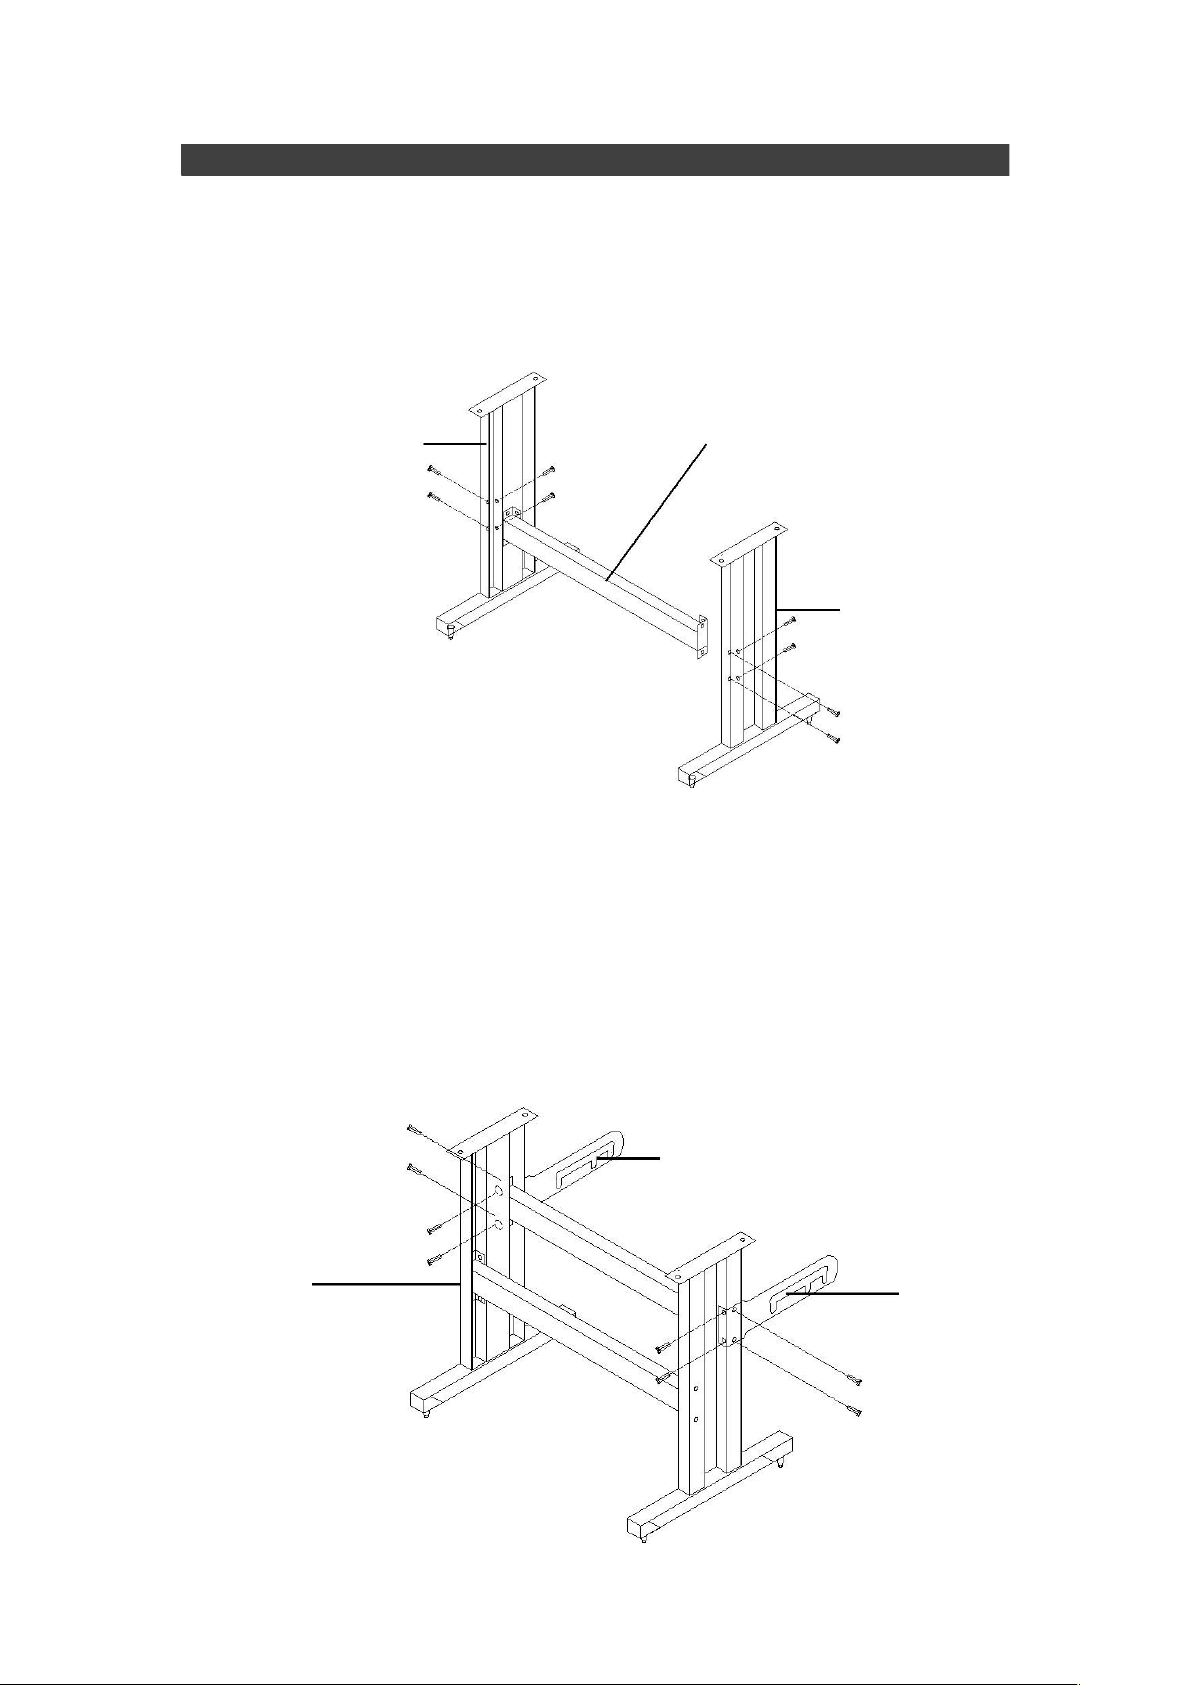
3.Floor Stand Installation
(
720,1350,1800
),
Step1
Position the support for the left side
perpendicularly to bottom standand
place the screw into the holes.Tighten
them to form a left T-stand .Repeat the
same steps with the support for the right
side
Support the left
side
Screw
screw
Bottom stand

Specialized in developing,designing and manufacturing kinds of vinyl cutter
Step2
Place the stand beam upright on the T-stand and put the screws into
the holes,but don’t tighten them at this step.Repeat the same steps
with another stand beam.
T-stand for left side stand beam
T-stand for right
side
专业研发,设计,生产制造伺服,步进刻字机
Step3
Position the roll holder support’s position to floor stand ,and tighten screws.
Roll holder support
Floor stand
Roll holder support

Specialized in developing,designing and manufacturing kinds of vinyl cutter
Step4
Place two roll holders into the holes in the roll holder support.
roll holder support
专业研发,设计,生产制造伺服,步进刻字机
Step5
How to install floor stand to machine.

Specialized in developing,designing and manufacturing kinds of vinyl cutter
Take off the screw from bottom of machine,insert bolt to top of floor stand.
专业研发,设计,生产制造伺服,步进刻字机
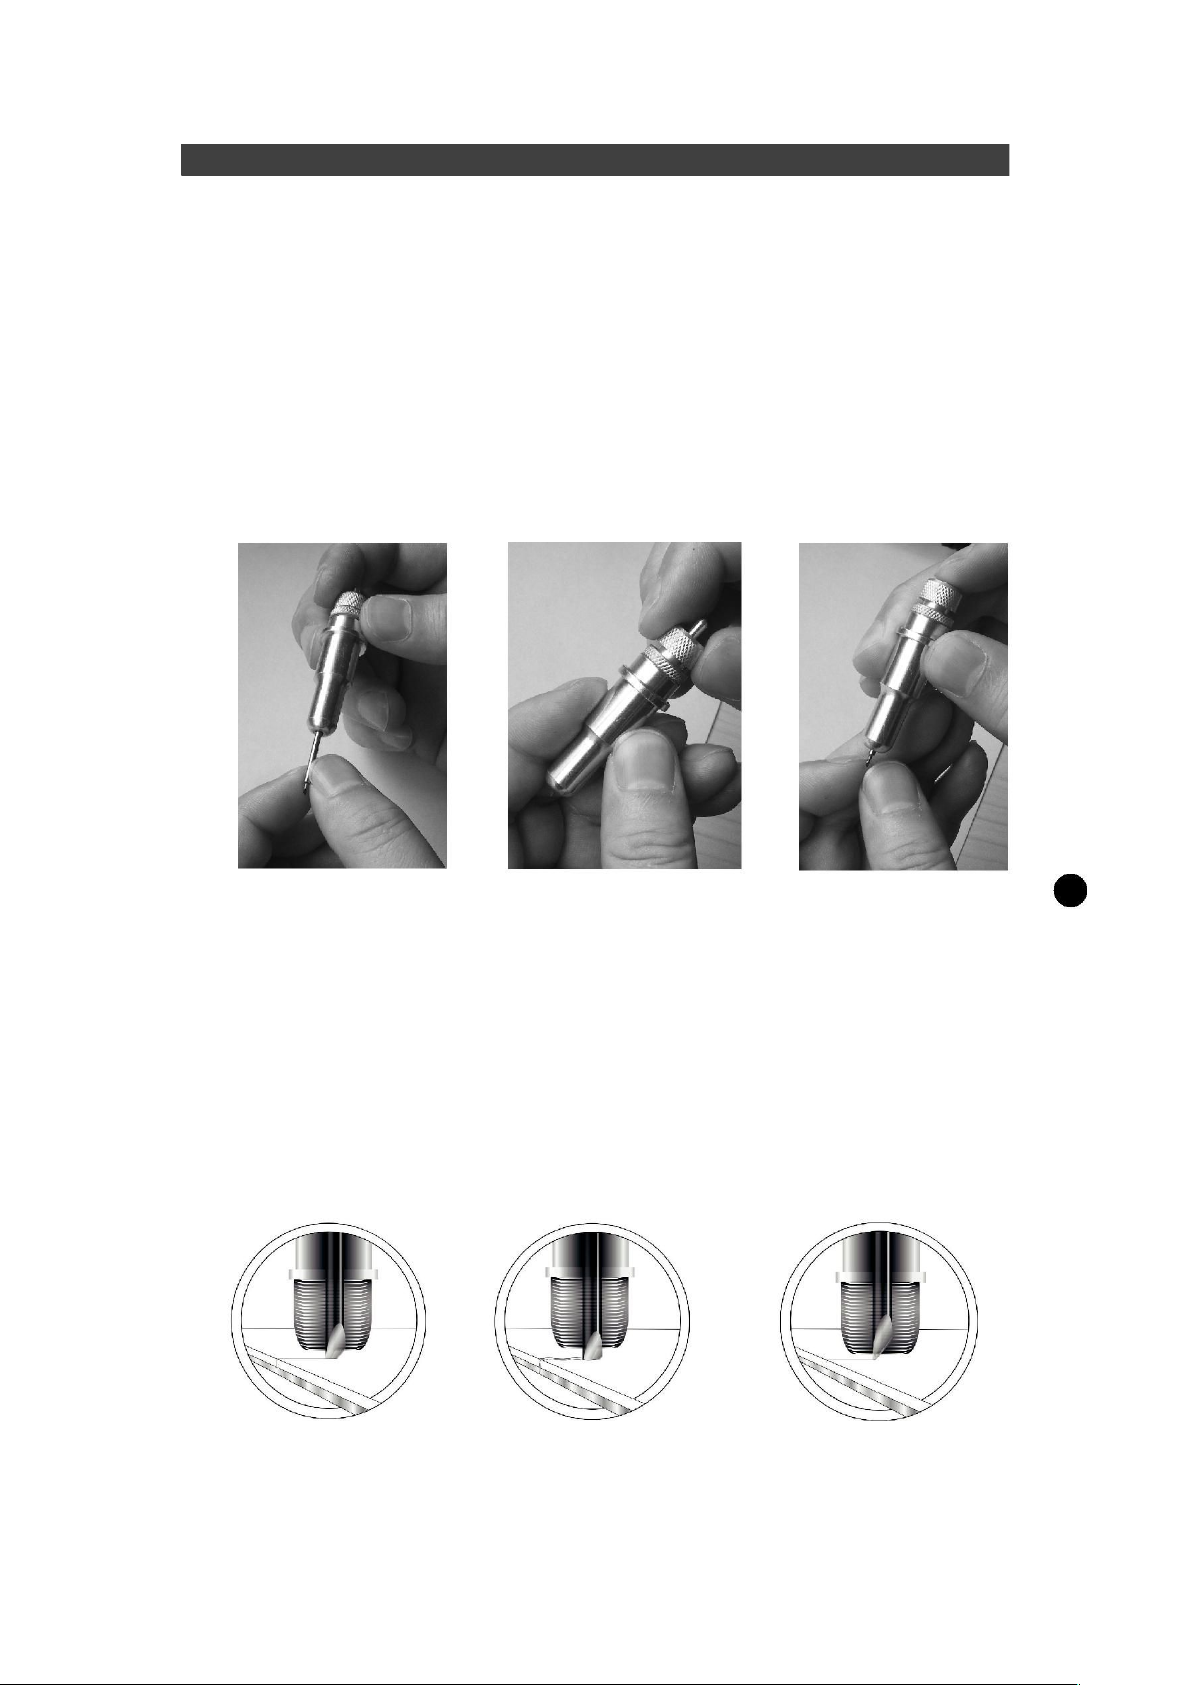
4.Blade installation
Pin
Caution :
Adjustment depth knobs
Don’t touch the tip of the blade with your fingers.
Lock
Notice
The blade is a consumable item,and you’ll always
get the best quality cut with a newer blade.please
Replace with a new blade when:
1.the tip of blade is broken.
2.The cutting traces are not as good as they were.
3.The blade will not cut cleanly even though the
Blade force has been raised significantly.

Specialized in developing,designing and manufacturing kinds of vinyl cutter
Step1/step2/step3
1.Push the blade to the bottom of the blade
holder.
2.Adjust the blade tip to suitable length by
rotating”Adjustment depth knobs”and then
tighten the lock.
3.Press the push-pin to remove the blade form the blade holder when
replacing blade.
step1 step2 step3
专业研发,设计,生产制造伺服,步进刻字
what is the correct blade depth
The correct blade depth ,blade just carve a post-it note surface layer, and
won't carve the post-it note on the back, usually is 0.1 mm,
Correct depth too long too short
Different post-it is difference blade depth,please according to difference post-it
choose difference blade depth.

Specialized in developing,designing and manufacturing kinds of vinyl cutter
Step 4
Will seat in the carriage on the right side of the blade holder, and to fasten on
blade holder.
专业研发,设计,生产制造伺服,步进刻字
1、Cutting plotter appearance
5.1 front
5.2 on the back

Specialized in developing,designing and manufacturing kinds of vinyl cutter
5.3 left-cap 5.4 right-cap
8
Power switch gorge line connector(
RS-232)
Power connector USB connector
专专业研发,设计,生产制造伺服,步进刻字
5.5Panel
5.6Panel function
LCD screen:to display function and error messages.
Reset:to restart
Option:function keys.
Set:to set up function,can change XP/YP,Tool offset ,sensitivity.
Test:to perform cutting tests in different ways.
Laser:On/Off laser.
Speed:to adjust the value of cutting speed and quality up.
Speed:to adjust the value of cutting speed and quality down.
Force:to adjust the value of cutting force up.
Force:to adjust the value of cutting force down.
Enter :to set item or register the immediately preceding input value.

Specialized in developing,designing and manufacturing kinds of vinyl cutter
2.installing and testing
6.1 set cutting plotter
●Please insure that the machine on flat,solid ground ,keep using the
environment clean and dry .
●The machine suitable for 110V/220V voltage,Please be sure to use and the
corresponding voltage matching.
●Turn on the power switch ,the carriage will automatically move to the right
and left and then stop when switched ON.if you need to adjust position of the
carriage,Please according to the panel adjust to position of the carriage,never
use yourhands move carriage
6.2Please as following machine USB leadand com cable (RS-232) ,connector
cutting plotter and computer.
6.2-1 Installing the USB lead ,USB2.0
The lead suitable for Windows7/Windows8 and Windows XP 。
Nonsupport Windoes95/98/Me system.
Please make sure that the machine supporting the use of software.,such as
Dragoncut software,Flexi software,Artcut,signcut etc .
6.2-2 How to installation USB print driver
Notice:Please install the USB print driver then connector the cutting plotter.
●Double-lick the CD in the setup. exe,the computer willautomatically install
the USB driver as a new portCOM1or COM2
●Connect the USB lead to the cutting plotter and the computer USB port .
●Windows willdetect the cutting plotter and install the USB printing driver
automatically,please be patient and give Windows sufficient time to recognition
and install the driver.
●If is a 32 bit system can be installed directly, if it is a 64bit system, please
install as administrator.
●Please check for the driver in Device manager under universal serial .Bus
controllers/USB printing support.If the (USB printer support driver )does not
appear,please re-check the power and of the USB lead connection andensure
the plotter is switchedon.
Questo manuale è adatto per i seguenti modelli
12
Indice