Sakar 44090 Manuale utente

1
44090
MUSICAM
Digital Camera and
MP3 Player
Owner’s Manual
© 2007 Sakar International, Inc. All rights reserved.
Windows and the Windows logo are registered trademarks of
Microsoft Corporation.
All other trademarks are the property of their respective
companies.

2
Table of Contents
Table of Contents.......................................................... 2
Introduction ................................................................... 2
Key Features................................................................. 3
What your camera includes........................................... 3
Computer System Requirements for Windows ............. 3
A Quick Look at Your Camera ...................................... 4
Charging Your Musicam for Use ................................... 5
Starting Your Camera ................................................... 6
Camera Mode ............................................................... 7
Capturing Photos ........................................................ 11
Capturing Video .......................................................... 12
Webcam Mode............................................................ 13
MP3 Mode................................................................... 13
Installing SD Memory Card ......................................... 13
Software Installation.................................................... 16
Everything you need to get the most from your photos20
Download photos to your PC ...................................... 22
Viewing Videos ........................................................... 25
Using your Camera as a Webcam .............................. 25
Music Express Software installation............................ 28
Using “Music Express” software.................................. 35
My Music Player Mode................................................ 41
Maintenance of Your Digital Camera .......................... 43
Sakar Warranty Card .................................................. 43
Appendix A: Technical Specifications ......................... 43
Appendix B: Troubleshooting ..................................... 44
Introduction
Thank you for purchasing the 44090 Digital Camera and MP3
Player. Everything you need to take quality digital photos is
included with your device. Please read this manual carefully
FIRST in order to get the most out of your digital camera.

3
Key Features
•1.3 MegaPixel Digital and Video Camera 320 x 240
•1.1 Inch Color LCD monitor
•SD Memory Card Slot only for MP3 device which accepts SD
and MMC compatible memory cards from 32MB up to 1GB.
•PhoTags Express software for downloading photos and
videos from your Digital Camera, managing and enhancing
your photos, printing, sending photos by e-mails and much
more
•WebCam Express software to use your Digital Camera as a
webcam for live chat or creating videos and taking snapshots
•Music Express software to move your favorite songs from
your computer to your MP3 for you to listen to wherever you
are and whenever you want.
What your camera includes
•Digital Camera and MP3 Player (2 in 1)
•PhoTags Express, WebCam Express, Music Express and
driver installation CD
•USB cable
•User’s Manual
•Earphones
•Necklace
•Warranty card
Computer System Requirements for
Windows
To be able to download photos and videos to your PC you will
need the following minimum configuration:
•Pentium processor or above with Windows 2000 or XP.
•130 MB free disk space, 128 MB RAM,
•Available USB Interface
•CD-ROM Drive
•Recommended screen resolution 1024 X 768 pixels or
higher.
•16-bit color or higher display adaptor.
Caution:
•Formatting will delete all the data on the SD Memory Card.
•Do not remove the SD Memory Card during formatting as this
may damage the card and render it unusable.
•Formatting will delete protected data too.
•SD Memory Cards formatted on a PC or device other than
the camera cannot be used. Be sure to format the card with

4
the camera.
•When you switch off the battery OFF-ON switch all the data
in the built-in memory will be deleted.
•After taken photos, we recommend always downloading your
photos to your computer as soon as possible to prevent
unintentional data loss.
•We strongly suggest not to use mp3 player and camera at
one time, as this will lead to unstable power supply.
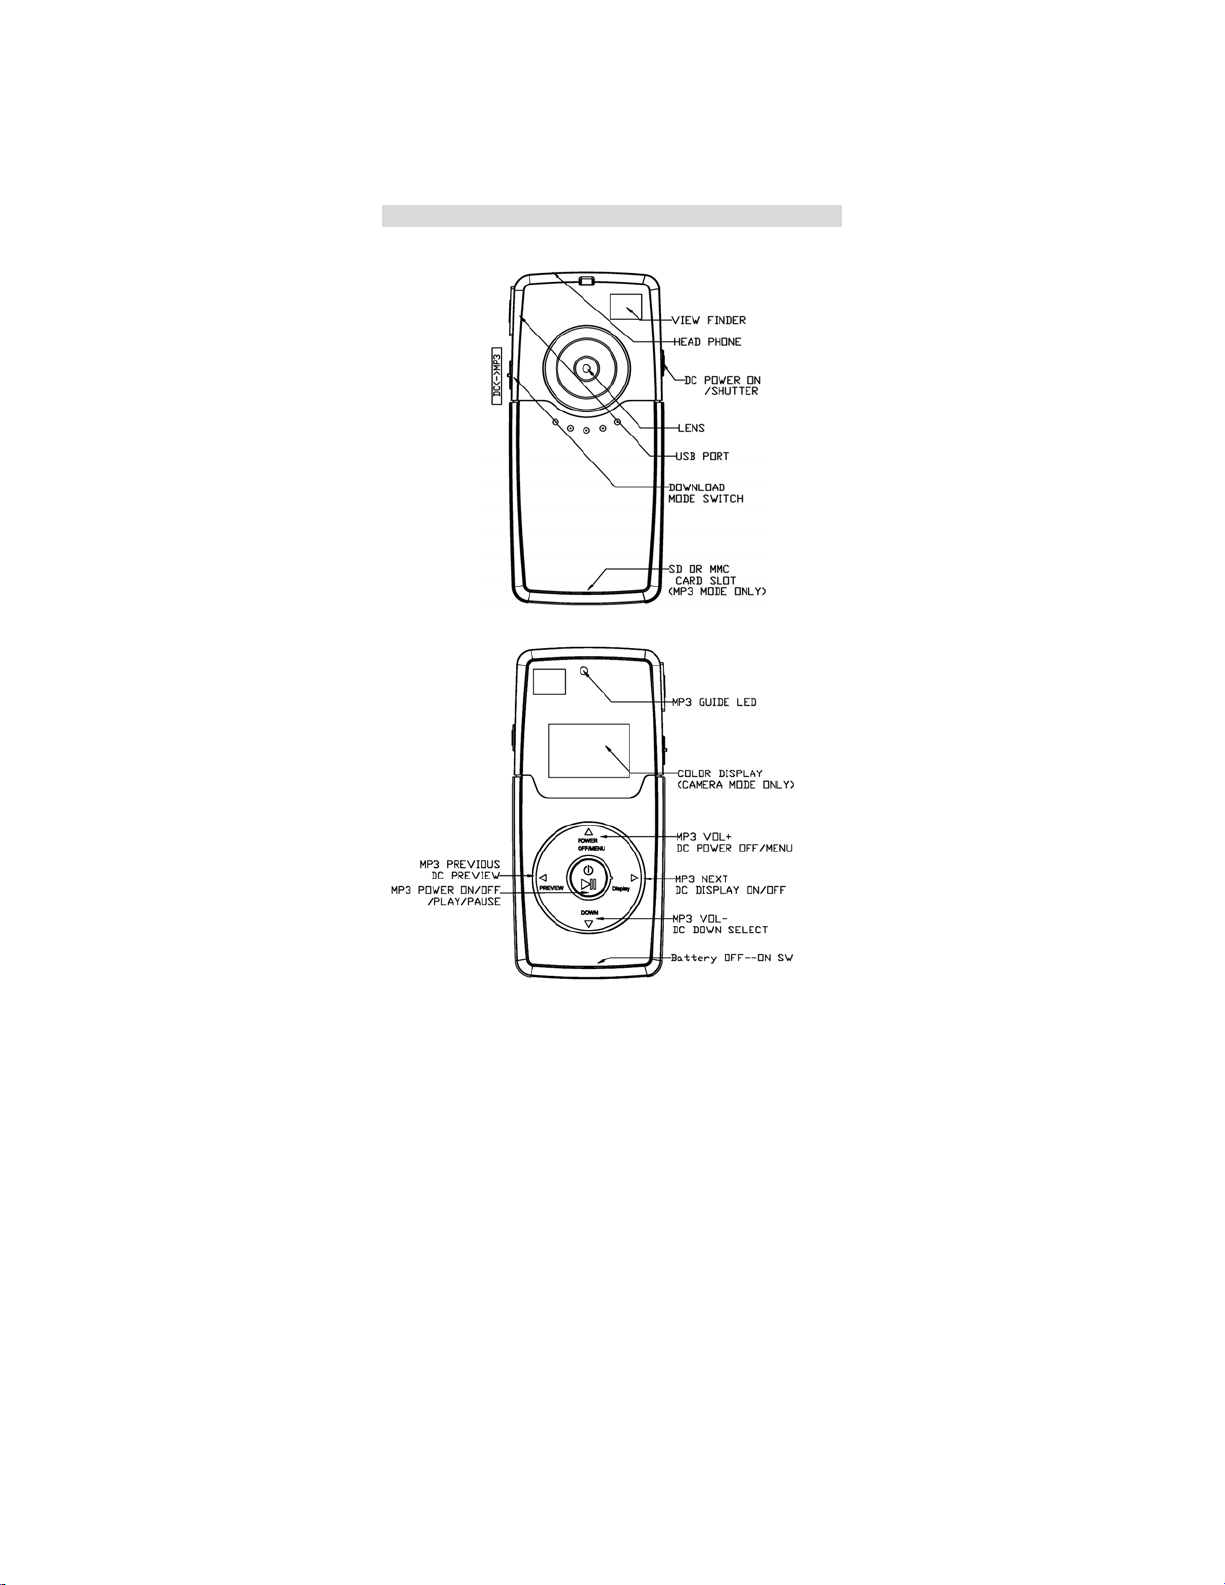
A Quick Look at Your Camera

5
Charging Your Musicam for Use
Built-in Battery
Your camera uses a built-in Lithium battery. When the Battery
On/Off switch is On.
the USB port serves as a charger for the battery. To charge the
battery, simply connect the device via the USB cable to your PC,
the camera screen will light up. In the charging period the screen
will continue to light up. Please note that you can not power off the
screen while the camera is connected to the USB port. Once
unplugged, the camera will power off automatically, simply press the
Power/Shutter button on the left side of the camera to start the
camera.
If the battery power is low, the LED light will flicker (MP3 mode) or
low battery will display on the screen (camera mode) and the
device will power off. Should this occur, download your photos to
your PC as soon as possible, and then charge the device. Charging
time is around 3-4 hours.
WARNING:
•Before starting to take photos, please test the device’s
functioning in order to avoid disappointing results. Should
the device fail to work, please contact us immediately.
•Static Electricity may affect your device by powering it
off. To restart, simply power on again.
•Shifting the Battery On/Off switch to Off will cause any
photos saved in the camera to be deleted from memory.
NOTE: If you do not intend to use your musicam for an extended

6
period, leave the switch in the Off position, this will save the energy
left in the battery.
Battery Capacity Icons:
An icon will appear on the top right corner of your LCD screen,
showing the amount of battery power available.
more than 70%
power
35%-70% power
5%-35% power less than 5%
power
1. the surface of the camera.
Starting Your Camera
1. Shift the Battery On/Off switch to On.
2. Hold the Camera with the LCD screen facing you and
press the Power/Shutter button on the left side of the
camera to start the camera. Press the power Off/ menu
button for more than 3 seconds to turn the camera off.
When the device is on, you can take photos.
When your device is connected to your PC, there are two
modes available.
The switch to move between the 2 modes is found on the right
side of the camera: DC Camera or MP3.
DC Camera mode:
When the mode switch is set to Camera mode (down), you can

7
take photos and videos, download them to your PC, or use the
device as a webcam. All MP3 functions will be disabled in this
mode.
MP3 mode:
When the mode switch is set to MP3 (up), the device enters
Mass Storage (MSDC) mode. All Digital Camera functions
except for taking photos will be disabled, and you can now
download music or other files onto your SD card.
Note: When you pull out the USB cable, the device will power
off.
Reset Function
If your device does not function properly, you can use the
Battery On/Off button at the base of the camera next to the SD
Card slot, to reset it. Simply switch the Battery off and then on
again. Please note that resetting will cause any photos stored in
the device’s memory to be deleted.
Important note: Please download all photos before
resetting your device.
Camera Mode
In order to download the photos and videos captured with
this camera you need to install the PhoTags Express,
WebCam Express and camera specific driver for this
device. The instructions to install this software are
explained further on in this manual.
Now that your device is powered on you can enter the Main
Menu by pressing the Menu button (top arrow on the dial). You
can navigate this menu by pressing the Down button to flip
through the various menu items.
Press the Power/Shutter button on the left side of the camera in
order to select an item and enter the sub-menu for that item.
Pressing the Menu button leads you to this Main Menu screen:
Below is an explanation for each of the Submenus on the Main
Menu.
Camera Submenu

8
Press the Menu button to enter the Main Menu, and press the
Power/Shutter button to select the Camera Submenus. Upon
entering the Camera Submenu, you can choose between the
following options:
Press the Shutter button to toggle through the various options
within this submenu, and the Menu button to select the mode of
your choice. The LCD screen will show your choice with a
symbol in the upper left corner.
Resolution Modification Submenu
Press the Menu button to enter the Main Menu, press the Down
button until the Resolution Modification icon is selected and
then press the Power/Shutter button to select this submenu.
Take Photo
Self-Timer
AVI(Video)
Continuous Capture

9
Press the Power/Shutter button to toggle between the different
resolution options, and press the Menu button again to select
and save the desired resolution. Options within the Resolution
Modification Submenu are as follows:
Note: Clearer photos will be taken at higher resolution, however
low resolution will allow you to take many photos at one time.
Compression Rate Submenu
Press the Menu button to enter the Main Menu, press the Down
button until the Compression Rate icon is selected and then
press the Power/Shutter button to select this submenu. Press
the Power/Shutter button to toggle between the different
compression rate options, and the press the Menu button again
to select and save the desired compression. Options within the
Compression Rate Submenu are as follows:
Frequency (Anti-Flicker) Submenu
Press the Menu button to enter the Main Menu, press the Down
button until the Frequency icon is selected and then press the
Power/Shutter button to select this submenu. Press the
SVGA (1280x1024)
VGA (640x480)
QVGA (320x240)
Non-Compression Mode
Compression Mode

10
Power/Shutter button to toggle between the frequency options,
and the Menu button to select the desired frequency. Options
within the Frequency Submenu are as follows:
Note: 60Hz is suitable for the U.S. and Asia, and 50Hz for
Europe and Japan.
Delete All Submenu
Press the Menu button to enter the Main Menu, press the Down
button until the Delete All icon is selected and then press the
Power/Shutter button to select this submenu. Upon entering this
submenu, you will be shown the following screen, asking if you
wish to Delete All of the photos in the camera. Press the Down
button to move between options, select Yes to Delete All, or No
to Cancel. Press the Power/Shutter button to confirm your
choice.
Delete Individual Photos
When the camera is in the Camera Playback Mode, you can
delete the last photo taken.
50Hz
60Hz
Altri manuali per 44090
1
Indice
Altri manuali Sakar Lettore MP3