
Sandstrom S7DPF10E Manuale utente

Instruction Manual
7” Digital Photo Frame
S7DPF10E

Contents
Unpacking the Photo Frame...............................................................................3
Product Overview................................................................................................4
Preparations.........................................................................................................5
Attaching the Stand ................................................................................................................ 5
Connecting to the Mains Power.......................................................................................... 6
Inserting a Memory Card / USB Flash Drive.................................................................... 7
Main Menu ...........................................................................................................8
Selecting the Memory Drive................................................................................................. 8
Viewing Photos....................................................................................................9
Viewing Thumbnails................................................................................................................ 9
Playing a Slideshow...............................................................................................................10
Changing Frame Settings ................................................................................ 11
Setting Auto Run ....................................................................................................................12
Troubleshooting ............................................................................................... 13
Specications.................................................................................................... 14
Safety Warnings................................................................................................ 15
Settings Basic Operation Preparations Introduction and
Product Overview
Troubleshooting
and Specication
GB-3
Safety Warnings
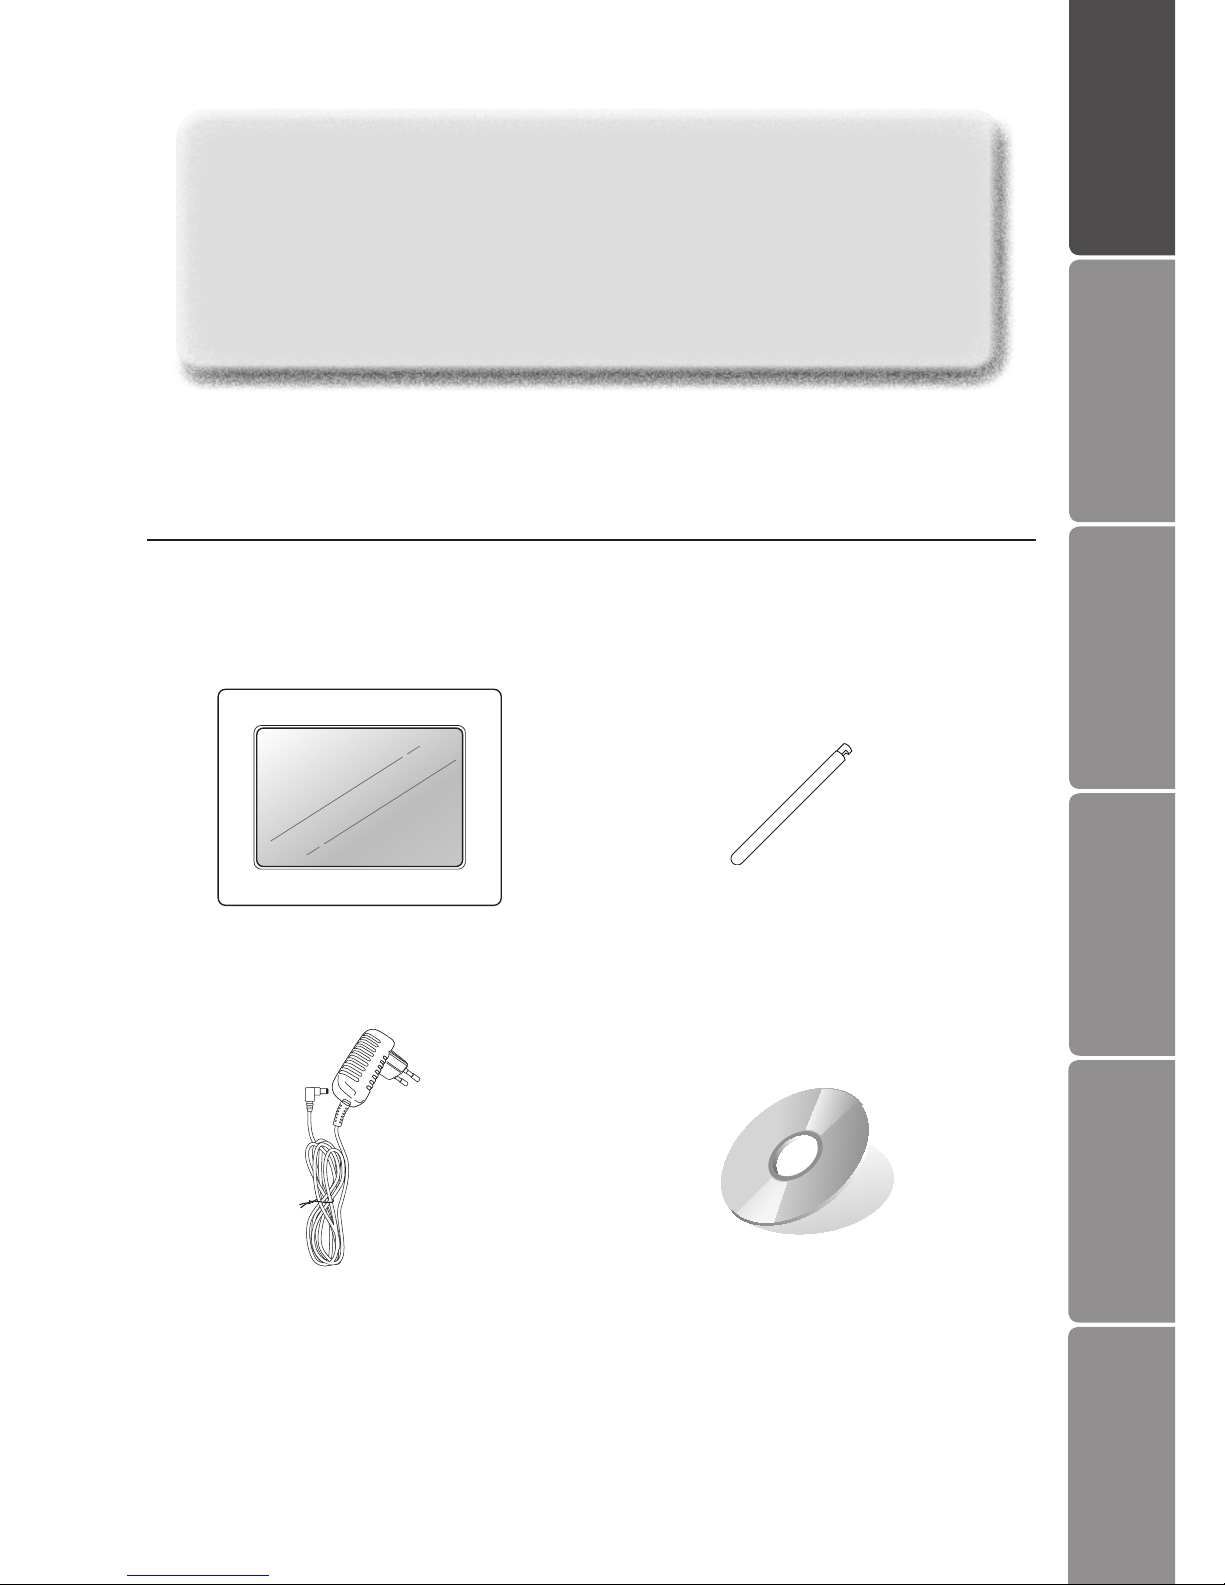
2. Photo Frame Stand
(P.N. : 27-155-06930100)
3. Mains Adapter
(P.N. : 49-501-05100059)
4. Instruction Manual
(P.N. : 54-800-74700109)
1. Digital Photo Frame
Unpacking the Photo Frame
Remove all packaging from the unit. Retain the packaging. If you dispose it please do
so according to local regulations.
If items are missing or damaged, please contact partmaster (UK only).
Tel: 0844 800 3456 for assistance.
Congratulations on the purchase of your new Sandstrøm Digital Photo Frame.
We recommend that you spend some time reading this instruction manual in order
that you fully understand all the operational features it oers. You will also nd
some hints and tips to help you resolve any issues.
Read all the safety instructions carefully before use and keep this instruction
manual for future reference.
Settings
Basic Operation
PreparationsIntroduction and
Product Overview Troubleshooting
and Specication
GB-4
Safety Warnings
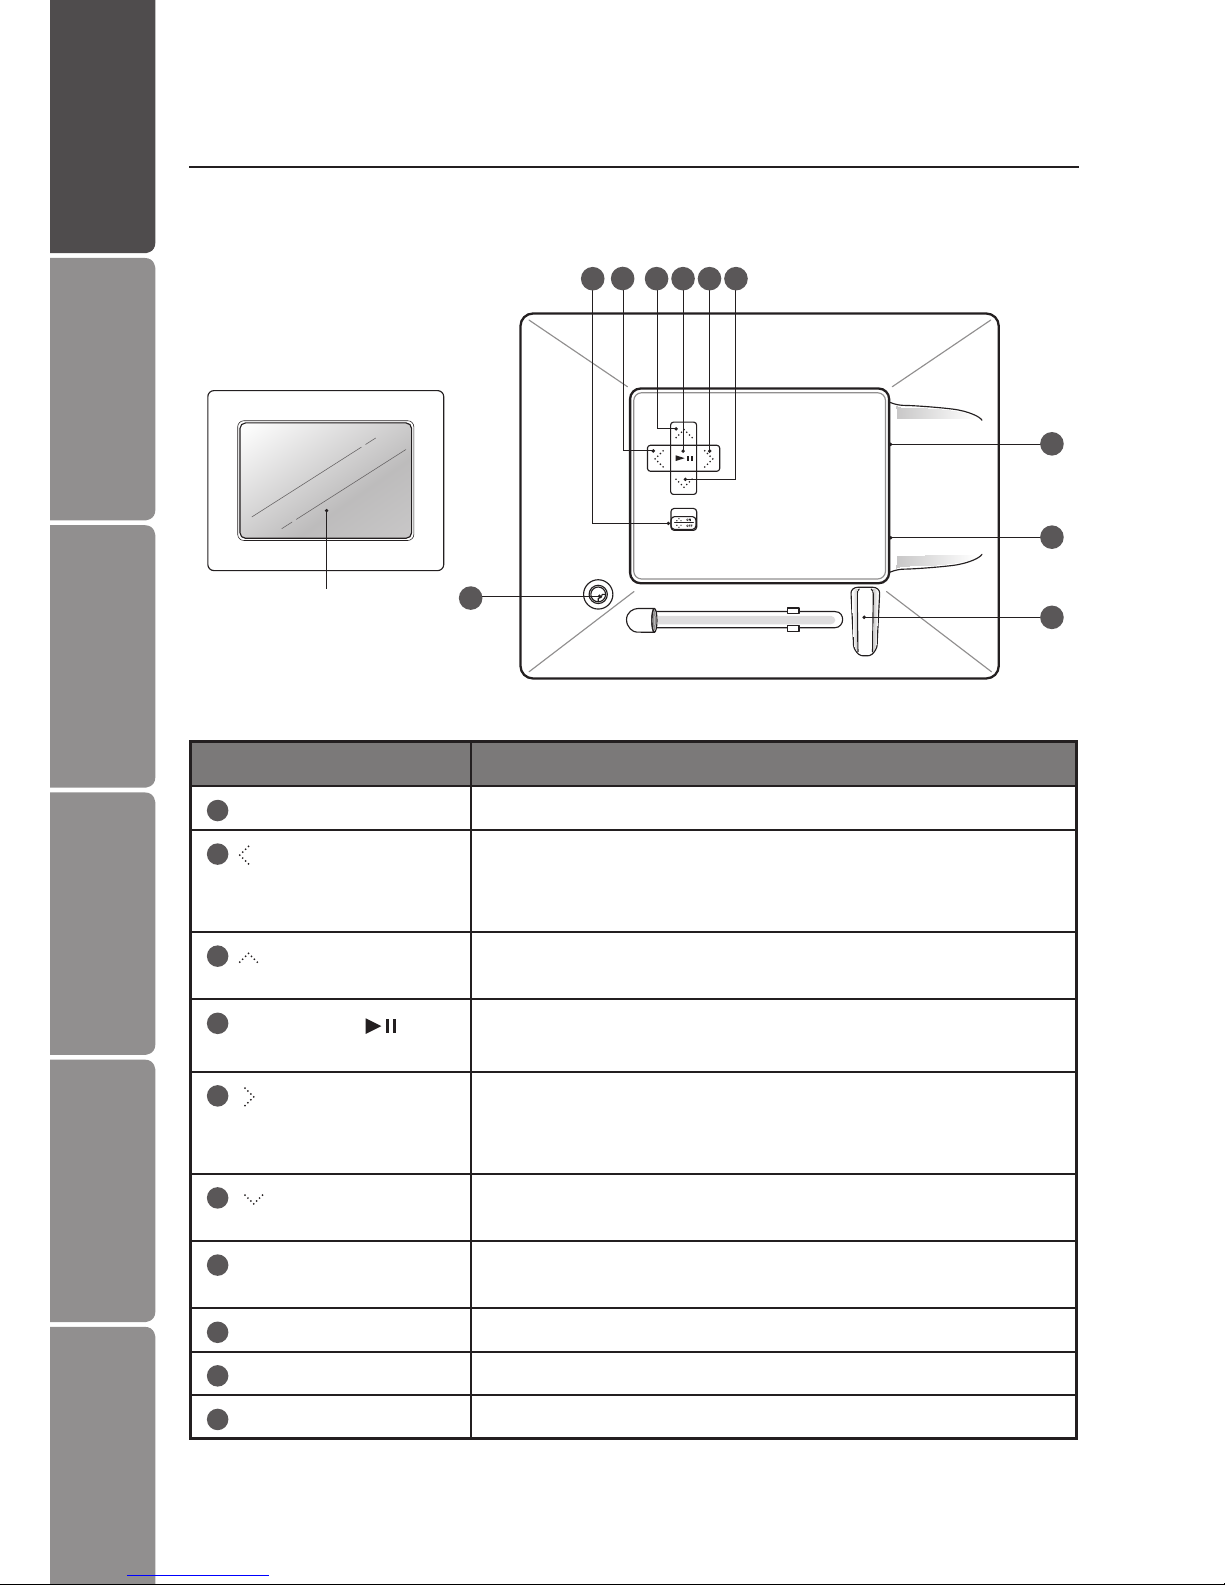
LCD Display
Product Overview
Main Unit
1
7
8
9
10
23
Name Description
1ON / OFF button • To turn the photo frame on and o
2button • Press to move right in the menu / thumbnail mode /
option settings
• To display the next photo
3button • Press to move up in the menu / thumbnail mode /
option settings
4Play / Pause • To start / pause the slideshow
• To conrm a setting or function
5button • Press to move left in the menu / thumbnail mode /
option settings
• To display the previous photo
6button • Press to move down in the menu / thumbnail mode /
option settings
7USB host • To accommodate USB devices such as portable USB
ash drives or ash memory card readers
8SD/MMC/MS slot • To accommodate SD, MMC, MS cards
9DC-IN socket • To connect to the mains
10 Stand receptacle • To attach the supplied stand
4 5 6
GB-5
Settings Basic Operation Preparations Introduction and
Product Overview
Troubleshooting
and Specication
Safety Warnings
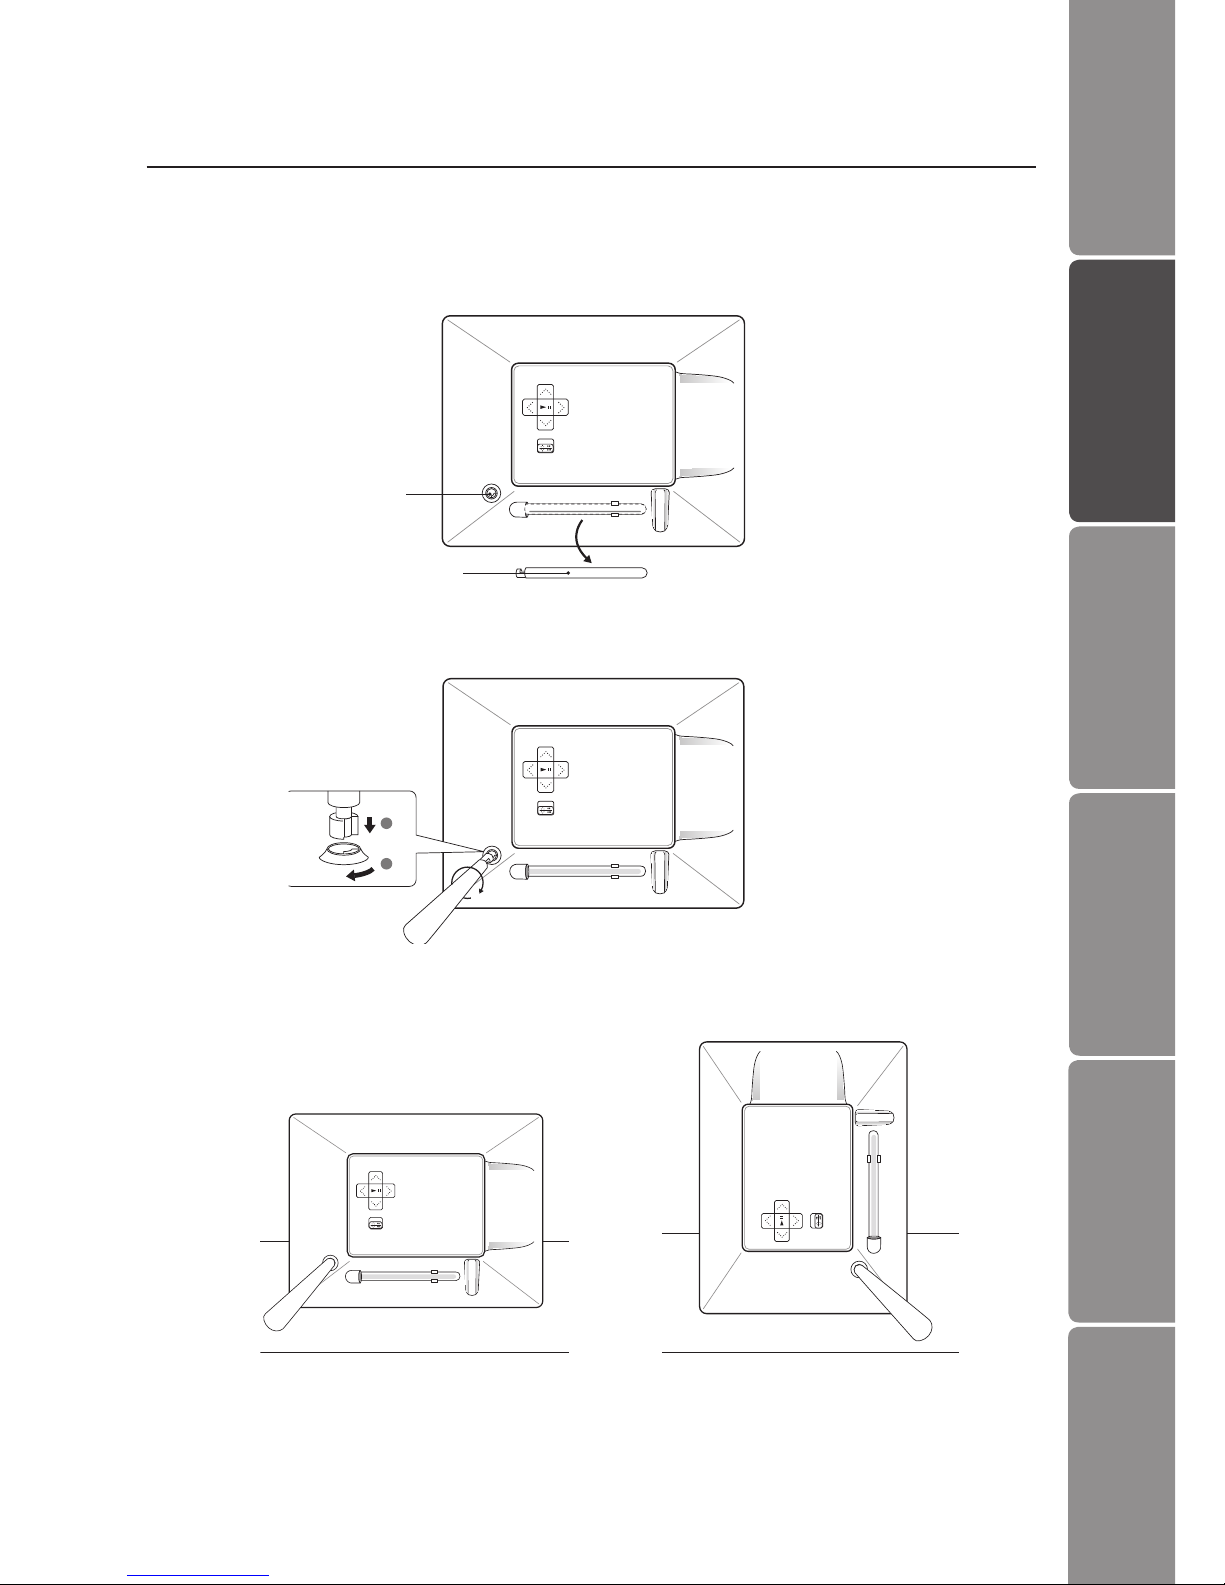
2. Screw in the stand into the stand receptacle.
3. Now the stand is xed, you can choose to display your photo frame in a landscape
or portrait position.
To take o the stand, unscrew it from its receptacle.
Preparations
Attaching the Stand
1. Take out the stand attached at the back of the photo frame.
Stand
Stand Receptacle
Landscape Position Portrait Position
1
2
GB-6
Settings
Basic Operation
PreparationsIntroduction and
Product Overview Troubleshooting
and Specication
Safety Warnings
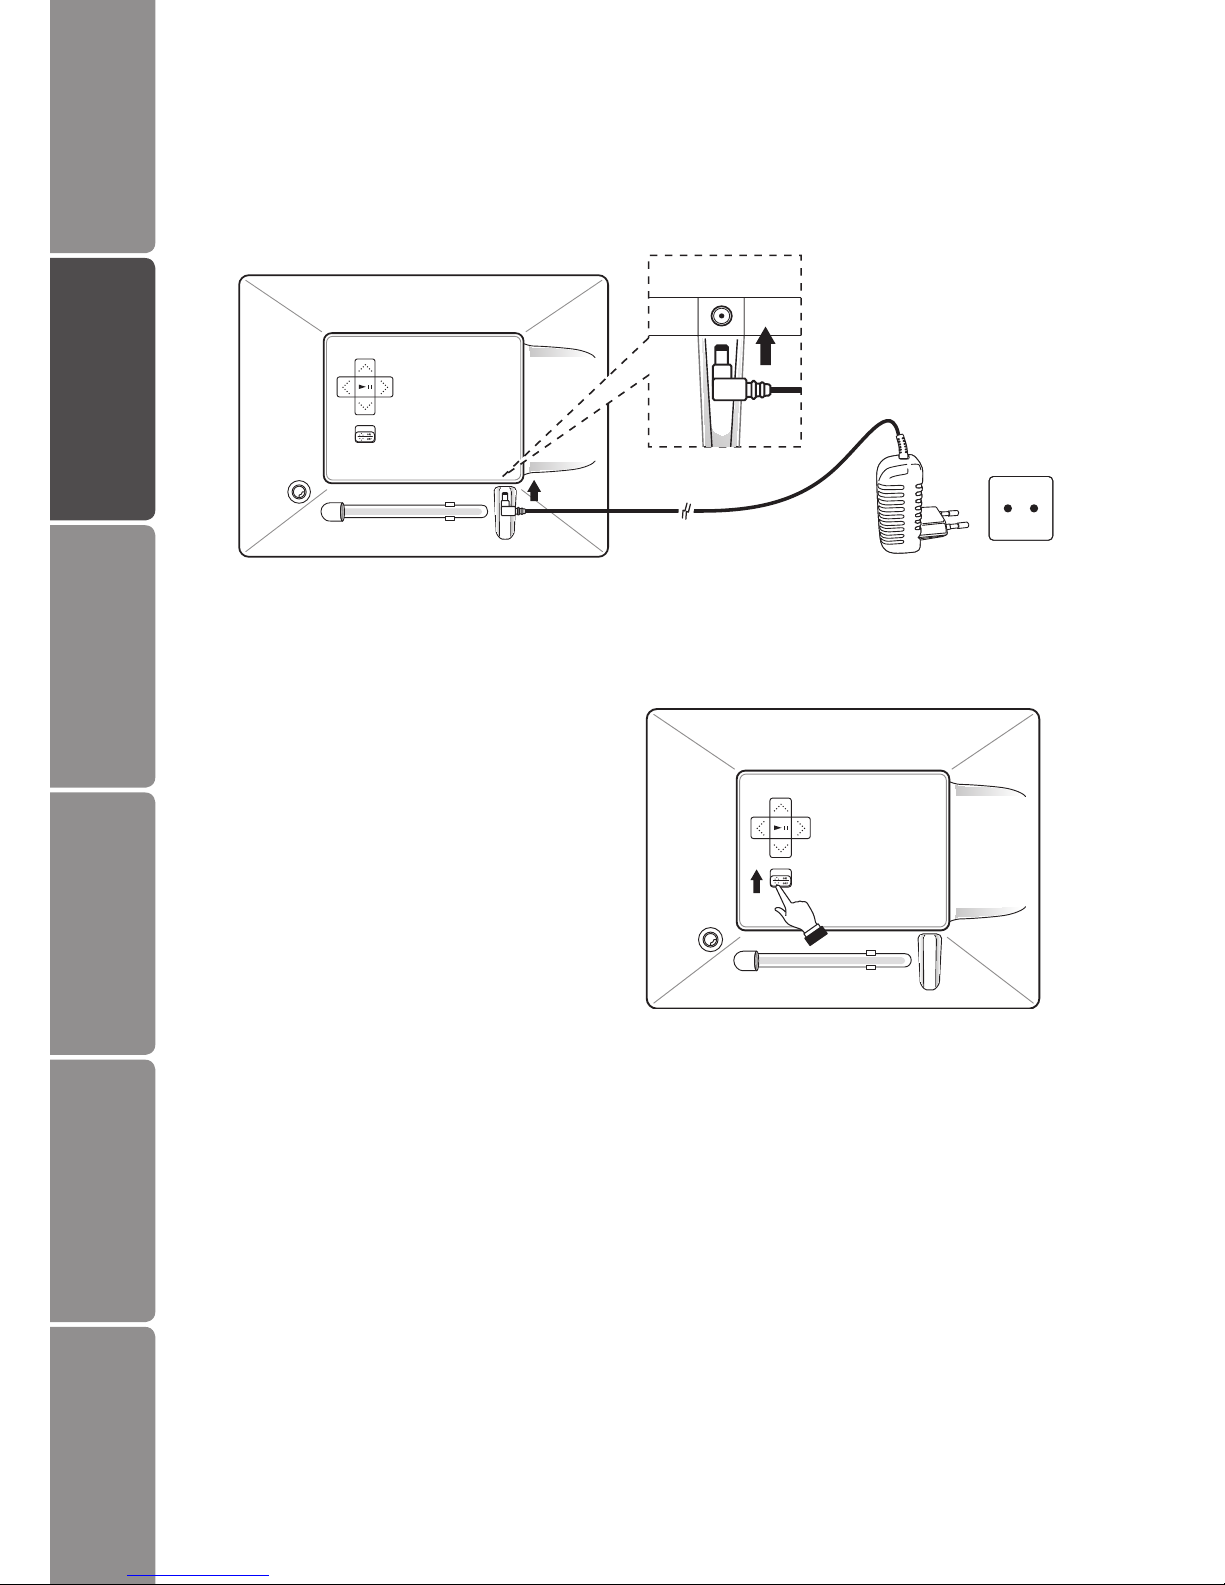
Connecting to the Mains Power
1. Connect the supplied mains adapter (5V DC, 1A) to the photo frame, and plug in
the mains adapter into the mains socket.
2. Slide the ON/OFF button on the
photo frame to turn it on.
3. To turn o the photo frame, slide the
ON/OFF button.
GB-7
Settings Basic Operation Preparations Introduction and
Product Overview
Troubleshooting
and Specication
Safety Warnings
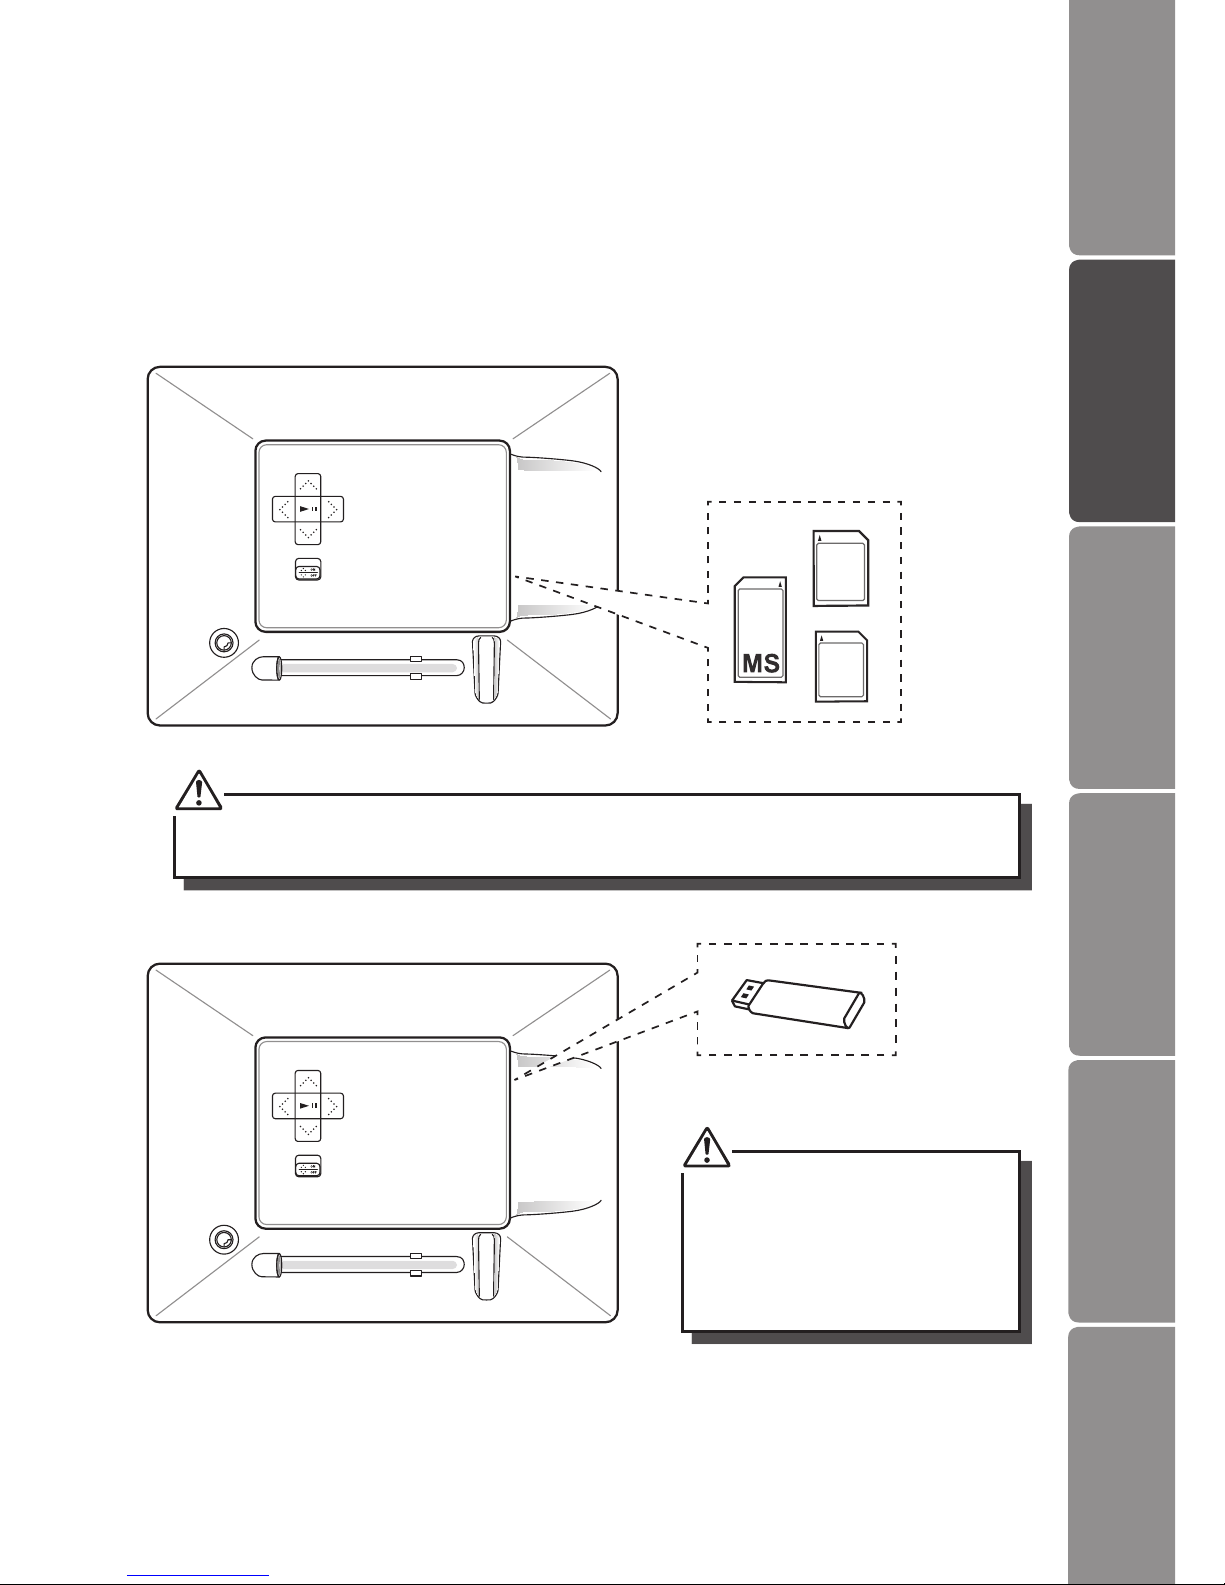
Inserting a Memory Card / USB Flash Drive
This photo frame can only display one storage media’s contents at a time.
If more than one storage device is connected, please refer to “Selecting the Memory
Drive” and select your desired drive to be displayed in the main menu.
This frame can only play images (JPEG). If les in other formats are played, please use
your computer to convert the images to a readable format.
• Insert your memory card into the
appropriate slot following the
orientation marked on the photo
frame.
• Insert a USB drive into the USB port.
MMC
SD
1. To remove MMC/SD/MS card, pull the card straight out.
2. Some of the newer higher capacity cards may not be compatible with this frame.
This device can only display one
storage media’s contents at a
time. If more than one storage
media is used, please refer to
“Selecting the Memory Drive”
section on page 8.
GB-8
Settings
Basic Operation
PreparationsIntroduction and
Product Overview Troubleshooting
and Specication
Safety Warnings
Main Menu
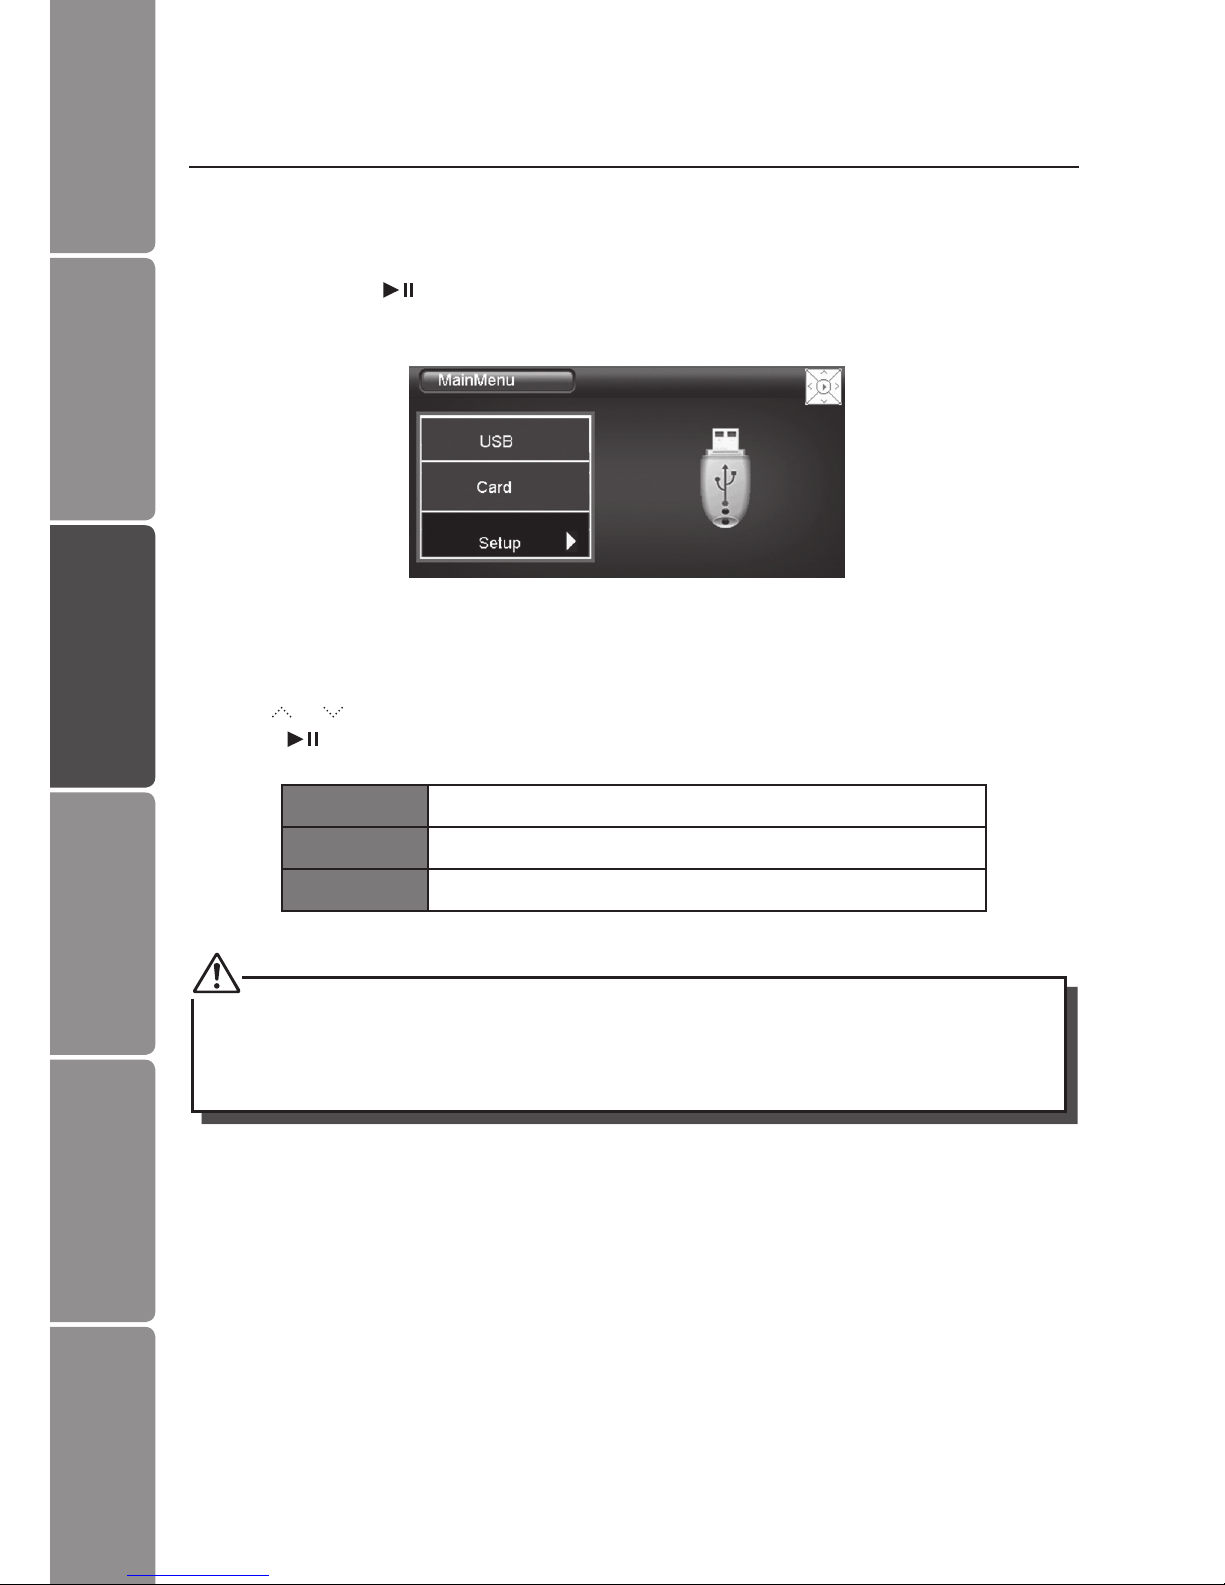
In the main menu, you can select connected source to view photos and change frame
settings.
Press and hold the button to access the main menu. All connected source, setup
and now playing icons are displayed.
Selecting the Memory Drive
Use the or buttons to navigate between options in the main menu. And then
press the button to conrm or enter the submenu.
USB Highlighted when you select a USB ash driver.
Card Highlighted when you select a SD / MMC / MS card.
Setup To customise the settings of Digital Photo Frame.
•In the main menu, if you insert a SD / MMC / MS card or a USB device, the frame will start
to the slideshow automatically.
•There is a button indicator on the right of the screen, indicating which button you are
pressing.
GB-9
Settings Basic Operation Preparations Introduction and
Product Overview
Troubleshooting
and Specication
Safety Warnings
Viewing Photos
Thumbnail View
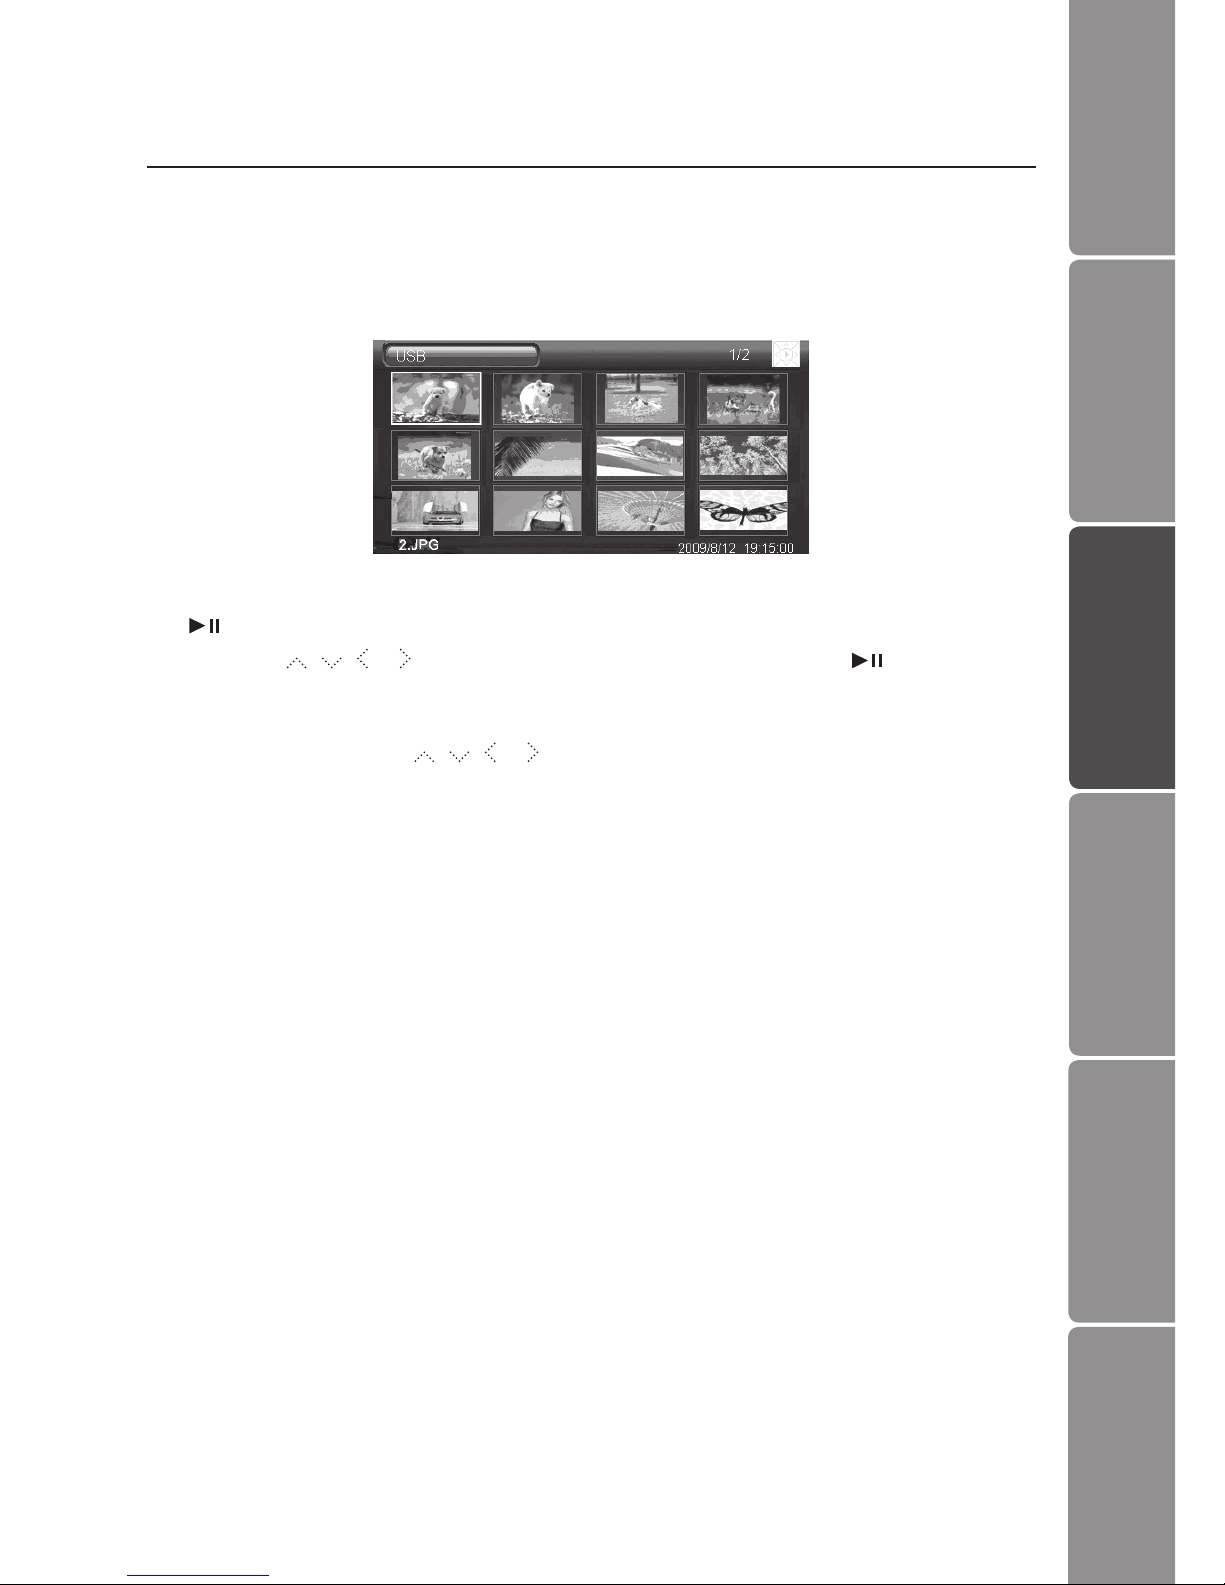
In Photo mode, the photos on the selected memory source can be displayed on the
screen as thumbnails. Up to 12 photos are displayed at a time.
1. Select a memory source (e.g. USB, SD/MMC/MS) on the main menu and press the
button. The thumbnail mode appears.
2. Press the , , or button to select photo, and then press the button. The
photo is displayed on the screen.
3. To navigate through the thumbnails or move to the next or previous page of
thumbnails, press the , , or button.

GB-10
Settings
Basic Operation
PreparationsIntroduction and
Product Overview Troubleshooting
and Specication
Safety Warnings
Playing a Slideshow
You have two ways to start playing a slideshow:
1. While browsing a single photo, press the button to start a slide show from the
current photo.
• Press the button once to open the OSD menu and pause the slideshow,
press twice to carry on the slide show.
• Press the button to exit the slideshow and view thumbnails of the photos.
• Press the button to rotate the photo.
Using OSD menu
You also can use the OSD menu to view photos manually one by one.
Press the button while viewing a photo or slideshow. The OSD menu appears
on the screen and the slideshow pauses.
2. Press the or button to navigate between icons on the OSD menu.
• To start or resume a slideshow from the current photo, highlight on the
screen and press the button. The icon is changes to icon on the screen.
• To select previous/next photo, highlight or on the screen, and then press
the button.
• To rotate a photo, highlight on the screen and press the button
repeatedly.
• To zoom on a photo, highlight on the screen and press the button
repeatedly to magnify a photo in the following sequences: X2, X4, X8, X16.
When a photo is magnied, hold the , , or button to view another part
of the photo.
• To exit and return to the previous screen, highlight on the screen and press
the button.
Indice
Altri manuali Sandstrom Cornice digitale

Sandstrom
Sandstrom S07DPF11 Manuale utente

Sandstrom
Sandstrom S7iDPF10 Manuale utente

Sandstrom
Sandstrom S08DPF11 Manuale utente

Sandstrom
Sandstrom S10DPF16 Manuale utente

Sandstrom
Sandstrom S10DPF10 Manuale utente

Sandstrom
Sandstrom S3CRAD11E Manuale utente

Sandstrom
Sandstrom S08DPF10 Manuale utente

Sandstrom
Sandstrom S8KDPF10 Manuale utente

Sandstrom
Sandstrom S7DPF10 Manuale utente

Sandstrom
Sandstrom S08DPF10E Manuale utente


