Sangean DDR-22 Manuale utente

Please read this manual before use
AWORLDOF LISTENING
GB
Operating instruction
WARNING:
TO PREVENT FIRE OR ELECTRIC SHOCK HAZARD,DO
NOT EXPOSE THIS PRODUCT TO RAIN OR MOISTURE.
THE LIGHTNING FLASH AND
ARROW- HEAD WITHIN THE
TRIANGLE IS AWARNING SIGN
ALERTING YOU OF
“DANGEROUS VOLTAGE”
INSIDE THE RADIO.
CAUTION: TO REDUCE THE RISK OF
ELECTRIC SHOCK, DO NOT REMOVE
THE BACK, NO USER SERVICEABLE
PARTS INSIDE. REFER SERVICING TO
QUALIFIED SERVICE PERSONNEL.
THE EXCLAMATION POINT
WITHIN THE TRIANGLE IS A
WARNING SIGN ALERTING
YOU OF IMPORTANT
INSTRUCTIONS ACCOMPANYING
THIS RADIO.
!
CAUTION
RISK OF ELECTRIC
SHOCK DO NOT OPEN
DDR-22
DAB+FM/RDS+MW
DIGITAL STEREO RECEIVER
DDR-22_381P101_GB.p65 2006/4/14, ¤U¤È 04:421

IMPORTANT SAFETY INSTRUCTIONS ........................... 2
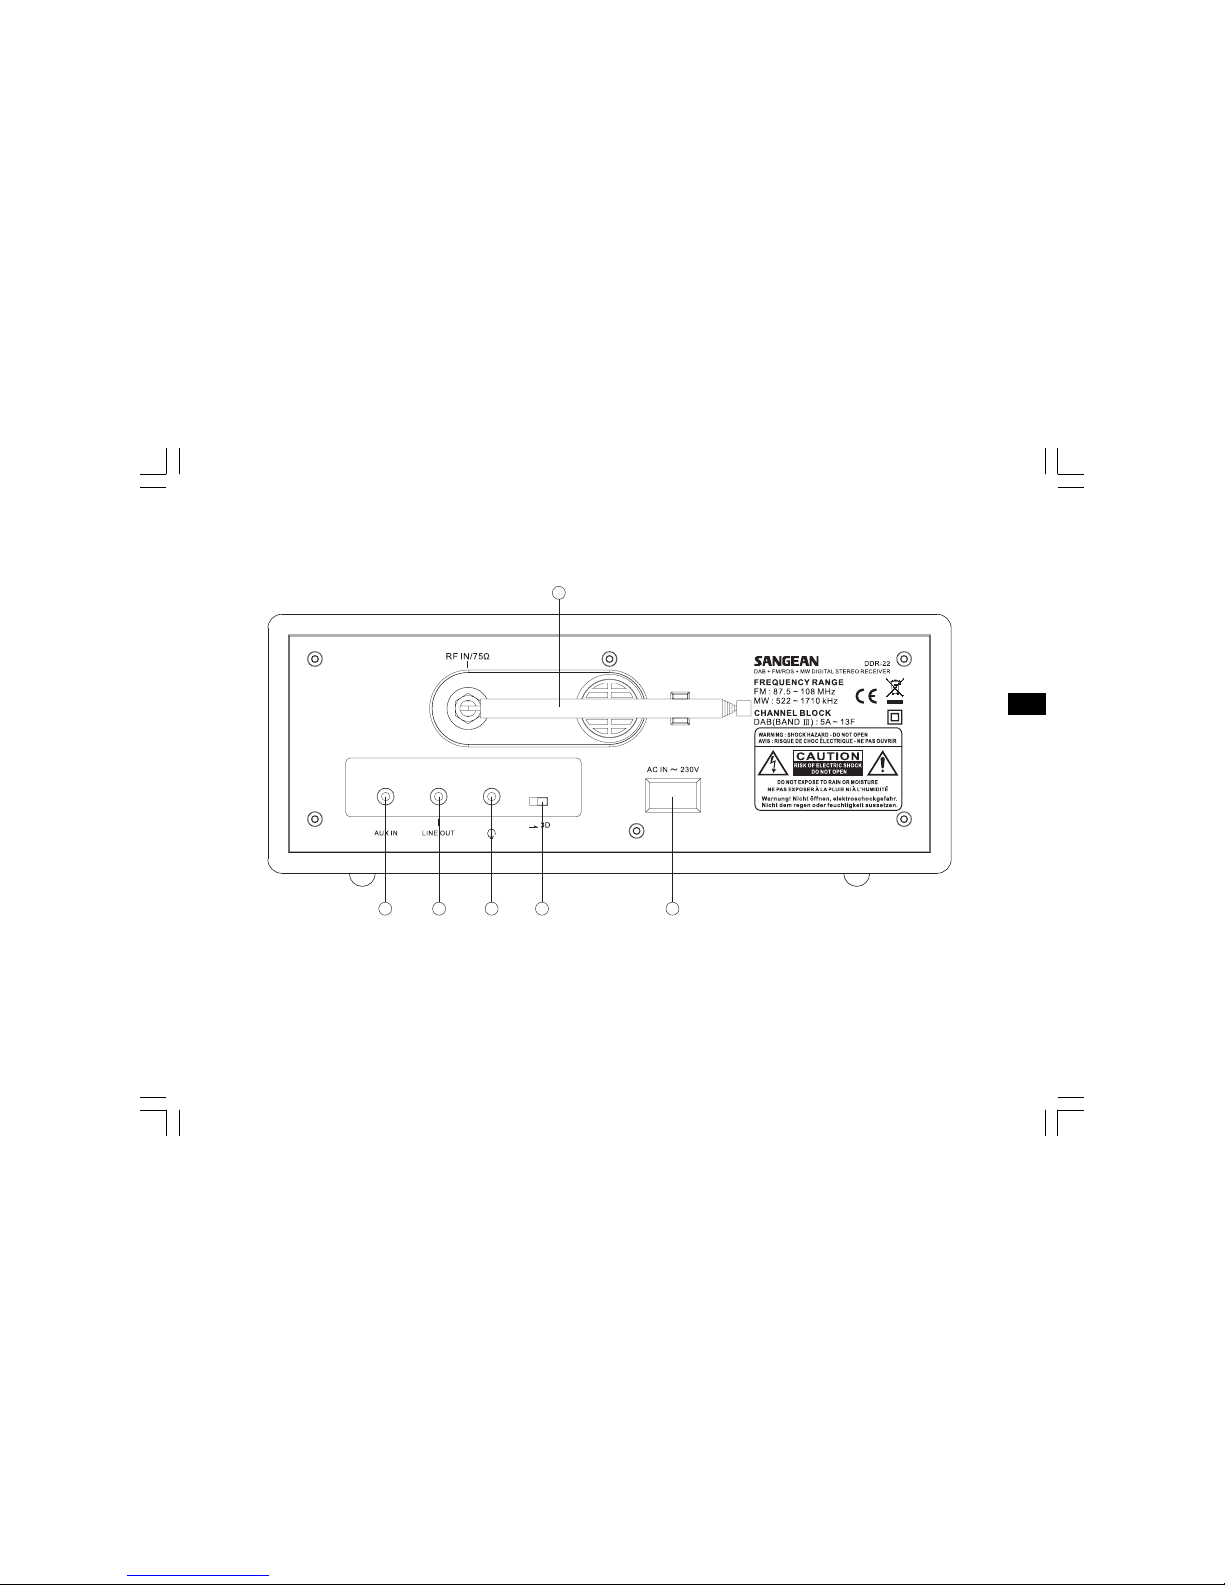
Controls .......................................................................... 3-4
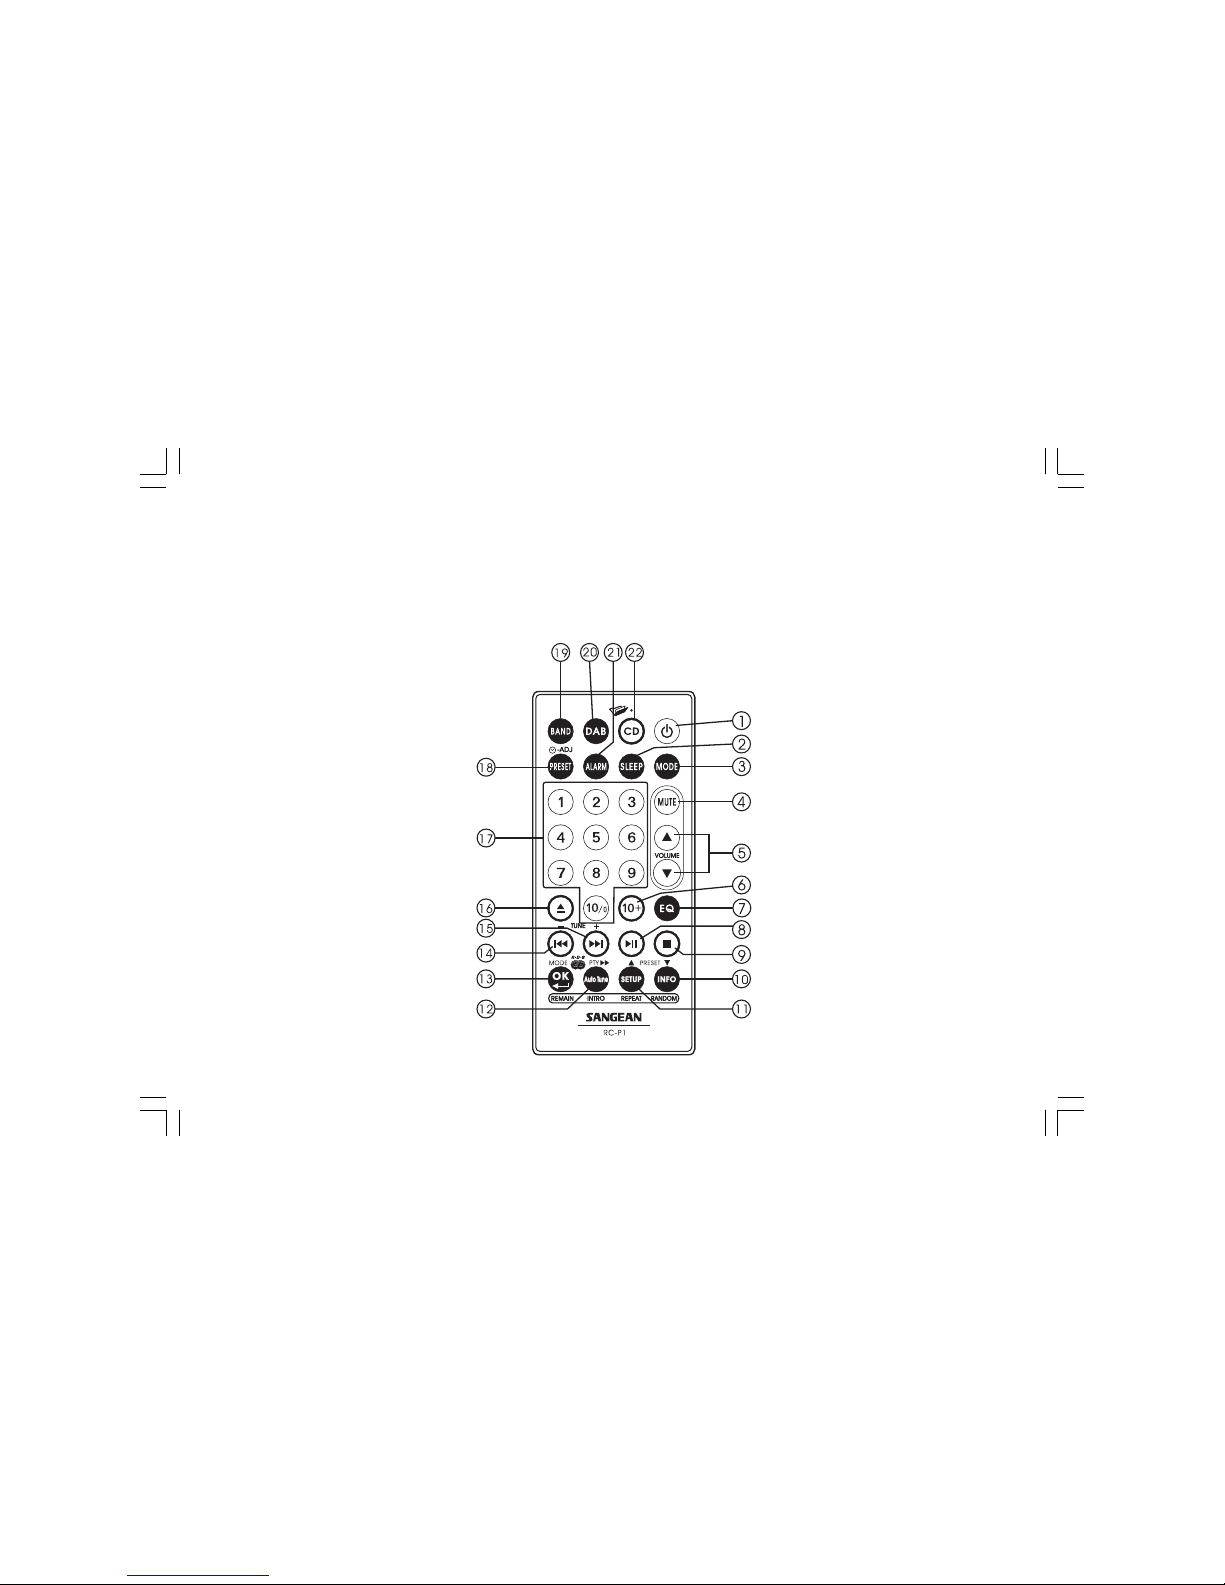
Remote control .................................................................. 5
Remote handset battery replacement .............................. 6
Mains operation ................................................................. 6
Time setting ...................................................................... 7
Alarm time setting ............................................................. 8
Alarm off time setting ....................................................... 9
Alarm Source .................................................................... 9
Alarm Volume.................................................................. 10
Alarm on and off .............................................................. 10
Sleep setting ................................................................... 11
Operation radio ................................................................ 12
Operating your radio – DAB ............................................ 12
Selecting a station – DAB .............................................. 13
Auto tuning ...................................................................... 14
Secondary services ......................................................... 14
Normal display mode....................................................... 15
Advanced display mode .................................................. 16
Station order – Service list order .................................... 17
Manual Tuning ................................................................. 18
DRC Value Control .......................................................... 19
Contents
Factory RESET ............................................................... 20
SW version ...................................................................... 20
Operating the radio – FM band ....................................... 21
Display modes – FM RDS .............................................. 22
Search RDS program type .............................................. 23
Operating the radio – MW band ..................................... 24
Presetting stations .......................................................... 24
DAB band Preset station................................................ 25
Recalling DAB preset station ......................................... 26
FM/MW waveband preset station ................................... 27
Recalling FM/MW waveband preset station ................... 27
Preset EQ........................................................................ 28
Operating the radio – Aux In ........................................... 29
Operating the radio – Line Out ....................................... 29
Headphone use ............................................................... 30
Flat/3D sound effect ....................................................... 30
Mute ................................................................................. 30
Specifications.................................................................. 31
1
DDR-22_381P101_GB.p65 2006/3/23, ¤W¤È 09:492

2
IMPORTANT SAFETY INSTRUCTIONS
1. Read these instructions.
2. Keep these instructions.
3. Heed all warnings.
4. Follow all instructions.
5. Do not use this apparatus near water.
6. Clean only with dry cloth.
7. Do not block any ventilation openings. Install in accordance with
the manufacturer’s instructions.
8. Do not install near any heat sources such as radiators,
heat registers, stoves, or other apparatus (including amplifiers)
that produce heat.
9. Do not defeat the safety purpose of the polarized or
grounding-type plug. A polarized plug has two blades with one
wider than the other. A grounding type plug has two blades and a
third grounding prong. The wide blade or the third prong are
provided for your safety. If the provided plug does not fit into your
outlet. consult an electrician for replacement of the obsolete outlet.
10. Protect the power cord from being walked on or pinched
particularly at plugs, convenience receptacles, and the point
where they exit from the apparatus.
11. Only use attachments/accessories specified by the manufacturer.
12. Use only with the cart, stand, tripod, bracket, or table specified by
the manufacturer, or sold with the apparatus. When a cart is
used, use caution when moving the cart/apparatus combination
to avoid injury from tip-over.
13. Unplug this apparatus during lightning storms or when unused for
long periods of time.
14. Refer all servicing to qualified service personnel. Servicing is
required when the apparatus has been damaged in any way,
such as power-supply cord or plug is damaged. liquid has been
spilled or objects have fallen into the apparatus, the apparatus
has been exposed to rain or moisture, does not operate
normally, or has been dropped.
15. To Reduce the Risk of Fire or Electric Shock, Do not Expose
This Appliance To Rain or Moisture.
16. The Shock Hazard Marking and Associated Graphical Symbol is
provided on the bottom panel of unit.
17. Apparatus shall not be exposed to dripping or splashing and no
objects filled with liquids, shall not be placed on the apparatus.
GB
DDR-22_381P101_GB.p65 2006/3/23, ¤W¤È 09:493

3
Controls
1. Infra red sensor
2. Standby indicator
3. Volume Control/Standby button
(Front)
1 2 3
DDR-22_381P101_GB.p65 2006/3/23, ¤W¤È 09:494

4
4. Telescopic aerial
5. AUX IN socket
6. LINE OUT socket
7. Headphone socket
8. 3D sound switch
9. Mains input socket
GB
4
5 6 7 8 9
Controls
(Rear)
DDR-22_381P101_GB.p65 2006/3/23, ¤W¤È 09:495

5
1. Standby button
2. Sleep button
3. Mode Selection
4. Audio Mute
5. Volume Control
6. Not applicable for non-CD version
7. Audio Equalizer (EQ)
8. Not applicable for non-CD version
9. Not applicable for non-CD version
10. Information /Preset Down button
11. Set Up button /Preset Up button
12. Auto Tune button /RDS Pty search
13. OK button/RDS Mode selection
14. Not applicable for non-CD version
15. Not applicable for non-CD version
16. Not applicable for non-CD version
17. Number keys
18. Preset Button
19. AM/FM band /Aux In Selection
20. DAB band button
21. Alarm button
22. Not applicable for non-CD version
Remote control
Note:
Remote control unit is designed to suit for CD and also non-CD version of radio. Some buttons will be useless for non-CD version.
MP3
DDR-22_381P101_GB.p65 2006/3/23, ¤W¤È 09:496

6
GB
Remote handset battery replacement
1. Release battery holder locker by pressing the holder up.
2. Pull out the battery holder.
3. Replace supplied battery (CR2025 or equivalent) ensuring that
positive side of battery faces you with holder positioned.
4. Replace the battery holder and make sure the holder locker is in
right position.
Mains operation
1. Place your radio on a flat surface.
2. Plug the mains lead into the socket located on the rear of your
radio, ensuring that the plug is pushed fully into the socket.
3. Plug the other end of the mains lead into a wall socket and switch
on the wall socket.
DDR-22_381P101_GB.p65 2006/3/23, ¤W¤È 09:497

7
Time setting
1. Turn on the radio by pressing standby button.
2. Press and release MODE button, display will flash 0:00.
3. Press and release Time Set button , display hour digit
will flash.
4. Press Tuning +/- button to select required hour then press Time Set
button again to confirm hour setting. Display minute digit will flash.
5. Press Tuning +/- button to select required minute then press
Time Set button again to finalize time setting.
Note:
The time can be auto adjusted by FM-RDS Auto clock set (CT)
but can’t be auto adjusted by DAB signal.
DDR-22_381P101_GB.p65 2006/3/23, ¤W¤È 09:498

8
GB
Alarm time setting
1. Press Mode button will cycle through Normal display, clock display,
alarm on display , Alarm off display, Alarm source, Alarm volume,
Sleep and normal display again.
2. During Alarm on display status, press Time Set button ,
display hour digit will flash.
3. Press Tuning +/- button to select required hour then press Time Set
button again to confirm hour setting. Display minute digit will flash.
4. Press Tuning +/- button to select required minute then press
Time Set button again to finalize alarm time setting.
5. The alarm will last for one hour until you switch it off by pressing
Standby button.
DDR-22_381P101_GB.p65 2006/3/23, ¤W¤È 09:499

9
Alarm off time setting
Follow above alarm on time setting to set alarm off time.
Alarm Source
1. Pressing Mode button to select Alarm Source mode.
2. Press Adj. button, display will flash last alarm source set.
3. Press Tuning + /- button to select required alarm source.
DDR-22_381P101_GB.p65 2006/3/23, ¤W¤È 09:4910
Indice
Altri manuali Sangean Ricevitore stereo

Sangean
Sangean SR-1 Manuale utente

Sangean
Sangean PR-D8 Manuale utente

Sangean
Sangean WR-1CL Manuale utente

Sangean
Sangean PR-D5CL Manuale utente

Sangean
Sangean DDR-47BT Manuale utente

Sangean
Sangean DPR-34 Plus Manuale utente

Sangean
Sangean MMR-77 Manuale utente

Sangean
Sangean ATS-803A Manuale utente

Sangean
Sangean DPR-26BT Manuale utente

Sangean
Sangean WFR-1D Plus Manuale utente
Manuali Ricevitore stereo popolari di altre marche

Pioneer
Pioneer SX-1000TA Manuale utente

Yamaha
Yamaha MusicCast TSR-5B3D Manuale utente

Sony
Sony STR-DE335 - Fm Stereo/fm-am Receiver Manuale utente

Sony
Sony STR-DG500 - Multi Channel Av Receiver Manuale utente

Panasonic
Panasonic AJSD955B - DVCPRO50 STUDIO DECK Manuale utente

Pioneer
Pioneer SX-838 Manuale utente


