Sealife SL961 Manuale utente

DIGITAL
PRO FLASH
Instruction Manual
www.sealife-cameras.com/onlineguide/manuals.html
Español - Deutsch - Français
Italiano - Nederlands - Türkçe

2
Contents:
I. Safety Warnings...........................................................3
II. Introduction ................................................................4
III. Preparing your camera ................................................5
IV. Preparing your flash ....................................................6
V. Testing your camera and flash ...................................21
VI. How to adjust your camera and flash........................22
VII. Maintaining a waterproof seal ...................................28
VIII. Pre-dive checklist ......................................................30
IX. After each dive..........................................................31
X. Care and maintenance ..............................................31
XI. Great pictures made easy..........................................32
XII. Troubleshooting Guide..........................................35
XIII. Specifications.......................................................38
XIV. Parts and service...................................................39
www.sealife-cameras.com/onlineguide/manuals.html
Español - Deutsch - Français - Italiano - Nederlands - Türkçe

3
I. Safety Warnings
Always discharge flash before opening the waterproof door, by moving
the power switch to the “TEST” position, and then to the “OFF” position.
This will discharge the high-voltage electricity stored in the flash.
If foreign objects or water has entered the flash, discharge and turn off
flash. Continued use in this state may cause fire or electrical shock.
Contact the SeaLife service center for repairs.
Do not attempt to access the electronic circuitry for any reason. The
internal electronics uses high-voltage components that may result in
severe electrical shock.
The On/Off/Test switch contains a powerful magnet. Keep away from
compasses and electronics to avoid magnetic interference.
Do not expose flash to heat or direct sunlight for prolonged periods of
time.
Observe all SCUBA dive safety rules and control your buoyancy at all
times. Consult your dive instructor for dive safety questions.
Visit www.sealife-cameras.com for updates to this manual and
techniques on underwater photography. Check out the online guide
called Great Pictures Made Easy.
4
II. Introduction
Thank you for purchasing the SeaLife Digital Pro Flash. Novice
and experienced divers alike know that the deeper you dive, less
light penetrates the water. While this descending drama adds to
your excitement as a diver, you will find that it also challenges
you as an underwater digital photographer.
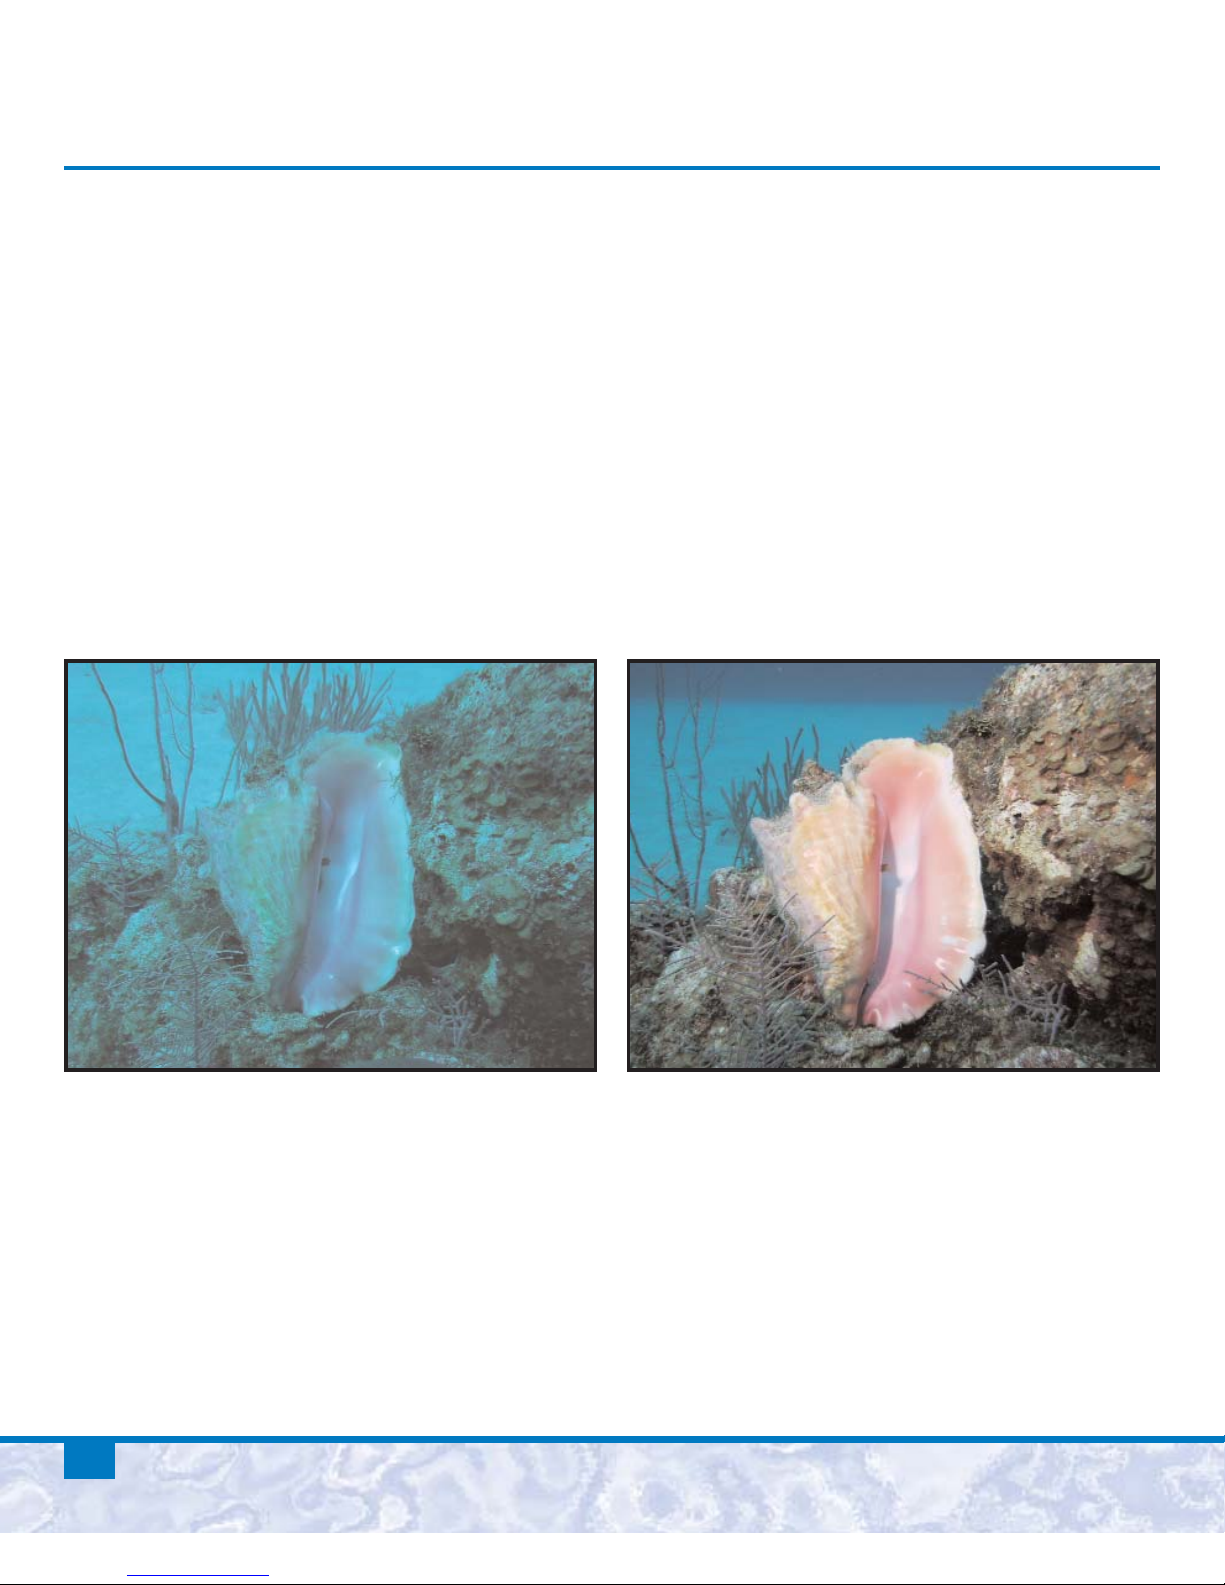
The water filters out red and yellow so everything looks blue. The
fact is that reefs and fish are bursting with color. A powerful
underwater flash system is the best way to restore the lost colors.
Without Digital Flash With Digital Flash
This instruction manual will guide you through all the essential
information on how to operate and care for your flash, and tips
on capturing some of the best underwater pictures of your life.

5
III. Preparing your camera
Become familiar with how to operate your camera. Refer to your
camera instruction manual for information on how to adjust the
settings described in this manual. Here is the basic camera set-up for
SeaLife and most other popular digital cameras and their housings.
1. Insert blank memory card. It’s good practice to regularly
format memory card, but be careful, because this will erase
all images on the card.
2. Make sure your camera battery(ies) are new or freshly charged
before each dive.
3. Set SeaLife digital cameras to External Flash mode
4. For Non-SeaLife camera’s, do this:
a. Set ISO to 100 (or less if available) but not Auto.
b. Set White Balance to “CLOUDY” for better color.
c. Set camera’s flash to FORCE ON.
d. Select the highest image resolution.
e. Some camera offer manual shutter and aperture controls,
which is recommended for advanced photographers only.
5. Inspect and clean camera housing and main O-ring in
accordance with the camera/housing instructions.
6. Insert camera and seal the housing.
7. Take a test picture to make sure the camera’s flash fires.

6
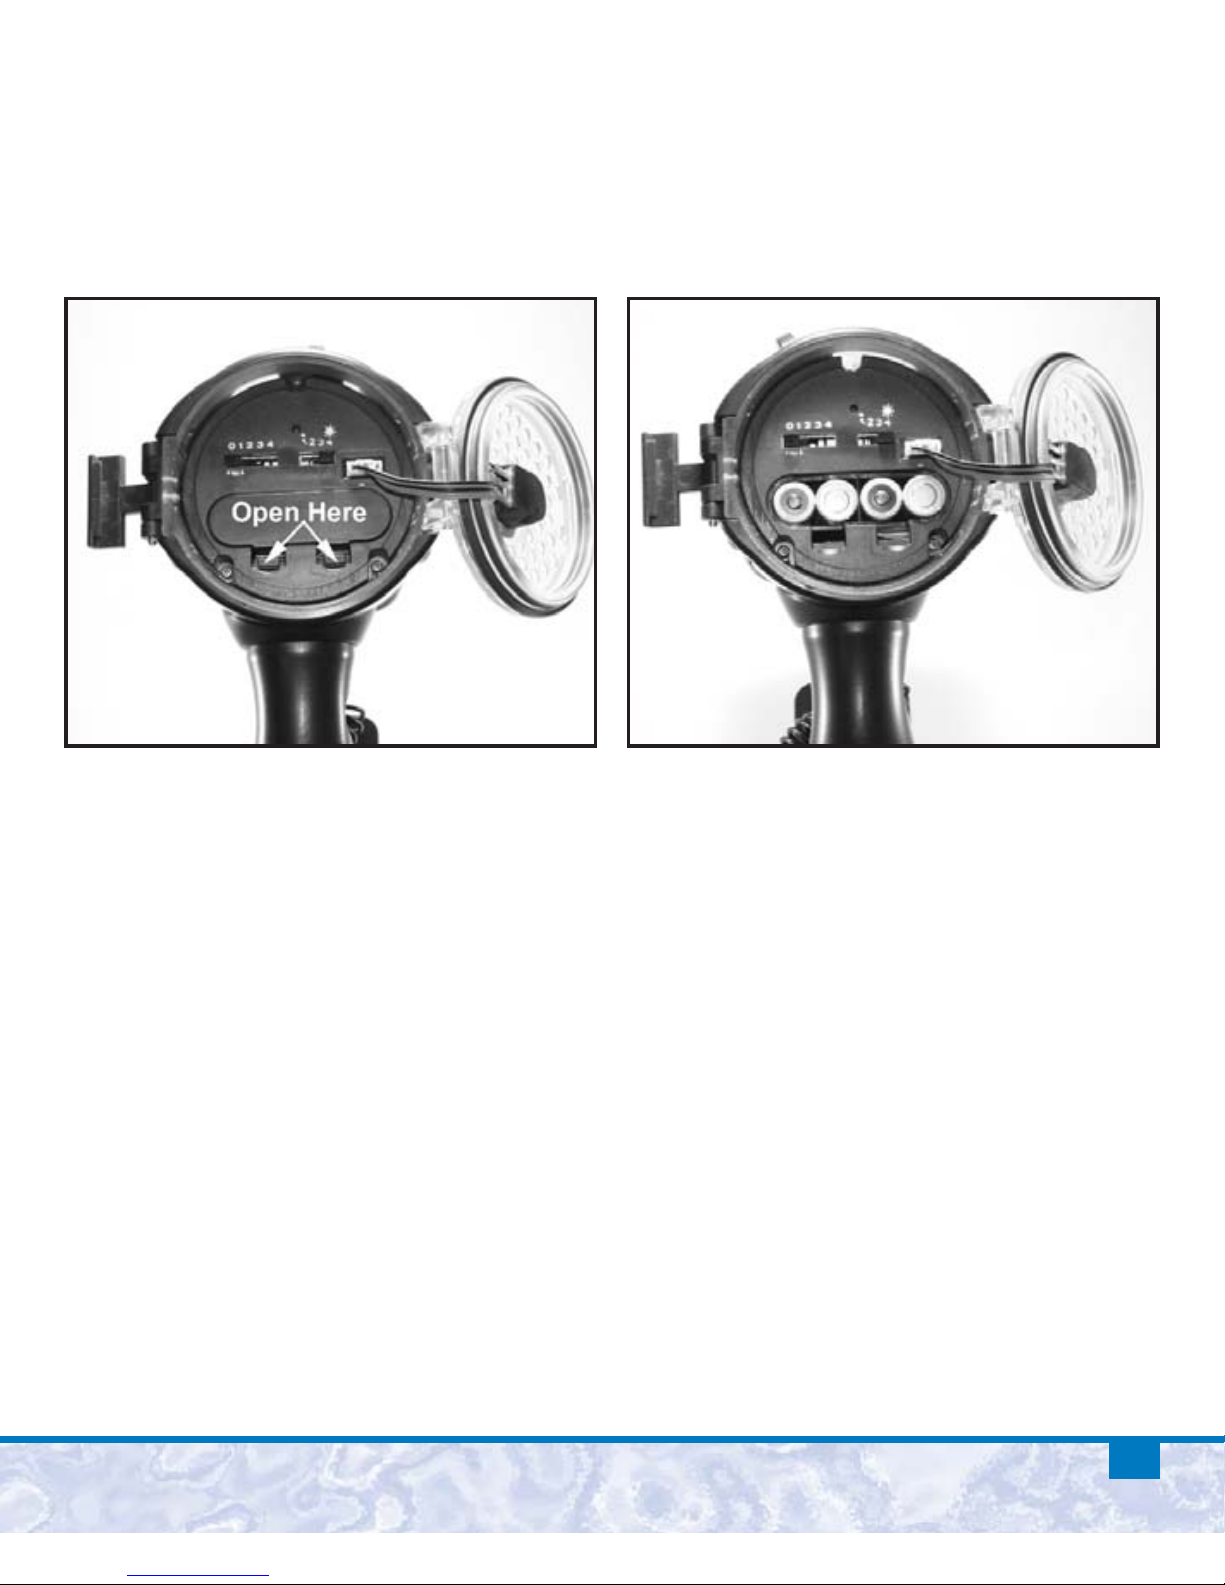
IV. Preparing your flash
Unlock the latch by sliding
down the safety lock.
Lift the latch and open the
waterproof door to access the
battery compartment, pre-flash
setting, and auto mode setting.
Important:
• Make sure the flash and you are perfectly dry before opening the
waterproof door.
• Open the waterproof door with the door pointing down, so any
water trapped around the o-ring does not drip inside the flash.
7
Insert 4 new or freshly charged AA batteries. Open the battery
compartment cover and insert batteries according to the polarity
markings above the battery compartment.

8
Set the Pre Flash switch to the “0” position for all SeaLife cameras.
For non-SeaLife digital cameras, set switch to the #4 position to
start. More information will be provided later in this manual on
finalizing the Pre Flash Setting for your non-SeaLife camera.
What is a Pre-flash?
Most digital cameras have one or more pre-flashes to assist in
autofocus/auto-exposure setting of the camera. The Pre-Flashes
occur before the camera’s primary flash fires. The Pre-Flash
Setting switch tells the external flash how many pre-flashes to
ignore before firing. For example, if your digital camera has 2
pre-flashes, you would set the Pre-Flash Setting switch to 2. The
external flash will now ignore the two pre-flashes and fire on the
third primary flash. SeaLife cameras do not have a pre-flash when
the camera is in External Flash mode. More information on how
to make the correct pre-flash setting for your non-SeaLife cameras
will be described later in this manual.
Pre Flash Switch

9
Pre-flash cancellation settings
(continued)
:
Switch position Description of setting
0 Cameras with no pre-flash
For all SeaLife cameras
[Camera set to Ext Flash mode]
1 Camera with 1 pre-flash
[and cameras with rapid-fire pre-flash*]
2 Camera with 2 pre-flash
3 Camera with 3 pre-flash
4 Camera with 4 pre-flash
*Note: The #1 pre-flash setting works with cameras that use 1
pre-flash or a rapid-fire pre-flash system because it has a built-in
50 millisecond delay between the first pre-flash and the primary
flash.
More information on how to calibrate the pre-flash setting for
your non-SeaLife cameras will be described later in this manual.

10
Set the Auto mode switch to the “1” position for all SeaLife
cameras and “4” position for all Non-SeaLife digital and film
camera’s. More information will be provided later in this manual
on how to make the correct Auto mode setting for your camera.
What is the Auto mode?
Auto mode will automatically control the brightness of the
external flash and help you to achieve optimal image exposure.
When the external flash fires the light sensor located in the front
of the flash will instantly measure the light reflecting from the
subject. If it senses too much light, it will quickly stop the flash
and prevent the image from being over-exposed. There are 4
possible Auto mode settings. settings. One of the four settings will
be best depending on your camera type. The #1 setting will result
in slightly less powerful flash brightness and #4 will result in a
more powerful flash brightness. More information on how to
calibrate the Auto mode setting for your non-SeaLife camera is
discussed later in this manual.
Altri manuali per SL961
1
Indice
Altri manuali Sealife Flash della fotocamera


