Securitytronix ST-NVR4CH-I Manuale utente


1
Thank you for your purchase of this SecurityTronix Network Video
Recorder (NVR). This Quick Start Guide covers the most essential
information for getting the NVR up and running. For more in-depth
information on the NVR’s functions the full manual is available in PDF
format at http://www.securitytronix.com/products
Getting Started
MAKING CONNECTIONS.................................................pg02
POWERING ON and SHUTTING DOWN.............................pg03
FIRST STARTUP............................................................pg04
LOGGING IN and LOGGING OUT......................................pg05
General Settings
SETTING DATE AND TIME..............................................pg07
CHANGING PASSWORDS................................................pg08
Record Settings
CAMERA DISCOVERY.....................................................pg10
SCHEDULING RECORDING..............................................pg11
CHANGING RECORD MODES...........................................pg13
Motion Detection
SETTING UP MOTION DETECTION...................................pg15
ADJUSTING MOTION REGIONS.......................................pg16
Playback and Backup
PLAYING BACK VIDEO...................................................pg17
BACKING UP VIDEO FILES.............................................pg19
Networking
NETWORKING THE NVR.................................................pg21
HOW TO ENABLE P2P....................................................pg22
MOBILE APPS...............................................................pg23
SOFTWARE..................................................................pg26
Troubleshooting
CONTACTING SUPPORT................................................pg28
2
Getting Started
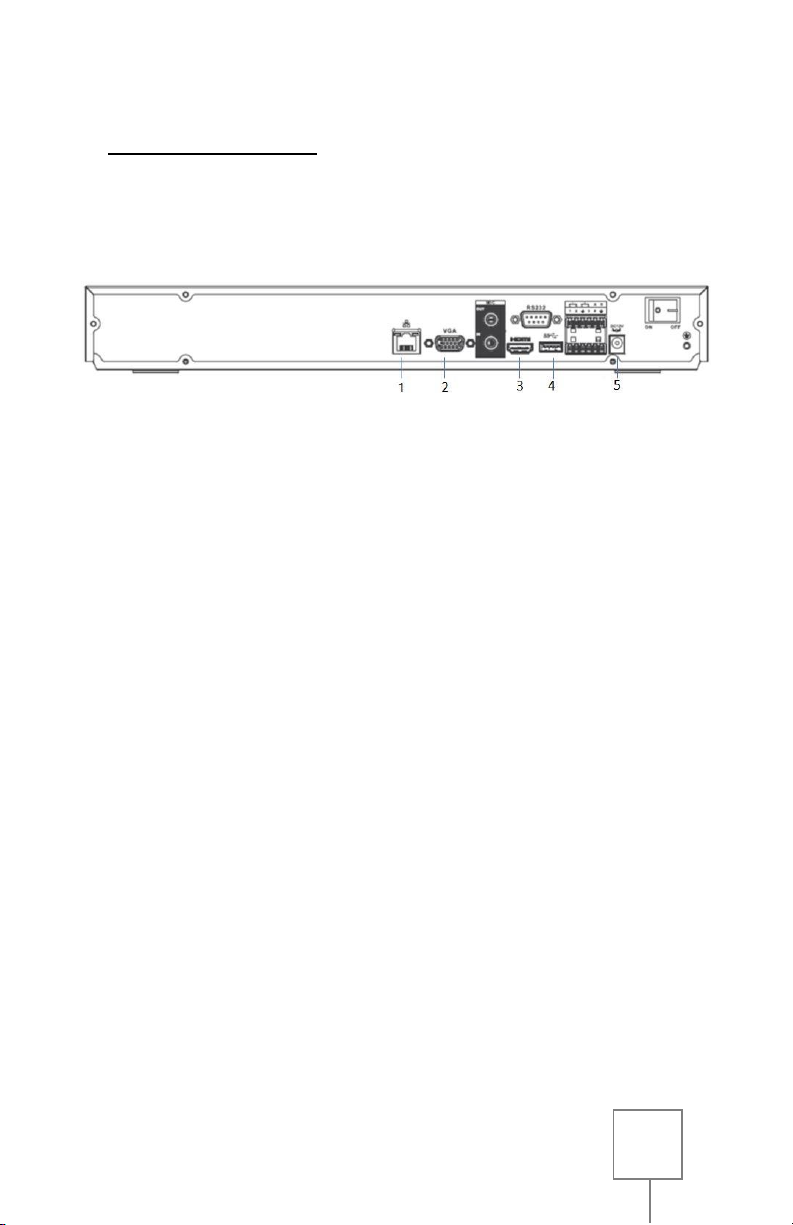
MAKING CONNECTIONS
8 channel NVR shown. Identical configuration for 4/8/16/32CH NVR
1. Connect the network cable from the back of the NVR to
Network switch or PoE switch. (#1 in the image above)
2. Connect a monitor to the NVR using either the VGA port (#2 in
the image above) or the HDMI port (#3 in the image above) and the
appropriate cable.
3. Connect the included USB mouse to the rear USB port of the
NVR. (#4 in the image above)
4. Connect the included 12VDC power supply’s AC plug into an
appropriate AC power outlet which supplies between 110
and 120 volts AC. Then plug the power supply’s DC connector
into the NVR’s DC power input port. (#5 in the image above)
NOTE: An uninterruptable power supply is recommended
for the NVR and any power supplies for the cameras, both
to protect against damage from sudden power loss, and to
maintain video surveillance in the event of a power outage.

3
POWERING ON and SHUTTING DOWN
POWERING ON
Once all necessary connections to your NVR are made, toggle the
power switch on the back of the NVR to the ON position.
If the NVR does not automatically start, press the button on the
front panel of the NVR.
The POWER indicator light will be displayed on the NVR’s front panel.
It is normal for the NVR to sound a beep during startup.
SHUTTING DOWN
In the event that the NVR needs to be powered down, perform one of
the following to ensure a safe shutdown:
1. Enter the MAIN MENU (see page 5), select SHUTDOWN in the
OPERATION section, then select SHUTDOWN from the popup
window.
2. Alternately, press and hold the button on the front panel
of the NVR. The screen will show a progress bar for
shutdown.

4
Continue holding the button until the progress bar fills and
the NVR shuts off.
NOTE: In rare cases it may be necessary to remove power to the NVR
by disconnecting the power supply. However, this should be avoided
if possible, as removing power without properly shutting down the
NVR may corrupt and/or damage the hard drive. Only remove power
from the NVR if it will not respond to a shutdown through the
methods described.
FIRST STARTUP
The first time that your NVR is powered on, it will perform necessary
functions, such as properly formatting an unformatted hard drive for
recording, and it will display the STARTUP WIZARD. It is recommended
that you follow the steps in the popup window to simplify the NVR’s
initial setup.

5
The STARTUP WIZARD will take you through:
General Settings (more on page 7)
Network Settings (more on page 21)
Remote Device (IPCAM) Settings (more on page 10)
Recording Schedule (more on page 12)
The STARTUP WIZARD will be displayed each time the NVR is started.
If you do not wish for the STARTUP WIZARD to be displayed, click to
uncheck the STARTUP option before proceeding. You can also find this
option in the GENERAL SETTINGS (see page 7).
LOGGING IN and LOGGING OUT
LOGGING INTO THE NVR & MENU
From the NVR’s main screen, right-
click the mouse and choose MAIN
MENU from the drop-down menu.
The SYSTEM LOGIN window will
appear to prompt you to log in. Click
in the PASSWORD field or on the
keyboard icon to bring up the input
keyboard.

6
The default administrative accounts and passwords are:
USERNAME: admin PASSWORD: admin
USERNAME: 888888 PASSWORD: 888888
Using the mouse, enter the NVR’s password, then click ENTER or the
keyboard icon to close the input keyboard, then click OK to log in and
enter the menu.
It is strongly recommended to change the default passwords after
logging in the first time. (see page 8)
NOTE: If the password has been changed and forgotten or misplaced
it will be virtually impossible for the user to log into the NVR. In this
case please contact SecurityTronix at:
(610)429-1821, Press 3for Tech Support, then press 2.
In order to use the password reset service you must provide
credentials to verify that you are the authorized installer of this NVR.
LOGGING OUT
It is recommended to log out of
the NVR each time after use, to
prevent unauthorized access or
tampering.
From the MAIN MENU, select
SHUTDOWN in the OPERATION
section, then select LOGOUT from
the popup window.

7
General Settings
SETTING DATE AND TIME
From the MAIN MENU, select SYSTEM in the Setup section, then
select GENERAL from the options on the left side of the window, and
then select DATE&TIME from the tabs at the top.
Under SYSTEM TIME, click the Year to bring up the input keyboard,
then enter the current year using the mouse. When you are finished,
click outside the input keyboard to close it. Repeat these steps to set
the current Month and Day.
The same process is used to enter the current Hour, Minutes and
Seconds. This is necessary if video is ever offered up as evidence
against a corresponding cell phone tied to a global clock system.

8
Be sure to click SAVE next to the SYSTEM TIME to save Date and Time
settings before navigating away from the DATE&TIME menu.
If desired, the NVR can be set to automatically adjust the time for
Daylight Savings Time if your locality uses it. This is done by clicking
DST checkbox, then entering the dates Daylight Savings Time becomes
active in your area using the method described to set Date and Time
above.
When finished, click APPLY and then SAVE at the bottom of the
screen. This will return you to the MAIN MENU.
CHANGING PASSWORDS
From the MAIN MENU, select SYSTEM in the SETUP section, then
select ACCOUNT from the options on the left side of the window.
Click the pencil icon in the MODIFY column for the user account you
wish to change. This will open the MODIFY USER menu, which enables
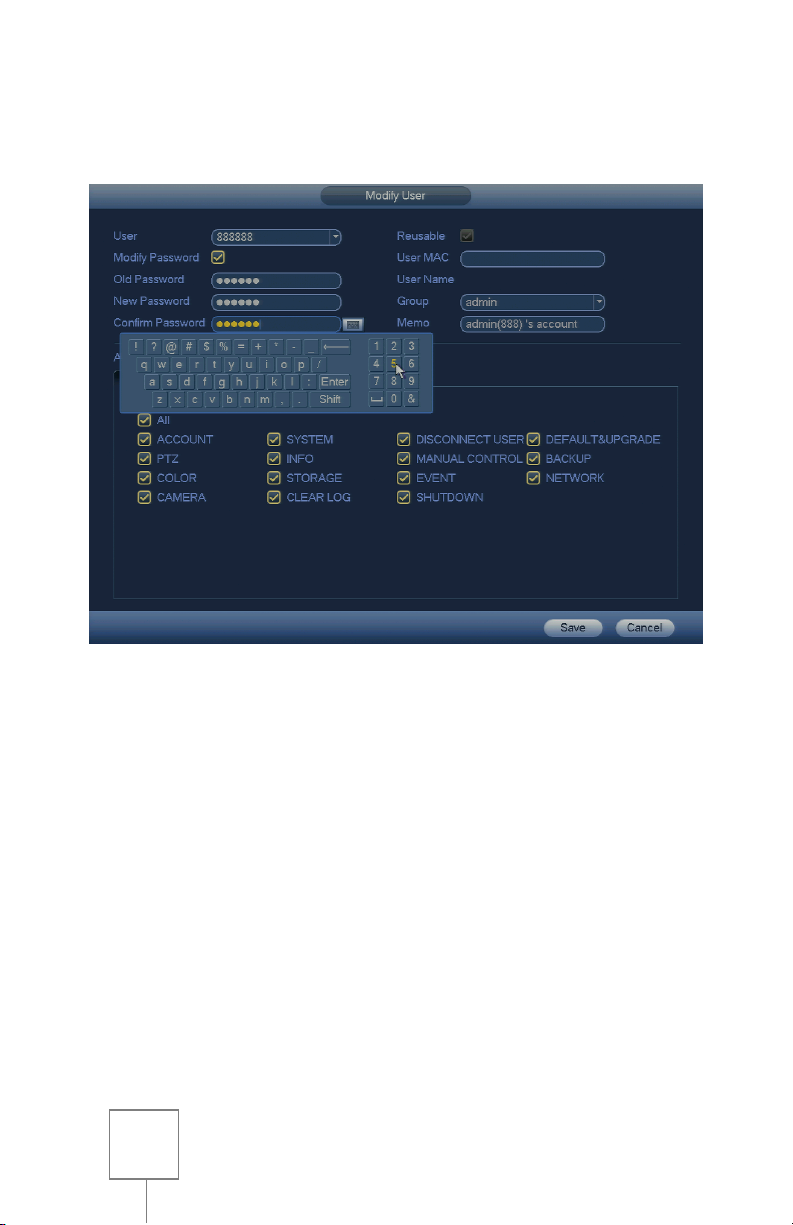
9
you to make changes to an account’s permissions, name, group, and
password.
Click the MODIFY PASSWORD checkbox to select it, and then click in
the OLD PASSWORD field to bring up the input keyboard. Using the
mouse, enter the account’s current password, then click ENTER or the
keyboard icon to close the input keyboard.
Next, click in the NEW PASSWORD field, and enter a new password
using your mouse, then click ENTER or the keyboard icon. It is
recommended to use a combination of letters and numbers that is
hard to guess, easy to remember, and has not been previously used.
Once your new password has been created and entered, click in the
CONFIRM PASSWORD field and enter your new password once more
using the method above. The NEW PASSWORD and CONFIRM
PASSWORD fields must match exactly.
Questo manuale è adatto per i seguenti modelli
3
Indice


