Sharp 32JF-77H Manuale utente

COLOUR TELEVISION
OPERATION MANUAL
32JF-77H
PRINTED ON ENVIRONMENTALLY FRIENDLY PAPER
Please read this operation manual carefull
before using the colour television.

1
Dear SHARP Customer
Congratulations! You are now the proud owner of a SHARP Colour Television Receiver. To
ensure proper operation, please read this manual carefully. After reading, keep this manual in a
safe place for future reference.
TERMS OF GUARANTEE
Subject to the conditions listed below Sharp Electronics (U.K.) Ltd. (Hereinafter called «the Com-
pany») guarantee to provide for the repair of, or at its option replace the Sharp Equipment, or any
component thereof, (other than Batteries), which is faulty or below standard, as a result of inferior
workmanship or materials.
The conditions of the guarantee are:
1. This guarantee shall only apply to defects or faults which are notified to the Company, or its
approved Service Facility within one year from the date of purchase of the equipment.
2. This guarantee covers equipment intended for private domestic use only. This guarantee does
not apply to equipment used in the course of a business, trade or profession.
3. This guarantee does not cover any faults or defects caused by accident, misuse, fair wear and
tear, neglect, tamper ing with the equipment, or any attempt at adjustment or repair other than
by an approved Service Facility.
4. In the unlikely event of that your equipment should require repair, please contact the dealer or
supplier from whom it was purchased.
5. The cost of carriage to and from the Dealer, Supplier or Sharp approved Service Facility shall
be borne by the pur chaser.
6. No person has any authority to vary the terms or conditions of this guarantee.
7. This guarantee is offered as an additional benefit to the consumer’s statutory rights and does
not affect rights in any way.
In the unlikely event of this equipment requiring repair during the guarantee period, you will need
to provide proof of date of purchase to the repairing company.
Please keep your invoice or receipt, which is supplied at the time of purchase.

2
Safety Precautions
This equipment complies with the requirements of Directives 89/336/EEC and 73/23/EEC as amended by 93/68/EEC.
The tube of your TV has a special coating.
Do not knock or rub on the tube face with
sharp or hard surfaces, otherwise you will
damage the coating.
To prevent damaging the surface of the
television screen, remove finger prints only
with a soft cloth dampened with glass
cleaner. Do not use any abrasive cleaners.
Do not use thinner, benzene or other strong
chemical cleaners.
To prevent fire or electrical shock, do not
use the TV set in an excessively damp place.
Position the TV set out of direct sunlight and
away from heat, as high temperatures can
damage the cabinet, CRT, or other electronic
parts.
Don't cover ventilation salts with objects such
as newspapers, tablecloths, curtains, etc.
Do not cover the ventilation holes at the back
of the TV set, this can cause fire or other
serious problems. Leave an adequate open
space behind the TV set for good ventilation.
Always disconnect your television from the
mains and the aerial cable during
thunderstorms.
Even if your television is switched off, it can
still be damaged by lightning striking the
mains and/or aerial cable.
Unplug the power cord from the wall outlet
immediately if the TV set begins to make
unusual noises or give off smoke or an odd
smell, then call your dealer for service.
In order to ensure that the television is
properly ventilated, leave a space of at least
10 cm around the set.
Do not install this equipment in a confined
space such as a bookcase or a built-in
cabinet.
Television equipment and cart combination
should be moved with care. Quick stops,
excessive force and uneven surfaces may
cause the equipment and cart combination
to overturn.
Wall or shelf mounting should follow the
manufacturer’s instructions, and should use
a mounting kit approved by the
manufacturer.
To prevent electrical shock, do not subject
the AC power cord to damage by bending or
twisting it, or by placing heavy items on top
of it and do not place the AC power cord
under the TV set. If the AC power cord
becomes damaged, unplug it from the wall
outlet immediately and call your dealer for
service.
Do place the TV set onto an even stand,
table or track which size is bigger than the
TV set.
If the TV set is put onto a smaller size or
uneven stand, table or track may cause the
TV cabinet distort. Do not put or insert
anything between TV set and the stand, table
or track.
In order to prevent electrical shocks and fires,
ensure that the television is not subjected to
splashes or spills of water, and avoid inserting
objects or pouring any type of liquid into the set.
To prevent fire, never place any type of candle or
naked flames on the top or near the TV set.
In the case that an object or liquid enters the set,
don't use and contact technical service.
Never remove the back of the cabinet, as
there is high voltage in the TV set.
Please call for service.
Do not place this television equipment on an
unstable cart, stand or table. The television
equipment may fall, causing serious injury
to a child or an adult, and serious damage to
the equipment.
Use only with a cart or stand recommended
by the manufacturer, or sold with the
television equipment.
CAUTION: For environmental and safety reasons, it is recommended that the
television isn't left in stand-by mode while not in use. Switch it off using the main
button and unplug it during periods of absence from the home.

Respect the environ-
ment and put used bat-
teries in a container that
is especially designed
for this purpose.
3
Remote Control Battery Installation
Contents
Terms of guarantee.......................................................... 1
Safety precaution ............................................................ 2
Contents .......................................................................... 3
Accessories ..................................................................... 3
Remote Control Battery Installation ................................ 3
Remote Control buttons .................................................. 4
Controls and Terminals ................................................... 5
Aerial Connections (Typical Connections) ....................... 6
Auto Installation ............................................................. 11
Switching on .................................................................. 13
Menu Structures..............................................................14
TV operation (Channel selection) .................................. 16
Picture Adjustments ...................................................... 17
Wide Mode .................................................................... 20
Double Window ............................................................. 22
Audio Adjustments..........................................................24
Sound Setting Mode.......................................................25
Features setting mode:
On Timer and Off Timer.......................................... 29
Child Lock (Channel Block) ................................... 30
Postcode Security.................................................. 32
Help and Demo ...................................................... 33
AV LINK ................................................................. 34
TV Channel Setting (Advanced):
To repeat the AUTO INSTALLATION .................... 36
Manual Channel Preset ......................................... 37
After preset has been performed .......................... 38
TV/VIDEO Selector, Headphone Jack, Sub-titles
and VCR Mode .............................................................. 40
Teletext Mode ............................................................... 42
21-pin Euro-SCART and 21-pin Audio/Video ............... 45
Troubleshooting ............................................................ 46
General Specifications for Television Receiver ............. 47
Index page ..................................................................... 48
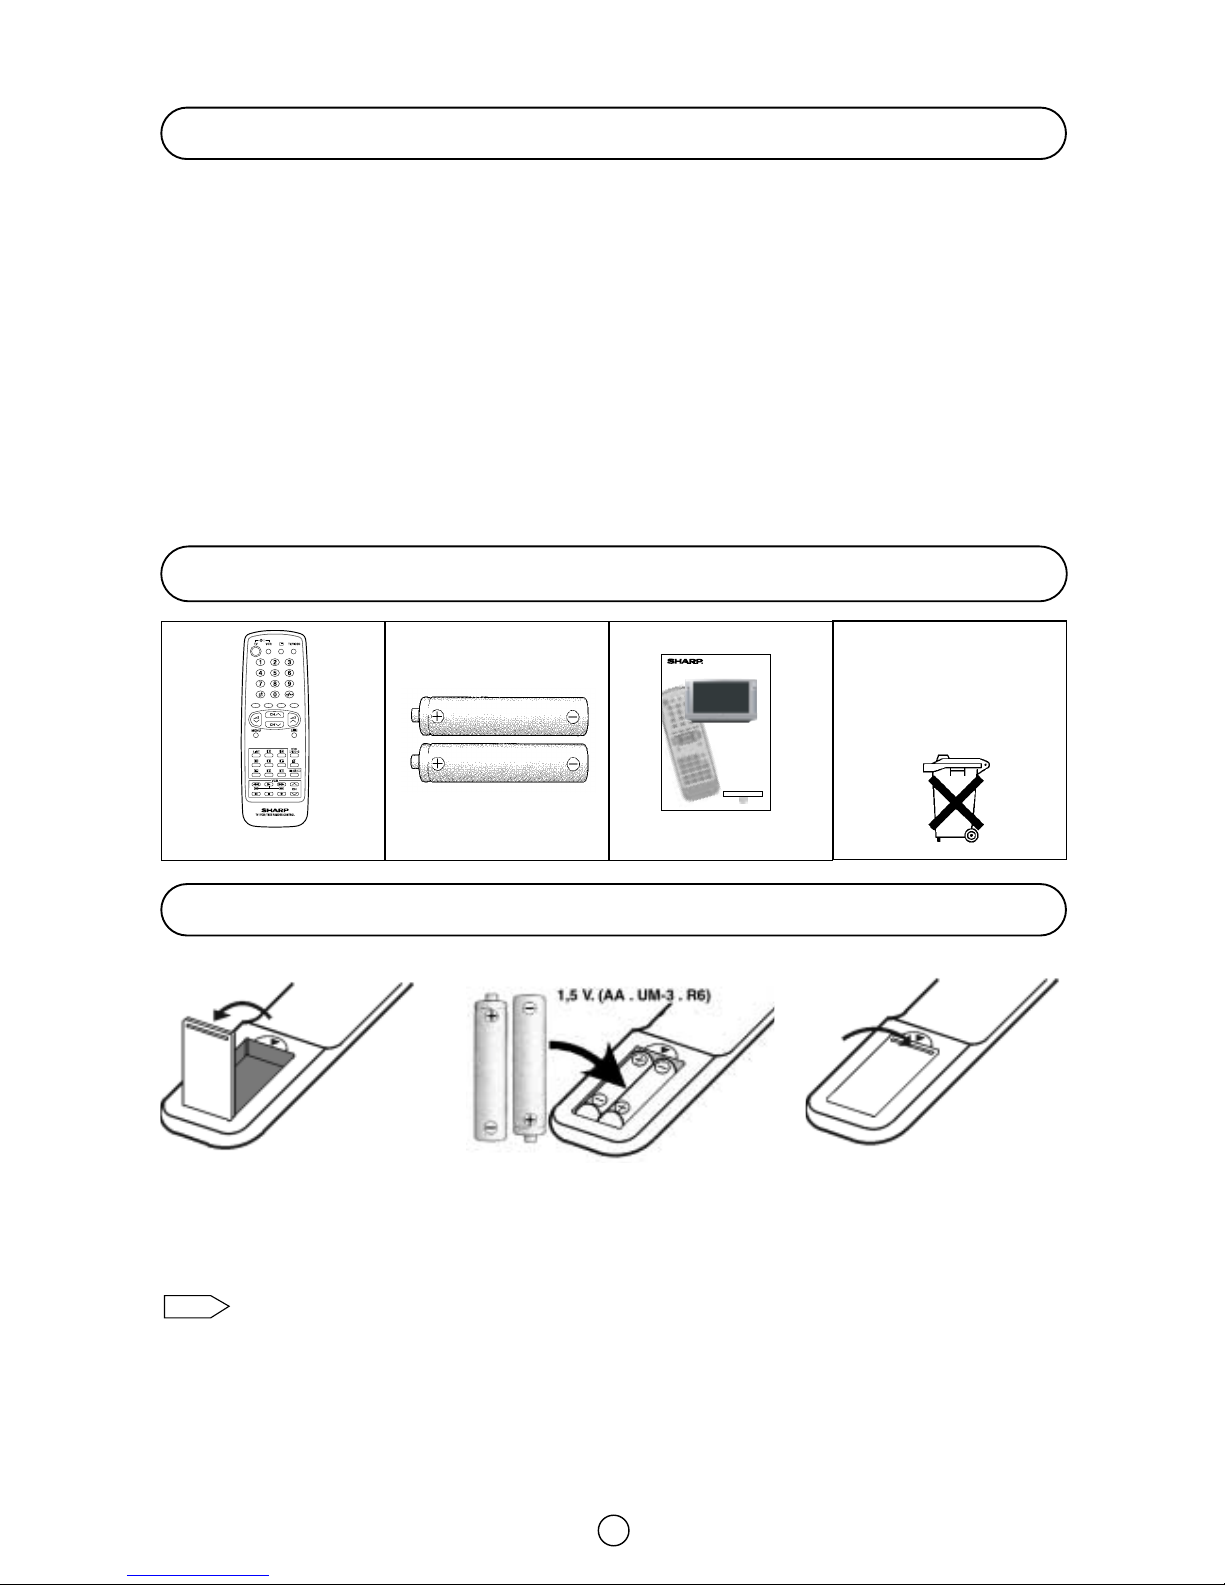
Remote control
Type-AA dry batteries
Operation manual
Before using the TV set for the first time, install the supplied dry batteries in the remote control.
• Remove batteries if weak or if the unit is not in use for long periods.
• Do not mix old and new batteries.
• Incorrect installation of the batteries may damage the remote control.
Note:
1. With your thumb nail, pull up
the slit as indicated by the
arrow to remove the battery
cover.
2. Insert two batteries 1.5 V (R-6,
“AA” size). Be sure to match
the battery ±/—terminals
with the ±/—marks inside
the compartment.
3. Replace the battery cover.
COLOUR TELEVISION
OPERATION MANUAL
32JF-77H
PRINTED ON ENVIRONMENTALLY FRIENDLY PAPER
Please read this operation manual carefull
before using the colour television.
Supplied Accessories

4
Remote Control
TV 1. Stand-by button (TV)
Video 2. Power button (VCR)
TV 3. 0 ~ 9 digit buttons
4. Flash back button
Teletext 5. GREEN button
6. RED button
TV 7. Volume DOWN button
8. MENU button
Teletext 9. REVEAL button
10. LIST button
11. STORE button
12. CANCEL button
13. HALF PAGE button
14. Reset button
TV 14. Subtitle/ Help
Video 15. Rewind/picture search reverse
16. Play button
17. Pause/Still button
18. Stop button
TV 19. TV/VIDEO button
20. Double window button
21. Single/Double entry button
Teletext 22. YELLOW button
23. BLUE button
TV 24. Channel UP button
25. Volume UP button
26. Channel DOWN button
27. Wide Mode Selector
TV /Teletext 28. CLOCK button
TV 29. Sound mode button
Teletext 30. HOLD button
TV 31. Sound Mute button
Teletext 32. TEXT/MIX/PICTURE button
33. INDEX button
Video 34. Channel UP button (VCR)
35. Fast forward/picture search forward
36. Channel DOWN button (VCR)
37. Record button
1. 19.
23.
21.
24.
25.
26.
27.
28.
29.
30.
31.
32.
34.
37.
36.
35.
33.
22.
20.
4.
5.
6.
7.
8.
10.
11.
12.
13.
15.
18.
17.
16.
14.
9.
2.
3.

Controls and Terminals
FRONT TV
1. Main Power On/Off Switch
2. Power Indicator
3. Remote Control Sensor
4. Door
HOW TO OPEN THE DOOR
Lift the projection at the lower right of the door with your
finger in the direction of the arrow.
Behind the door
5. Volume Button (DOWN)
6. Volume Button (UP)
7. Program Selector (NEXT)
8. Program Selector (PREVIOUS)
9. S-Video input terminal
10. Video Input Terminal (PAL/SECAM/NTSC)
11. Audio Input Terminal (left)
12. Audio Input Terminal (right)
13. Headphone Socket (3.5mm Ø, 16~600 ohms)
REAR TV
21-pin In/Out
1. 21-pin Audio/Video (AV-2) With
PAL/SECAM/NTSC Video Input
2. 21-pin Audio/Video (AV-1) With
PAL/SECAM/NTSC/S-Video Input
and AV LINK control signal
3. 21-pin Euro SCART (RGB) With
PAL/SECAM/NTSC Video Input
RF Input
4. Aerial terminal
Digital Audio Input
5. RCA Input Terminal
Use this digital audio input to connect a
set with digital audio output, for example
a DVD, a DAT or a CD.
123 4
5 6 7 8 910 11 12 13
42 3
1
DIGITAL
AUDIO
INPUT
5
DIGITAL
AUDIO
INPUT
5

Note: For further details, please refer to operation manual of your VCR.
DIGITAL
AUDIO
INPUT
DIGITAL
AUDIO
INPUT
6
Typical Connections
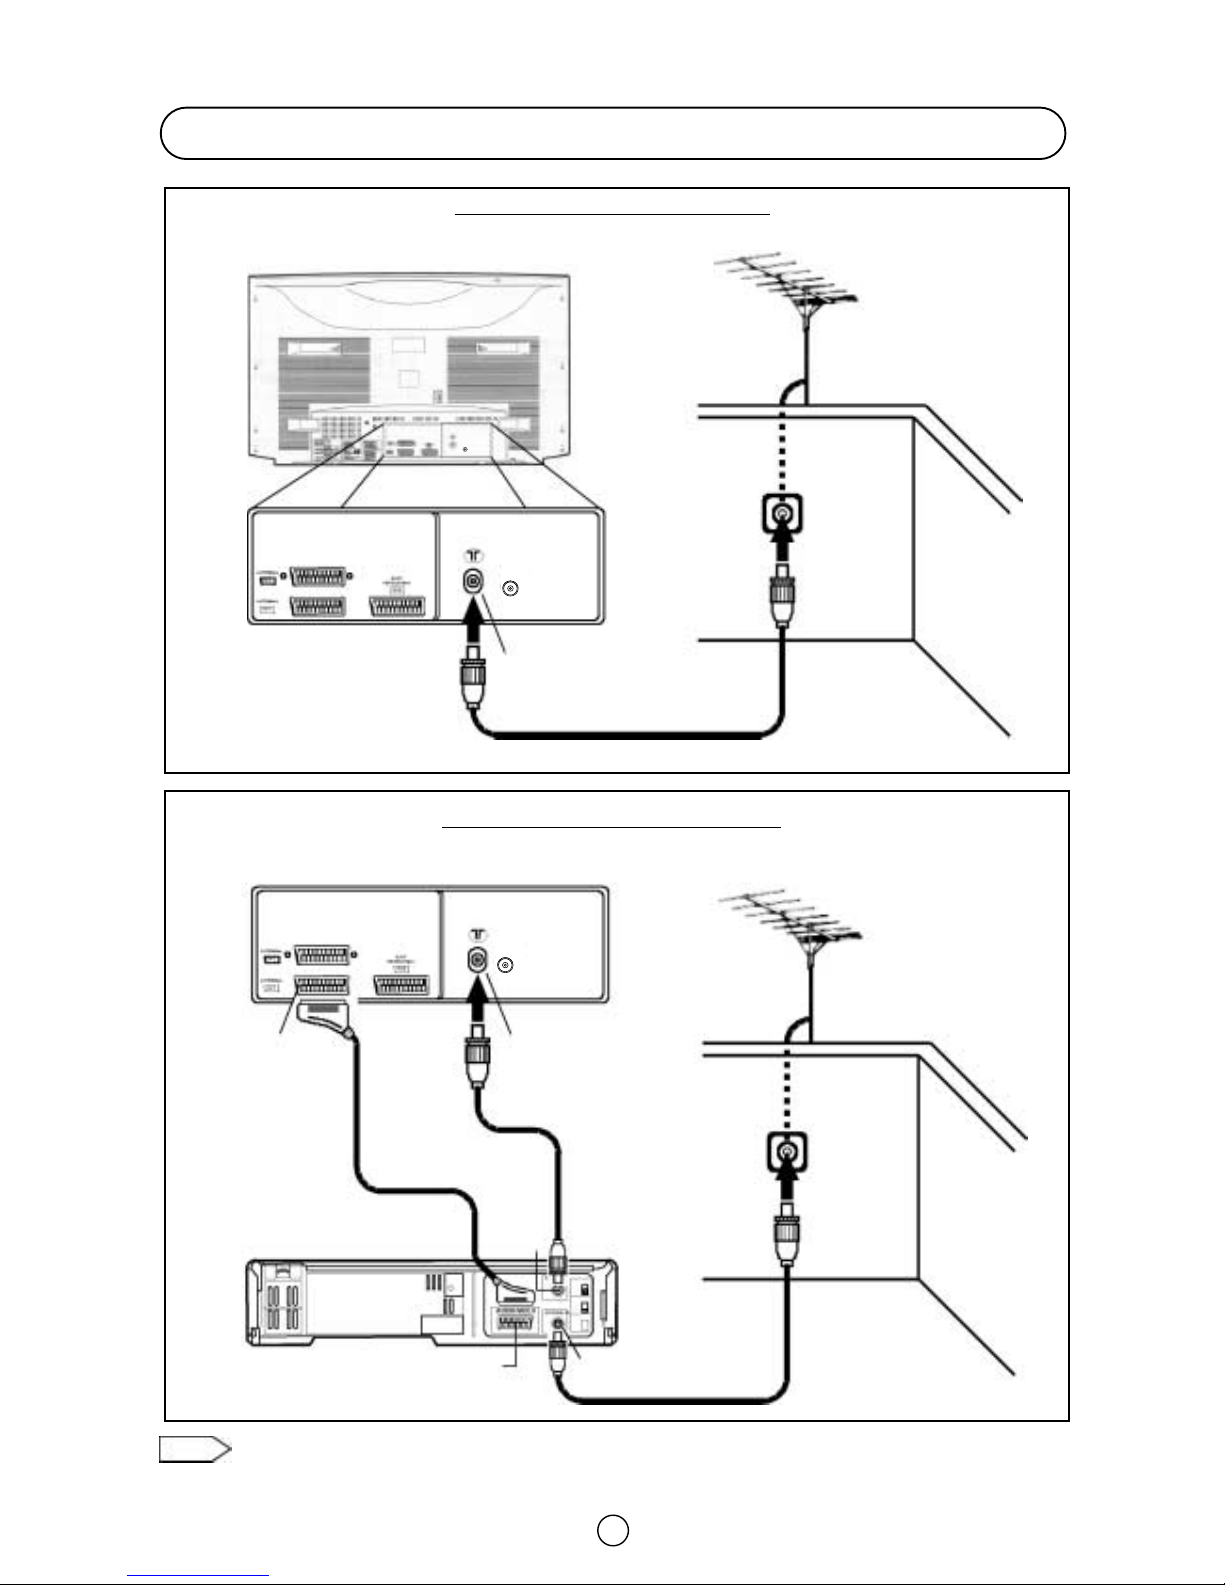
Aerial connection - TV set only -
Aerial Connections - TV and VCR -
BACK OF TV
BACK OF TV
BACK OF VCR
Aerial
(Not supplied)
Aerial
(Not supplied)
Aerial Lead
(Not supplied)
Aerial Lead
(Not supplied)
Aerial Lead
(Not supplied)
Aerial IN
Audio/Video
Scart Lead
(Not supplied)
RF OUT
AV/TERMINAL
(AV-1)
Aerial IN
Aerial IN
DIGITAL
AUDIO
INPUT

DIGITAL
AUDIO
INPUT
7
Connections - TV, DVD Player, DECODER and VCR (Videorecorder) -
Typical Connections (Continued)
Note: For further details, please refer to operation manuals of your DVD Player, DECODER and VCR.
BACK OF TV DVD PLAYER
DECODER
BACK OF VCR
Aerial
(Not supplied)
Scart Lead
(Not supplied)
Scart Lead
(Not supplied)
AV/TERMINAL (AV 2)
AV/TERMINAL
(AV 1)
Euro SCART
(RGB) Aerial IN
Aerial IN
RF OUT
Audio/Video
Aerial Lead
(Not supplied)
Aerial Lead
(Not supplied)
Scart Lead
(Not supplied)
DIGITAL
AUDIO IN
Audio lead (Not supplied)
DIGITAL
AUDIO OUT
DIGITAL
AUDIO
INPUT

DIGITAL
AUDIO
INPUT
8
Connections - TV, DVD Player, and Digital Set Top Box-
Typical Connections (Continued)
BACK OF TV DVD PLAYER
Scart Lead
(Not supplied)
Scart Lead
(Not supplied)
AV/TERMINAL (AV 2)
Euro SCART
(RGB) Aerial IN
Aerial Lead
(Not supplied) Dish Lead
(Not supplied)
DISH IN
AERIAL IN
TV SCART
RF OUT
Satellite dish
(Not supplied)
Aerial
(Not supplied)
Aerial Lead
(Not supplied)
DIGITAL SET
TOP BOX
Note: For further details, please refer to operation manuals of your DVD Player and Digital Set Top Box.
Satellite dish
(Not supplied)
DIGITAL AUDIO IN
Audio lead (Not supplied)
DIGITAL AUDIO OUT
DIGITAL
AUDIO
INPUT

DIGITAL
AUDIO
INPUT
9
Connections - TV, DVD Player, VCR and Digital Set Top Box -
Typical Connections (Continued)
BACK OF TV DVD PLAYER
Scart Lead
(Not supplied)
Scart Lead
(Not supplied)
AV/TERMINAL (AV-2)
AV/TERMINAL
(AV 1)
Euro SCART
(RGB) Aerial IN
Aerial IN
Audio/Video
Aerial Lead
(Not supplied)
Aerial Lead
(Not supplied)
Aerial Lead
(Not supplied)
Dish Lead
(Not supplied)
DISH IN
AERIAL IN
TV SCART
RF OUT
Satellite dish
(Not supplied)
Aerial
(Not supplied)
Scart Lead
(Not supplied)
BACK OF VCR
DIGITAL SET
TOP BOX
RF OUT
Note: For further details, please refer to operation manuals of your DVD Player, VCR and Digital Set Top Box.
DIGITAL AUDIO IN
DIGITAL AUDIO OUT
Audio lead (Not supplied)
DIGITAL
AUDIO
INPUT
Indice
Altri manuali Sharp TV a tubo catodico

Sharp
Sharp DV-5403S Manuale utente

Sharp
Sharp 37ET-35H Manuale utente

Sharp
Sharp 37GT-25H Manuale utente

Sharp
Sharp 32C231 Manuale utente

Sharp
Sharp 14J1-RU Manuale utente

Sharp
Sharp 32U-S60B Manuale utente

Sharp
Sharp DV-5151S Manuale utente

Sharp
Sharp 29S-FX10U Manuale utente

Sharp
Sharp 54DS-02S Manuale utente

Sharp
Sharp 32C530 Manuale utente

Sharp
Sharp DV-3750S Manuale utente

Sharp
Sharp DV-3751S Manuale utente

Sharp
Sharp 51DS-05H Manuale utente

Sharp
Sharp 54GT-25S Manuale utente

Sharp
Sharp 27F640 Manuale utente

Sharp
Sharp 14LM-40C Manuale utente

Sharp
Sharp 70DW-15SN Manuale utente

Sharp
Sharp 51CS-05H Manuale utente

Sharp
Sharp CV-3720G Manuale utente

Sharp
Sharp 51DS-02H Manuale utente