Sharper Image ELECTRIC X2 Manuale utente

SHARPER IMAGE ELECTRIC
X
2 Owner’s Manual
Model SI700
NOTICE: READ THIS FIRST!
Read this manual thoroughly before
assembly and operation.
Follow all safety precautions.
TM

INTRODUCTION
Your scooter operates best on smooth, flat terrain. By kicking along, you can “boost” its power, adding your leg
power to the scooter motor power. This is also a great way to add a little exercise to your travels.
Please read this manual completely before riding for the first time. Pay attention to the safety precautions and the
information on battery charging. Like all powered moving vehicles, your scooter requires care and maintenance
to deliver dependable use.
Scooter riding can be a hazardous activity even under ideal circumstances. This manual contains many warnings and
cautions. Because any fall can result in serious injury or death, we do not repeat the warning of possible serious
injury or death with each warning. However, this risk should always be implied from all safety warnings and
cautions contained in this manual and on the scooter itself.
Important Message to Parents
For your child’s safety, it is your responsibility to review common safety procedures as well as the information contained
in this manual with your child. Periodically review and reinforce the information in this manual with younger riders.
Parents are required to inspect and maintain the child’s scooter to ensure their safety.

• Always wear a helmet and safety gear when riding this vehicle.
• Check your local ordinances to determine where you can legally operate this product, and what restrictions
there may be.
• This scooter is recommended for ages 10 years and older.
• Read this manual thoroughly and follow all the safety and maintenance recommendations.
• Before each use, inspect your scooter thoroughly for loose or missing parts.
• To avoid damage to the motor, manually kick off first to assist in starting.
• Be aware of and avoid unintentional starts.
• Do not leave the power switch on when not in use.
• Do not use in rain or wet conditions. Doing so could damage the electronic components.
• Do not place the battery near fire or heat as this may cause the battery to explode.
• Do not expose the charger to moisture or water.
READ CAREFULLY
SAFETY WARNINGS

SAFETY WARNINGS
• To avoid damage to battery, do not use the charger if it has been struck, dropped or damaged in any way.
• Keep hands, face, feet and hair away from all moving parts.
• Do not touch the motor, wheels or drive belt while they are rotating.
• Avoid gravel, sand, grass or rough surfaces.
• To avoid injury, use caution when operating the folding hinge.
• Do not attempt to carry passengers or operate this scooter with more than one rider/operator.
• Brakes are designed to control speed as well as stop the vehicle. Practice braking to slow down and smoothly
stop under various conditions and situations.
• Avoid touching the wire or heated parts while charging battery.
• Do not operate this product while intoxicated.
• Do not leave this vehicle with children unless an adult is present.
READ CAREFULLY

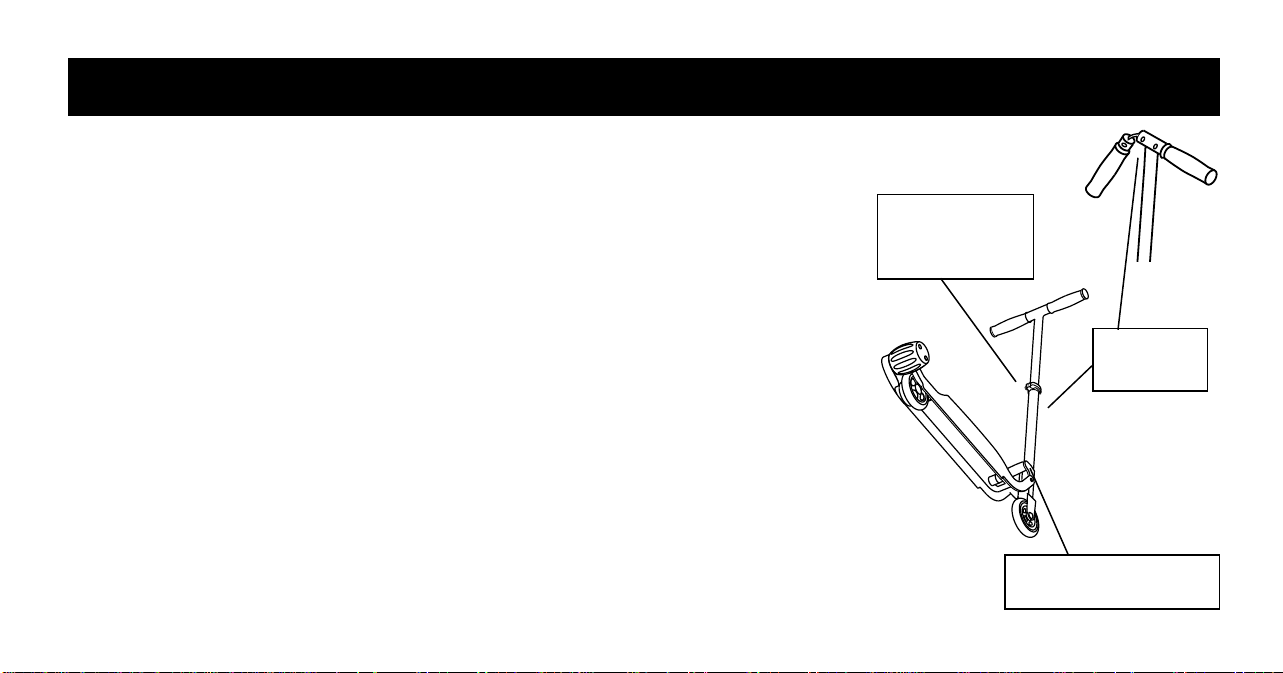
PARTS DESCRIPTION
Main Power Switch
Low Battery Indicator
Charged Battery Indicator
Accelerator
Battery Charger
Head Tube Deck
Power Socket
Folding Mechanism
Quick Release
Brake
Quick Release
Height Adjustment

CONNECTING AND ACCESSING BATTERY
This scooter is shipped with the battery disconnected to prevent accidental operation during shipping. The
battery must be connected for first use.
The battery should always be disconnected if the scooter is going to be stored for several months or more, or if
young children might have access to the scooter.
The battery compartment is located underneath the scooter deck.
Turn the main power switch off and turn the scooter upside down
to access the rechargeable battery.
TO CONNECT:
Plug the POWER CABLE into the BATTERY JACK located on
the front side of the BATTERY PACK.
The battery pack can be removed from its compartment by
removing the two bolts on the front and back end of the battery
pack. (This is only necessary if the battery needs to be replaced.)
Battery Pack
Battery Jack
Power Cable

The battery indicators next to the MAIN POWER switch will display the battery status whenever the accelerator
is activated. RED indicates a low battery. GREEN indicates a battery with sufficient charge to operate.
Always charge the scooter in a dry location. Never expose the charger to wet or damp conditions.
Confirm that the MAIN POWER switch is in the OFF position. Failure to do so may result in personal injury
or property damage.
Plug the charger into the POWER SOCKET first. Then plug the charger into a wall outlet.
Fully charging the battery takes from 2 to 3 hours. The LED on the adapter is red while charging and green when
charging is complete (or when the charger is not plugged into the scooter).
Frequent overcharging or overcharging for extended periods of time can damage the battery. Unplug the charger
as soon as possible after the its green LED indicates that the charging cycle is complete.
Battery is disconnected for shipping. Connect battery first!
Charge when low battery indicator turns on (red LED next to MAIN POWER switch).
Operating the motor on low battery can severely damage or reduce the battery life.
BATTERY AND CHARGING

BATTERY AND CHARGING (CONTINUED)
If you experience problems charging the battery,
momentarily disconnect the charger from the scooter
and check to see if the green LED on the charger
is illuminated. If the light is not illuminated, or
you have any questions about charging, please call
Sharper Image Electric Customer Service at:
(800) 344-5555.
CHARGER LED
Red when charging and green when
charge is complete or charger is not
plugged into scooter battery.

BATTERY CARE
• Fully discharging the battery (until red LED indicator turns on) between charges will increase the
life of the battery. Avoid charging battery until the battery indicator LED turns red, indicated that
charging is required.
• Store and charge the battery at a temperature between 50 F° (10 C°) and 100 F° (38 C°).
• Handle the battery and charger with care. Be careful not to drop them.
• Disconnect the battery if the scooter will be stored for several months or more. Charge periodically
(every few months) to protect battery life while unit is in storage.
• Do not place the battery near fire or heat — it could explode.
• To avoid injury and damage, use only batteries provided or recommended by The Sharper Image. Other
batteries may look and fit the same, but could leak during charging and when in use.
• Always use the charger provided with your scooter. Other chargers could overcharge the battery and/or
cause it to leak or explode.
• Avoid overcharging the battery. Disconnect the scooter battery from the charger after the charging
cycle is complete (indicated when the LED on charger goes from red to green).
To unfold your scooter, unlock the folding mechanism by pulling the QUICK
RELEASE away from the unit.
Lift the HANDLEBARS and STEERING TUBE until they are fully open.
Close the QUICK RELEASE by pushing it back to its original locked position.
Inspect and test the mechanism to confirm that it cannot collapse during use.
UNFOLDING THE SCOOTER
Open the QUICK RELEASE on the handlebar tube to adjust the handlebars
to the height that gives the rider the best control. The handlebar tube is
indexed with “pop-out” buttons. Confirm that a button has popped out of the
center area of the handlebar tube AND on both handlebar grips.
Tighten the QUICK RELEASE if necessary to assure that the handlebars
won’t move. Return the QUICK RELEASE to the locked position.
NOTE: The QUICK RELEASE is tightened by rotating the knob on the
opposite side. These bolts should be tight enough to prevent movement,
but not so tight as to make it difficult to operate the QUICK RELEASE.
HANDLE BAR ADJUSTMENT
FOLDING MECHANISM
Folding Mechanism
Quick Release
Quick Release
Height
Adjustment
“Pop Out”
Buttons
Questo manuale è adatto per i seguenti modelli
1
Indice
Altri manuali Sharper Image Scooter


