SIIG CE-AV2012-S1 Manuale utente

1
AVTuner Pro-PVR
Quick Installation Guide
Introducing the AVTuner Pro-PVR
The AVTuner Pro-PVR is a new generation TV box which
you can use with your CRT, LCD, Plasma or projection
monitortowatch,record,pauseliveTVandcapturehigh
resolution video on your computer.
FeaturesandBenefits
•3DProgressiveScanwithupto1280x1024resolution
• SupportsMTSstereoandSAP
•Colorandpicturequalityenhancementtechnologies
•Capture and record in MPEG-1 and MPEG-2
•TV and digital video recording capabilities and
pre-scheduled TV recording
SystemRequirements
•Antenna,cable,satelliteTVandothervideosources
utilizing S-Video, RCA or Coaxial connections
•VGA/SVGA/XGA/SXGAcompatibleLCDorCRT
monitor
•Speakers with 3.5mm stereo connector
For Video Recording Capabilities:
•Pentium or equivalent PC: 1.5GHz for 352x288;
2.0GHz for 640x480; 2.4GHz for MPEG-2
•128MB RAM (256MB recommended)
•Windows XP (SP1) with 800x600 video resolution
•USB 2.0 port and sound card
04-0383A
2
PackageContents
•AVTuner Pro-PVR
•Remote control with 2 AAA batteries
•Switching power adapter
•VGA extension cable
•3.5mm stereo cable
•USB A to B data cable
•Driver and utility (InterVideo WinDVR 3) CD
•Quick installation guide
Layout
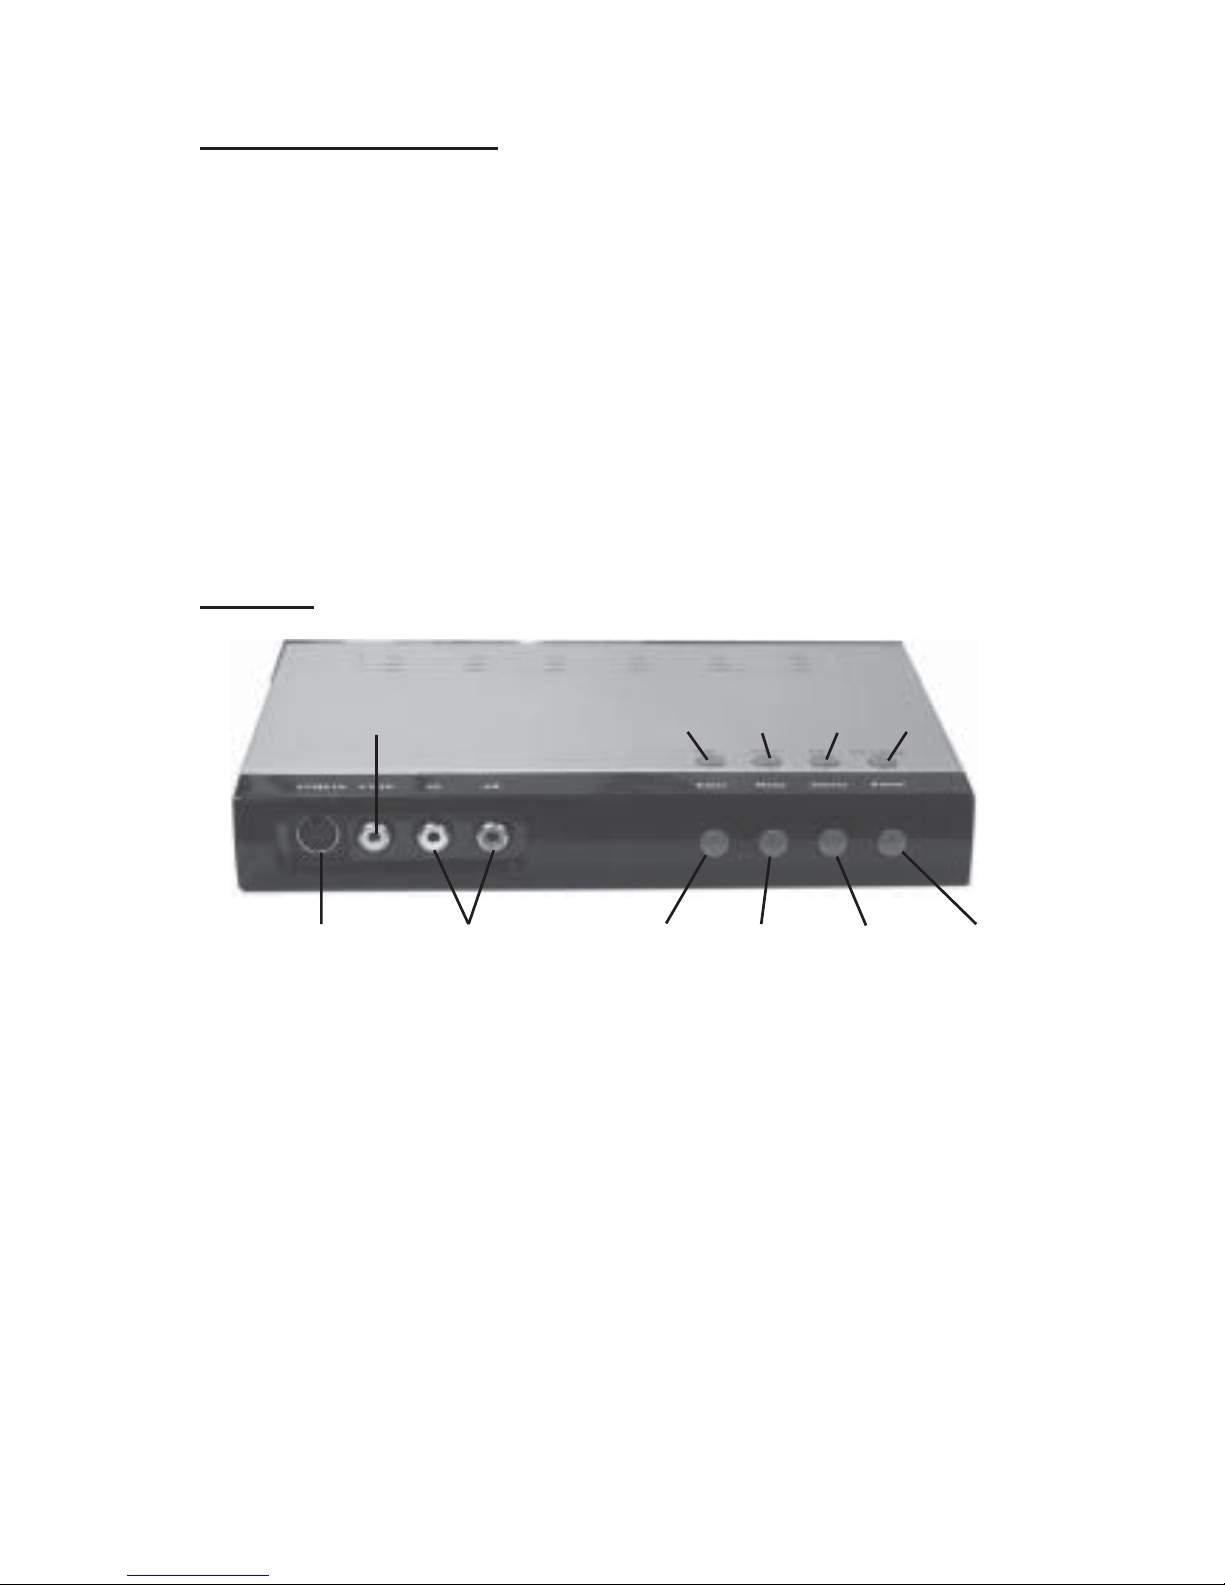
Figure 1: Front Panel
•S-Video In: connects to the S-Video output of any
AV device
•Video In: connects to the video output of any AV
device via RCA connector
•L/R audio inputs: connects to the left and right
audio output of any AV device via RCA connector
•Volumecontrol: pressVol+toincreaseandVol-to
decrease the volume level. Also used to navigate
through the Menu Options (see page 9)
S-Video
In
Video In
L/R audio
inputs
Vol- Vol+ Ch- Ch+
Enter Menu PC/TV Power

3
Figure 2: Back Panel
•Powerconnector: poweradapterjackforDCpower
•Monitor: connects to your PC's monitor
•VGA In: connects to your PC's VGA out
•Speaker: 3.5mm audio output jack for connecting
external speakers
•Line In: connects to your PC's Line-out/speaker
out jack
•USB: connects to your PC's USB port (USB 2.0
recommended). Onlyneededforrecordingfeature.
•Video Out: composite video RCA jack connects to
the video input jack of any video display source;
active in TV Box mode only
•Tuner In: input for antenna, Cable or Satellite TV
•Channel selection: press Ch+ to go up and Ch- to
go down to the next channel. Also used to select
Menu Options (see page 9)
•Enter: confirms menu settings (TV Box mode);
Snapshot capture (USB TV Capture mode)
•Menu: displays a menu of all possible settings (TV
Box mode); Pause (USB TV Capture mode)
•PC/TV: switches between TV and PC
•Power: power On/Off switch
Power
connector Monitor VGA
In Speaker Line
In Video
Out Tuner In
USB

4
RemoteControlButtons
•Power:
- TV Box mode: On/Off switch
- USB TV Capture mode: turns on/off WinDVR 3
•RES/CH Surf:
- TV Box mode: selects resolution and refresh
rate
- USB TV Capture mode: channel preview
•Numberkeys: key-innumbersforchannelselection
•ENTER: confirms channel selection
•CH RTN: returns to previous channel
•PC/TV: switches between TV Box mode and USB
TV Capture mode
•MENU/SNAP:
- TV Box mode: displays Menu settings
- USB TV Capture mode: still image capture
(snapshot)
•CH (+, -): channel up/down or menu up/down
•VOL (+, -): volume up/down or menu left/right
•ENTER/ZOOM:
- TV Box mode: confirms Menu settings
- USB TV Capture mode: full screen display
•SOURCE: switchesbetweenTVandexternalvideo
sources
•MUTE: turns sound On or Off
•16:9/Time Shift:
- TV Box mode: switches between 4:3 and 16:9
aspect ratio
- USB TV Capture mode: enables/disables
Timeshifting function

5
•SLEEP/REC:
- TV Box mode: enables/disables sleep mode
(10min, 30min, 60min, 90min, off)
- USB TV Capture mode: records video/audio
•SCAN/Play/Pause:
- TV Box mode: scans TV channels
- USB TV Capture mode: play or pause video
•OSD/F.F:
- TV Box mode: displays OSD information
- USB TV Capture mode: fast forwards video
playback
•M+/REW:
- TV Box mode: adds/deletes favorite channels
- USB TV Capture mode: rewinds video playback
•MEM/STOP:
- TV Box mode: calls up favorite channel list
- USB TV Capture mode: stops video playback
•Audio: bilingual stereo sound
Hardware Installation
With the AVTuner Pro-PVR you can watch live TV on
your PC without the use of Windows operating system
(TV Box mode) or watch/record/pause live TV/Video
while in Windows (USB TV Capture mode). To view
live TV without the use of Windows, skip step #7 in
Connecting To Your PC on page 6, and skip Software
Installation section on page 7. Otherwise complete all
instructions.

6
1. Connectthecoaxialcablefromyourantenna/cable/
satellite TV to the Tuner In connector, and/or any
other video sources, such as DVD player, VCR, or
DV camcorder, utilizing the S-Video, Composite
videoand left/right audio inputsonthefrontpanel
(see Figure 1 on page 2 for more information).
2. ConnecttheVGAextensioncableto the VGAInof
theAVTunerPro-PVR,thenconnecttheotherendto
the VGA output of the computer.
3. Connectthemonitor'sVGAconnectortotheMonitor
jack of the AVTuner Pro-PVR.
4. Skipthis stepifthe AVTunerPro-PVRand yourPCwill
use separate speaker systems. Plug one end of the
3.5mm stereo cable into the Line In of the AVTuner
Pro-PVR, then plug the other end into Speaker out/
Line out port of the computer's sound card.
5. ConnectspeakerstotheSpeakerjackoftheAVTuner
Pro-PVR.
6. ConnecttheSwitchingPoweradaptertothePower
connector, then plug the power adapter into a
reliable power source.
7. PlugthetypeBconnectoroftheUSBdatacableinto
the USB port of the AVTuner Pro-PVR. Do not
connecttheotherendofthecableintothecomputer's
USBportuntilfirstcompletingSoftwareInstallation
section on page 7. The USB connection enables you to
view, record and pause live TV and video while in
Windows.

7
Software Installation
This software is needed for watching and recording live
TV and video while in Windows. Skip this section if you
do not need this feature.
WindowsXP
1. Boot up Windows. At the Windows desktop insert
the driver CD.
2. The installation should auto start, if not, click Start,
Run. Type in D:\AVShow\setup.exe, then click
OK. (Change D: to match your CD-ROM drive
letter)
3. Followtheonscreeninstructionstoinstallthedriver
andWinDVR3software. TheserialnumberforWinDVR
3 is on the CD-ROM sleeve.
4. Restart Windows when prompted.
5. When Windows resumes, plug the AVTuner
Pro-PVRintoaUSBporttocompletetheinstallation.
Operating Instructions
ConfiguringtheAVTunerPro-PVR
Before using the AVTuner Pro-PVR, please configure it
using the instructions below.
For TV Box mode
In TV Box mode, you can watch live TV and video
without your computer.
1. Press the Power button on the AVTuner Pro-PVR.
2. Press the Menu button on the front panel to display
the menu options.

8
3. Use the Vol buttons to select the Area Settings
menu, then press Enter on the front panel. Use the
Chbuttonsonthefrontpaneltoselectyourcountry,
thenpressEnteronthefrontpaneltoconfirm. Press
the Menu button to return to the menu options.
4. Use the Vol button to select the TV Source menu,
then press Enter on the front panel. Use the Ch
buttons on the front panel to select TV or CATV,
thenpressEnteronthefrontpaneltoconfirm. Press
the Menu button to return to the menu options.
5. Use the Vol button to select the Auto Scan menu,
then press Enter on the front panel. Use the Ch
buttons on the front panel to select Channel scan,
thenpressEnteronthefrontpaneltoconfirm. Press
the Menu button to return to the menu options.
Note: SelectingFreqScanorFinetunewillincrease
the amount of channels found.
For USB TV Capture mode
In USB TV Capture mode, you can watch, record, pause
live TV and capture high resolution video on your
computer.
ThefirsttimeWinDVR3isstarted,theinitilizationwizard
will guide you through the steps in configuring the
software. Follow the directions below to configure the
software.
1. Press the Power button on the AVTuner Pro-PVR.
2. Press the PC/TV button on the front panel to switch
to USB TV Capture mode. Boot up Windows.
3. At the Windows desktop, press the Power button
on the front panel or double click the WinDVR 3
icon on the desktop to start WinDVR 3.

9
4. At the Device window, confirm the settings, then
click Next.
5. At the TV window, confirm the settings, then click
Next.
6. At the Channel window, click Auto scan.
7. When Auto scan completes, click Next.
8. AttheStoragewindow,clickFinishtocompletethe
software setup.
MenuOptions(TVBoxmode)
•Picture: adjusts brightness, contrast, tint and
saturation
•Source: selects video sources; TV, Composite,
S-Video
•Resolution: adjusts the resolution of the screen
between four modes; 640x480, 800x600, 1024x768
and 1280x1024
•SleepSetting: selectssleeptimesettings;Off,10min,
30min, 60min, 90min
•Load Default: selects Yes or No to load the default
values
•Screen Set: selects 4:3 or 16:9 screen aspect ratio
•Channel Edit: displays current channel, switches
current channel, exchanges channel number and
deletes current channel
•Language: selects language
•OSD Mode: selects different on screen display
styles
•Screen positions: adjusts horizontal and vertical
display axis

10
•TV Source: selects Air (antenna) or CATV
•Area Settings: selects your country
•Favorite Channel: adds or deletes your favorite
channels
•Auto Scan: scans for available channels
WinDVR 3
With WinDVR 3 you can view and record live TV and
VideoonyourPC. ThissectionisanoverviewofWinDVR
3, for more information, please refer to the online help
databasebyclickingonthequestionmark(?)intheControl
Panel window.
ControlPanel
The control panel provides easy access to all of the most
commonlyusedfunctionintheprogramandisdesigned
to look like controls on a VCR. Keep in mind that not all
options are available all the time, and may be grayed out
depending on your hardware setup and TV service.
Control Panel
Channel Up: Cycles up to next available
channel
Channel Down: Cycles down to next
available channel
Indice


