
SilverStar SS9151SC Manuale utente

MODEL: SS9151SC
PLUTO BEAM
USER MANUAL
PLUTO BEAM
SS9151
1
PLUTO BEAM
SS9151
1 PRODUCT
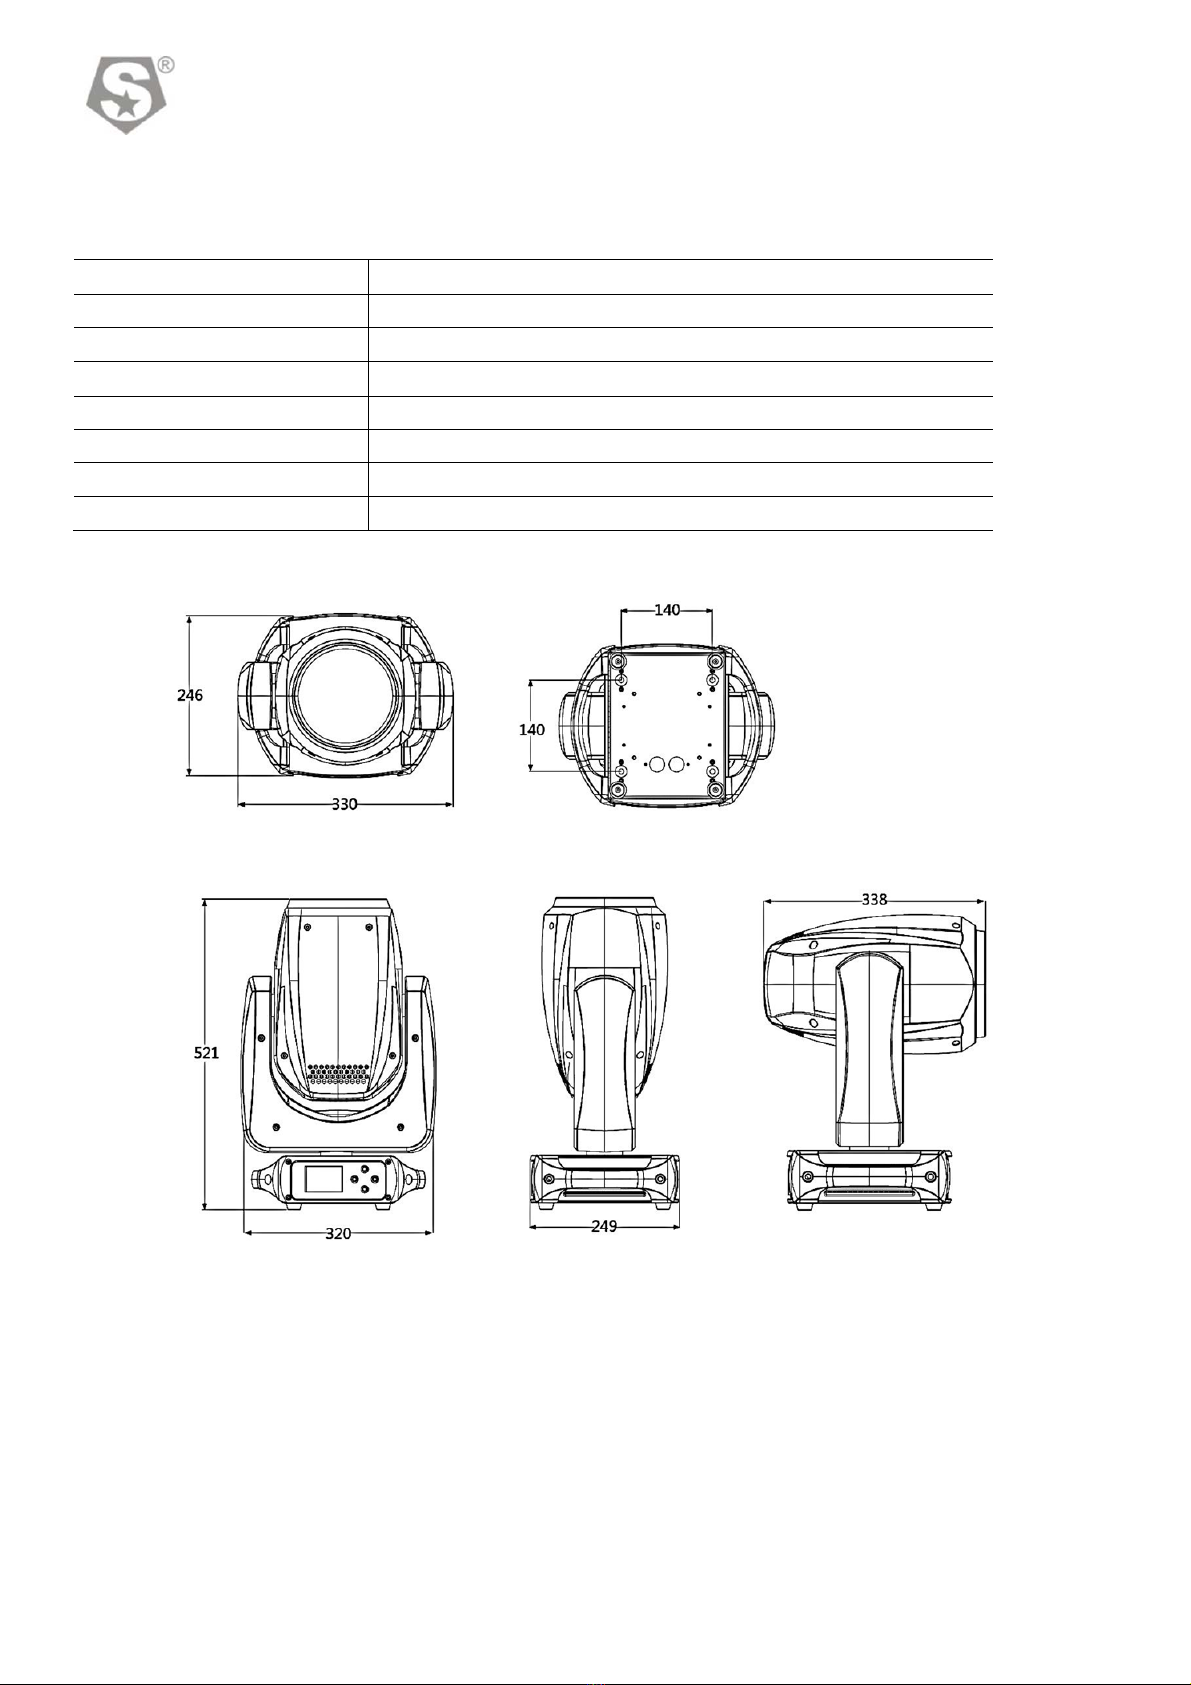
1.1 TECHNICAL SPECIFICATIONS
Type SS9151SC
LED colors 130W Cool White LED
Power 200W
Voltage Range AC100~240V,50/60Hz
Protection IP20
Operation Temperature 0℃~45℃
Dimensions 330x249x521mm
Weight 15kg

2
PLUTO BEAM
SS9151
1.2 Safety Notes
IMPORTANT
.........
This product must be installed by a qualified professional.
In order to maintain this condition and to ensure a safe operation, it is absolutely necessary
for the user to follow the safety instructions and warning notes
The manufacturer will not accept liability for any resulting damages caused by the
non-observance of this manual or any unauthorized modification to the device.
CAUTION!
........
Make sure that the available voltage is not higher than stated on the rear panel.
Do not touch the power cables if your hands are wet.
The earth wire must always be connected to the ground. Therefore it is essential to connect
the yellow/green conductor to earth.
Make sure that the power-cord is never crimped or damaged by sharp edges. Check the
device and the power-cord from time to time. The electric connection, repairs and servicing
must be carried out by a qualified employee.
Always disconnect power input cable to completely remove power from unit when not in use
or before cleaning or servicing the fixture.
Do not switch the fixture on and off in short intervals as this would reduce the lamp’s life.
Do not touch the device’s housing bare hands during its operation (housing becomes hot)!
The surface of the product’s casing can reach up to 70° C (158° F) during operation. Avoid
contact by persons and materials. Do not install the product in a location where there is a risk
of accidental contact. Allow the product to cool for at least 10 minutes before handling.
For replacement use lamps and fuses of same type and rating only.
Please protect the fixture and avoid destroy during transport and installation. If there is any
damage to the coating, the shell may be corroded.
When hanging lamps and lanterns, it is necessary to verify that facilities and hooks can bear
at least 10 times the weight of lamps and lanterns.
Fix the safety rope at the correct holes only. Only operate the fixture after having checked
that the housing is firmly closed and all screws are tightly fastened.
The maximum ambient temperature 45°C must never be exceeded. Do not operate the
product if the ambient temperature (Ta) exceeds 45° C (115° F).
During the initial start-up some smoke or smell may arise. This is a normal process and does
not necessarily mean that the device is defective.
E
.
lectrical
.........
W
.
arning
......
The light source contained in this luminaire shall only be replaced by the manufacturer or his
service agent or a similar qualified person
For replacement use lamps and fuses of same type and rating only.
The lens has to be replaced when it is obviously damaged, so that its function is impaired, e.
g. due to cracks or deep scratches!

3
PLUTO BEAM
SS9151
Keep the product well away from flammable materials
............................................
Keep all combustible materials (e.g. fabric, wood, paper) at least 500 mm (20 in.) away from
the product.
Ensure that there is free and unobstructed airflow around the product. Provide a minimum
clearance of 150 mm (6 in.) around fans and air vents.
Do not illuminate surfaces within 3 m (10 ft.) of the product.
Do not install a fuse that has a higher rating than the one originally installed in the product.
Do not bypass fuses.
Do not stick filters, masks or other materials onto optical components.
If the fixture seems to be abnormally hot, shows signs of melting or emits smoke, disconnect
the fixture from power immediately and allow it to cool. Do not touch the fixture without
heatproof safety gloves. Keep the fixture well away from combustible and flammable
materials.
NEVER LOOK DIRECTLY INTO THE LIGHT SOURCE!
RETINA INJURY RISK - MAY INDUCE BLINDNESS!
Do not point the front of the fixture towards the sun or other strong light sources. The
front lens focuses and concentrates light just like a magnifying glass. Strong light can
cause internal damage to the fixture, melting components or starting an internal fire
within seconds.
To avoid problems from strong light sources:
......................................
Do not expose the front of a fixture to sunlight or any other strong light source. Avoid pointing
other high-powered beam lights directly at the fixture.
Do not focus a light beam from one lighting fixture directly towards another.
For outdoor applications during daylight, make sure that the front face of any fixture is
shielded or points away from the sun, even when not in use.
Do not expose the product to heat (from other lighting fixtures for example).
4
PLUTO BEAM
SS9151
2 INSTALLATION
2.1 MOUNTING
Truss installation
.................
Keep all combustible materials (e.g. fabric, wood, paper) at least 500 mm (20 in.) away from
the product.
For overhead use, always install a safety cable that can hold at least 10 times the weight of
the fixture.
For overhead installation, the fixture must be always secured with a safety wire that can bear
at least 10 times the weight of the fixture;
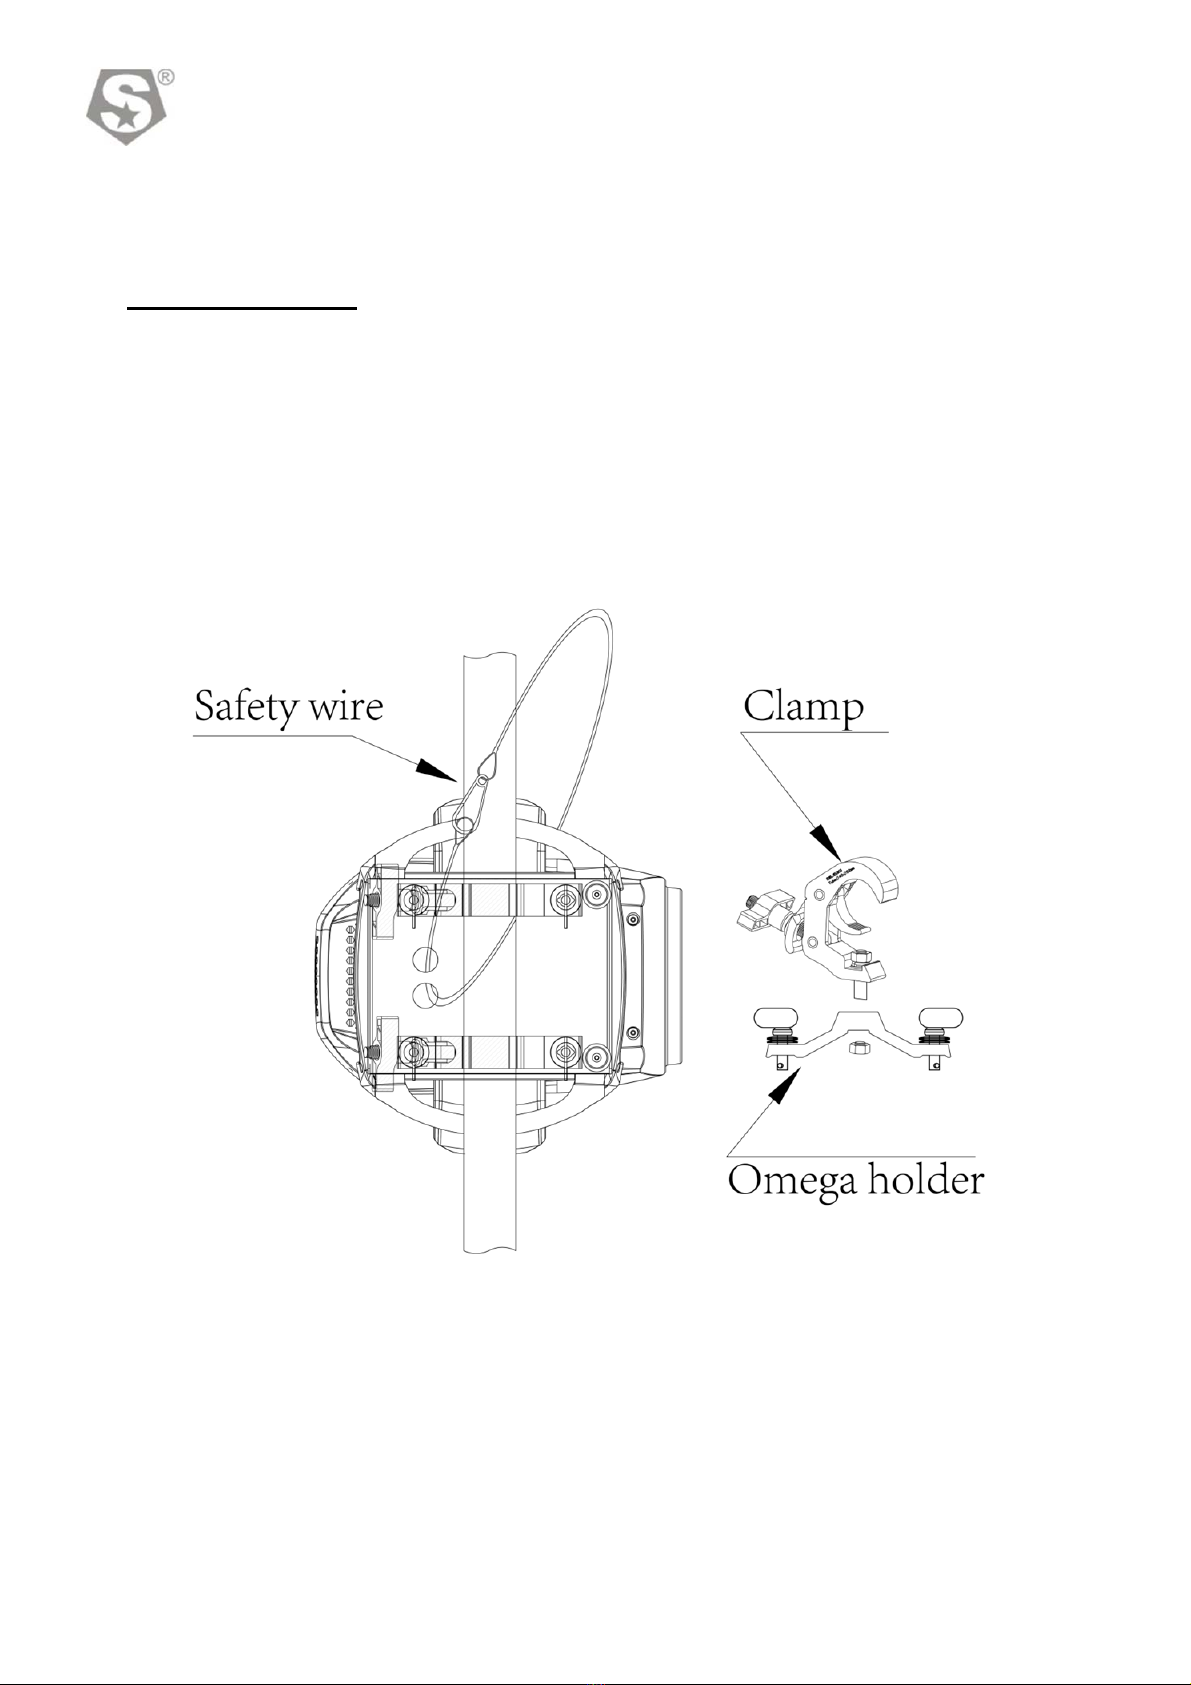
Secure the fixture with a safety cable through the rear safety eye and truss as shown..
Ensure that the structure (truss) to which you are attaching the fixture is secure
5
PLUTO BEAM
SS9151
2.2 POWER CONNECTIONS
This product has an auto-ranging power supply that can work with an input voltage range of
100–240 VAC, 50/60 Hz.
2.3 Data network requirements
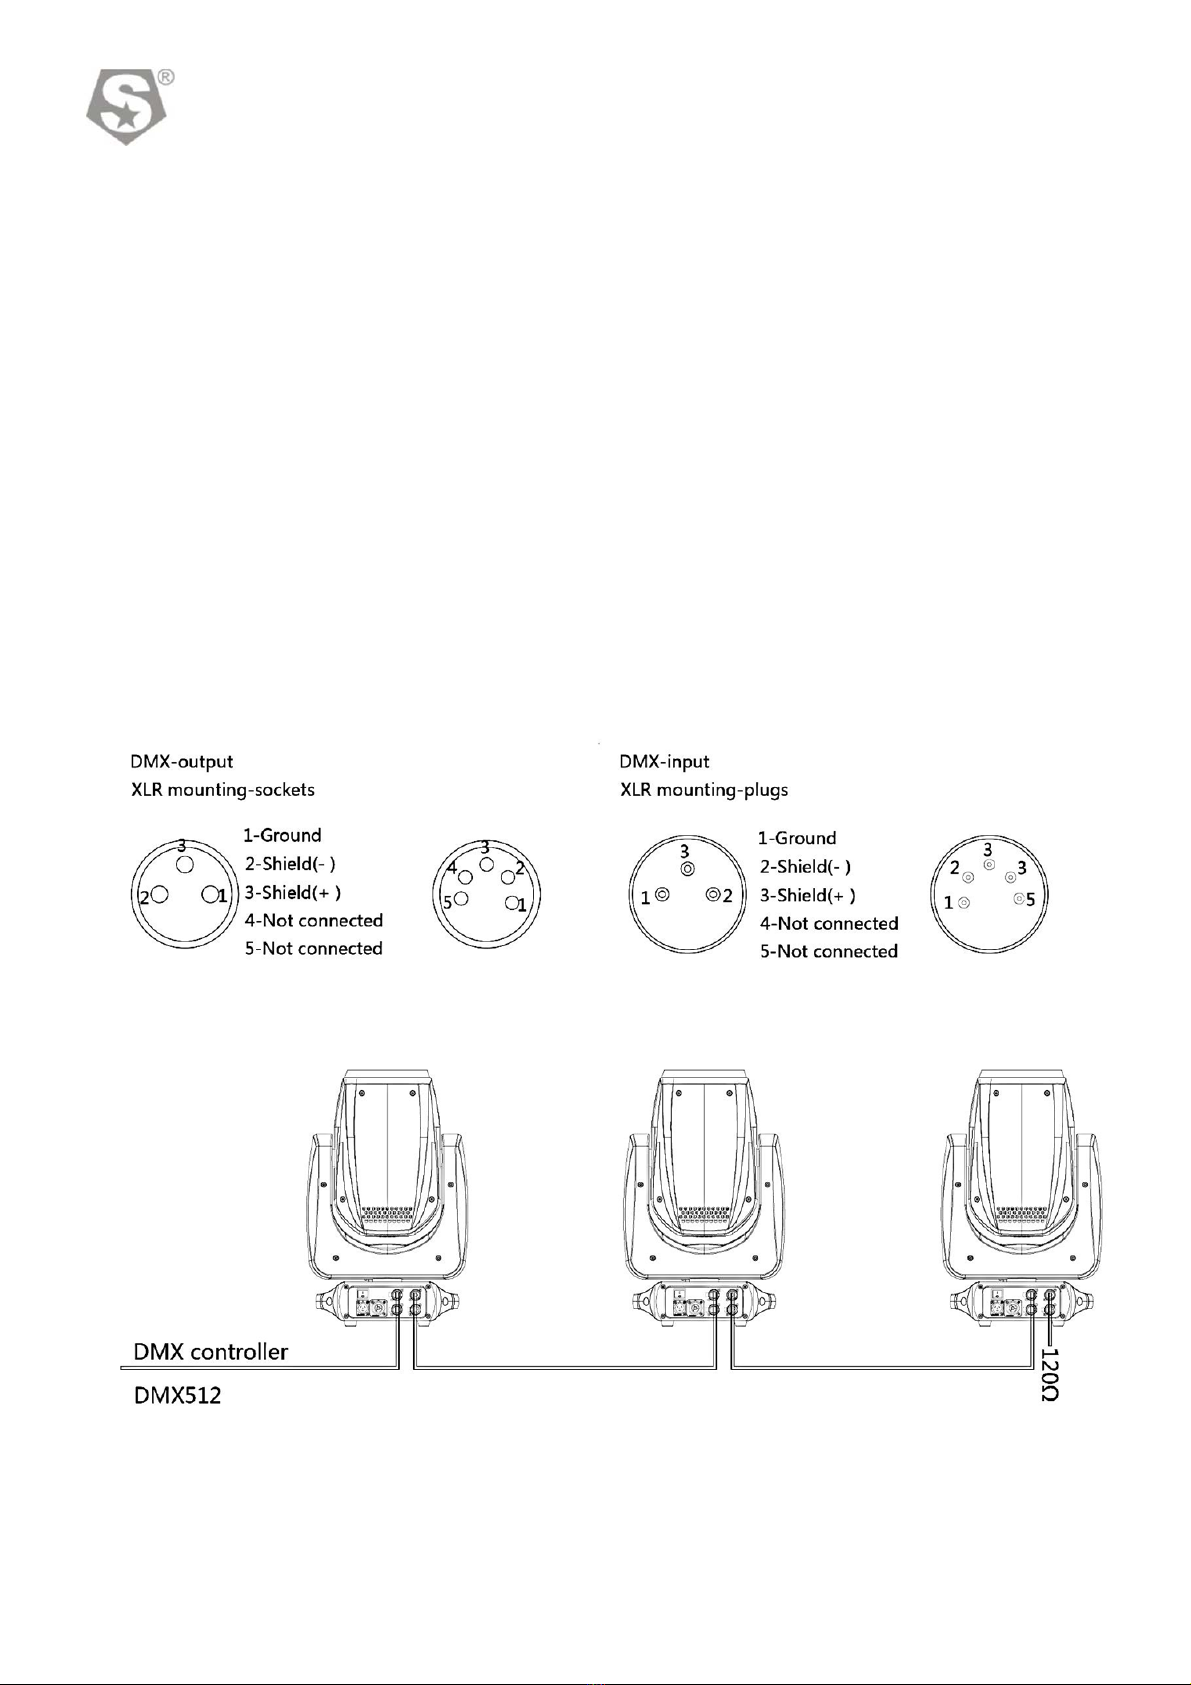
Connect the DMX512 controller to the units in series. A DMX 512 data link is required in
order to control the fixture via DMX. The fixture has 3/5-pin XLR connectors for DMX data
input and output.
Each unit has 13 DMX channels so the DMX Addresses should increase by increments of 1,
(Nx1)+1,(Nx2)+1,(Nx3)+1...
Any DMX address in the range from 001 to 512 may be used.
Connect the DMX-output of the first fixture in the DMX chain with the DMX-input of the next
fixture. Always connect one output with the input of the next fixture until all fixtures are
connected.
Caution: At the last fixture, the DMX-cable has to be terminated with a terminator. Solder a
120 Ω resistor between Signal (–) and Signal (+) into a 3/5-pin XLR-plug and plug it in the
DMX-output of the last fixture.
6
PLUTO BEAM
SS9151
3 FUNCTIONS AND SETTINGS
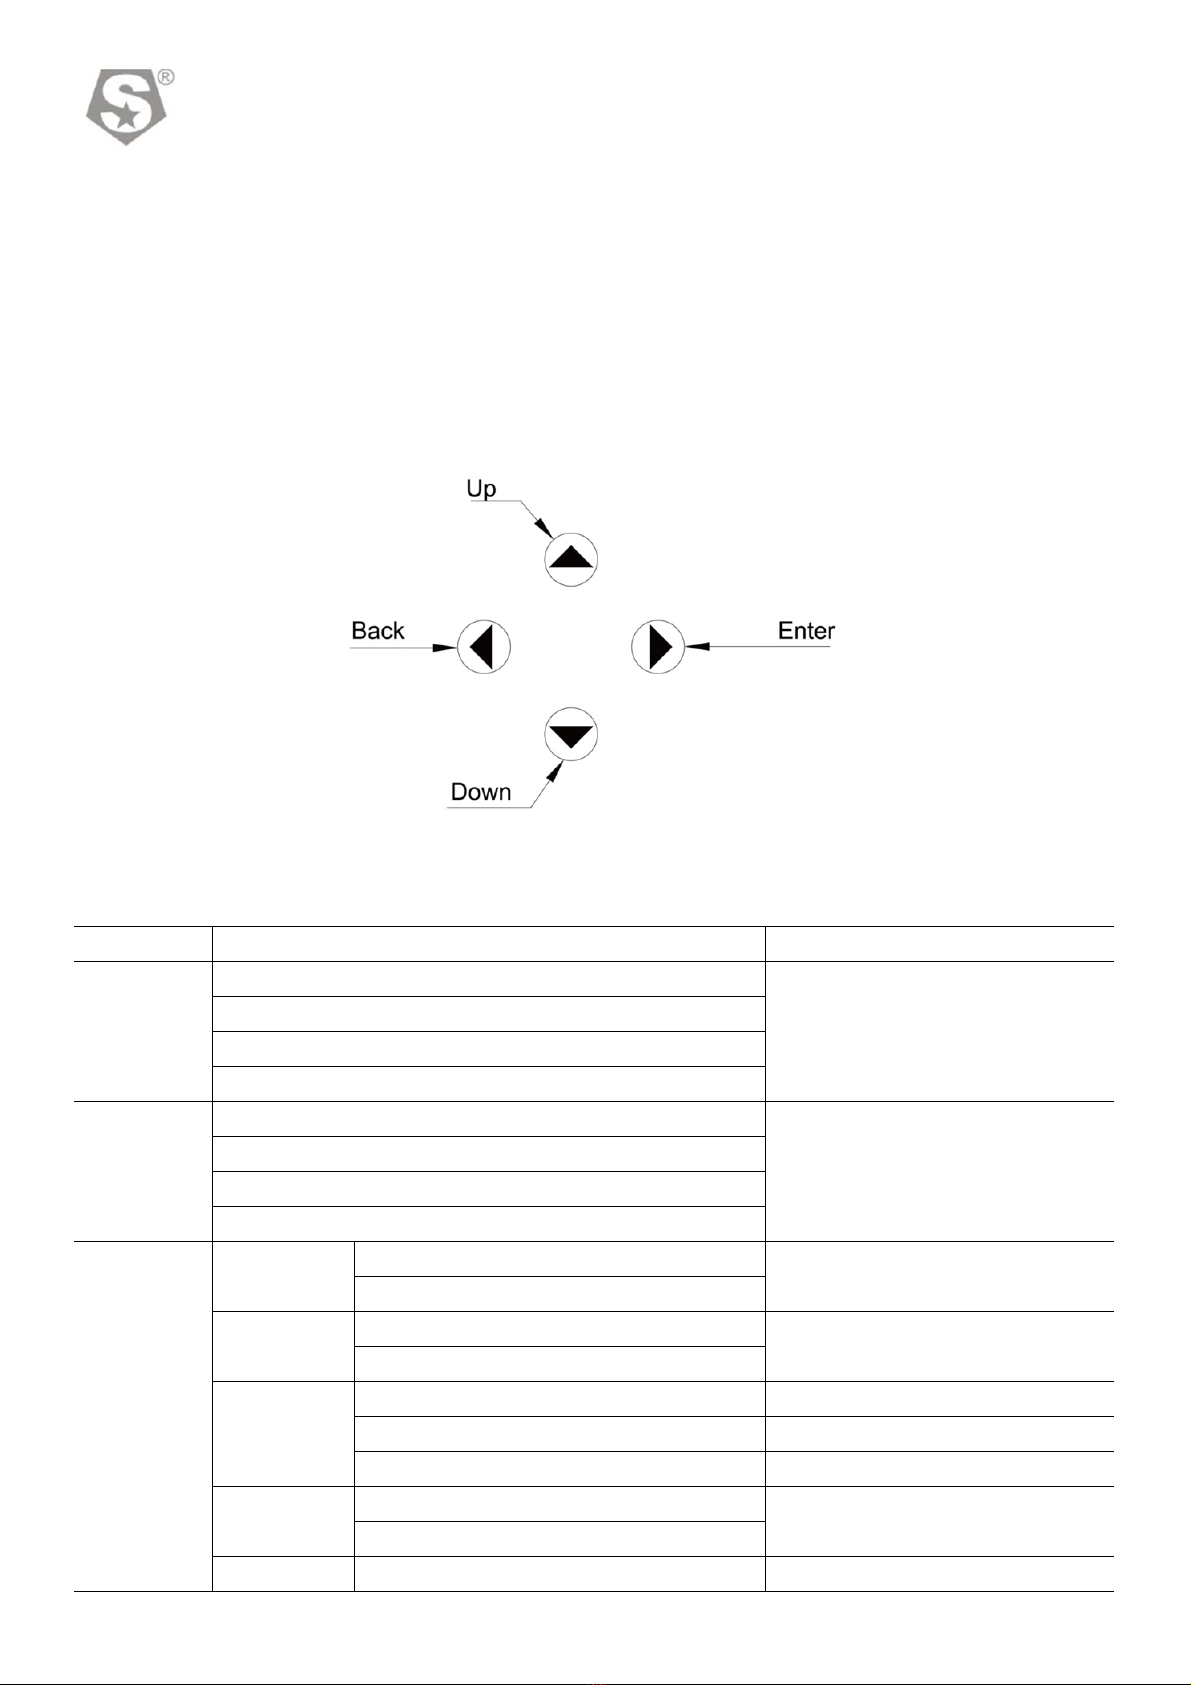
3.1 DISPLAY OPERATION
Up:Scroll‘Up’through the menu list or increase the value of the current function.
Down:Scroll ‘Down’ through the menu list or decrease the value of the current function.
Left(Back):Scroll through the main menu.
Right(Enter):Enter the currently selected menu or confirm the current function value.
3.2 Menu Map
ADDRESS 001 - 512
DMX address setting
PERSON
BASIC
Use the menu to select desired channel
mode
STANDARD (Default)
EXTEND
SY
RUNMODE
DMX512 (Default)
Select Signal
Default: DMX512
CUSTOM1-2 Set up get into EDIT MENU
edit
AUTO
CUSTOM1
CUSTOM2
OPTION
PAN INVERT NORMAL(Default)
PAN moving direction selection
INVERT
TILT
INVERT
NORMAL(Default)
TILT moving direction selection
INVERT
PERFORM
STUDIO
Fan mode low speed
POWER
Fast rotation of fan,all power
LIVE (Default)
Automatic rotation of fan
BLACKOUT OFF(Default)
Select OFF blackout without delay
Select ON Blackout delay 3s
ON
DIMMER DIM4(Default)
Dimming curves DIM1 (fast) to DIM4

7
PLUTO BEAM
SS9151
DIM3
(slow)
DIM2
DIM1
OFF
LED PWM
1200Hz (Default)
Sets the PWM frequency
2000Hz
2400Hz
4000Hz
6000Hz
25000Hz
DMX
ERROR
SAVE (Default)
Hold after loss of DMX signal
BLACK
Blackout after loss of DMX signal
DISPLAY
INVERT
OFF
(Default)
Display reverse off
ON Display reverse on
DISPLAY
TIME
On
Display backlight always on
30s
Display light 30s
1min(Default)
Display light 1min
2min
Display light 2min
DISPLAY
LOCK
OFF
Locks display (passcode is <UP>,
<DOWN>,<UP>, <DOWN>, <ENTER>)
ON(Default)
LOAD PARA NO
Upload data
YES
Not upload data
SETTING
RECOVERY ****
Restore default factory settings.
CLEAN EDIT1 ****
Clean customer self-editing scene 1
CLEAN EDIT2 ****
Clean customer self-editing scene 2
WDMX HIDE
YES
Hide wireless mode WDMX reset and
signal hide and the default is wired mode
only
NO
PT
ENCODER
OFF
XY Encoder switch.
OFF is close; ON is open.
ON
WDMX
RESET
NO
Do not clear the receiver's message.
YES
Clear the receiver's message
SIGNAL
ONLY XLRDMX
ONLY XLR is wire only
XLRDMX FIRST
XLR FIRST is wire first
ONLY WDMX
ONLY WDMX is wireless only
WDMX FIRST
WDMX FIRS is wireless first
WDMX TO XLRDMX
WDMX TO DMX is wireless to wired
EDIT EDIT 1-2 STEP 1-14
PAN 0-255
Edit the custom programs1-30
Select play 【EDIT 1】 in RUNMOEDE
CUSTOM 1; Select play 【EDIT 2】 in
RUNMOEDE CUSTOM 2
TILT 0-255
PT SPEED 0-255
COLOR 0-255

8
PLUTO BEAM
SS9151
FIXED GOBO 0-255
PRISM1 0-255
PRISM2 0-255
FOCUS 0-255
RAINBOW.D 0-255
RAINBOW.R 0-255
DIMMER 0-255
STROBE 0-25
TIME 0-255
USE YES/NO
Select YES to run the steps user need.
MENUAL
Auto Test Auto Test YES/NO
Auto Test channel
CHANNEL
PAN 0-255
Manual control channel
TILT 0-255
PT SPEED 0-255
COLOR 0-255
FIXED GOBO 0-255
PRISM1 0-255
PRISM2 0-255
FOCUS 0-255
RAINBOW.D 0-255
RAINBOW.R 0-255
DIMMER 0-255
STROBE 0-25
DEBUG
HIDE
NO
Factory testing mode. All stepper motors
are not controlled by signal, It only works
again after the reset.
YES
RESET
ALL RESET
Select Yes/No to carry out all reset hide
PT RESET
Select Yes/No to carry out P/T reset
COLOR SYS
COLOR reset
OTHER
Zoom/ Focus/ Prism reset
INFO
FIXTURE HOURS
Hours of fixture use
LED USE HOURS
LED use time
TEMPERATURE
LED temperature
VERSION
Software versions
RDM UID 0x388Axxxxxxxx
Check fixture's ID
LABEL PLUTO BEAM
Check fixture's LABEL
SYSTEM
ERROR
MEMORY IC
Memory IC
ANGLESENSOR
Angle Sensor
PAN SENSOR
PAN SENSOR
PAN ENCODER
PAN ENCODER
PAN DRIVE IC
PAN DRIVE IC

9
PLUTO BEAM
SS9151
TILT SENSOR
TILT SENSOR
TILT ENCODER
TILT ENCODER
TILT DRIVEIC
TILT DRIVEIC
TEMPERATURE
TEMPERATURE
COLOR RESET
COLOR RESET
FGOBO RESET
FGOBO RESET
PRISM1 RESET
PRISM1 RESET
PRISM2 RESET
PRISM2 RESET
FOCUS RESET
FOCUS RESET
RAINBOW RESET
RAINBOW RESET
SERVICE ****
PAN ±127
Pan position fine adjustment
TILT ±127
Tilt position fine adjustment
COLOR ±127
Color position fine adjustment
FIXED GOBO ±127
Fixed Gobo position fine adjustment
PRISM1 ±127
Prism 1 position fine adjustment
PRISM2 ±127
Prism 2 position fine adjustment
FOCUS ±127
Focus position fine adjustment
RAINBOW ±127
RAINBOW position fine adjustment
LED DIMMER 128-255
Rest Fixture Time Rest fixture time
Rest LED Time Rest LED time
All passwords of this product are <UP>, <DOWN>,<UP>, <DOWN>, <ENTER>)
Indice
Altri manuali SilverStar Attrezzatura di illuminazione

SilverStar
SilverStar LT-VIII Manuale utente

SilverStar
SilverStar WASH 250 Series Manuale utente

SilverStar
SilverStar ECLIPSE MINI COLOR SS867 Manuale utente

SilverStar
SilverStar FREZNO 250 HEX Manuale utente

SilverStar
SilverStar INDIGO 4000XS Manuale utente

SilverStar
SilverStar MX-COLOR Manuale utente

SilverStar
SilverStar Show Wash 120 Manuale utente

SilverStar
SilverStar LT-215 Manuale utente

SilverStar
SilverStar MAXCYC SS809 Manuale utente

SilverStar
SilverStar YX-2007 Manuale utente


