Siser Juliet Manuale utente

OPERATION MANUAL
MANUEL D'UTILISATION
MANUAL DEL USUARIO

READ SAFETY INSTRUCTIONS PRIOR TO SETUP OR USE
LIRE LES INFORMATIONS DE SÉCURITÉ AVANT LA MISE EN PLACE OU
L'UTILISATION
LEA LA INFORMACIÓN DE SEGURIDAD ANTES DE
CONFIGURAR O USAR

TABLE OF CONTENTS
OVERVIEW
SETUP
TOUCH SCREEN
SAFETY INFORMATION
FCC STATEMENT
12
35
610
1112
13
TABLE DES MATIÈRES
VUE D'ENSEMBLE
MISE EN PLACE
ÉCRAN TACTILE
INFORMATIONS SUR LA SÉCURITÉ
DÉCLARATION DE LA FCC
1415
1618
1923
2425
26
TABLA DE CONTENIDOS
VISIÓN GENERAL
CONFIGURAR
PANTALLA TÁCTIL
INFORMACIÓN DE SEGURIDAD
DECLARACIÓN DE LA FCC
2728
2931
3236
3738
39

2.
1.
5.
4.
6.
3.
9.
7.
11.
12.
13.
14.
10.
15.
1.
2.
3.
4.
5.
6.
7.
8.
9.
10.
11.
12.
13.
14.
15.
OVERVIEW
1
8.
Machine Head
Flip Cover
Touch Screen
Cutting Strip
Tool Holder
Holds cutting blade housing or
marker adapter
Feed Tray
Helps stabilize material
Adjustable Pinch Rollers
Feeds material in and out of the
cutter
Grit Marks
Power Button
Pinch Roller Levers
Adjusts the tension of the pinch
rollers
USB-A Port
Used for connecting flash drives
to cutter
USB-B Port
Used for connecting cutter to a
computer
DC Power Port
Roller Bar Lever
Locks down or releases material
under roller bar and allows pinch
rollers to be adjusted
Raised Feet

2
POWER CORD AND
POWER SUPPLY
USB CORD
12”X12” CUTTING MAT
45º BLADES BLADE HOUSINGMARKER ADAPTER 60º BLADE
12
11
10
9
8
7
6
5
4
3
2
1
0 1 2 3 4 5 6 7 8 9 10 11 12
12
11
10
9
8
7
6
5
4
3
2
1
0 1 2 3 4 5 6 7 8 9 10 11 12
*Items shown are not to scale
TWO SHEETS OF 6”X12” SISER®HEAT TRANSFER VINYL
ONE COVER SHEET
ALSO INCLUDED IN PACKAGING:

JULIET™ SETUP
Set up your cutter online at
setup.siser.com
OR SETUP MANUALLY USING THE
FOLLOWING INSTRUCTIONS
1Remove all protective packaging from cutter and
accessories, including plastic wrap.
2Plug the round end of the power cord into the DC
power port on the rear of the machine, then plug the
opposite end into a standard electrical outlet.
Press the power button to turn the cutter on.
3
Download Leonardo™ Design Studio for free
with your cutter purchase
3Carefully remove 45° blade from
packaging and insert into socket
on blade housing with the
pointed side facing outwards.
4Twist the upper screw of the blade
housing clockwise to expose less of
the blade, or counterclockwise to
expose more of the blade. The
ideal length of exposed blade is
about a credit card’s width. Once
the blade is properly adjusted,
twist the inner screw to lock in the
blade position.

5
7Tap ‘Cut Settings’ on the
touch screen, then tap the
current preset to view the
entire menu. Select the
preset that matches your
material to automatically
adjust the cut force and
speed.
4
8Tap ‘Test Cut’ to cut a
small shape out of your
material to ensure the cut
settings are correct. After
testing, select the ‘Home’
icon to return to the
home screen.
6Lower the roller bar lever to
adjust the pinch rollers and
position as desired. Take
material or cutting mat and
align under the rollers. Raise
the roller bar lever to secure
the material or mat in place.
Insert blade housing into tool holder on the machine
head with the blade facing down. Turn the knob on
the tool holder clockwise to tighten.
HTV
RENAME LOAD
PSV OTHER
EASYWEED VS11 FS40
VS11 FS40
VS10 FS20 VS8 FS35
VS12 FS40
VS9 FS25
GLITTER
TWINKLE
STRIPFLOCK PRO
HOLOGRAPHIC
METAL
PRESETS
PRESET
CUT SPEED VS
FORCE FS
40
560
CUT SETTINGS
Pinch Rollers
The pinch roller levers can be flipped
‘up’ to increase the tension of the
roller or ‘down’ to ease the tension.
Position pinch rollers over the
grit marks for optimal traction.

Identifying a Good Test Cut
9Once you’re ready to cut, plug in the USB flash drive
via the USB-A port on the rear of the cutter. Tap the
‘Settings’ button, then ‘USB’. Select your cut file*
from the drop down.
*Visit siserna.com for info on accepted file types
5
10 Move the position of the
blade by using the
on-screen arrow buttons.
Once the blade is in
position, tap the play
button to begin cutting.
Congratulations— you’ve cut your first design! To learn
how to apply your design, visit www.siserna.com.
Ready to use your cutter to its full potential?
Access advanced designer tools, inspirational projects,
tutorials, and more by downloading
LeonardoTM Design Studio.
SETTINGS
CUT SETTINGS
TEST CUT
Cut not deep enough
and can’t be weeded
Material and carrier
cut through
Material cut and
carrier not cut through

TOUCH SCREEN
6
SETTINGS
CUT SETTINGS
TEST CUT
HOME SCREEN
SETTINGS
CUT SETTINGS
TEST CUT
Navigate by tapping the touch screen to select an option or slide along a
bar to adjust values.
1.
2.
3.
4.
5.
6.
7.
1.
2.
3.
4.
5.
6.
7.
HOME SCREEN JOB IN PROGRESS
1.
1.
2.
3.
2.
3.
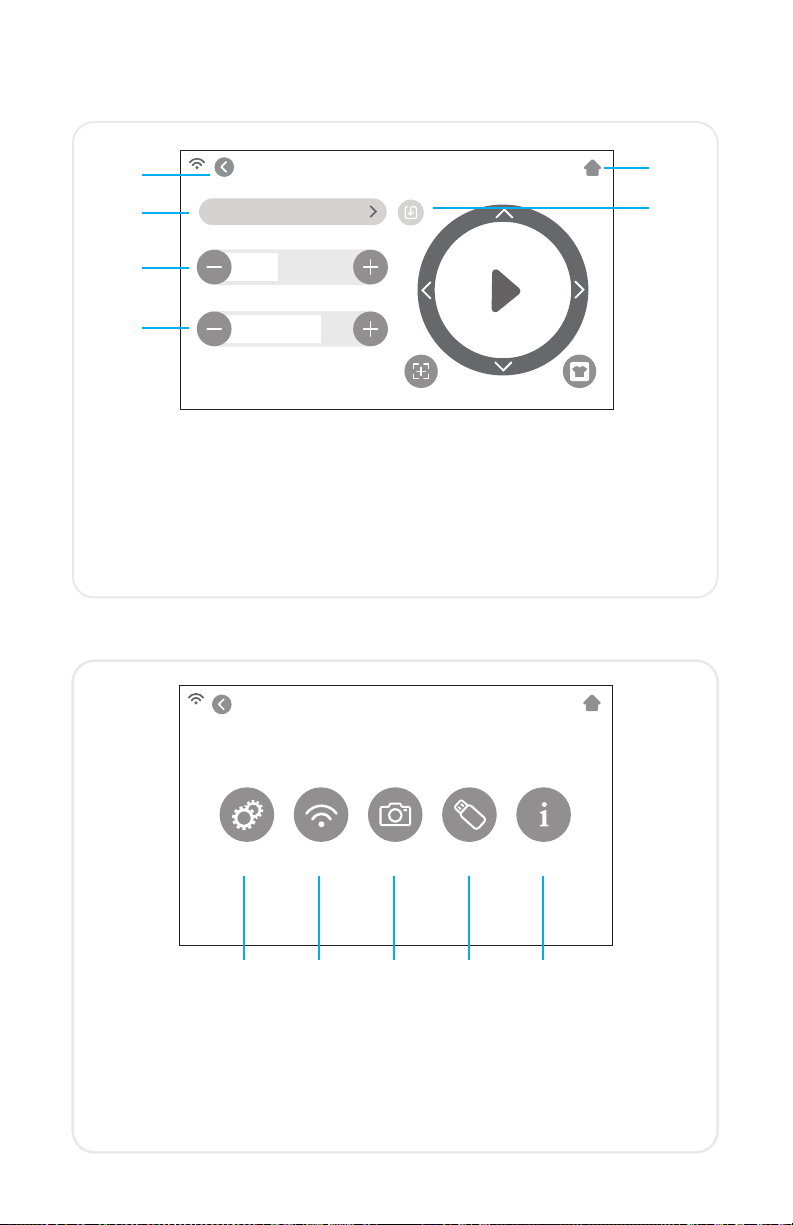
WiFi Indicator — Displays WiFi connection status
Directional Arrows — Moves material and machine head
Play Button — Resumes cut or recuts the last known design
Tool Reorientation — Moves tool holder back to starting position
Settings — Opens cutter settings menu
Cut Settings — Opens presets menu with adjustable cut settings
Test Cut — Performs a test cut at the tool holder’s current position
Pause Button — Pauses job at current position
Job Progress Bar — Displays progress of current job based on how
far the circle is completed
Cancel Button — Cancels current job
PRESET
CUT SPEED VS
FORCE FS
40
560
CUT SETTINGS
SETTINGS
GENERAL
SETTINGS
WIFI CAMERA USB SYSTEM
INFO
7
CUT SETTINGS
1. 2.
3.
4.
5.
SETTINGS
1.
2.
3.
4.
5.
1.
2.
3.
4.
5.
6.
1. 2. 3. 4. 5.
6.
Adjust the cut settings of the cutter
Back Button — Returns to previous screen
Home Button — Returns to the Home Screen
Cutting Presets — Opens preset cutting menu
Cut Speed — Adjusts how fast the machine head moves
Force — Adjusts how much pressure the machine head exerts
Update Preset — Overwrites preset with the current settings
Access the various settings and functions of the cutter
General Settings — Opens general cutter settings menu
WiFi— Opens WiFi settings menu
Camera — Opens camera settings menu
USB — Opens USB menu for opening files from a USB flash drive
System Info — Displays system information
Indice
Lingue:
Altri manuali Siser Taglierina


