SiTime SiT6702DM Manuale utente

SiT6702DM Rev. 1.01
Page 1 of 17
www.sitime.com
SiT6702DM Demo Board User Manual
Contents
1 Introduction .............................................................................................................................................1
2 SiT6702DM Package................................................................................................................................. 1
3 Board Features and Connections............................................................................................................. 2
4 PC Connection and Clock Configurator Software .................................................................................... 5
4.1 Software Installation........................................................................................................................ 5
4.2 Software Operation ......................................................................................................................... 7
Appendix: SiT6702DM Schematic...............................................................................................................14
1Introduction
The SiT6702DM is an I2C/SPI demonstration board used for evaluating the features of SiTime oscillators
that have I2C/SPI interfaces for in-system programming of output frequency or pulling/tuning the
frequency. The SiT6702DM board has a USB interface for connecting to the PC. The board is powered
through the USB by default, but it can be configured to accept an external +5-V supply. TimeMaster™
clock configurator software is provided for controlling the board.
The SiT6702DM board is designed to be used in combination with the SiT6722EB, SiT6722SEB, or
SiT6712EB evaluation boards (EVBs).
1. The SiT6722EB and SiT6722SEB EVBs support SiT5155/6/7, SiT5356/7, SiT5358/9 TCXO families
with the DCO function enabled via I2C
2. The SiT6712EB EVB supports SiT3521 and SiT3522 I2C/SPI in-system programmable oscillators
2SiT6702DM Package
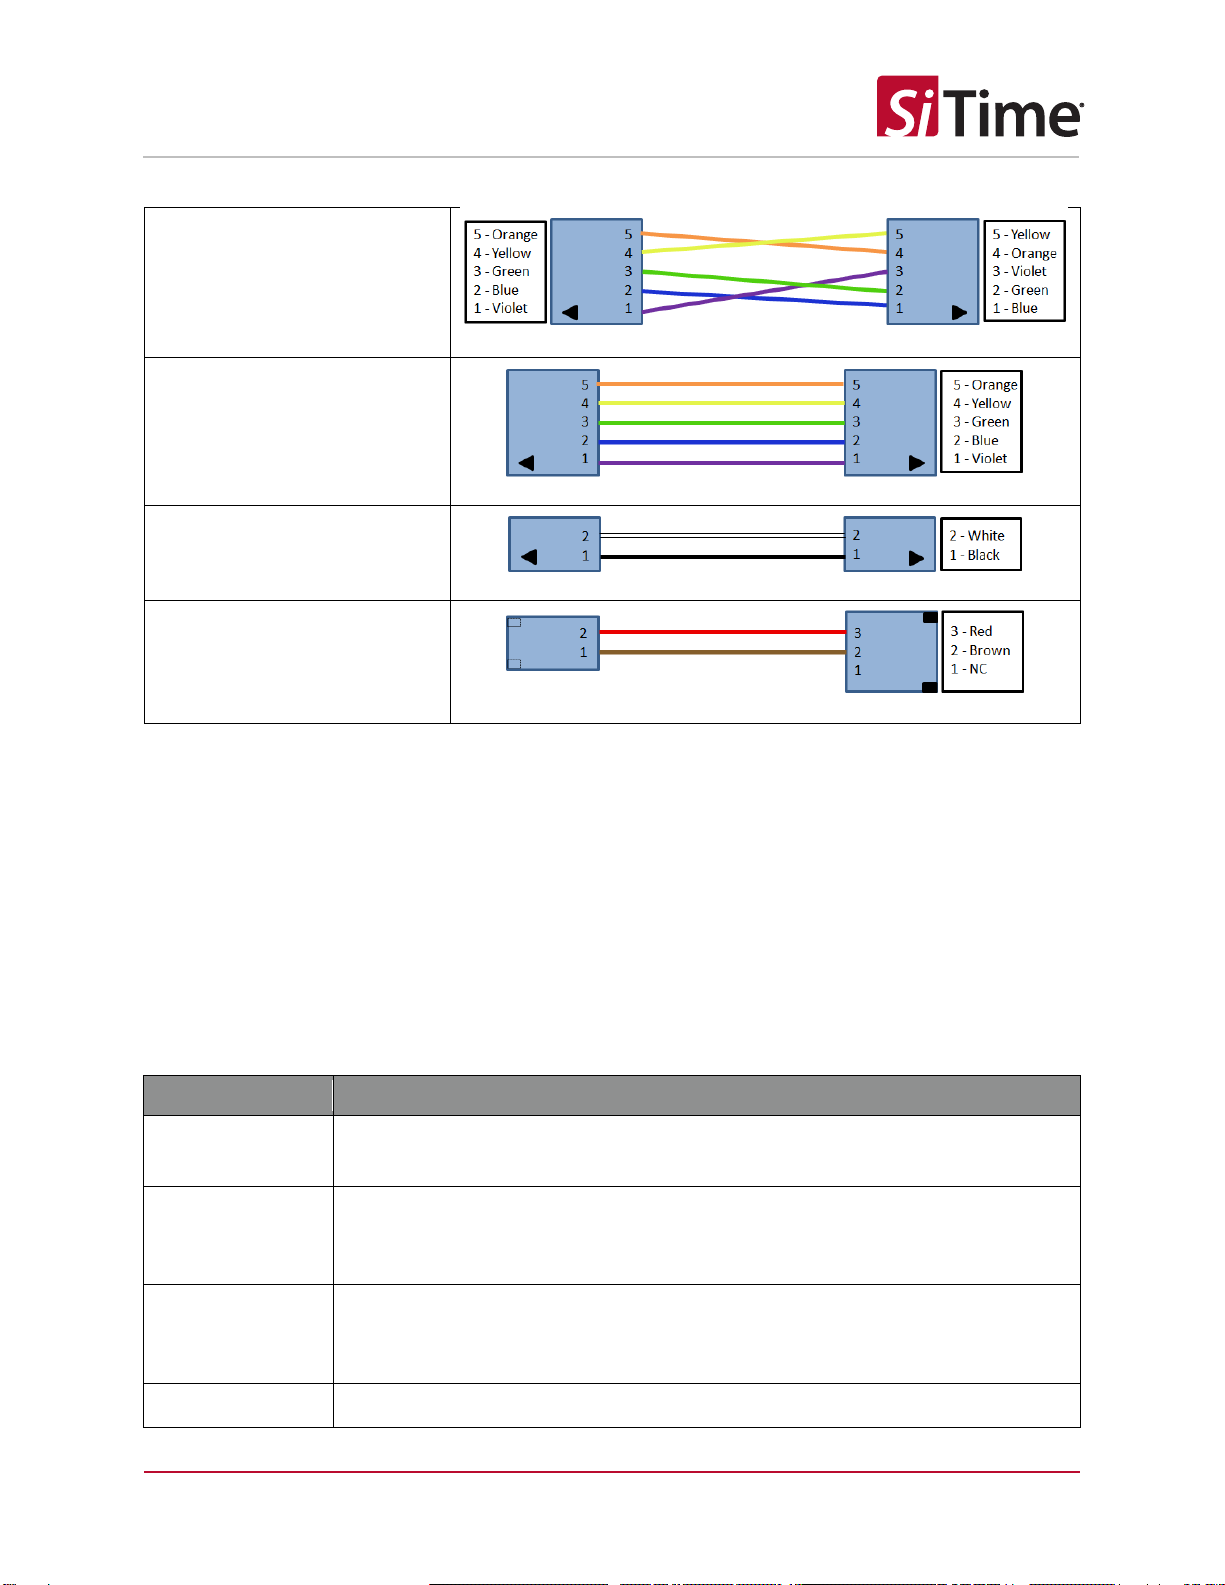
Table 1: The SiT6702DM rev 1.01 shipment package includes:
Item
Image
SiT6702DM rev.1.01

SiT6702DM Rev. 1.01
Page 2 of 17
www.sitime.com
SiT6702DM Demo Board User Manual
I2C interface cable for
connection with
SiT6722EB/SiT6722SEB
I2C/SPI interface cable for
connection with SiT6712EB
OE control cable
Power supply cable
3Board Features and Connections
The SiT6702DM board has the following connections (refer to Figure 1).
1. USB interface for connecting to the PC (USB Micro B connector)
2. USB power or external +5V power (resistor configurable)
3. I2C/SPI communication with SiTime devices
4. Hardware OE control
5. DUT VDD connector
External connections for the SiT6702DM are listed in Table 2 and are shown in Figure 1.
Table 2: SiT6702DM I/O
I/O
Description
USB
USB Micro B connector for connection to the PC. By default board is powered
through this connector.
External Power
A two-pin connector (P3) for DC power supply to the SiT6702DM board. Pin
polarity is identified on the silkscreen pattern near the connector (see Figure 1).
Nominal voltage required is +5V.
I2C Interface
A five-pin connector (P4) is available for communicating with the
SiT6712EB/SiT6722EB/SiT6722SEB boards via an I2C interface.
See Figure 2 and 3for connection diagrams.
SPI Interface
A five-pin connector (P5) is available for communicating with the SiT6712EB

SiT6702DM Rev. 1.01
Page 3 of 17
www.sitime.com
SiT6702DM Demo Board User Manual
board via an SPI interface. See Figure 4for connection diagram.
OE Control
A two-pin connector (P6) is available for switching the output of the oscillator
(it is effected only for PIN control option)
DUT VDD
A two-pin connector (P7) provides power to the
SiT6712EB/SiT6722EB/SiT6722SEB boards
Figure 1: SiT6702DM main connections
The power source can be selected by changing the resistor assembly configuration. Table 3 shows the
truth table for different configurations.
Table 3: Power options
Power
Option
R9
R10
Comment
USB (default)
0 Ω
Do not
stuff
Board is powered from USB
External
Do not
stuff
0 Ω
Board is powered from external supply connected to P3
Figures 2-4 show connection diagrams between the SiT6702DM board and SiT6722EB/SiT6722SEB EVBs
(Figure 2) and SiT6712EB (Figure 3, Figure 4) for I2C and SPI interface usage respectively. The
SiT6722EB/SiT6722SEB boards use an I2C interface only.
Two interface cables are supplied with the SiT6702DM: one is intended for connecting to the I2C
interface of the SiT6722EB/SiT6722SEB EVBs and the second is intended for connecting to the I2C/SPI
Board Power
Selection
Board Power
LED
Indicator
External
Power
Connector
DUT VDD
I2C Interface
OE Control
SPI Interface
USB
Interface for
Connection
to the PC

SiT6702DM Rev. 1.01
Page 4 of 17
www.sitime.com
SiT6702DM Demo Board User Manual
interface of the SiT6712EB EVB. Follow the coloring scheme as shown in Figures 2-4 for selecting the
proper cable connection.
Figure 2: SiT6702DM to SiT6722EB/SiT6722SEB connections, I2C
Figure 3: SiT6702DM to SiT6712EB connections, I2C
Figure 4: SiT6702DM to SiT6712EB connections, SPI

SiT6702DM Rev. 1.01
Page 5 of 17
www.sitime.com
SiT6702DM Demo Board User Manual
4PC Connection and Clock Configurator Software
The SiT6702DM board connects to the PC with a USB interface. TimeMaster clock configurator software
is supplied with the board and is compatible with Microsoft Windows-based systems: Windows 7 and
Windows 10. After the connection, board will be identified by the system automatically and the
standard Windows drivers will be installed.
Note: TimeMaster software requires .NET Framework 4.5 or higher to be installed on the PC.
TimeMaster software can be downloaded from the SiTime web site.
4.1 Software Installation
After the software is downloaded, the user needs to run TimeMaster_rev.1.0.msi and complete the
following steps to finish installation:
1. Click Next on the welcome window
2. Select I accept the terms in the License Agreement and then click Next

SiT6702DM Rev. 1.01
Page 6 of 17
www.sitime.com
SiT6702DM Demo Board User Manual
3. Select the destination folder and then click Next
4. Click Install
5. After the installation is complete, click Finish to close the installer window. Software installation
will automatically add a shortcut on the desktop for quick software launch.

SiT6702DM Rev. 1.01
Page 7 of 17
www.sitime.com
SiT6702DM Demo Board User Manual
4.2 Software Operation
There are two GUI startup flows that are supported.
1. Start with the board disconnected from the PC. The GUI will open with a notice that the board
is disconnected (see Figure 5). After the board is connected the user should go to the menu:
SystemCheck->Initialize to initialize the system.
2. Start with the board connected to the PC. The software will ask the user to enter device options
on startup (see Figure 7 and Figure 8). A similar window is shown for the previous case after the
board is connected and system initialization is launched.
Figure 5: Startup GUI appearance when the board is disconnected
The software with start with the window shown on Figure 6 and the following options should be
specified to initialize the GUI.
1. Device family:
a. Select the device family and press Next
2. Siganling type:
a. Select signaling type and press Next
3. Supply voltage:
a. Select the DUT VDD and press Next
4. Interface:
a. Select the communication interface and press Next
5. I2C address type (I2C Interface Only):
a. Select the I2C address type and press Next
6. I2C address (I2C Interface Only):
a. Select the DUT I2C address and press Next
7. OE control:
a. Select the OE control type and press Next
8. Output frequency (SiT51xx/53xx Only):
a. Set the DUT frequency and press Configure Device

SiT6702DM Rev. 1.01
Page 8 of 17
www.sitime.com
SiT6702DM Demo Board User Manual
Important note: The software does not automatically detect the output signaling type so it is important
to select the correct item in the Signaling Type menu. If the wrong signaling type is selected, the driver
settings may be programmed incorrectly during the feature evaluation which will result in an incorrect
output waveform. This applies when the SiT6712EB board with a SiT3521/2 device is used. For
SiT51xx/SiT53xx device families, the output driver options are not controlled.
1.
2.
3.
4.
5.
6.

SiT6702DM Rev. 1.01
Page 9 of 17
www.sitime.com
SiT6702DM Demo Board User Manual
7.
8.
Figure 6: Device options selection window
Once all options are selected, the GUI will start the main window showing the board connection status
(see Figure 7). The main GUI shows a simplified block diagram of the device with DCO and output enable
blocks accessible to the user. Frequency and pull range vaules are displayed on the startup window and
represent the current state of the DUT.
Figure 7: Startup GUI appearance when board is connected, SiT6712EB with SiT3521 device example

SiT6702DM Rev. 1.01
Page 10 of 17
www.sitime.com
SiT6702DM Demo Board User Manual
Figure 8: Startup GUI appearance when board is connected, SiT6712EB with SiT3521 device example,
register content viewer enabled
Figure 9: Startup GUI appearance when board is connected, SiT6722EB with SiT5356 device example
Indice
Manuali Hardware per computer popolari di altre marche

EMC2
EMC2 VNX Series Manuale del proprietario

Panasonic
Panasonic DV0PM20105 Manuale utente

Mitsubishi Electric
Mitsubishi Electric Q81BD-J61BT11 Manuale utente

Gigabyte
Gigabyte B660M DS3H AX DDR4 Manuale utente

Raidon
Raidon iT2300 Manuale utente

National Instruments
National Instruments PXI-8186 Manuale utente


