skandia Vertical Blinds Manuale utente

1 of 3 Installing Your Vertical Blind
Parts List
A. Wall Bracket Assembly
B. Nuts
C. ounting Clips
D. Bolts
E. ounting Screws
F. Extension Bracket (optional)
G. Headrail
H. Louvers
I. Tension Pulley attached w/cord,
and 2 pull tassels attached w/chain.
SUGGESTED FASTENER GUIDE
ANCHORS (not supplied)
Plastic or lead anchor insert.
Plastic anchor insert for lightweight
blinds only, in drywall, paneling, etc.
HOLLOW WALL ANCHORS (not
supplied)
For heavy blinds.
Hollow wall toggle blot.
For heavy blinds.
H
I
Verti al Blind Installation
SECTION A
OUTSIDE MOUNT MOUNTED ON A
VERTICAL SURFACE (WALL, WINDOW
OR DOOR FRAME)
1. ark "HEIGHT" on wall at louver length +
2".
2. Center headrail over window at "HEIGHT"
mark. ake about a 2" long mark on wall
about 4" in from each end.
For blinds over 62" wide, make marks on
wall for every bracket. Spaced evenly.
0-62" WIDE 2 BRACKETS
62" - 98" WIDE 3 BRACKETS
98" - 134" WIDE 4 BRACKETS
134" - 170" WIDE 5 BRACKETS
170" - 192" WIDE 6 BRACKETS
3. Hold brackets up to 2" marks and mark
mounting holes on wall.
4 You may find it easier to mark wall and
mount wall brackets if the clip is twisted
out of the way. For brackets with two
screws, remove one screw and loosen the
other then twist clip 1/4 turn.
5. Drill holes at these marks. If mounting
into drywall, use wall anchors (not
included) and push into drilled holes.
Screw brackets into place. use 2 screws
per bracket.
6. Twist all clips back to original postilion
and tighten all screws. Snap headrail in
place by inserting from edge in mounting
clips and rotating back. (note: put cord on
right for right draw and left for left draw.)
7. To remove blind, release headrail by
inserting a screwdriver between headrail and
release tab.
Warranty
SaVanna Verticals PVC louvers carry a 5-year warranty, as do valance corners,
headrail carriers, pinion rod support and wand control. Headrail and headrail parts
carry a 10-year warranty. See full warranty in the retail price guide.
Skandia Window Fashions®
www.skandiawf.com
2 of 3 Installing Your Vertical Blind
SECTION B
INSIDE MOUNT MOUNTED ON
HORIZONTAL SURFACE
(CEILING OR UPPER INSIDE
DOOR/WINDOW FRAME)
Note: This mounting method can be
used for dust cover valance.
1. The mounting clips may come to
you attached to the mounting brack-
ets. The brackets are not used with
this way of mounting. Loosen and re-
move the screw on the bottom of the
bracket. If your bracket has two
screws, remove both of them. Do this
on all wall brackets. Discard brackets
and adjusting screws and keep just
the clips.
2. You will need to make marks on
two things. One is your door/window
frame or ceiling and the other is the
valance.
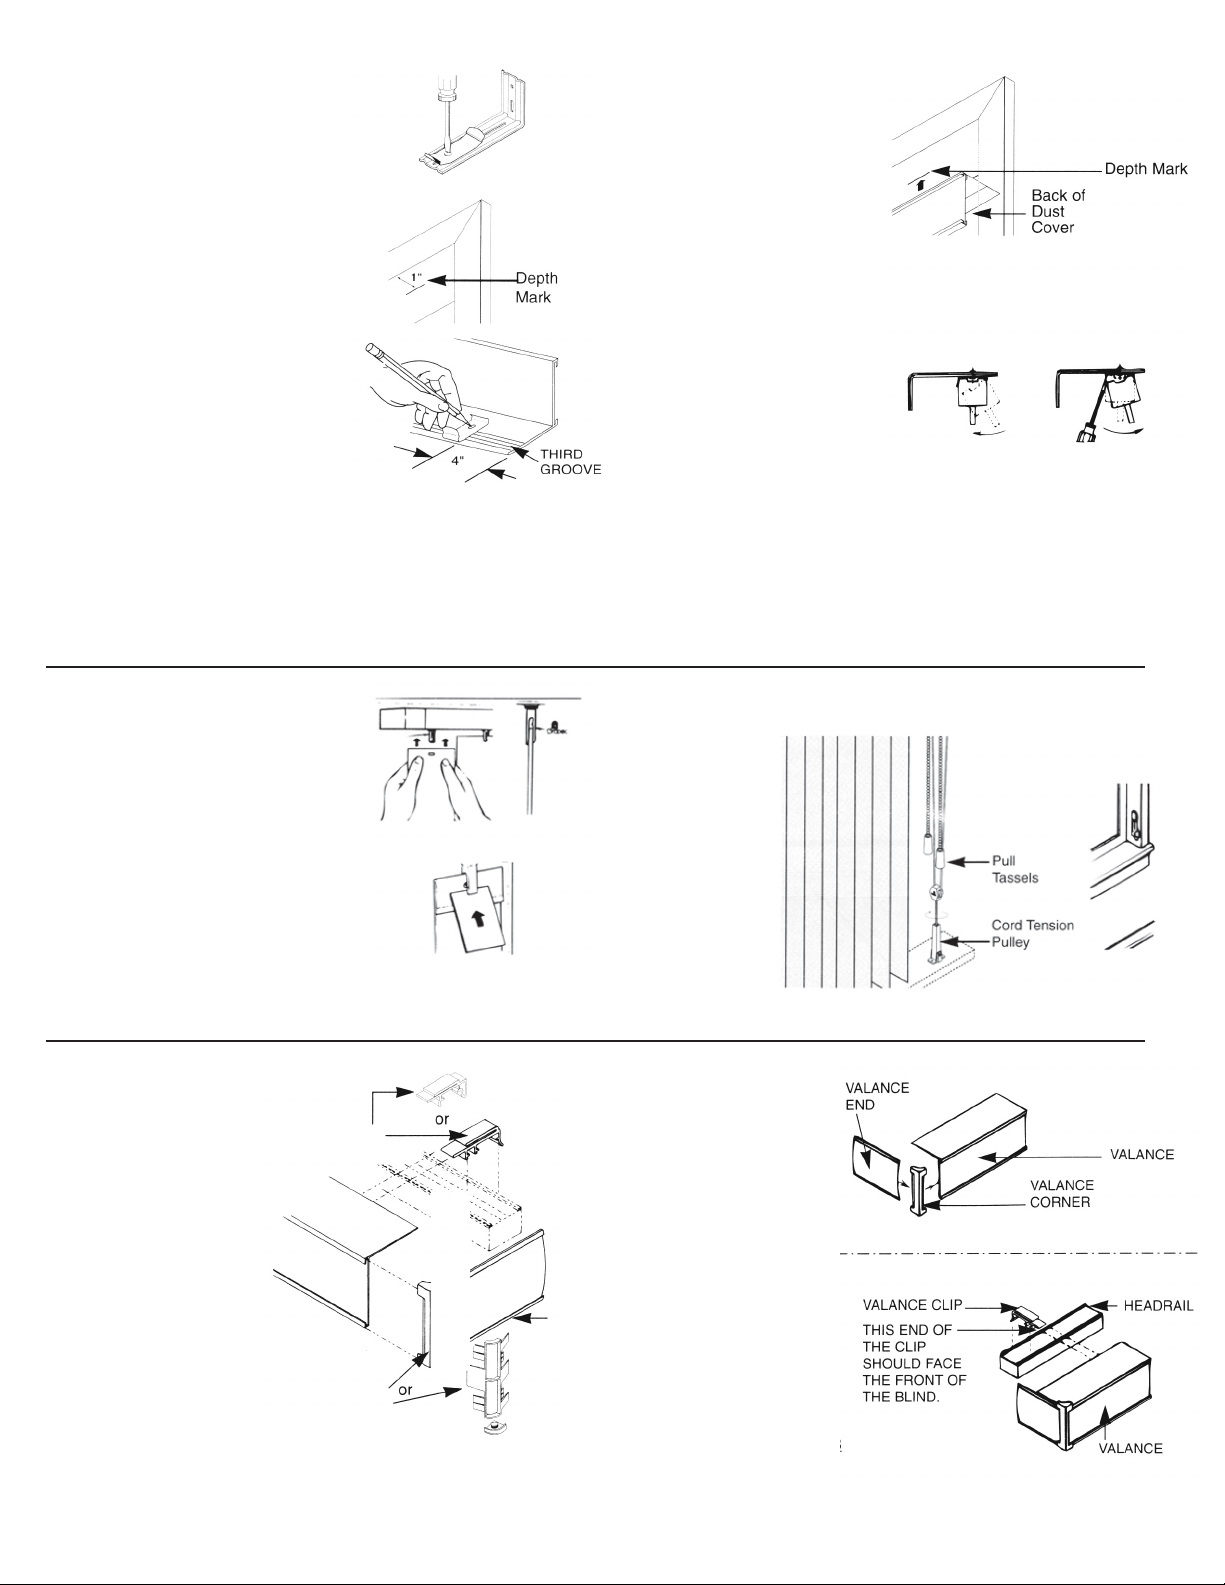
3. For marks on your door/window frame or ceiling, hold your
valance up, centered over door or window and mark the width of our
valance (WIDTH ARK). At the valance width marks you must
made, measure out 1" from wall and make pencil marks (DEPTH
ARKS).
4. Center a clip over the third
groove and about 4" or less
from each end. For blinds over
62", evenly space all additional
clips and mark all hole loca-
tions.
5. Hold valance up. Line back of
dust cover (on valance) up with
DEPTH marks (step 3). Drill
holes through valance at the
mounting hole marks. If mount-
ing into drywall, use wall an-
chors (not included) and push
into drilled holes.
6. Hold valance and clips up to
the holes and drive screws
through clip and valance and
into your ceiling or sill.
7. Snap headrail in place by inserting front edge in mounting clips
and rotating back. (Note: Put cord on right for right draw and left for
left draw.)
To remove blind, release headrail by inserting a screwdriver between
headrail and release tab.
SECTION C
INSTALL THE LOUVERS
Rotate stems so that you can see
through the stem slots. Push louvers up
into stem. Bently full down on louver to
insure it catches on stem hook.
Remover louvers by inserting credit
card between louver and long leg of
stem.
TENSION PULLEY
To Avoid Strangulation, cord tension
pulley should be attached to the cord
and then secured to the wall. Two pull tassels should be attached to
the chain.
INSTALL CORD TENSION PULLEY
Note: Do not pre-
drill holes.
For inside mounts,
pulley should be
positioned toward
back of sill so that it
will not interfere
with the louver
rotation.
SECTION D
DUST COVER VALANCE
VALANCE PARTS
J. Valance
K. Standard Valance
Corners
L. Valance Returns
. Valance Clips
VALANCE CORNER
ASSEMBLY
For standard corner
valance insert valance
ends into valance corners
and attach to valance.
Attache Dust Cover
Valance to vertical blind:
OUTSIDE OUNTING
Snap one clip onto headrail
about 2" from each end.
Space remaining clips
evenly on headrail. Slide
valance into clips.
INSIDE OUNTING: GO
TO SECTION B.
Skandia Window Fashions®
www.skandiawf.com

3 of 3 Installing Your Vertical Blind
SECTION E
WAND CONTROL
To rotate the louvers, rotate the wand in the direction you want
the louvers rotated.
TO OPEN OR CLOSE THE LOUVERS, first rotate the louvers
open. Then, push or pull the wand to open (stack louvers) or
close (unstack louvers) the blind.
NOTE: If louvers are installed with the front of the louver facing
the wand, the wand will be tin front of the louvers when the blind
is rotated closed. If the louvers are installed with the back of the
louver facing the wand, the wand will be in back of the louvers when
the blind is rotated closed.
SECTION F
SHORTEN CORD / REMOVE CORD TWIST
If the cord is too long you may adjust it. Traverse louver holders to
stacked position. Grasp knot located along the inside of the track
and pull out excess cord. Re-knot and cut-off excess.
Un-Twisting Pull Cords
After you mount your blind, your cords may be twisted together.
Follow these instruction to untwist them.
Open blind all the way. Pull out the knot that is farthest away from
the end with the cords and chain.Use a needle
nose pliers, if you have one, to get
at the knot. Hold the cord near the
knot and the cord near the drive
end and twist both of them in the
same direction. Try twisting one
way and then the other until you
find the right way to untwist the
cord. Pull the cords on the end of
the blind to get the knot back inside
the blind.
ADJUSTMENT OF THE L-60 HEADRAIL
One of the features of the L-60 headrail is that it is self-adjusting. If,
at any time, the louver stems become uneven, it is very easy to
adjust. First, take the chain and pull until there is resistance. Then
give the chain a good tug in the direction of the pull. You will hear the
headrail make a sound like gears stripping. Second, pull the chain in
the opposite direction until there is resistance. Then, once again,
give the chain a good tug. Again the headrail will make a sound like
gears stripping. Repeat this until the louver stems are lined up
correctly. This can be done before or after installation.
LOUVER MAINTENANCE
Clean PVC louvers with a damp cloth and mild soap. A this film of
mild soap left on the louvers helps keep static electricity from
building up. If cleaning becomes necessary, it is recommended to
use a mild non-abrasive household detergent such as 409 or Ivory
dish washing liquid to wipe dust build-up from the louvers.
Skandia Window Fashions®
www.skandiawf.com
Manuali Tenda per finestra popolari di altre marche


Domondo
Domondo PureNight Manuale di istruzioni per l'installazione

rollease acmeda
rollease acmeda Easy Spring Air Guida all'installazione

IKEA
IKEA KADRILJ Manuale utente

Hallis Hudson
Hallis Hudson Rolls Super glide Manuale utente

Benthin
Benthin P1614 Manuale utente

MV LINE
MV LINE CLARA 015 Manuale di istruzioni


