Slot.it Oxigen SCP-3 Manuale utente

Manual EN 3.0
SCP-3 1.0
1/23 v.1.00 May 5th 2020
ACTIVATE THE SCP-3 BEFORE USE
Thank you for your purchase. Before ANY further action, the CP-3 must be ACTIVATED with
the lot.it APP. Without activation the CP-3 will not work. What is the activation? Very simply,
via Bluetooth, the APP reads the network ID (known as MAC) of the controller, writes permanently
the current date in the CP-3 memory, and saves the following data: your email, the controller
MAC, the activation date, the firmware version, and the device name in a cloud database that we
can access. The same data is available on the APP.
The activation date is the date used for warranty. Regardless of when you bought the controller, and
of availability of the purchase receipt, we consider a two years period from the day you actually
start using your device – which is the activation date.
You must give a name to the controller, which is quite useful thing to do if you have more than one.
As we develop the APP further, it will become an indispensable companion to the CP-3, extending
its capabilities, with more advanced features becoming avaible.
The app is also the tool used to update the firmware of your controller to the latest version, or to
switch to a different one – you can easily reprogram the CP3 from being an oXigen controller to a
to a calextric ARC AIR/PRO and viceversa.
Note: the APP display has been condensed to fit inside these paper sheets.
How to activate the CP-3:
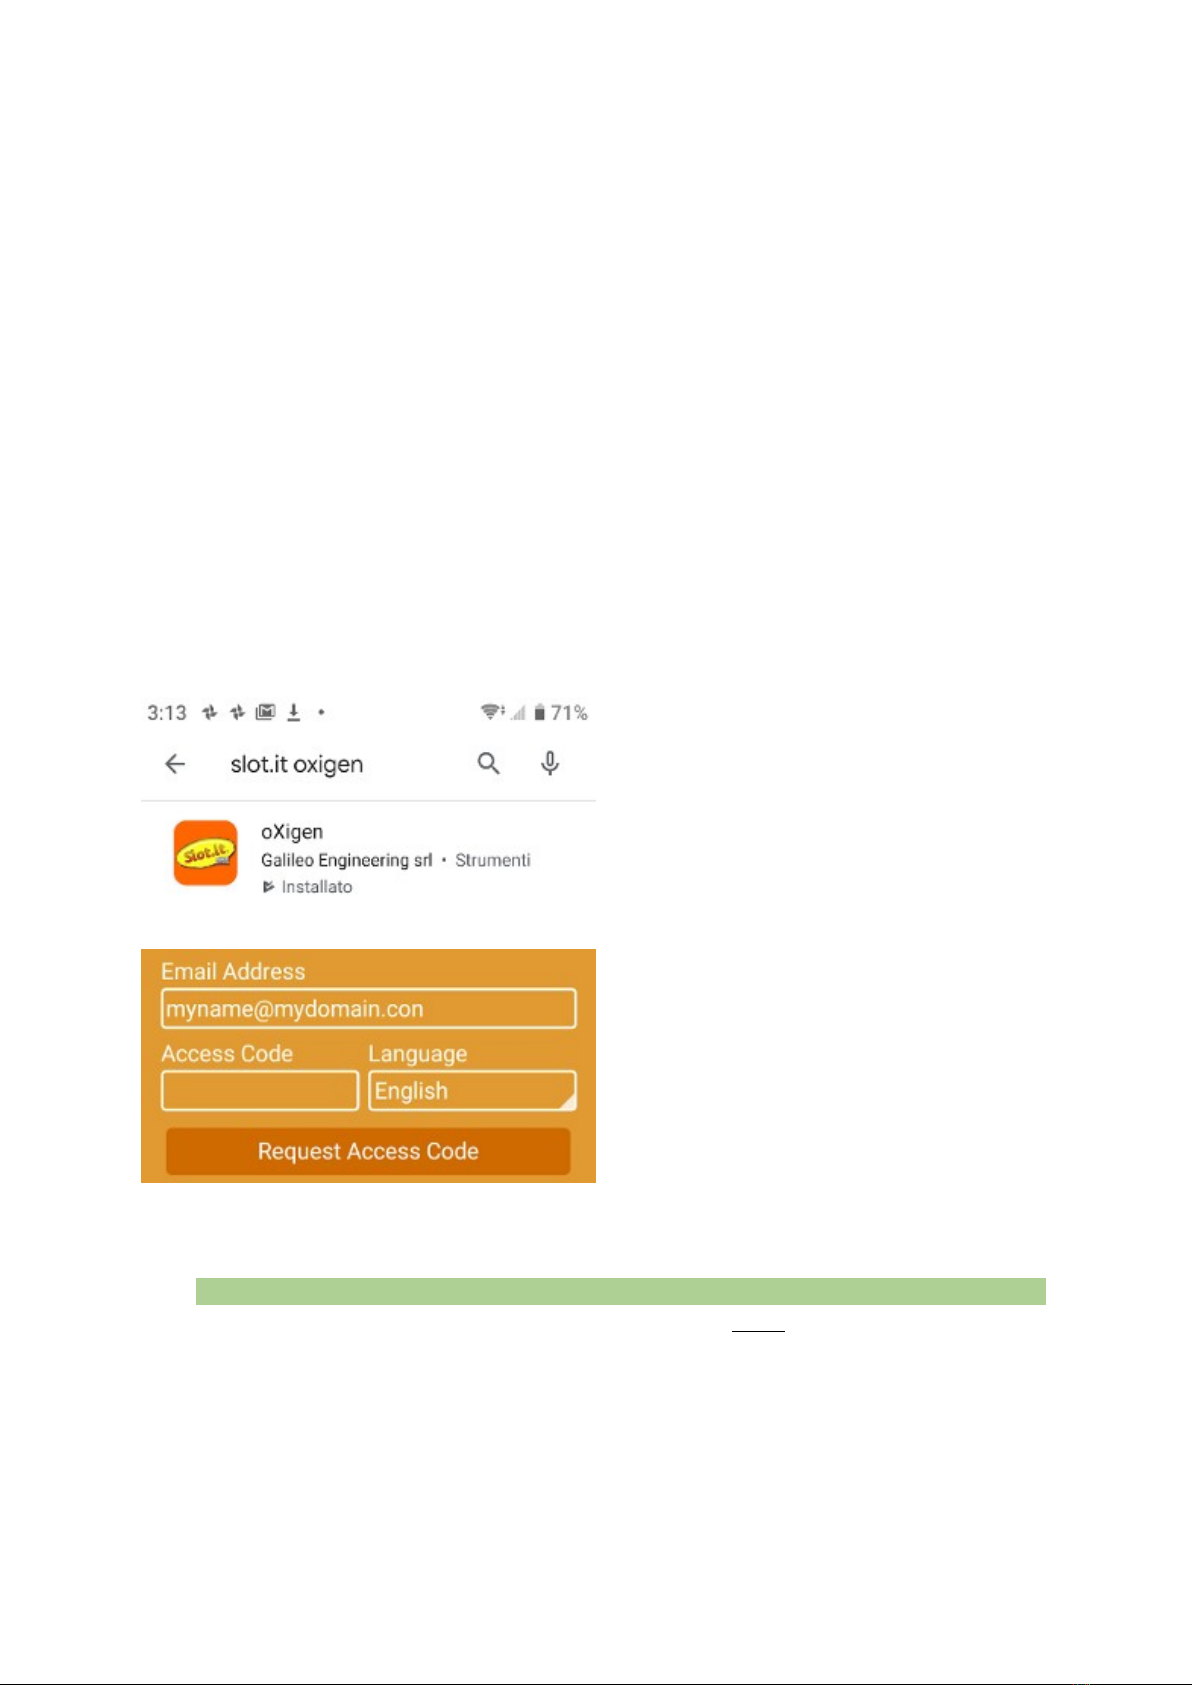
1. earch for oXigen in the APP store.
Don’t search for lot.it unless you want
get a darn slot machine game. ownload
and install the lot.it APP on your
Android (Android 7.0 or greater) or iO
device. Make sure the geographic
location is turned on. This is need by
Android Bluetooth function, we don’t
use such data.
2. Register yourself (email necessary) to
access the APP. Enter your email, and
touch ‘Request Access Code’. The APP
sends a confirmation email is sent to your
address: copy the code from your inbox,
and enter it into the app in the ‘Access
Code’ field. Now press the ‘User
Login’button that has just appeared
3. Power on the CP3. Remember, the CP3 comes with an ON/OFF/Curve selector switch
on the back of the controller. Look at the display – the moving message is telling you to
“LAUnCH tHE APP And Add tHE SCP3 – PreSS AnY button to StArt”
4. Press any button on the CP3 (example: the big friendly Panic Brake button) for two
seconds, and the display shows ‘hn’. ‘hn’ is the short form for ‘handle’, that is, the handle
part of the CP3. Now it’s time to use the lot.it APP.
2/23 v.1.00 May 5th 2020

5. o launch the APP (you’ve done that
already if you’ve followed steps 1. and
2. ), login if necessary, then click ‘Add’
6. The APP searches for the CP3 for a
while (you will notice a circle in the
middle of the screen), then when the
CP3 is detected, it appears on screen.
Click on ‘Register’
7. You are now ready to use your CP3
8. Click on ‘info’ to see your controller’s
data. Name can be changed with the
‘change’ button, firmware updated with
DFU, and for the immediate future you
can ignore the ‘buy’ button as it is
inactive.
3/23 v.1.00 May 5th 2020

The SCP3 at power ON
The CP3 can be switched OFF with the sliding switch on the back. It’s a three position switch
which also serves to select the response mode between ‘curve’ and ‘linear’. (Needs photo)
Therefore the controller can be easily switched on and off at will, and can do different things
depending on whether it is turned on with or without some buttons pressed.
STANDARD MODE power on: just switch it on without pressing any buttons. If the controller
was already activated, then just drive you car. If it wasn’t active, and you see a moving message
inviting you to launch the APP, please refer to the previous section of this manual (activation).
APP MODE power on: to connect to the APP via Bluetooth, switch on the CP3 with BOTH
ARROW pressed. On display, a moving message shows
APP-SELECthAndLEorPACHIP –
As the CP3 may have or not a power amplifier unit (PA), you must connect either that, or the
handle (main controller) to the APP. elect HANDLE with DOWN ARROW, or POWER AMP
MODULE with UP ARROW. Display shows either
hAndLE- or PACHIP-
You can switch back and forth, until you confirm with the round ‘brake’ button. The message
shows (fixed) either
hn or PA
Now the CP3, handle or PA module, can be reached with the APP.
DFU MODE power on: DFU means ‘direct firmware upgrade’. This is seldom used, as we suggest
to use the APP (APP mode) to start DFU. However, it may be useful. To enter DFU mode switch
on the CP3 with BRAKE pressed. On display, a moving message shows
dFU–SELECthAndLEorPACHIP–
Again, the CP3 may have or not a power amplifier unit (PA), you must select either that, or the
handle (main controller) for firmware upgrade . elect HANDLE with DOWN ARROW, or
POWER AMP MODULE with UP ARROW. Display shows either
hAndLE - or PA CHIP -
You can switch back and forth, until you confirm with the round ‘brake’ button. The message
shows (fixed) either
hn or PA
Now the CP3, handle or PA module, can be reprogrammed directly. Note that during the firmware
update, it is normal to see funny character appear on the display.
BOOTLOADER MODE power on: the bootloader is a special PC program that communicates, via
the oXigen dongle, with the CP3. To enter this mode, switch on the CP3 with UP ARROW and
BRAKE button pressed. A
U
appears on the display. At this point you should be familiar with the usual Bootloader procedures.
Note that if you choose to upgrade firmware through the Bootloader, then the Nordic APP (and not
the lot.it APP) should be used to perform the upgrade
4/23 v.1.00 May 5th 2020

BATTERY SELECTION (for 2.4GHz oX gen / ARC SSD w reless systems)
The CP-3 can be powered by an optional Li-Po battery which may be stored inside the handle, in
place of the cartridge. If powered by the battery, the CP-3 becomes a wireless, untethered device
directly compatible with lot.it oXigen and calextric D digital systems.
LiPo batteries can be damaged if allowed to discharge below a safety threshold. Our electronics
incorporates a circuit which protects the battery against over discharging.
The battery inside the CP-3 can be charged like the battery of a normal mobile phone through the
U B charger plug. The controller cannot be operated via U B battery charger power alone.
Battery specification
Capacity 750/1000 mAh
Voltage 3.7V (1s)
Undervoltage protection referably yes
weight approx. 20g
Max W*L*H 45*28*10 mm
Balance plug NA
lug JST 2pin
The 2.4 GHz rad o sect on of the SCP-3 can also be used f the controller s powered v a the
SCP-3 power supply cartr dge (SCP301c).
5/23 v.1.00 May 5th 2020
JST Connector Sample Example: Turnigy nano tech 750mah 1S

Description
The CP-3 is a speed controller for slot cars. It reads the trigger position using a contactless,
friction free sensor, with linear magnetic trigger position readout. It is directly compatible, via the
built-in 2.4 GHz wireless interface, with digital oXigen and calextric ARC AIR/PRO systems.
Like its predecessor CP-2, it features an interchangeable cartridge system, to connect to analog
systems.
The digital cartridge will be supported at a later stage.
Warranty: two years from the date of activation. Before usage, the CP-3 must be connected to a
Android or iO phone and ‘activated’, that is, the date of its first use is written into the controller’s
memory and in our database. We recommend to keep the receipt anyway, in case the CP-3 cannot
be caontacted via radio anymore.
This device complies with RoH directive. Do not immerse this controller in water.
Thanks to all our beta testers whose work was essential to help us bring this product to market.
The name CP comes from the nickname eCaPelo ( ecapelo=Hairdryer) that was given to early
lot.it controllers.
This controller is Made in Italy and is the result of the hard work of Maurizio Ferrari, Maurizio
Gibertoni, Cristian Anceschi of
Galileo Engineering srl, Via Cavallotti 16 – 42100 Reggio Emilia, Italy [email protected]
o, now you know who to blame.
Please also check out our lot.it, Policar and Galileo Engineering sites!
lot.it and the lot.it logo are registered trademarks belonging to Galileo Engineering srl.
lot.it is in no way affiliated with Carrera, Hornby Hobbies, Ninco, Tecnitoys; Carrera Pro-X,
Carrera Digital 132, Hornby D, Ninco N-Digital, Tecnitoys The Digital ystem D , are
registered trademarks belonging to their respective owners.
Electron c vers ons of the manual n Ital an/Castellano/German can be downloaded
from the Slot. t s te www.slot. t.
6/23 v.1.00 May 5th 2020
UK

Slot.it SCP-3 1.0
UICKSTART for ANALOG SYSTEM
7/23 v.1.00 May 5th 2020
LC/SS On Max / Min / /Diagnostic
Analog: Single shot 100% brake
Curve/Max
SCP 3
Analog / Digital :
Thumb brake
Analog: Set Brake 100%
Digital: LC
0
0 10
Minimum Voltage Setting
(Sensitivity)
Instant Brake using
'Brake' knob setting
oXigen unctions
analog: braking at 100% while pressed
oXigen: lane change, DOWN
analog: one-shot braking at 100% brake
oXigen: change lane, UP
Setting o MAX speed (linear modes) or
Curve control (curve mode)
Red/Green LED
ixed red: MAX trigger reached
ixed green: MIN trigger reached
lashing: diagnostic code
Green LED
Analog: 100% brake active
Dig/O2: Status o LC Double Action Brake:
Sweep rom 100% to 0 or
Fixed braking
Power Ramp Control
(AntiSpin)
interchangeable
cartridge
0 10 0 10 10 10
Power Trim Min Speed Brake
LIN
OFF
Battery
charge
port
Mode selector:
LIN='linear'modes
CRV='curve'mode
trigger map selector
Fast Slow
Std
O2: up/down LC ↑↓
O2: Lights on/off
Track call
So t rubber coated trigger
1 or 2 ingers option
CRV

BEFORE YOU START Choose a tr gger
Install the trigger that matches your driving style: short (for one finger) or 'long' (for two
fingers). Use the provided screw.
QUICKSTART for ANALOG SYSTEMS (SCP-3 w th analog cartr dge)
The colour scheme of the CP-3 cables follows the standard U (Parma) colour coding. In
our opinion, it does not make sense to use anything other than red for battery power and anything
other than black for ground, however since the long time standard established convention is
different, we decided, reluctantly, to follow it.
o: WHITE is +, RED is – (ground), BLACK is motor (track). If you have a D connection box,
colour will match the existing colours on the female plugs of the box.
Anyway: plug the WHITE/YELLOW cable into the PO ITIVE (+) terminal of your track; plug the
RED cable into the NEGATIVE (-) terminal of your track; plug the BLACK terminal to the motor
connector of your track, then go to the Qu ckstart common sect on chapter.
Technical pecifications
Power supply 7 to 24V
Maximum current:
home racing cartridge
high end cartridge
5A
40A
Operating temperature 0 to 40°
Weight 270 g
As a radio device, it operates on the 2.4GHz band either as a BLE (Bluetooth Low Energy) device,
to interface with, for example, a mobile phone, or on the proprietary oXigen or calextric D
ARC AIR/PRO networks and protocols.
8/23 v.1.00 May 5th 2020
UK
UK
+
WHITE
RED
BLACK
+

QUICKSTART for oX gen and Scalextr c ARC AIR/PRO SYSTEMS
. The CP-3 is directly compatible with oXigen lot.it wireless digital system. You should
not use the old oXigen cartridge (for CP-1 and CP-2) with it. An extra Power Amplifier Module
is available if you need to cover extra distance.
It can also be used as a calextric ARC AIR/PRO controller.
Refer to the oXigen manual for instructions about how to use the CP-3 in an oXigen or ARC AIR/
PRO system.
NOTE for DIGITAL SYSTEMS (SCP-3 w th d g tal cartr dge)
Currently, the lot.it CP-c controller does NOT support the universal digital cartridge. We
need to write appropriate firmware. It will happen though.
9/23 v.1.00 May 5th 2020
UK
UK

QUICKSTART common sect on
Move the slider on the back of the controller to the LIN position, and the top switch on
TD.
Turn the 'Power Trim' and 'Min peed' knobs completely counterclockwise. Turn the 'Brake
'and 'Curve/Max' knobs completely clockwise.
Press the trigger and the car should start. Adjust the 'Min peed' knob to get a good starting speed;
this will depend on the track, car, driving style and voltage. Then, adjust the Curve/Max knob to
suit the whole curve to the desired response. Have fun. Then please, read the rest of this manual.
Please. It is important, otherwise we wouldn't have written it. In particular, advanced users should
read the chapter named 'Reprogramming the SCP 2')
Complete electron c vers ons of the manual may be downloaded from the Slot. t s te
www.slot. t
NOW READ THE COMPLETE MANUAL!
ORA LEGGERE IL MANUALE COMPLETO!
LEA Ud. AHORA EL MANUAL COMPLETO!
DAS KOMPLETTE HANDBUCH JETZT LESEN!
MAINTENANT, LISEZ LE MANUEL!
10/23 v.1.00 May 5th 2020
0 10 0 10 10 10
Power Trim Min Speed Brake
0
0 10
Curve/Max
UK
UK
Fast Slow
Std
LIN
back of controller top of controller
CRV
OFF
UK
Indice
Altri manuali Slot.it Controllori


