SLS QTVDVD Manuale utente

TM
OWNER’S & INSTRUCTION MANUAL
SURELOCK-SECURITY.COM
Quick Touch Vault
Drawer
MODEL:
Digital Drawer (QTVDVD)
Digital + Bio Drawer (QTVDVDB)

2
ENGLISH
IMPORTANT! READ CAREFULLY, RETAIN FOR FUTURE REFERENCE. MANUAL MUST
BE READ BEFORE OPERATING!
NEVER keep backup keys in your safe!
Do not store this document in your safe.
Mount your safe in a secure location.
Store a record of your combination and keys in a safe and secure location away from children.
• Make a record of your serial number on the lock. This is important information for the
manufacturer to make duplicate keys, if they're lost.
DO NOT store loaded guns in this unit.
ALWAYS check to make sure the latch is closed. The lid requires a rm press on the top to
lock automatically.
Neither seller nor manufacturer shall be liable for unauthorized access, any injury, loss or
damage to personal property direct or consequential, arising out of the use of, or the inability to
use the safe.
The user shall determine the suitability of the safe before the intended use and user assumes
all risk and liability. Our safes are not intended to protect against environmental hazards
including re and water.
Be sure and follow all local and state rearm laws.
DO NOT operate a rearm without proper training and experience.
For any questions, issues, problems, concerns please contact us. Email: service@surelock-
security.com
ATTENTION
DISCLAIMERS
!
!
!
!

3
ENGLISH
TABLE OF CONTENTS
COPYRIGHT NOTICE
Copyright 2021. All right reserved. No part of this manual may be copied, transmitted,
transcribed, stored in a retrieval system, in any form or by any means without expressed
written permission of.
DANSONS
3411 North 5th Avenue, Suite 500, Phoenix, AZ, USA 85013
service@surelock-security.com
www.surelock-security.com
CUSTOMER CARE
USA: (480) 923-9637
Attention .......................................................................................................................2
Disclaimers...................................................................................................................2
Parts & Specs...............................................................................................................4
Introduction...................................................................................................................5
Battery Installation..................................................................................................5
Battery Display .......................................................................................................5
Opening Safe with the Backup Key........................................................................6
Programming
Code Resetting.......................................................................................................6
Registering Fingerprints .........................................................................................7
Deleting Fingerprints ..............................................................................................8
Keypad Sound........................................................................................................8
Backlit Keypad........................................................................................................8
Installation
Safe Installation......................................................................................................8
Mounting Instructions .............................................................................................9
Care and Maintenance ...............................................................................................15
Troubleshooting..........................................................................................................15
Lifetime Warranty .......................................................................................................16
Safe Information .........................................................................................................16
4
ENGLISH
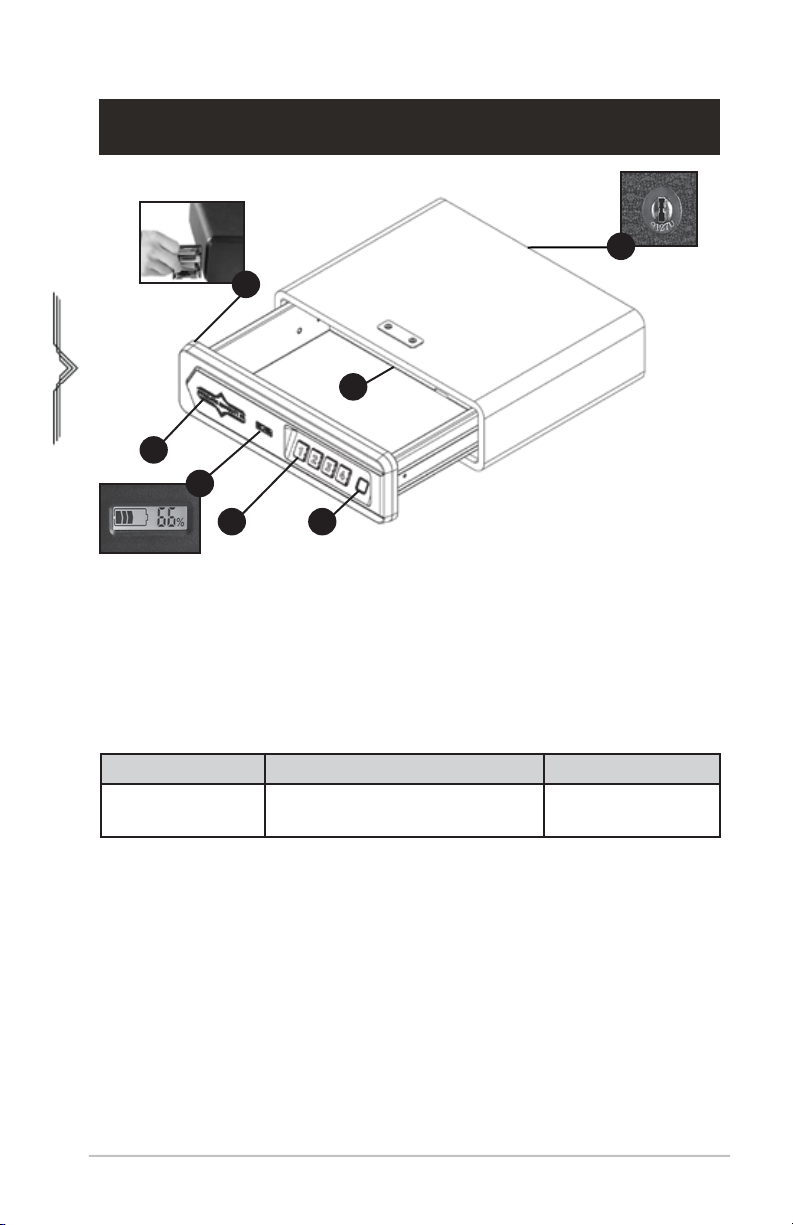
PARTS & SPECS
*Features may vary by safe model
(QTVDVDB shown)
1. Keyhole and Key Number
2. Brand Name Logo
3. Battery Display
4. Battery Compartment
5. Program Button
6. Keypad Keys
7. Fingerprint Scanner*
2
3
4
5
6 7
1
MODEL ASSEMBLED (WXDXH) WEIGHT
QTVDVD/QTVDVDB 13.50x11.10x3.81 IN.
343x282x97 MM. 15.87 LBS / 7.20 KG
BOX CONTENTS
1 x Safe & Attached Mounting Plate
2 x Backup Keys
6 x Mounting Screws
1 x Manual
**Batteries Not Included (use new 4 - AA Batteries)
5
ENGLISH
INTRODUCTION
The Surelock Quicktouch Vault is a biometric ngerprint access, code access, and key access
safe. It provides secure storage for valuables such as rearms, ammunition, cash, and other
personal items. The safe combines high security with complete quick access control with its
solid construction and biometric technology.
Please take time to read and familiarize yourself with the proper operating procedures
presented on the following pages.
If you have any questions, problems, or need help conguring the system, please contact us at
service@surelock-security.com.
1. Open the battery cover with a
screwdriver.
2. Insert 4 - AA fresh alkaline batteries
(not included) into the battery
compartment.
Note: Pay attention to the"+" and"-"
signs.
3. Install the battery compartment.
Once the batteries are inserted
correctly you will hear a short beep
and see the keys light up once.
IMPORTANT: YOUR SAFE WILL AUTOMATICALLY LOCK WHEN YOU FULLY PUSH THE
DRAWER. USE NEW AA ALKALINE BATTERY ONLY.
BATTERY INSTALLATION
BATTERY DISPLAY
If battery display shows less than 20%, please replace the 4 new batteries. Use AA fresh
alkaline batteries.

6
ENGLISH
Programming
IMPORTANT
1. If 5 incorrect entries are made, the safe will go into alarm mode for 5 minutes with
lights ashing and beeping. You can open the safe with the backup key and stop the
alarm by removing the batteries.
2. Two Pin Code Buttons can not be pressed at the same time.
3. Programming a new code will overwrite your previous code.
4. If you forget the previous code, simply repeat the above steps to reset a new code.
Locate the key hole at the back of the safe.
Turn the key counter-clockwise to open the
safe.
Default Code: 1234
1. With the vault open, press and hold down
the 'PROGRAM' button for 5 seconds and
immediately remove your nger once you
hear a beep and all keypad keys light up
once.
2. Enter your NEW code.
(Code must be 3 digits to 8 digits).
3. Press the 'PROGRAM' button once and
release it. The keypad keys will light up twice
with two beeps and now your new code is
set.
4. Test the code. The door will open if the
correct code is entered. You will hear ve
beeps with lights ash if the wrong code.
Repeat above steps if the new code doesn't
work.
OPENING SAFE WITH THE BACKUP KEY
CODE RESETTING
NOTE: In Step 1, Remove your nger on the Program button immediately once
you hear a beep. If you keep holding it down for about 10 seconds, you will hear
two beeps and the Pin Code Buttons will light up twice. This will result with all
registered ngerprints to be erased.
7
ENGLISH
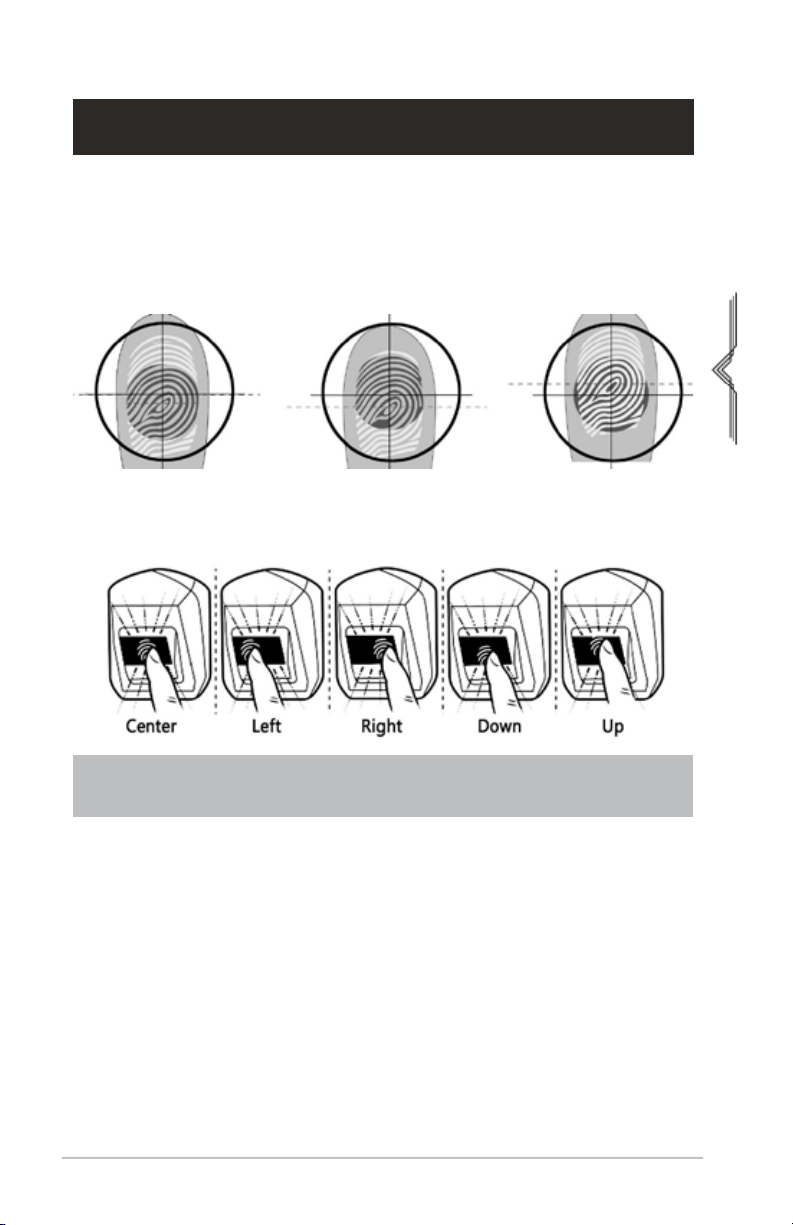
1. It is highly recommended that users should program a new vault code before registering
ngerprints. To increase your success rate of registering a ngerprint, ensure that your
hands are clean. Excessive moisture such as lotions or oils will affect your ngerprint and
may cause inaccurate sensor readings. If you experience difculty with a particular nger,
try another.
2. When registering a ngerprint, adjust your nger slightly between scans for increased
accuracy, shown in the illustration below.
To increase your success rate, register several ngerprints. Start by placing a single nger at
the center of the scanner and change positions with each scan. This allows the scanner to read
where most of the ngerprint detail is located.
REGISTERING FINGERPRINTS
If you have any difculties please contact our Customer Care team for help, advice,
and how to videos.
1. With the vault open, press and hold the PROGRAM button for ve seconds. All keypad keys
(1-4) will light up once with one beep and the ngerprint scanner will light up BLUE.
2. Register ONE nger on the ngerprint scanner:
• Place your nger on the center of the ngerprint scanner for the rst scan. Wait for a
short beep and the scanner will light up BLUE (1-2 seconds after placing nger). Lift your
nger off.
• Place the same nger again over the ngerprint scanner and repeat same process two
more times. Adjust your nger slightly between scans for increased accuracy.
• Once all keypad keys (1-4) light up twice with two short beeps, which conrms that the
new ngerprint has been registered successfully.
3. Now test the ngerprint: close the door and place your nger on the ngerprint scanner. If
you made a mistake and the ngerprint will not work, use the backup keys to open the vault
and attempt to register again with a different nger.

8
ENGLISH
With the vault open, press and hold the PROGRAM button (for 8-10 seconds) until all the keypad
keys (1-4) ash twice with double beeps, then release. All registered ngerprints are now erased.
DELETING FINGERPRINTS
BACKLIT KEYPAD
KEYPAD SOUND
You can turn off the “BEEP” sound of the keypad by pressing and holding the 1 button for 3
seconds to turn on/off the sound.
Placing your hand next to the keypad or the keyboard will light up.
IMPORTANT
• If all keys ash green 5 times with 5 beeps, it means registration has failed and you
must repeat the above steps.
• The safe can hold 20 ngerprints. If the light ashes 5 times with 10 beeps when
trying to register your ngerprint, it means the ngerprint storage capacity is full.
• To increase your success rate, please register the same nger multiple times in
different positions.
Contact Customer Care if you encounter any problems
IMPORTANT: WHEN THE KEYPAD KEYS FLASH ONLY ONCE WITH ONE BEEP, KEEP
HOLDING. YOU MUST HOLD THE PROGRAM BUTTON UNTIL THE KEYS FLASH
TWICE WITH DOUBLE BEEPS, THEN RELEASE.
CHOOSING A LOCATION FOR YOUR SAFE:
The location of your safe is very important. For optimal safety and security, we recommend
installing your safe in a location with a level surface. We also suggest a cool and isolated
area, away from combustibles. Due to the fact that heat rises, avoid putting your safe in the
upper level of your home. Avoid placement near a furnace or water heater or anywhere that
ammable materials are present.
For added protection, we suggest storing the safe in a location that is convenient, but out of
sight from others.
SAFE INSTALLATION
Installation

9
ENGLISH
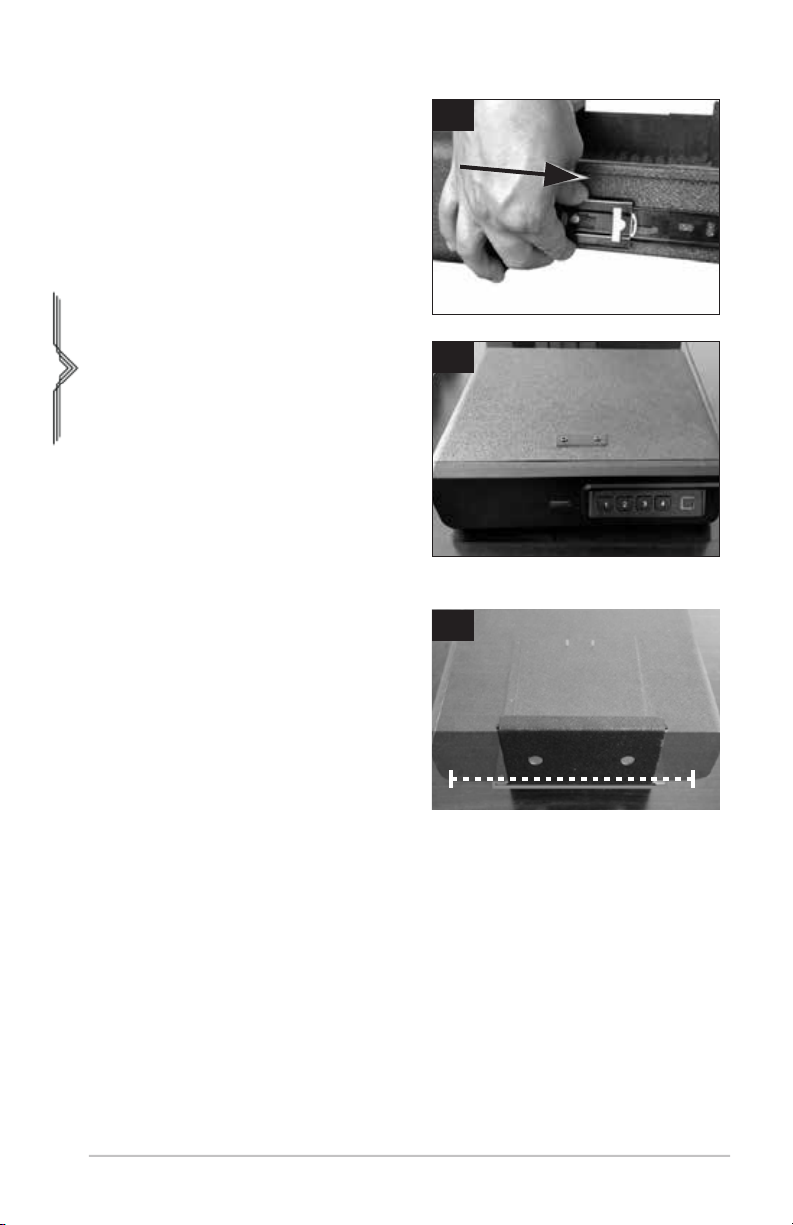
1. Open your safe and press the small handles
on the outside of the drawer sliders. Slide
out the drawer to separate from the safe
base.
MOUNTING INSTRUCTIONS
ON A DESK WITHOUT A MOUNTING PLATE
1
2
3
2. Unscrew the nuts that secure the plate to
the bottom of the safe.
3. Flip the safe base and pull the plate away
from the safe.
10
ENGLISH
4. Pull out the slide bar from the safe base and
reconnect the drawer.
5. Place the safe on top of the desk.
1. Put the safe on the desk and mark the
position of the plate.
ON A DESK WITH A MOUNTING PLATE
4
5
1
Questo manuale è adatto per i seguenti modelli
1
Indice
Manuali Cassetto LCD popolari di altre marche

Acnodes
Acnodes KD 8228 Manuale utente

Ameriwood
Ameriwood 9524328PCOM Manuale utente

Kesseböhmer
Kesseböhmer TANDEM solo Manuale utente

Crystal Image Technologies
Crystal Image Technologies RMD-151-A Series Manuale utente

APW Wyott
APW Wyott Ease Extreme HDX-1-120 Manuale utente

NTI
NTI RACKMUX-V17-N Manuale utente


GRASS
GRASS DWD XP Manuale utente

StarTech.com
StarTech.com DuraView RACKCONS1701 Manuale utente

Fisher & Paykel
Fisher & Paykel IZONA CoolDrawer RB36S Manuale utente

Synergy Global Technology
Synergy Global Technology LCD1U17-44 Manuale utente

Fujitsu
Fujitsu RC25 Manuale utente

Acnodes
Acnodes RK 1000B Manuale utente