
Smart Witness SWC101S Manuale utente
www.smartwitness.com
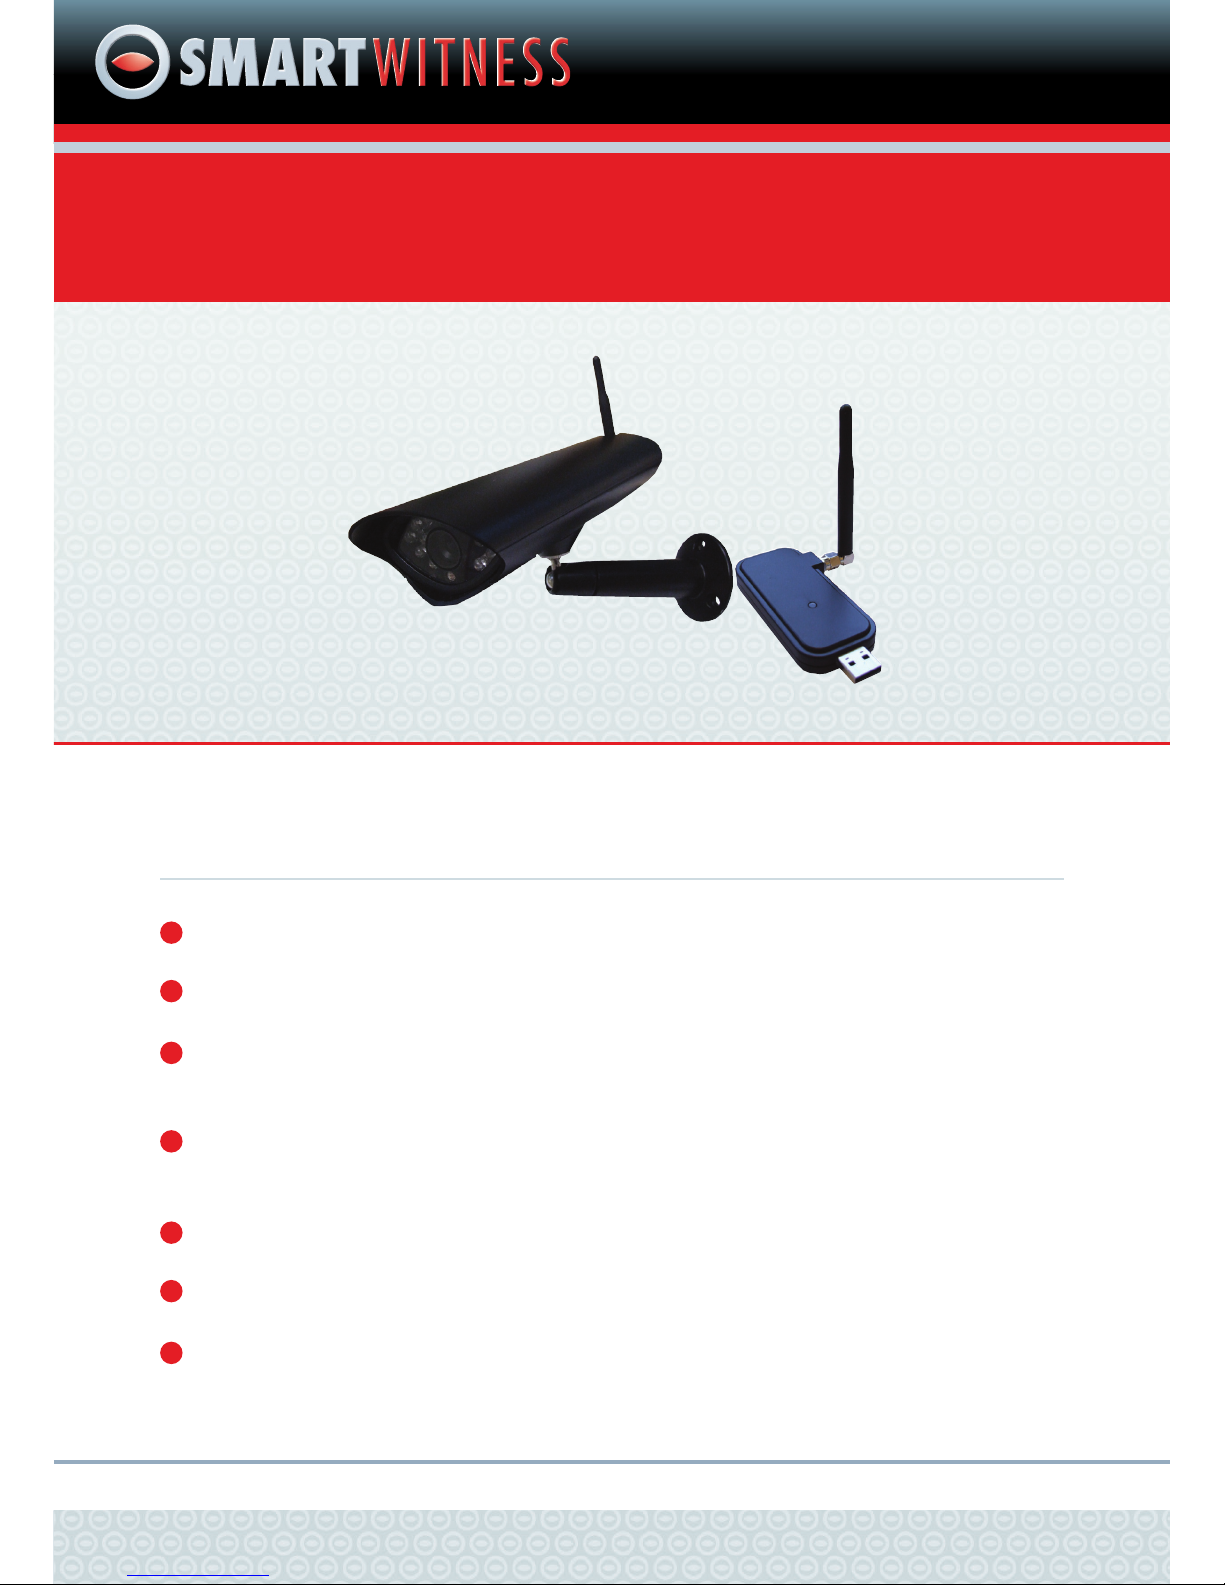
SWC101S
Wireless Outdoor CCTV Kit for Windows PCs
SWC101S v1.0
BEFORE YOU BEGIN
Please unpack the box carefully and identify that all the parts are present.
The Receiver is suitable for indoor use only.
Make sure you use the recommended power input. Damage caused to the Camera or
Receiver by incorrect voltage is not covered by the warranty.
Do not attempt to open the casing to access the Camera or Receiver. Damage caused
to the products by tampering with the casing is not covered by the warranty.
Ensure the camera and receiver are positioned in an area free from dust.
Do not aim the camera at the sun or similar intense light.
Avoid installing the camera where there are thick walls, or large obstructions between
the Camera(s) and the Receiver as this may reduce the wireless connection.

PRODUCT DESCRIPTION
The SWC101S is a complete wireless system designed for home or business monitoring and
recording. The system uses the latest interference-free wireless signal for excellent image
quality. It is easy to set up and use, requiring only very basic DIY skills to install. Video and
image files can be easily viewed, backed up and played back on any Windows PC or Mac
computer with a USB 2.0 port. The camera has a built-in motion detection sensor which can
activate recording upon movement. The system can be expanded at any time by adding up
to 3 additional cameras from the range (Model: SWC100S or SWC101S).
System Features
The system uses the latest interfer-
ence-free wireless signal for excellent
image quality.
Features IR LEDs for up to 10m Night
Vision in complete darkness.
640 x 480 pixel resolution.
Expand the system at any time by
adding up to 3 additional cameras.
View up to 4 cameras in Quad view or
a single camera in full screen.
Cameras should be mounted indoors
and can be up to 200m from the
receiver (through walls & ceilings the
wireless range is reduced by 50%).
Optional outdoor cameras can be
added to the system.
Recording Features
USB connection for viewing and
recording the cameras on a Windows
PC or Mac computer.
Record cameras continuously to your
hard drive.
Supports Continuous, Scheduled or
Motion Activated recording and can
take image snapshots.
Compatible with MSN and Skype.
Supports Remote Viewing via an
internet connection to the receiver PC.
FEATURES
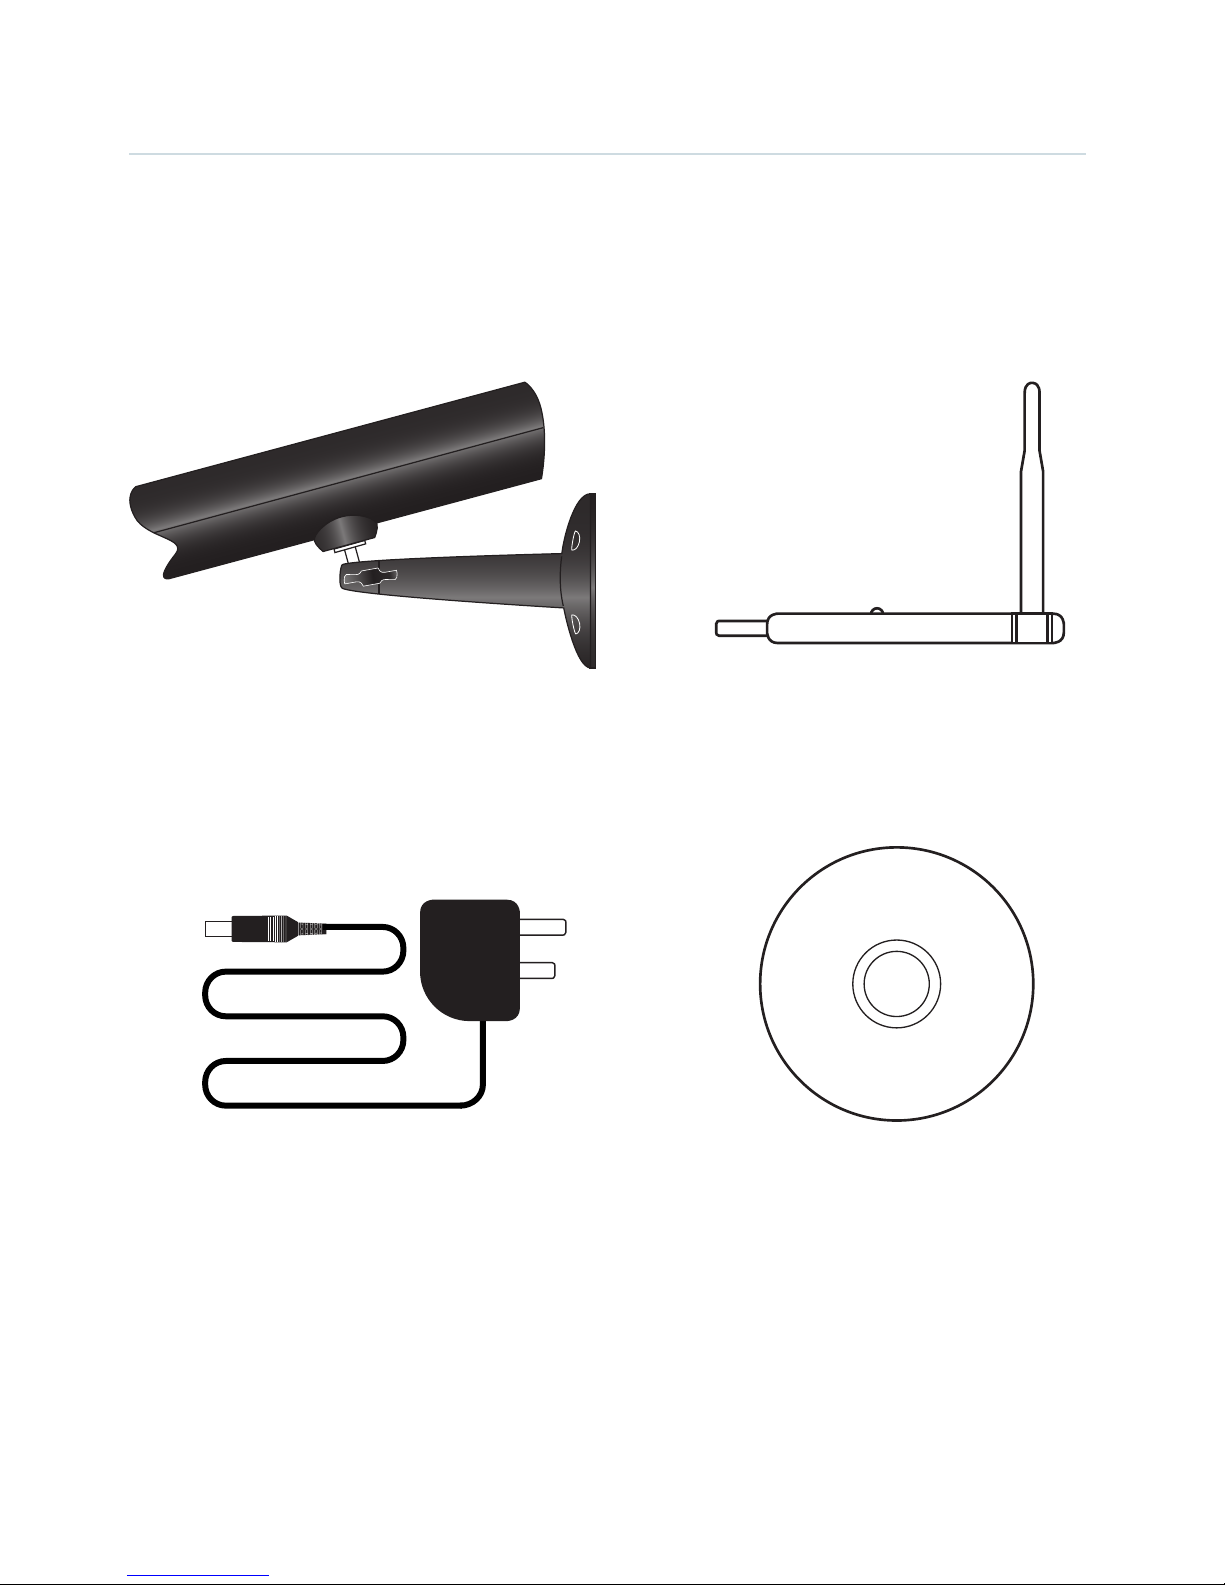
PACKAGE CONTENTS
Wireless USB ReceiverWireless Camera with
mounting bracket
Power Adaptor for Camera DVR Software
Installation CD
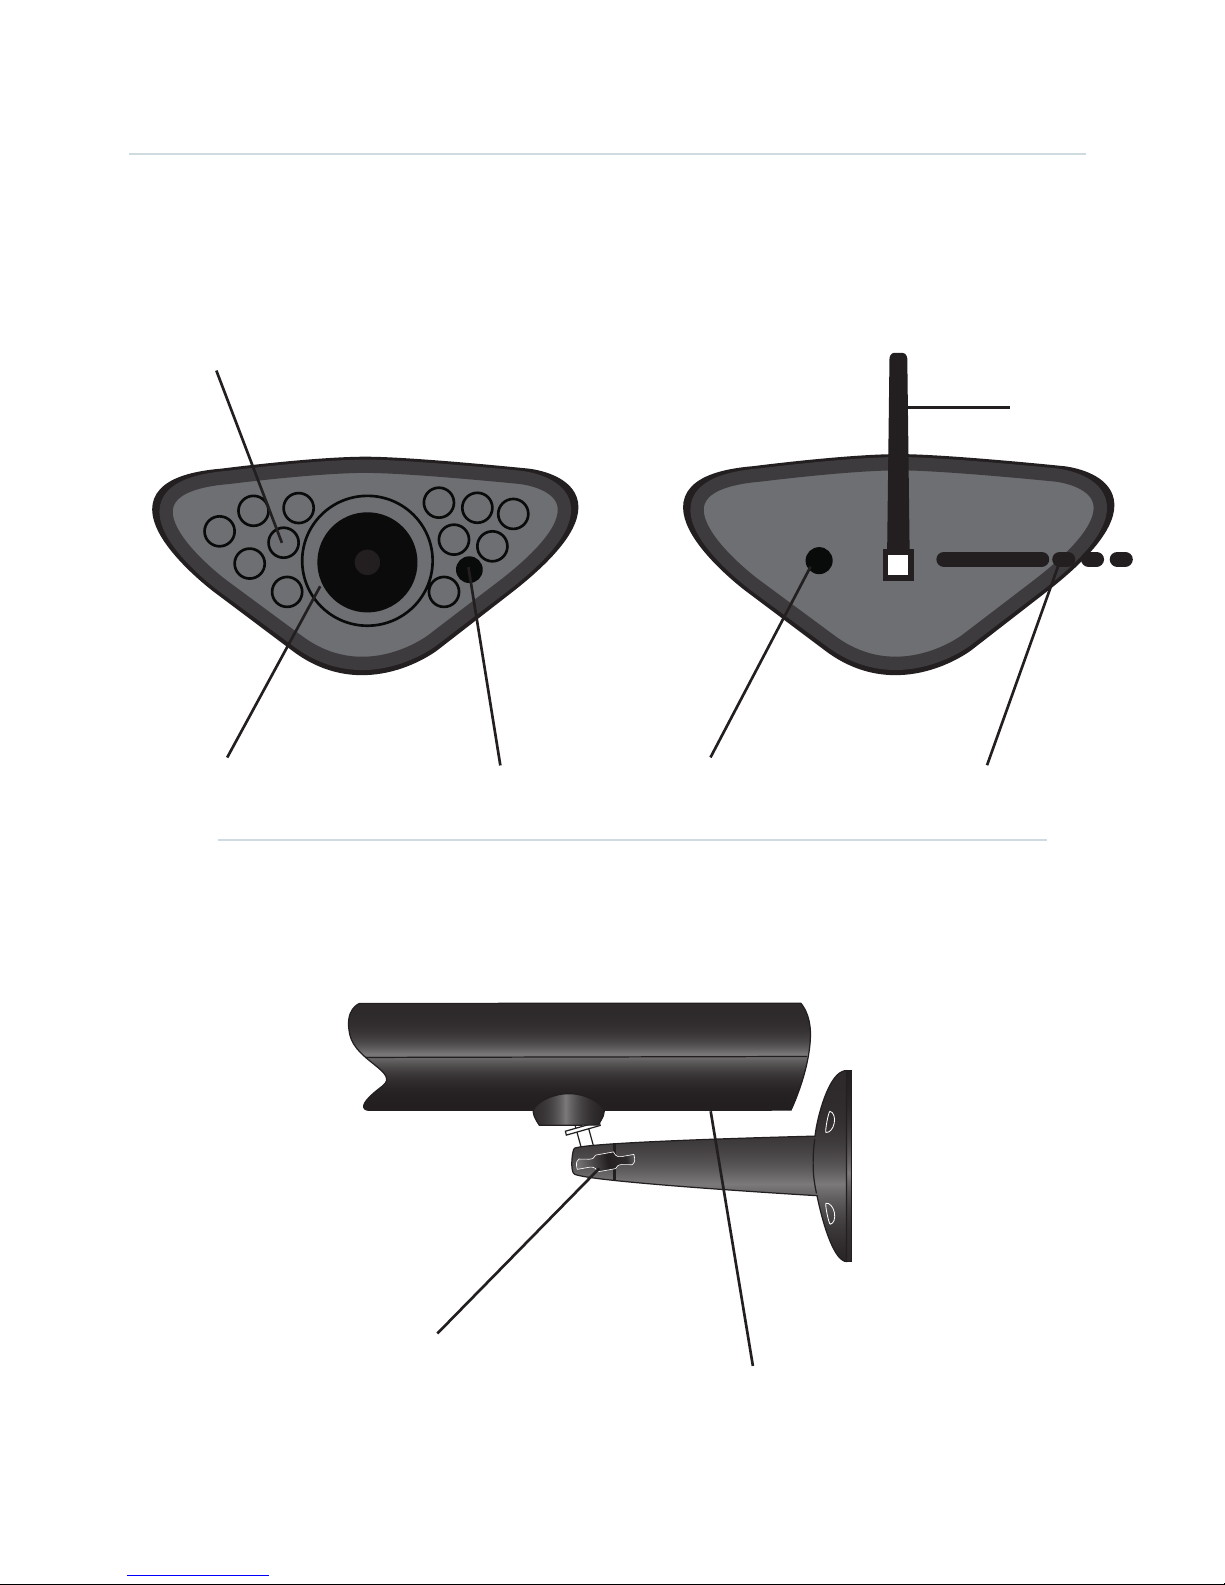
PARTS
CAMERA SIDES
CAMERA FRONT CAMERA REAR
Camera bracket
(Can be rotated for free
standing or wall mounting)
Camera Lens Pair button
Antenna
Power cable
IR Sensor
IR LEDs
Microphone
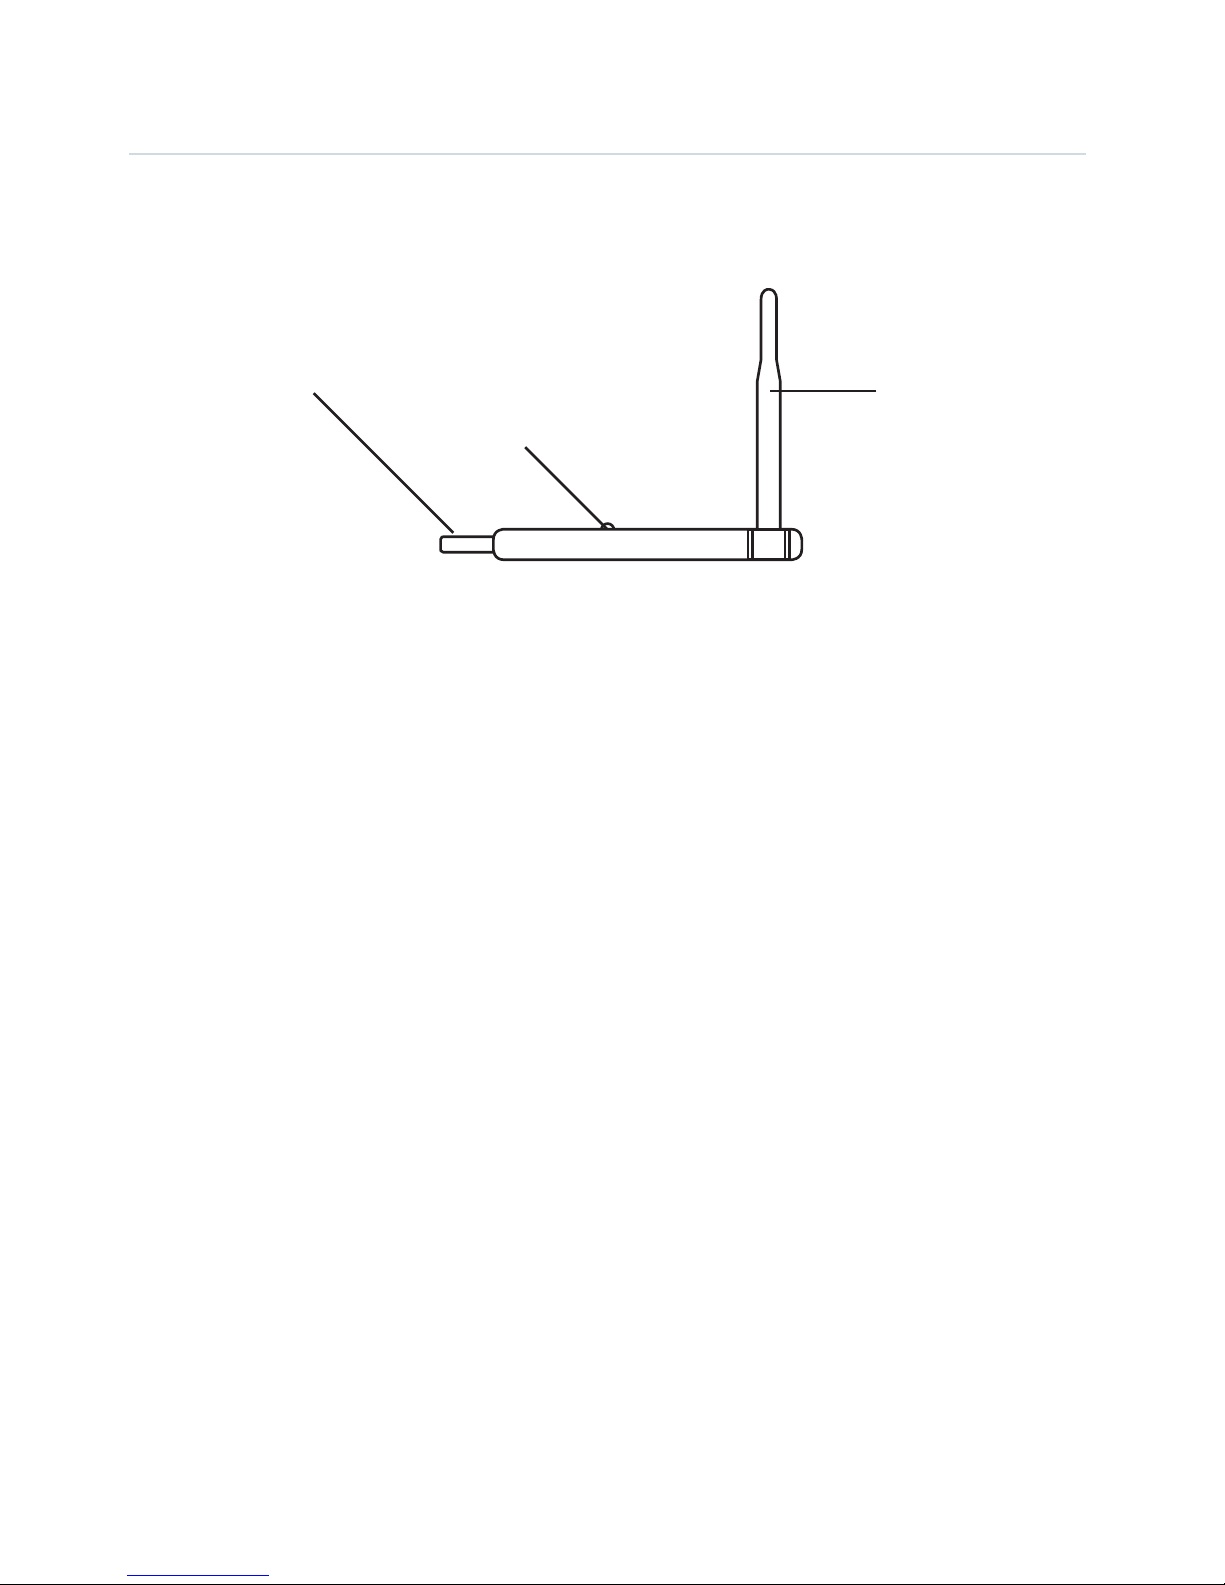
RECEIVER PARTS
RECEIVER
Camera Antenna
Antenna is permanently attached to the
camera. It transmits wireless signals to the
receiver.
Power Input Socket
Plug the power adaptor here.
Wall Mounting Bracket
Use the bracket to mount the camera on
a wall or other flat surfaces.
IR LEDs
Provides up to 10m Night Vision viewing.
Lens
Captures video images.
Microphone
Receives sound which will be transmitted
from the camera to the receiver.
Pair Button
Used to pair the camera with receiver.
Receiver Antenna
Receives signals from the camera(s).
Adjust the antenna to vertical position for
better signal reception.
USB Connection
Plug this side into the computer’s USB
port.
Power LED
Power Indicator.
USB Connection
Power LED
Antenna
CAMERA INSTALLATION
Plan where the camera will be positioned. Ensure that the power adaptor cable is able
to connect back to the camera. It is recommended that the performance of the wireless
connection is verified at the selected location area before the camera is permanently
installed.
1. Install the software CD enclosed and restart your computer when prompted.
2. Connect the power adaptor to the camera’s power input on the rear and plug it to a
mains power supply. Then switch on the power.
3. Connect the USB receiver to your computer and run the application software ‘WUSB
Camera’, from the icon on your desktop.
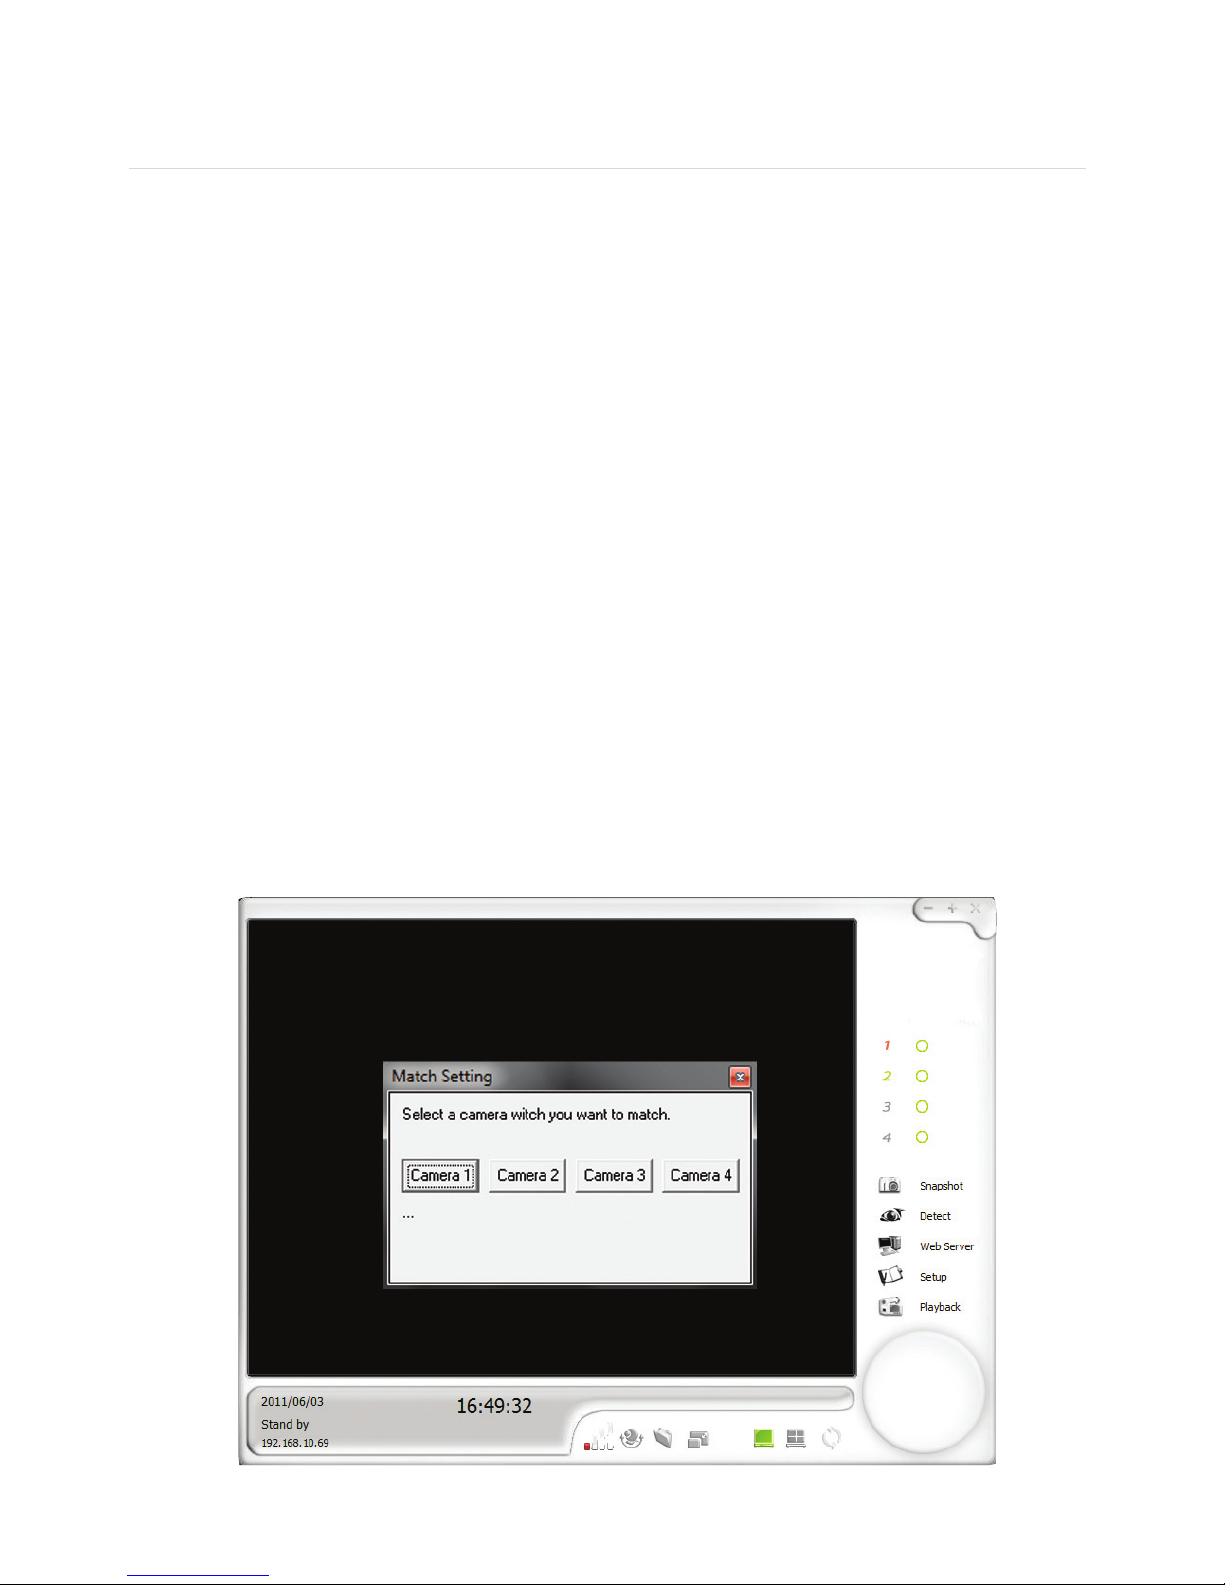
4. Pair up the camera and receiver, by clicking on the pair ‘Cruise’ icon (see page 8 for
icon descriptions) and selecting the camera you want to pair. Press the ‘Pair button’ at the
rear of the camera within 10 seconds. The image below shows the procedure for pairing the
cameras:
MAIN APPLICATION WINDOW
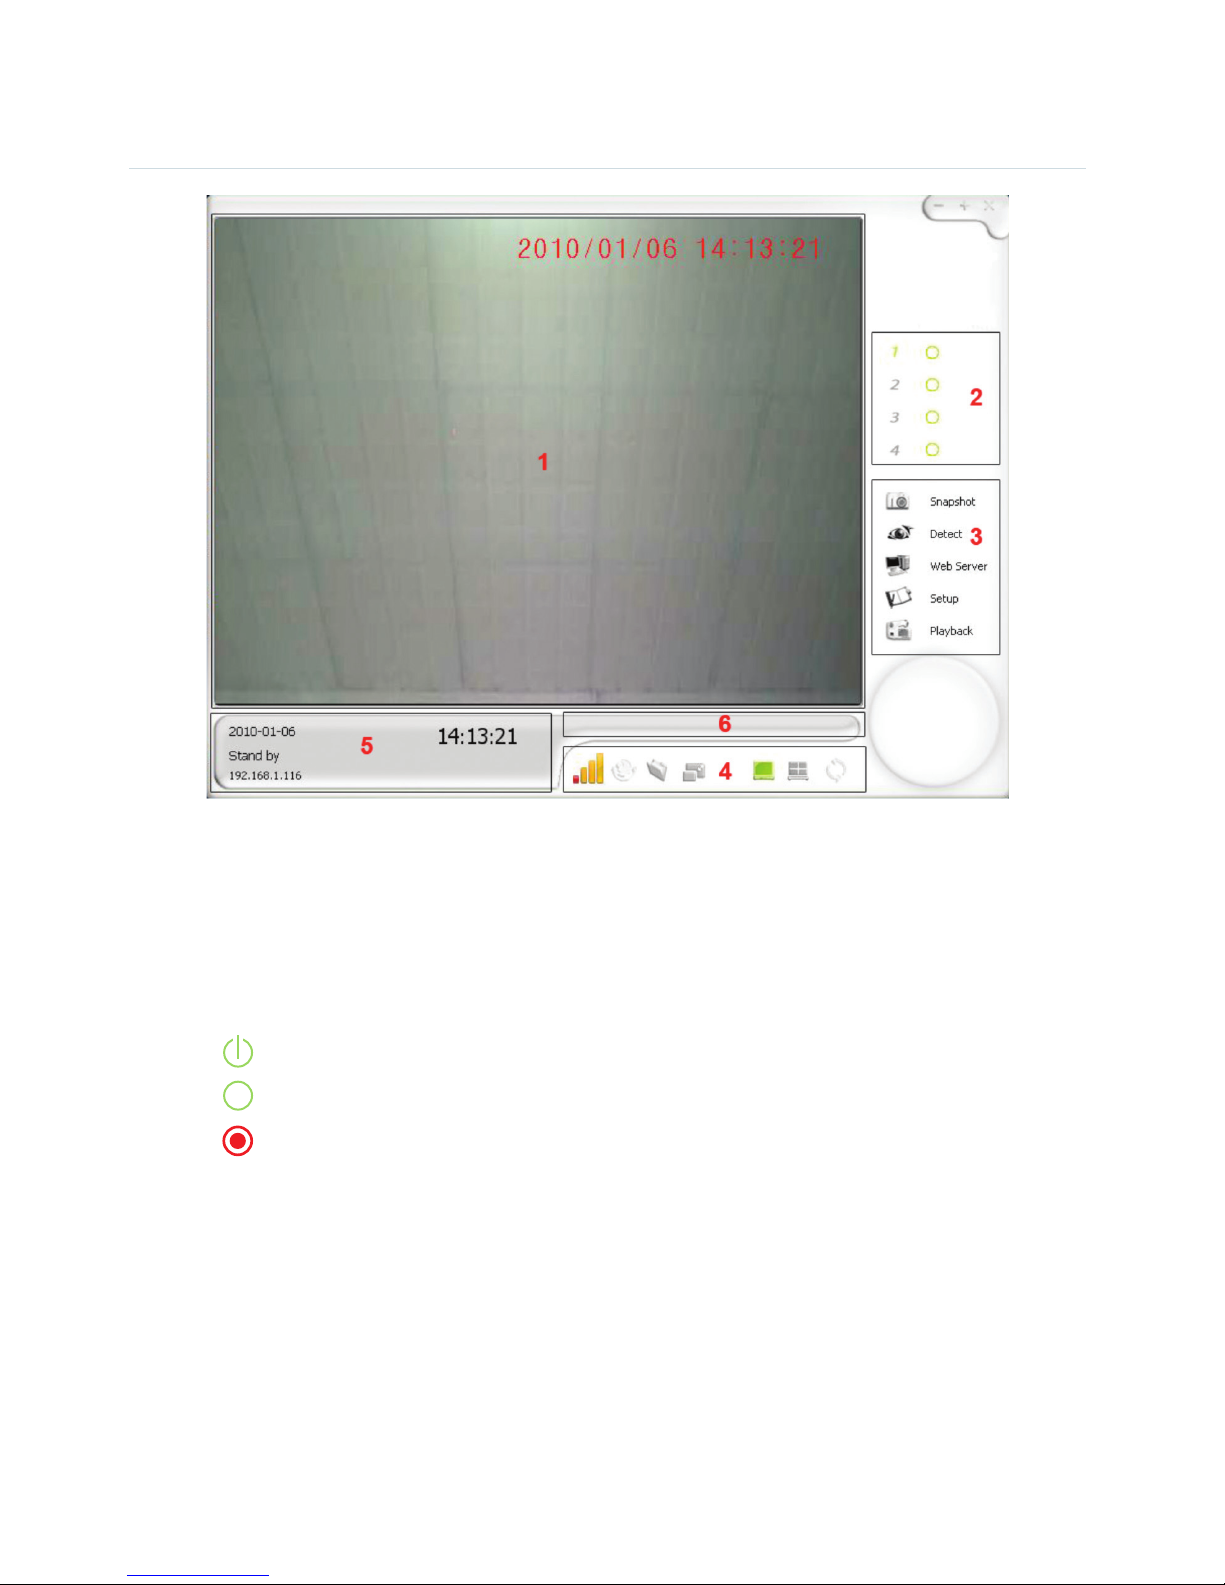
1. Display Area: This area shows the image from the camera or playback page. You can
choose to view in either a single or a quad (4 camera) mode.
2. Channel Status: This area shows the status of one specific camera.
: This icon means the camera is detecting.
: This icon means the camera is in standby mode.
: This icon means the camera is recording.
3. Operation Menu:
•Snapshot : Allows a snapshot to be taken.
•Detect : Switches Motion Detection on/off.
•Web Server : Activates remote network surveillance mode.
•Setup : Enter the setting interface.
•Playback : Enter Playback/Recording interface.

4. Camera/Display control: This area contains the display controls for the camera.
: Signal strength
: Pair camera (Cruise) icon
: Open a snapshot folder
: Adjust the size of display area
: Single channel display
: Quad display
5. Channel Information: This area shows the information of the channel in use.
6. Message Alert display area: All alerts are displayed on the main program window.
MAIN APPLICATION WINDOW continued
VIEWING MODE
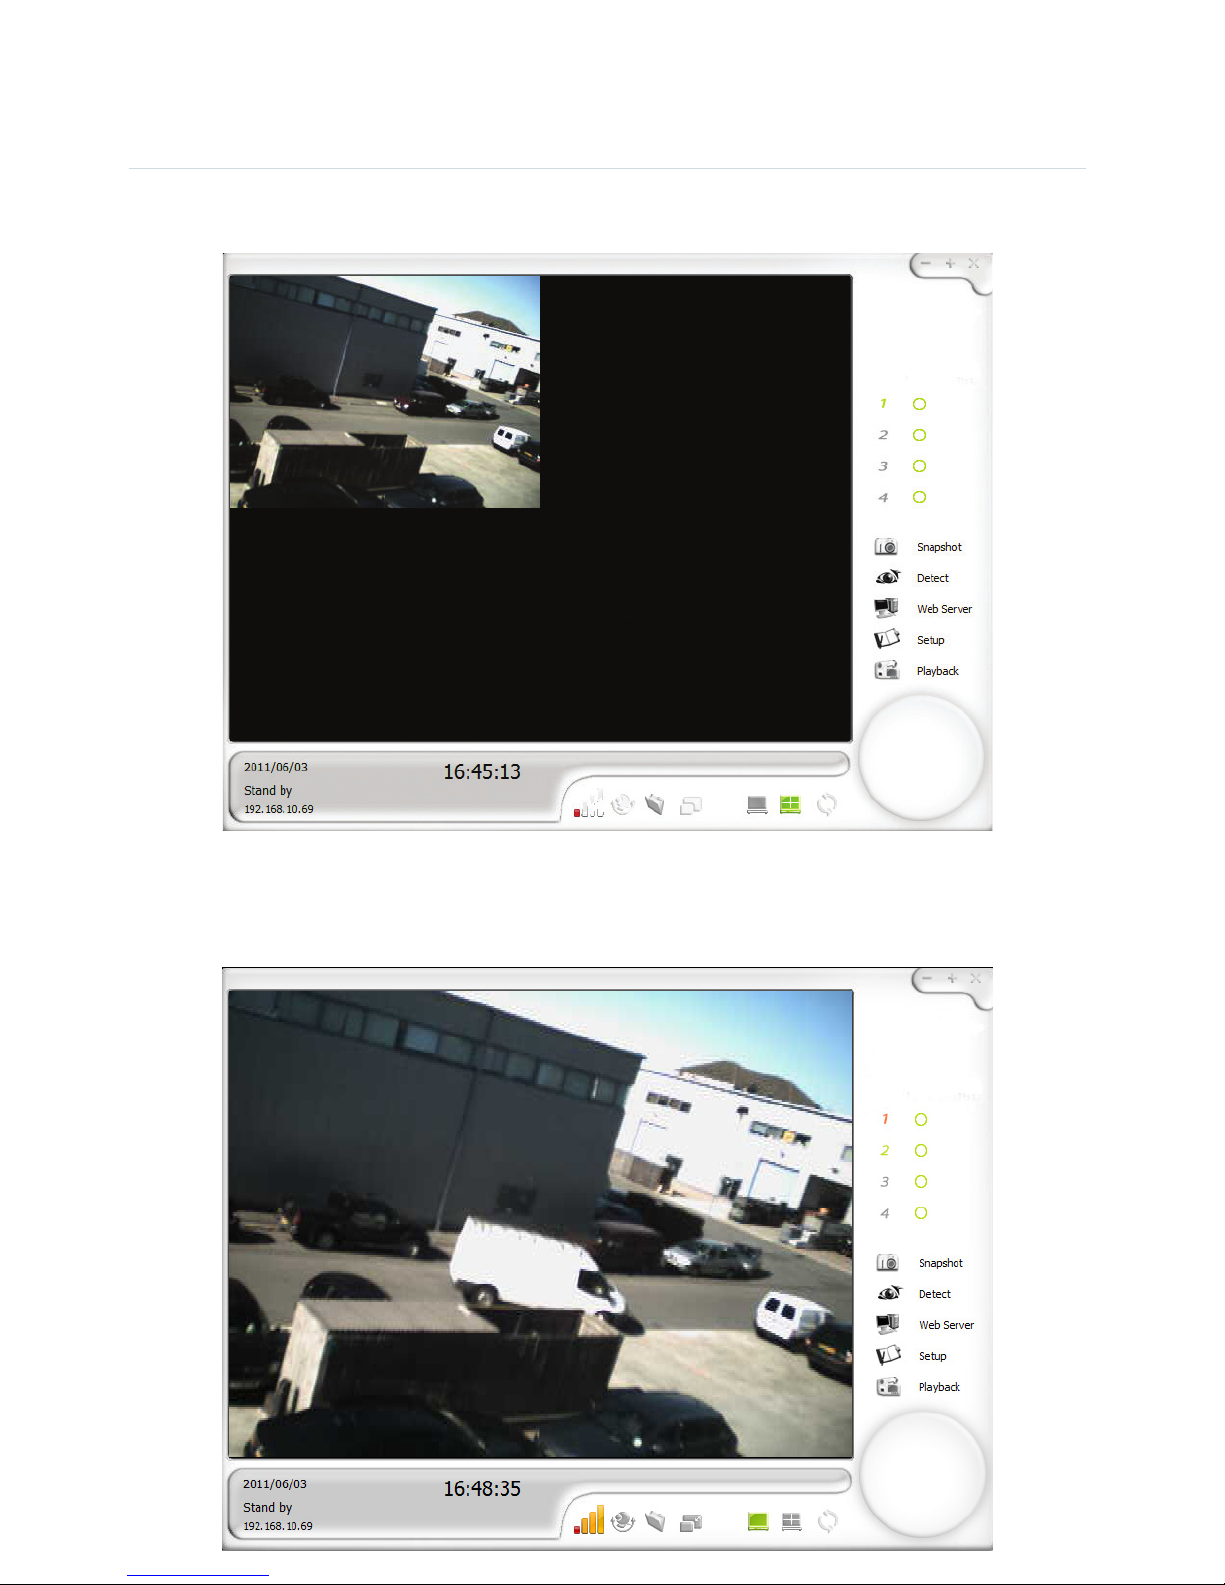
The camera image displays in a quad view after it is paired as shown below:
Right click on the display image to view recording in full-screen which also enables camera’s
‘Audio’ feed.
SYSTEM SETTINGS
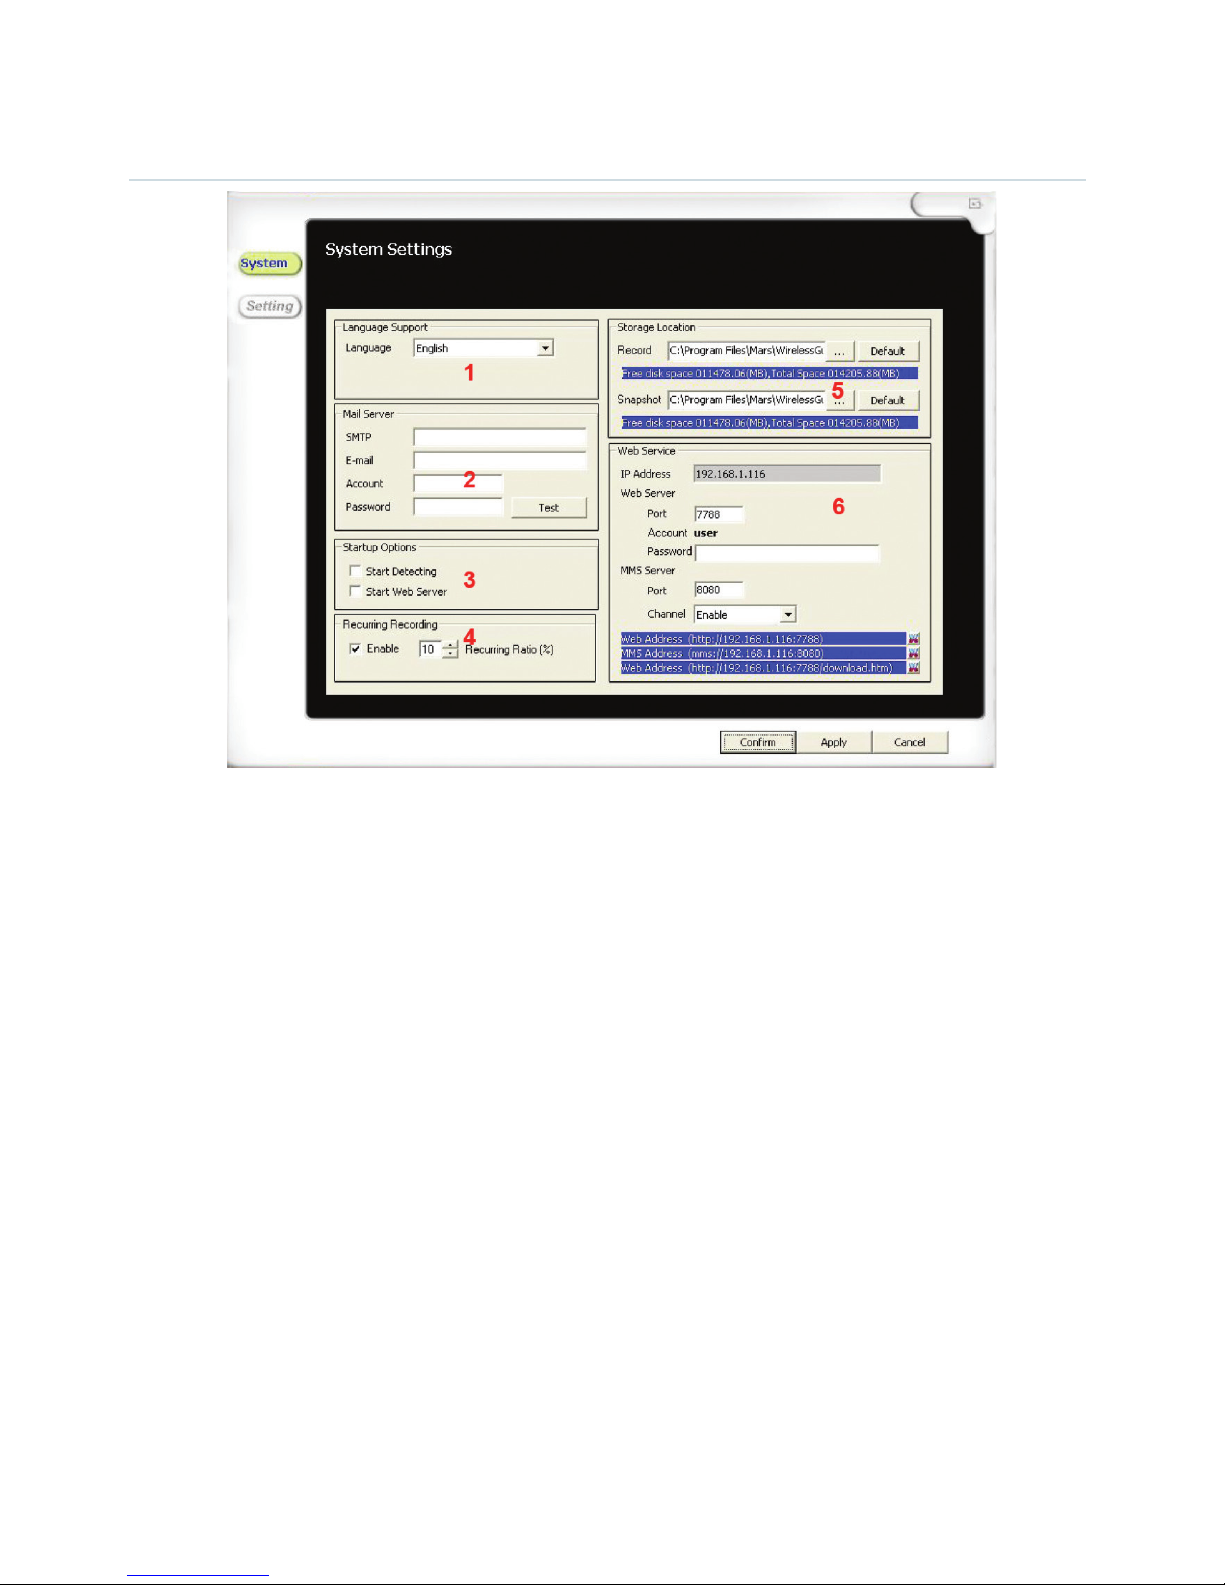
Click the ‘Setup’ button from the main Window to access the System Settings.
1. Language: Current language in use.
2. Mail server: The mail server details for setting up email alerts:
•SMTP : SMTP server address (from your mail service provider)
•E-Mail : E-Mail address you want to use to send out alert e-mail
•Account : E-Mail account (generally the same as your e-mail address)
•Password : Password for your e-mail
Hint: You need to set up the recipient’s e-mail address in ‘Alert setting’ (see page 17).
3. Startup options: Setting options for when the viewing software starts up:
•Start Detecting : Automatically starts recording
•Start Web Server : Automatically starts up the Web Server option
4. Recurring Recording: Enables files to be overwritten to save disk space.
Indice
Altri manuali Smart Witness Sistema di sicurezza

Manuali Sistema di sicurezza popolari di altre marche


EDM
EDM Solution 6+6 Wireless-AE Manuale utente

Highway Safety Group
Highway Safety Group EA401 Manuale utente

Siren
Siren LED GSM Manuale utente

Detection Systems
Detection Systems 7090i Istruzioni per il montaggio

Se-Kure Controls
Se-Kure Controls MicroMini SK-4841 Manuale utente

Siemens
Siemens FDM273 Manuale utente