
Smeg Oven SC709X Manuale utente

31
1. INSTRUCTIONS FOR SAFETY AND USE ..................... 32
2. INSTALLATION ............................................................... 35
3. DESCRIPTION OF CONTROLS ..................................... 37
4. USING THE OVEN .......................................................... 43
5. AVAILABLE ACCESSORIES ........................................... 45
6. COOKING HINTS ............................................................ 46
7. CLEANING AND MAINTENANCE ................................... 53
8. EXTRAORDINARY MAINTENANCE ............................... 58
Contents
INSTRUCTIONS FOR THE INSTALLER: these are intended for the qualified
technician who must install the appliance, set it functioning and carry out an
inspection test.
INSTRUCTIONS FOR THE USER: these contain user advice, description of
the commands and the correct procedures for cleaning and maintenance of the
appliance.
32
Instructions for safety and use
1. INSTRUCTIONS FOR SAFETY AND USE
THIS MANUAL IS AN INTEGRAL PART OF THE APPLIANCE AND
THEREFORE MUST BE KEPT IN ITS ENTIRETY AND IN AN ACCESSIBLE
PLACE FOR THE WHOLE WORKING LIFE OF THE OVEN. WE ADVISE
READING THIS MANUAL AND ALL THE INSTRUCTIONS THEREIN BEFORE
USING THE OVEN. INSTALLATION MUST BE CARRIED OUT BY QUALIFIED
PERSONNEL IN ACCORDANCE WITH THE REGULATIONS IN FORCE. THIS
APPLIANCE IS INTENDED FOR DOMESTIC USES AND CONFORMS TO THE
EEC DIRECTIVES CURRENTLY IN FORCE. THE APPLIANCE HAS BEEN
BUILT TO CARRY OUT THE FOLLOWING FUNCTIONS: COOKING AND
HEATING-UP OF FOOD. ALL OTHER USES ARE CONSIDERED IMPROPER.
THE MANUFACTURER DECLINES ALL RESPONSIBILITY FOR IMPROPER
USE.
DO NOT DISCARD PACKING IN THE HOME ENVIRONMENT. SEPARATE
THE VARIOUS WASTE MATERIALS AND TAKE THEM TO THE NEAREST
SPECIAL GARBAGE COLLECTION CENTRE.
THE APPLIANCE MUST BE CONNECTED TO EARTH IN COMPLIANCE WITH
ELECTRICAL SYSTEM SAFETY REGULATIONS.
WHEN LINKING UP TO THE POWER SUPPLY NETWORK BY PLUG AND
SOCKET, MAKE SURE THAT BOTH ARE COMPATIBLE AND CONNECT BY
MEANS OF A POWER CABLE COMPLYING WITH THE REGULATIONS IN
FORCE.
THE SOCKET MUST BE ACCESSIBLE AFTER THE APPLIANCE HAS BEEN
BUILT IN.
NEVER UNPLUG BY PULLING ON THE CABLE.
DO NOT OBSTRUCT VENTILATION OPENINGS AND HEAT DISPERSAL
SLITS.
IMMEDIATELY AFTER INSTALLATION CARRY OUT A BRIEF INSPECTION
TEST OF THE OVEN, FOLLOWING THE INSTRUCTIONS BELOW. SHOULD
THE APPLIANCE NOT FUNCTION, DISCONNECT IT FROM THE POWER
SUPPLY AND CALL THE NEAREST TECHNICAL ASSISTANCE CENTRE.
NEVER ATTEMPT TO REPAIR THE APPLIANCE.
33
Instructions for safety and use
ALWAYS CHECK THAT THE CONTROL KNOBS ARE IN THE "ZERO" (OFF)
POSITION WHEN YOU FINISH USING THE OVEN.
NEVER PUT INFLAMMABLE OBJECTS IN THE OVEN: IF IT SHOULD
ACCIDENTALLY BE SWITCHED ON, THIS MIGHT CAUSE A FIRE.
DURING USE THE APPLIANCE BECOMES VERY HOT. TAKE CARE NOT TO
TOUCH THE HEATING ELEMENTS INSIDE THE OVEN
THE IDENTIFICATION PLATE WITH TECHNICAL DATA, SERIAL NUMBER
AND BRAND NAME IS POSITIONED VISIBLY ON THE OVEN DOOR FRAME.
DO NOT REMOVE THIS PLATE FOR ANY REASON.
THE USE OF THIS APPLIANCE IS NOT PERMITTED TO PEOPLE
(INCLUDING CHILDREN) OF REDUCED PHYSICAL AND MENTAL ABILITY,
OR LACKING IN EXPERIENCE IN THE USE OF ELECTRICAL APPLIANCES,
UNLESS THEY ARE SUPERVISED OR INSTRUCTED BY ADULTS OR
PEOPLE RESPONSIBLE FOR THEIR SAFETY.
THIS APPLIANCE IS MARKED ACCORDING TO THE EUROPEAN DIRECTIVE
2002/96/EC ON WASTE ELECTRICAL AND ELECTRONIC EQUIPMENT –
(WEEE).
THIS DIRECTIVE DETERMINES THE STANDARDS FOR THE COLLECTION
AND RECYCLING OF WASTE ELECTRICAL AND ELECTRONIC EQUIPMENT
APPLICABLE THROUGHOUT THE EUROPEAN UNION.
BEFORE THE APPLIANCE IS PUT INTO OPERATION, ALL LABELS AND
PROTECTIVE FILMS APPLIED INSIDE OR OUTSIDE MUST BE REMOVED.
The manufacturer declines all responsibility for damage to persons
or things caused by the non-observance of the above prescriptions or
deriving from tampering with any part of the appliance or by the use of
non-original spare parts.

34
Instructions for safety and use
INFORMATION FOR USERS
Pursuant to Directives 2002/95/EC, 2002/96/EC and 2003/108/EC
relating to the reduction of the use of hazardous substances in electrical
and electronic appliances, as well as to the disposal of refuse, the
crossed out bin symbol on the appliance indicates that the product, at
the end of its useful life, must be collected separately from other refuse.
Therefore, the user must consign the product that has reached the end
of its working life to the appropriate differentiated collection centres for
electrical and electronic refuse, or deliver it back to the retailer when
purchasing an equivalent product, on a one for one basis. Adequate
differentiated collection for the subsequent forwarding of the
decommissioned product to recycling, treatment and ecologically
compatible disposal contributes to avoiding possible negative effects on
the environment and on health and promotes the recycling of the
materials of which the appliance consists. The illicit disposal of the
product by the user results in the application of administrative
sanctions.

35
Instructions for the installer
2. INSTALLATION
2.1 Electrical connection
Make sure that the voltage and capacity of the power supply line
conform to the data shown on the plate located on the oven door frame.
Do not remove this plate for any reason.
The appliance must be connected to earth in compliance with electrical
system safety regulations.
If a plug and socket connection is being used make sure that the plug
and socket are compatible. Avoid use of adapters and shunts as these
could cause overheating and burns.
If a fixed connection is being used, fit the power line with an omnipolar
circuit breaker with a contact opening gap equal to or greater than 3
mm, in an easily accessible position close to the appliance.
For operation on 220-240V
∼
:use a
H05RR-F / H05RN-F type three-core cable
(3 x 1.5 mm2).
The end to be connected to the appliance
must be an earth wire (yellow-green) at
least 20 mm longer.
The manufacturer declines all responsibility for damage to persons
or things caused by non-observance of the above prescriptions or by
interference with any part of the appliance.

36
Instructions for the installer
2.2 Positioning the oven
The oven is designed for mounting into any piece of furniture as long as
it is heat-resistant. Proceed according to the dimensions shown in
Figures 1, 2and 3. For installing under a work top, follow the
dimensions given in Figure 1-3. For installing under a work top with
combined cooking hobs, ensure a minimum clearance from any side
walls of at least 110 mm as shown in Figure 1. When installing in tall
units, comply with the dimensions shown in figure 1-2, bearing in mind
that the top/rear of the unit must have an opening 80-90 mm deep.
Tighten the 4 screws A inside the frame (fig. 1).
For installing beneath a countertop hob, allow for a rear and bottom
clearance as shown in Figure 1 (ref. B). See the relevant instructions
for fitting and securing the hob.
Never use the oven door to lever the oven into
place when fitting.
Avoid exerting too much pressure on the oven door
when open.
37
Instructions for the user
3. DESCRIPTION OF CONTROLS
3.1 The front panel
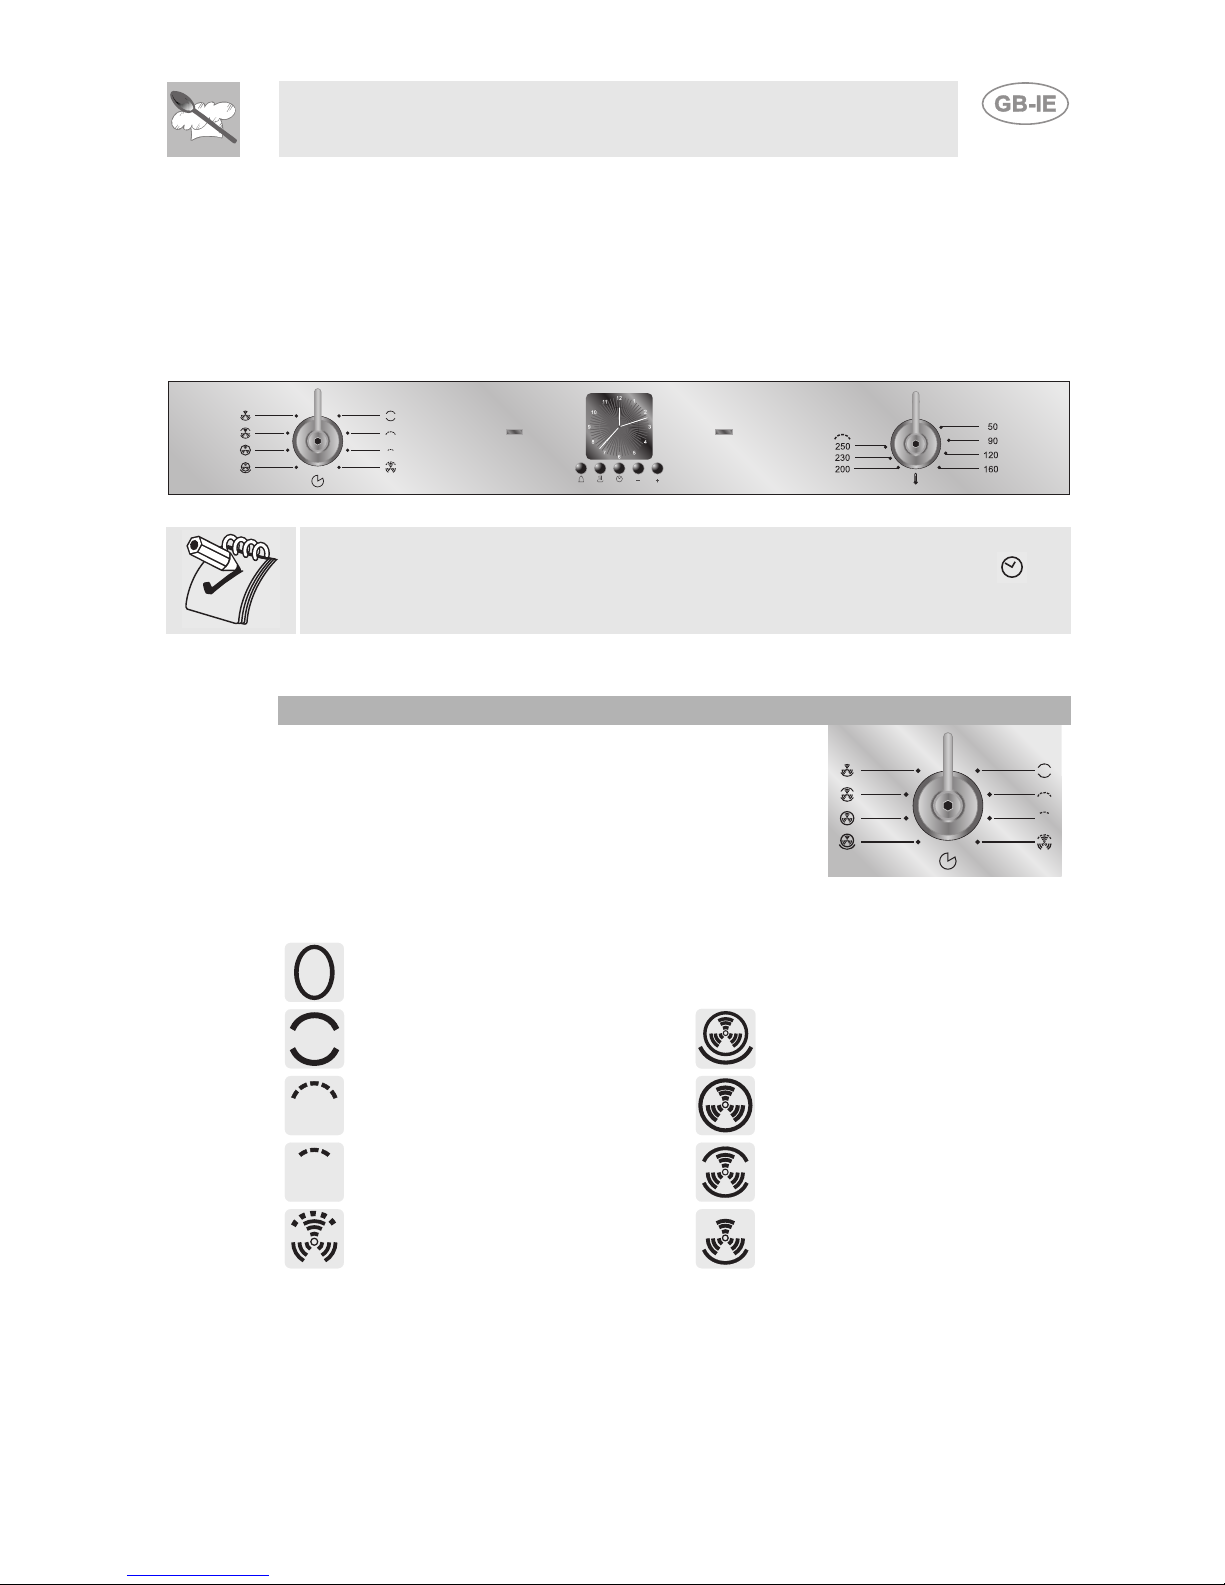
All the oven controls are grouped together on the front panel.
At first use or after a power outage, press the central button for
1 / 2 seconds to enable the oven for cooking.
FUNCTION SWITCH KNOB
Turn the knob in either direction to select a
function from the following:
NO FUNCTION SELECTED
UPPER AND LOWER
HEATING ELEMENTS
LOWER HEATING ELEMENT
+ FAN-ASSISTED HEATING
ELEMENT
WIDE GRILL ELEMENT FAN-ASSISTED HEATING
ELEMENT
SMALL GRILL ELEMENT
UPPER AND LOWER
HEATING ELEMENTS +
VENTILATION
GRILL ELEMENT +
VENTILATION
LOWER HEATING
ELEMENT + VENTILATION

38
Instructions for the user
THERMOSTAT KNOB
The cooking temperature is selected by turning the knob
clockwise to the desired setting, between 50° and 250°C.
THERMOSTAT INDICATOR LIGHT (ORANGE)
The light comes on to indicate that the oven is heating up. When
it goes out, the preset heating temperature has been reached.
When the light flashes regularly it means that the temperature
inside the oven is kept steady on the set level.
INDICATOR LIGHT (GREEN)
This light comes on when any element of the oven is powered
on.

39
Instructions for the user
3.2 Electronic Analogue Clock
LIST OF FUNCTIONS
TIMER KEY
END OF COOKING KEY
TIME SETTING AND RESET
VALUE DECREASE KEY
VALUE INCREASE KEY
The buzzer that sounds at the end of each programming will be made
up of 10 buzzes repeated 3 times at intervals of about 1 minute. It can
be stopped at any time by pressing any key.
3.2.1 Setting the time
When the oven is used for the first time, or after an interruption in the
electricity supply, the display flashes at regular intervals. Press the key
to stop the display flashing. Press key again for 2 seconds; the
current time can now be set. Press the value modification buttons or
to increase or decrease the setting by one minute for each pressure.
Press either of the value modification keys to display the current time.
Five seconds after last pressing the key, the clock will start from the set
time.
40
Instructions for the user
3.2.2 Timer
This function only activates the buzzer, without
stopping cooking.
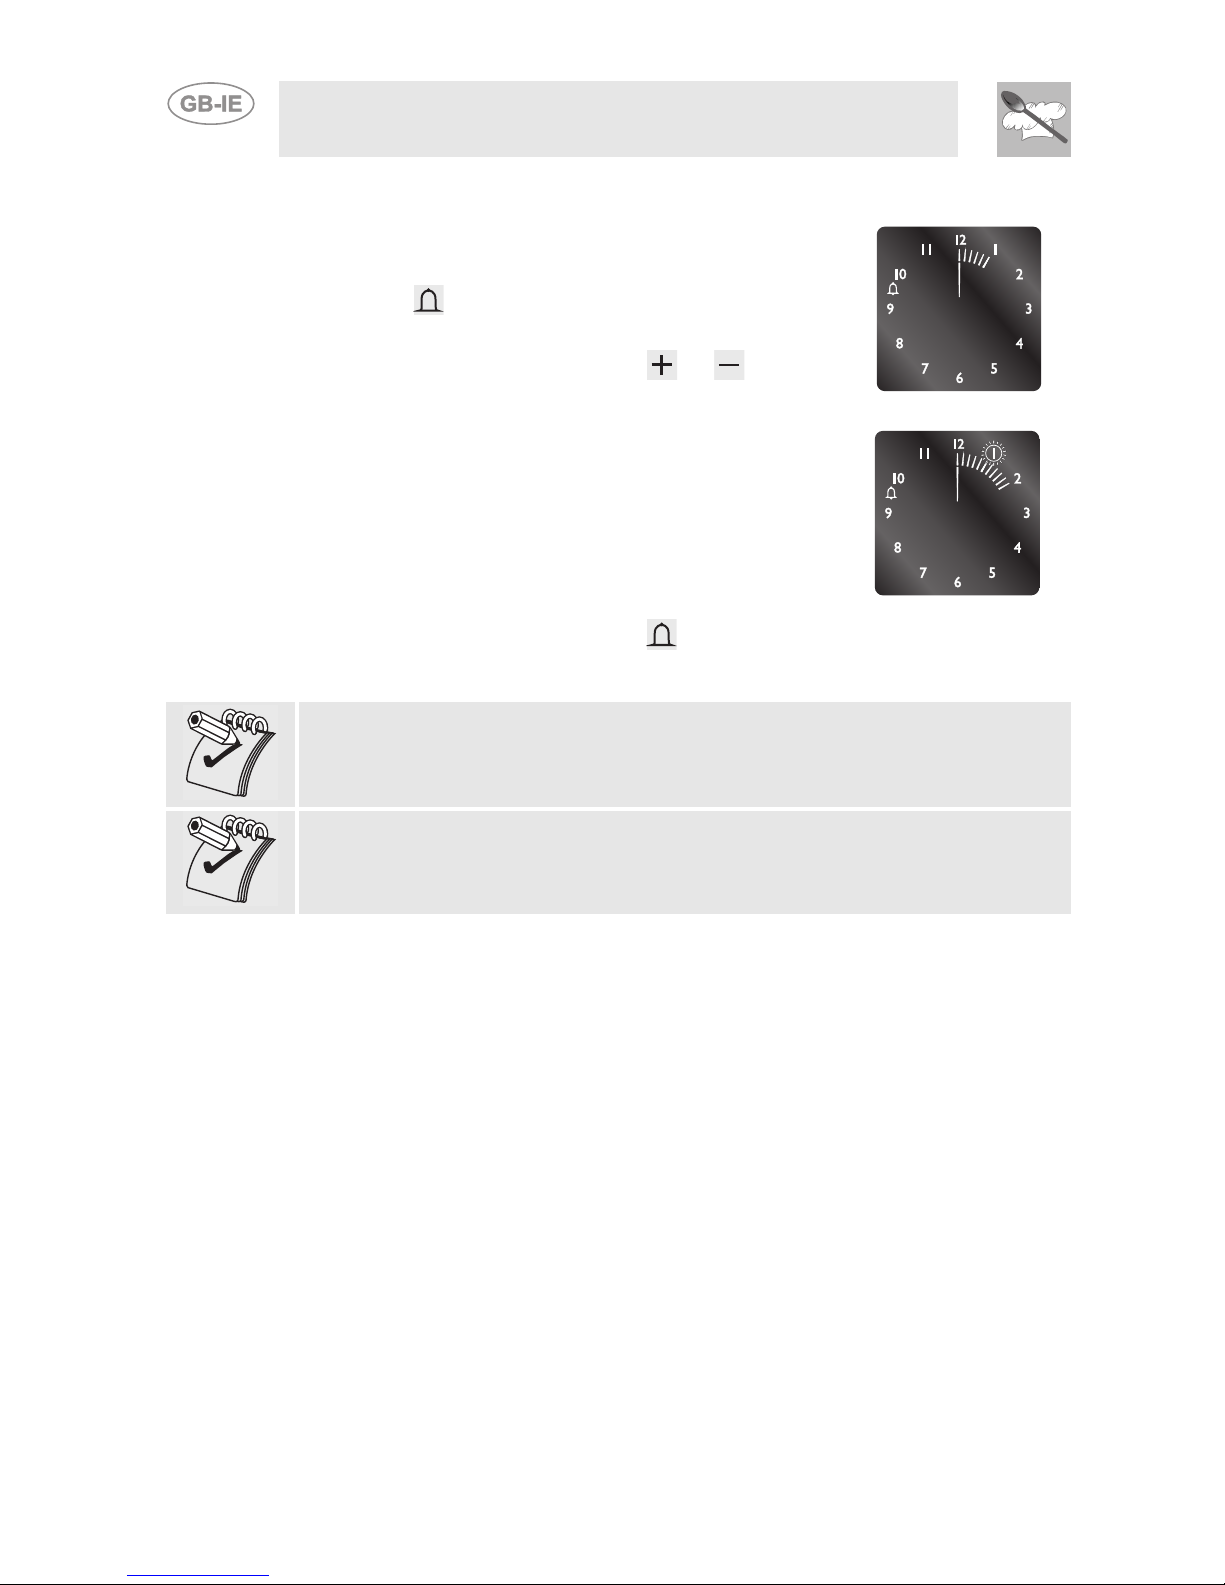
• Press and the display will light up as shown
in figure 1;
• Within 5 seconds press key or to set the
timer. Each time a key is pressed, an outer
segment representing 1 minute of cooking is lit
or switched off (figure 2 shows 1 hour and 10
minutes of cooking).
• Five seconds after last pressing the key the
countdown begins, at the end of which the
buzzer activates.
• The current time can be viewed during the
countdown by pressing key once, press the
key again to return to the timer display.
1
2
At the end of the countdown the oven must be stopped manually by
turning the thermostat knob and the function selector knob to 0.
It is not possible to set a cooking time of more than 4 hours.
Altri manuali per Oven SC709X
1
Questo manuale è adatto per i seguenti modelli
3
Indice
Altri manuali Smeg Forno

Smeg
Smeg SCA45VC2 Manuale utente

Smeg
Smeg DUCO4SS Manuale utente

Smeg
Smeg FP850APZ Manuale utente

Smeg
Smeg ALFA161X Manuale utente

Smeg
Smeg SAC578X Manuale utente

Smeg
Smeg SF6388X Manuale utente

Smeg
Smeg SFPA6309X Manuale utente

Smeg
Smeg DO67CAS Manuale utente

Smeg
Smeg S200 Manuale utente

Smeg
Smeg SF7302TX Manuale utente

Smeg
Smeg SFP372X Manuale utente

Smeg
Smeg SFP140NE Manuale utente

Smeg
Smeg SF4395MCX Manuale utente

Smeg
Smeg SOA330X Manuale utente

Smeg
Smeg AP320 Manuale utente

Smeg
Smeg Oven Manuale utente

Smeg
Smeg Electric Oven SCA301X Manuale utente

Smeg
Smeg SF6604 Manuale utente

Smeg
Smeg BG91IX9 Manuale utente

Smeg
Smeg Oven PIRO10NE Manuale utente


