Smeg SLB510 Manuale utente

Instructions for Use 3
Instructions for Use
Washing Machine
Thank you for your trust and for buying this appliance. We hope it will
successfully serve its purpose for many years.
This washing machine was designed for home use.
It meets all the requirements of modern washing: it is economical, it
uses less water, less energy and washing agent.
Before use 4-5
Removing the transport brackets 6
Placing and installation 7-9
The door 10
Preparing the laundry 11-12
Washing agents and how much to
use 13-15
Washing 16-21
Cleaning and maintenance 22-23
Trouble-shooting guide 24-25

Instructions for Use4
Before Use
This instruction manual was prepared for the user of the washing
machine. Read the manual carefully and get to know your washing
machine so that you will know how to use it safely and correctly.
This instruction manual was prepared for various models of washing
machine, and they vary in function and design. Make sure to consider
only those switches and knobs your machine is equipped with.
• When you find your appliance is out of use and no longer needed, try
not to burden the environment with it. Call your nearest authorized
"collecting service for used appliances".
Tips for Energy Savings
Through correct use and considering our recommendations, you
can make substantial energy savings.
• For economical washing, always refer to the table of
programmes with recommended wash loads.
• Skip the pre-wash whenever possible (if laundry is lightly soiled).
• Laundry which was usually washed at 95°C may be washed at 60°C
when using either the TAED washing agent (bleaching agent activator)
or concentrated washing agents (any of the ...SUPER or ...ULTRA).
• Use an adequate washing agent, and always consider the
recommended amount, and pay attention to water hardness and
degree of soiling.
• In the course of time (depending on water hardness) lime deposits on
the heater and inside the appliance. This increases the consumption of
energy for heating water. Occasionally remove the lime deposit with a
special agent.
Important
Before putting the machine into use, don't forget to remove the
transport brackets. Switching on a blocked machine may damage
the machine. Our guarantee does not cover such damage.
• Before switching the machine on, check that the transport brackets has
been removed.
• Don't place the appliance in a room where the temperature may fall
bellow 0°C, causing individual parts of the machine to freeze and
become damaged (hose may crack).
• The appliance should stand firmly and horizontally on a solid base (a
machine standing on an uneven floor is very likely to vibrate during the
spinning cycle).

Instructions for Use 5
• Always consider the instructions for correct placing and installation of
the machine to the mains and water supply. This will help you avoid
accidents and protect your machine against damage.
• The appliance is to be connected to the water mains using new hose-
sets and that old hose-sets should not be reused.
• The appliance my not be built-in under the kitchen worktop in a
row of cabinets, because the use of the appliance without the
top cover is not allowed for safety reasons. Likewise, the
removal of the rear panel and the bottom of the appliance are
also not allowed.
• The appliance should be positioned in such way to provide normal
ventilation.
• The end of the outlet hose should not be immersed in the discharge
water (the machine may pump the discharge water back).
• During the washing cycle, the door of the machine cannot be opened. It
can only be opened 2 minutes after washing is finished.
• The glass door gets very hot during washing, so take care of children.
• Use only washing powder and other agents specially designed for
machine washing.
We do not take any responsibility for damage caused by the improper
use of bleaching or colouring agents (coloured gasket and other
plastic parts).
• Lime dissolving agents contain acid, so only use those containing
rust-protection agents. Always consider the manufacturer's instructions.
When you have finished removing lime deposit, run a few rinse cycles
to make sure that the acid is thoroughly rinsed. Even traces of acid can
cause substantial damage to component parts.
• Never use washing agents containing solvents - individual component
parts may be damaged or toxic gases may be produced. There is also
a risk of ignition or explosion.
• When washing is finished, remember to close the tap.
• Your washing machine can only be transported with transport brackets.
It is usually enough to use only one of the rods, that is the upper one. It
is much easier to insert the rod if you remove the top cover. Before
doing anything, however, don't forget to disconnect the machine from
the power supply.
• Data plate with essential information on the appliance is fitted above
the opening for laundry insertion under the door frame.

Instructions for Use6
Removing the Transport Brackets
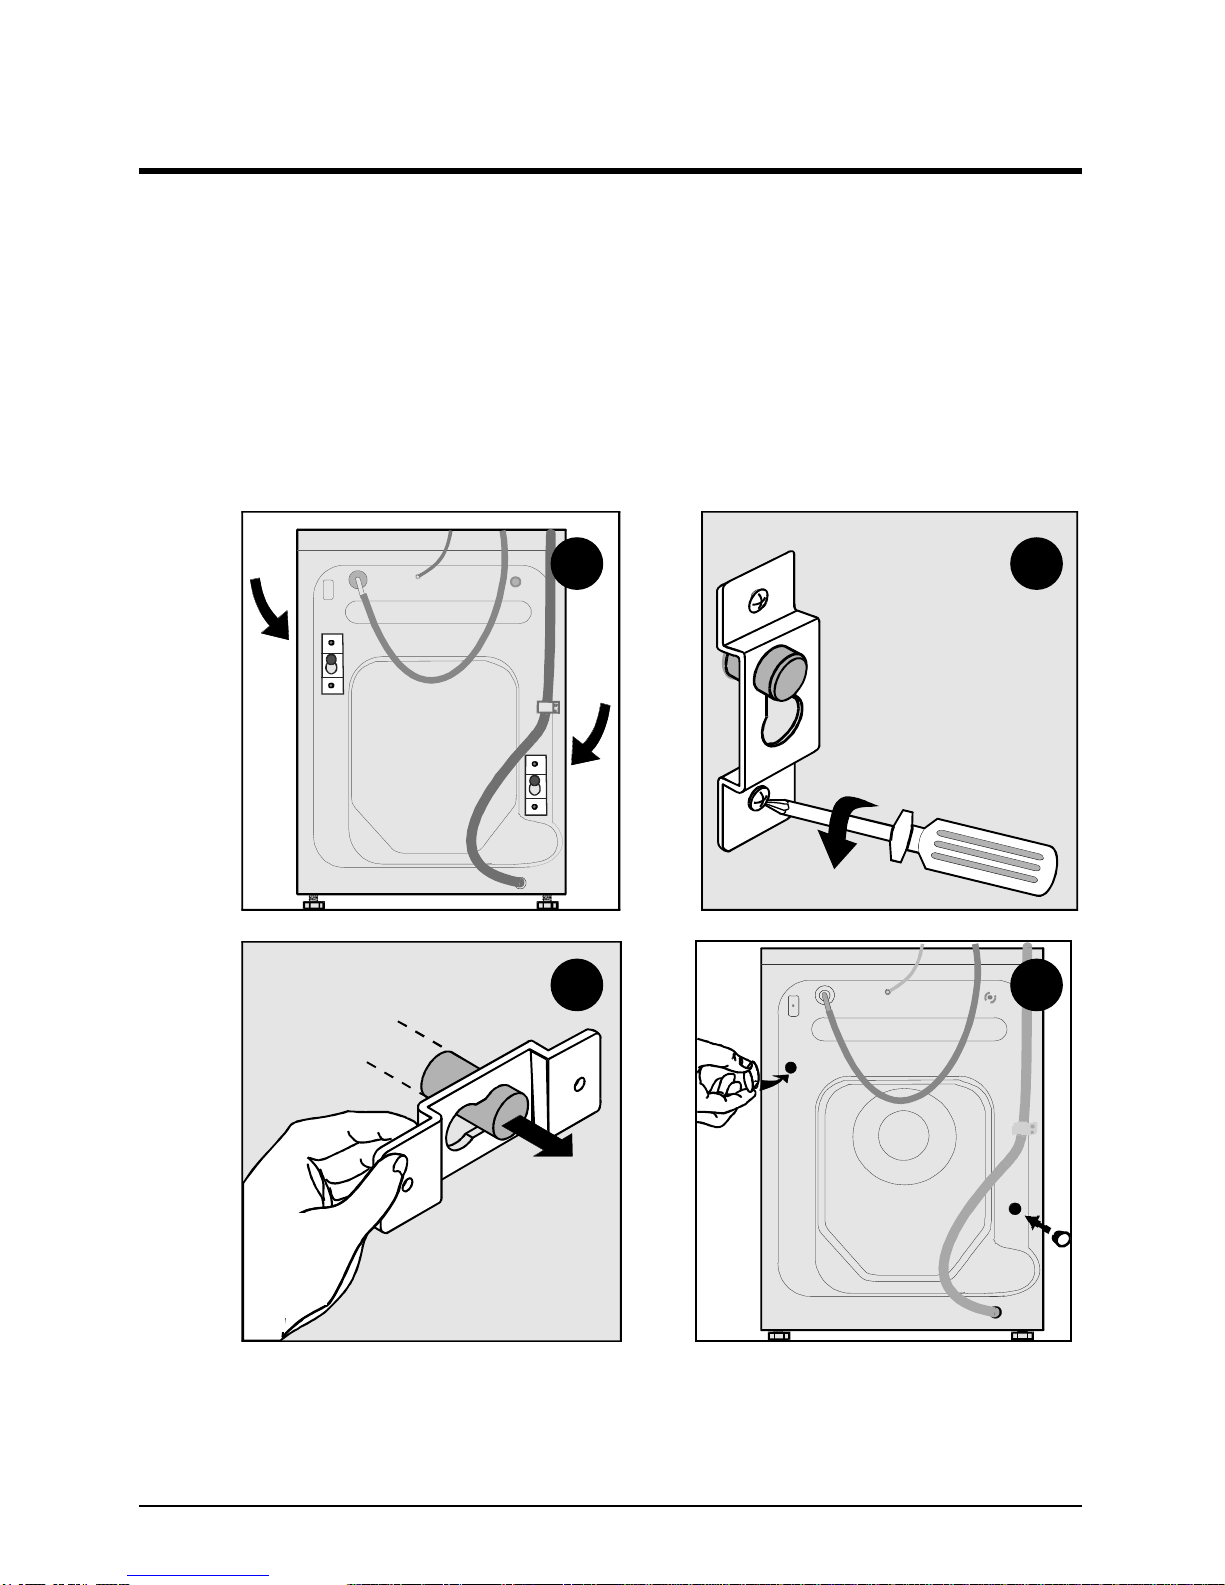
The washing assembly is blocked with two metal rods which protect
the machine during transport (fig.1).
• Undo the screws on the rear wall (fig. 2).
• Remove the squares, rotate them 180°and use them to pull out
the rods (fig. 3).
• Disengaged parts may remain at the bottom since they do not
obstruct the operation of the machine (4 rubber hoses and 4 paper
spools).
• Use the enclosed plastic caps to plug the holes (fig. 4).
Save the brackets: you may need them later.
3
2
4
1

Instructions for Use 7
Placing and Installation
If the floor is uneven, use the adjustable feet to level the machine.
• Undo the nuts. Rotate the feet to level the machine (fig. 5).
• Fix the nuts (fig. 5.1).
Maximum height of the washing machine is 850 mm.
IMPORTANT
The floor on which the machine stands should be dry, otherwise the
machine may slide during the spinning cycle.
Connection to the Water Supply
The elbow connection of the inlet hose is fixed to the coupling on the rear
wall of the appliance.
Insert a rubber washer with a net (filter) into a nut on the other end of
the hose, and fix the hose to a tap. To ensure efficient operation, the
water pressure of the water supply should be between 0.5 and 8.0
bars.
If the pressure exceeds the maximum allowed limit, fit a pressure
regulator. (Open the tap fully - in 15 seconds, 3 litres of water should
pour out; and this is the minimum pressure of the water supply).
Connection to cold water
Insert the enclosed washer with filter into the loose end of the hose and
connect the hose to water tap (fig. 6).
Connection to hot/cold water
Washing machines designed for the connection to hot/cold water are
equipped with two inlet hoses. The attachment and the inlet hose for hot
water are marked with red colour.
5.15

Instructions for Use8
Insert the enclosed washers with filter into the loose ends of the hoses
and connect the red marked hose to hot water tap and the other hose
to cold water tap (fig. 6.1).
IMPORTANT
The highest allowed temperature of hot water is 60°C.
Water Outlet
Hook the outlet hose securely over the edge of the washbasin or bath
tub. The outlet hose can also be connected directly to the plumbing
outlet, the diameter of which should be not less than 4 cm (fig. 7).
Wall siphon drain must be correctly fitted in such manner to enable
cleaning.
If water is drained through a washbasin, always check it is drained
quickly enough, otherwise an overflow may occur or the machine may
pump the water back. Pull a string through the hole on the plastic knee,
and secure the outlet hose to prevent it from falling off (fig. 8).
78
66.1
hot cold

Instructions for Use 9
The end of the outlet hose should be raised from the floor by not more
than 100 cm and not less than 60 cm. If the hose is positioned higher
than recommended, the machine will not pump out the water.
Connection to Power Supply
Connect the appliance to the power supply with a cable cord. The wall
socket should be equipped with an earth contact (safety socket).
Fixed connection should be carried out by an expert.
Rated voltage, frequency and other data are listed on the rating plate of
the machine.
Your washing machine should be grounded and connected to the
power supply according to local electricity board regulations and
standards.
WARNING!
In the supply cord is damaged, it must be replaced by the
manufacturer or his service agent or a qualified person in order to
avoid hazard.
• The appliance should be placed in the position, where the plug is
within reach.

Instructions for Use10
The Door
The door can only be opened two minutes after the washing
programme has finished.
Open the door by pulling the door handle (fig. 9).
When closing the door, push it towards the machine until it locks
(fig. 10).
If the door is not correctly closed, the machine will not operate.
IMPORTANT
• When closing the door, be careful not to trap fabric between the door
glass and the rubber gasket.
• If you need to open the door after the machine has been switched on,
first switch it off and wait for about two minutes.
When opening the door, be careful, as the water level may be high
and water may pour out when you open the door.
• Don't even try to open the door while the machine is operating.
• If the machine won't start after switching on, push the door once again
towards the machine (at handle).
• An inadequately closed door is the most common cause of
malfunctions.
Direction of Opening the Door
Certain models of appliances allow the possibility of changing the
direction of door opening. This is an option that has to be ordered
separately and paid for by the customer.
910

Instructions for Use 11
Preparing the Laundry
Sort the laundry before washing according to the type, quality, colour and
soil degree of the laundry.
Type of Fabrics
Most clothes nowadays have labels describing the type of fabric they are
made of, the kind of recommended wash, and the recommended
washing temperature.
These labels will help you choose the most suitable washing
programme for your clothes.
Put delicate laundry (stockings, fine underwear...) into a sack or into a
pillow case if washed together with other laundry.
WASHING
White laundry - resistant.
Coloured laundry - resistant
Fine and delicate laundry
Hand wash.
No washing.
DRY CLEANING
Dry cleaning.
Dry cleaning not allowed.
DRYING
Drying in tumble drier allowed.
Higher temperature
(resistant laundry)
Lower temperature
(delicate laundry)
Drying in tumble drier not allowed.
IRONING
Ironing: up to 200°C - up to 150°C - up to 110°C
No ironing

Instructions for Use12
Colour Fastness
Pay special attention to colour fastness, and always choose the correct
washing temperature. When washing new clothes, always check colour
fastness first - wash separately the first time.
Degree of Soil
Stained and heavily soiled laundry should be washed in small loads or
with a larger amount of washing powder.
Heavily stained or soiled areas on the fabric can be treated before
washing using special agents.
Use the energy-saving programme for lightly soiled laundry (no
pre-wash, economic programme, lower washing temperature).
Loading
The maximum load of dry laundry is stated in the table.
Excessive loads cause creases and decrease the washing effect.
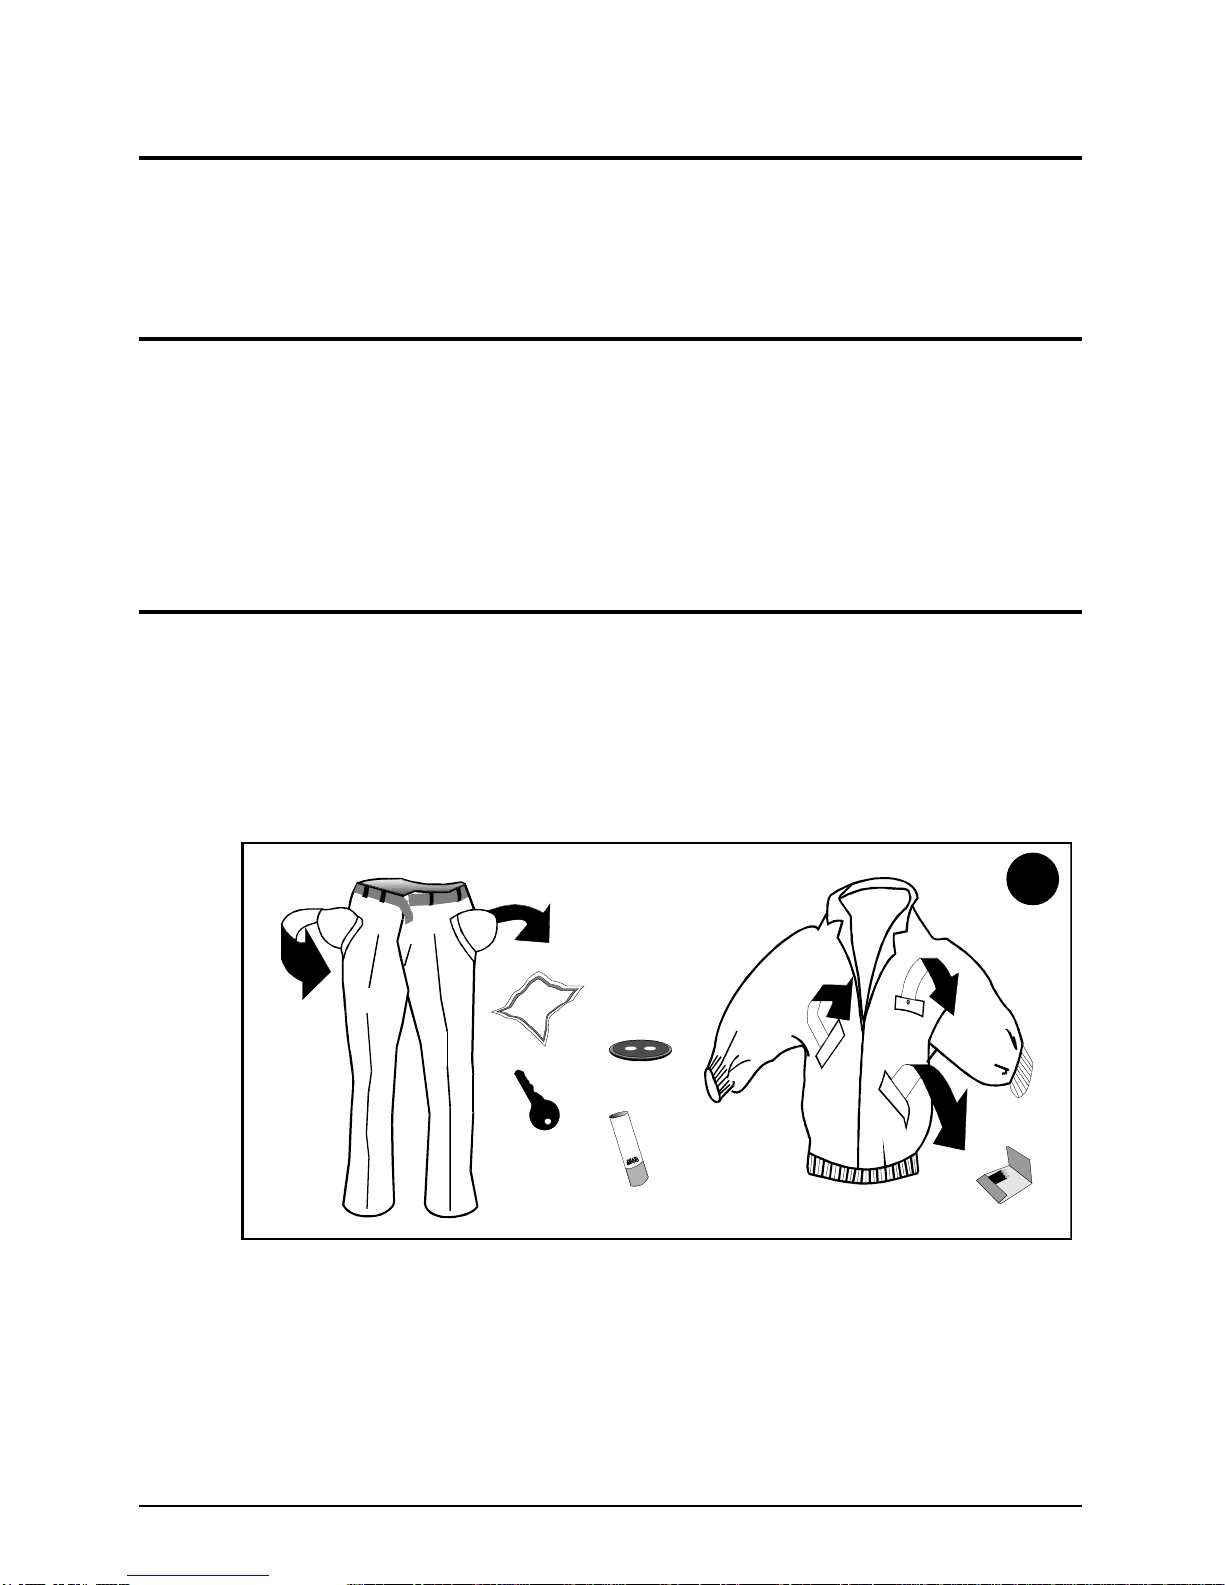
Always check the pockets before loading the laundry. Remove keys,
coins, hair-pins and similar objects that may clog the water outlet hose.
Zip the zippers and remove metal pins that may damage the laundry or
even the drum (fig. 11).
Folded clothes should be loosened before loading.
The best washing effect is obtained by mixing larger and smaller
items of laundry in one load.
11
Questo manuale è adatto per i seguenti modelli
1
Indice
Altri manuali Smeg Rondella

Smeg
Smeg LST127 Manuale utente

Smeg
Smeg LBW610CIT Manuale utente

Smeg
Smeg SLB12SB Manuale utente

Smeg
Smeg SWM40T Manuale utente

Smeg
Smeg GW2145 Manuale utente

Smeg
Smeg LBS 126 Manuale utente

Smeg
Smeg WHT1114LSUK Manuale utente

Smeg
Smeg SWM65 Manuale utente

Smeg
Smeg WHTS914LSSA Manuale utente

Smeg
Smeg LBW60IT Manuale utente

Smeg
Smeg WM127IN Manuale utente

Smeg
Smeg LB501 Manuale utente

Smeg
Smeg LST147-2 Manuale utente

Smeg
Smeg LBB14PB Manuale utente

Smeg
Smeg SWM65EG Manuale utente

Smeg
Smeg TLS65 Manuale utente

Smeg
Smeg LBL16 Manuale utente

Smeg
Smeg GW1050H-1 Manuale di istruzioni

Smeg
Smeg TLS6-1 Manuale utente

Smeg
Smeg WHTS1114LSSA Manuale utente