SMK-Link Digital Photo Frame Mouse Manuale utente

Page 1

Page 2

Page 3
Agency Certifications
Regulatory Compliance
This device complies with Part 15 of the FCC Rules. Operation is subject to the
following two conditions: (1) This device may not cause harmful interference, and
(2) This device must accept any interference received, including interference that
may cause undesired operation.
FCC Certification
This equipment has been tested and found to comply with the limits for a Class B
digital device, pursuant to part 15 of the FCC Rules. These limits are designed to
provide reasonable protection against harmful interference when the equipment
is operated in a residential installation. This equipment generates, uses and
can radiate radio frequency energy and, if not installed and used in accordance
with the instructions, may cause harmful interference to radio communications.
However, there is no guarantee that interference will not occur in a particular
installation. If this equipment does cause harmful interference to radio or
television reception, which can be determined by turning the equipment off and
on, the user is encouraged to try to correct the interference by one or more of the
following measures:
* Reorient or relocate the receiving antenna.
* Increase the separation between the equipment and receiver.
* Consult the dealer or an experienced radio/TV technician for help.
Notice: Any changes or modifications not expressly approved by the party
responsible for compliance could void the user’s authority to operate the
equipment. Extension cables are not recommended, if used, they must be
shielded in order to comply with the emission limits.

Page 4
IC Certification
The term “IC” before the certification/registration number only signifies that the
Industry Canada technical specifications were met.
Declaration of Conformity
Hereby, SMK-Link Electronics Corp. declares that this Digital Photo Frame Mouse
is in compliance with the essential requirements and other relevant provisions of
Directive 1999/5/EC. All trademarks and registered trademarks mentioned in this
document are the property of their respective owners.
Legal Information
© 2010 SMK-Link Electronics Corp. SMK-Link and the SMK-Link Logo are trade-
marks of SMK-Link Electronics corporation. All other trademarks are trademarks
or registered tradmarks of their respective holders. Features and specifications
are subject to change without notice.
System Requirements
Hardware: Computer with 1 available USB port
Operating System: Windows XP, Vista, Windows 7
Package Contents
Digital photo frame mouse
User’s manual
Page 5
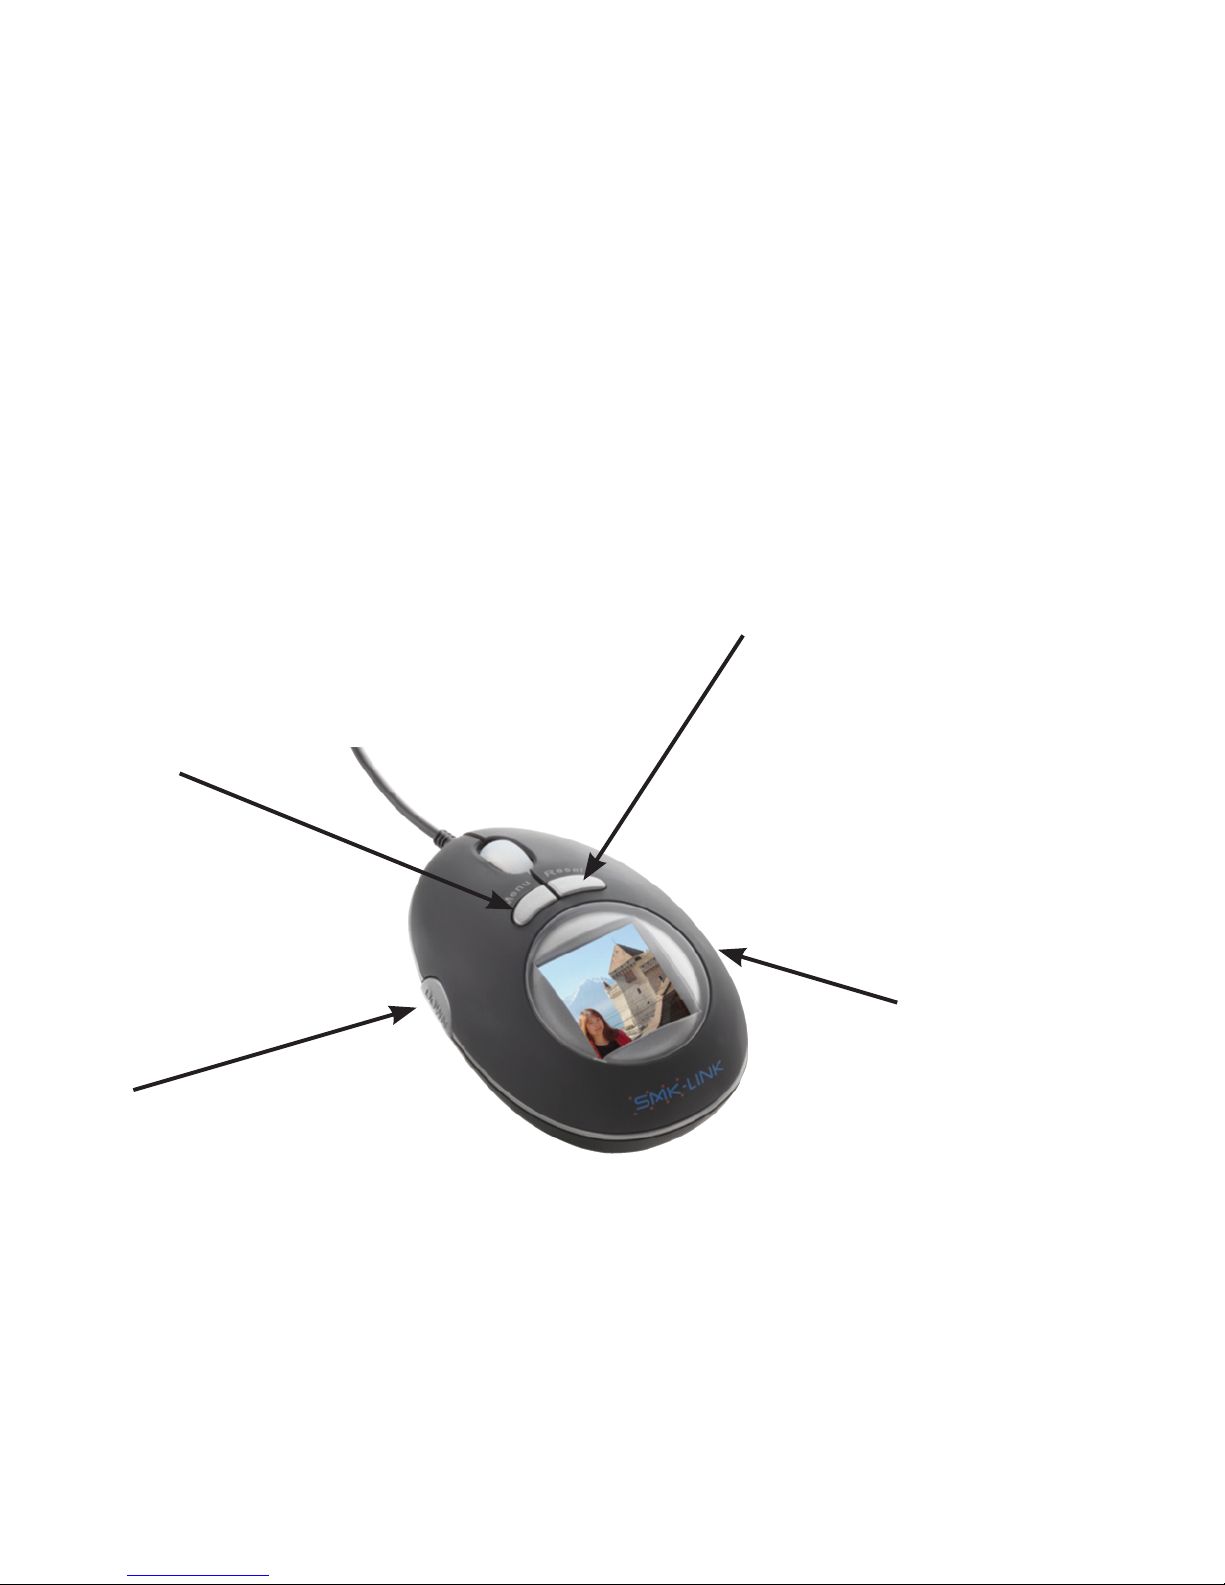
Menu: press once to bring up
the menu selections; press
down for 3 seconds to power
on/off the digital photo frame
function
Before You Get Started
This mouse functions as a standard 3-button optical mouse and
doubles as a digital photo frame.
Please familiarize yourself with the following control buttons for
digital photo frame mode:
Down: scroll down or forward
on the display in digital photo
frame mode (no function in
mouse mode)
Up: scroll up or backwards
on the display in digital photo
frame mode (no function in
mouse mode)
Reset: to restart the digital
photo frame function when it
has been stopped or to reset

Page 6
Connecting the Mouse to the Computer
Connect the mouse USB cable to an available USB port on the
computer.
Mouse is ready after the system performs auto driver instal-
lation in the background and recognizes the new hardware.
Use it as a regular 3-button mouse: left click, right click, with
the scroll wheel functioning as the center click.
Note: the Up and Down buttons located on the 2 sides of the
mouse do not function in mouse mode; they are navigation
buttons in digital photo frame mode.
Using the Mouse as a Digital Photo Frame
Make sure the mouse is connected to your computer (see
Connecting the Mouse to the Computer in the previous
section.)
If the display screen on the mouse is off, press and hold the
Menu button for about 3 seconds to turn on the digital photo
frame.
To turn off the display on the mouse, press and hold the Menu
button for about 3 seconds until the LCD screen displays the
•
•
•
•
•
•
•

Page 7
message “Power Off.”
Download photos from your computer to the mouse (see
Exploring the Menu in Digital Photo Frame Mode in the
next section.) The built-in memory in the mouse can store up
to approximately 100 compressed photos depending on the
original size of the photo files.
To view the photos already stored in the mouse, simply set it to
“Slideshow” or manually scroll through the photos by pressing
the Up and Down buttons.
•
•

Page 8
Exploring the Menu in Digital Photo Frame
Mode
Press the Menu button to bring up the Main Menu on the
mouse LCD display
Press the Up and Down buttons to scroll up and down the
menu options
Press the Menu button to accept the highlighted menu option
Use USB Connect to download photos from your computer to
the mouse
Use Slide Show, Auto Off, Backlight and Contrast to set up
preferences
Always choose Exit to activate any
changes made before exiting from the
Main Menu
•
•
•
•
•
•Main Menu
USB Connect
Slide Show
Auto Off
Backlight
Contrast
Delete
Power Off
Exit
Page 9
USB Connect (DPFMate Digital Photo Frame
Software):
Press Menu to select USB Connect
Select “Yes” to bring up the DPFMate software, or “No” to
return to mouse mode. DPFMate software allows you to
manage and download photos to the mouse
•
•

Page 10
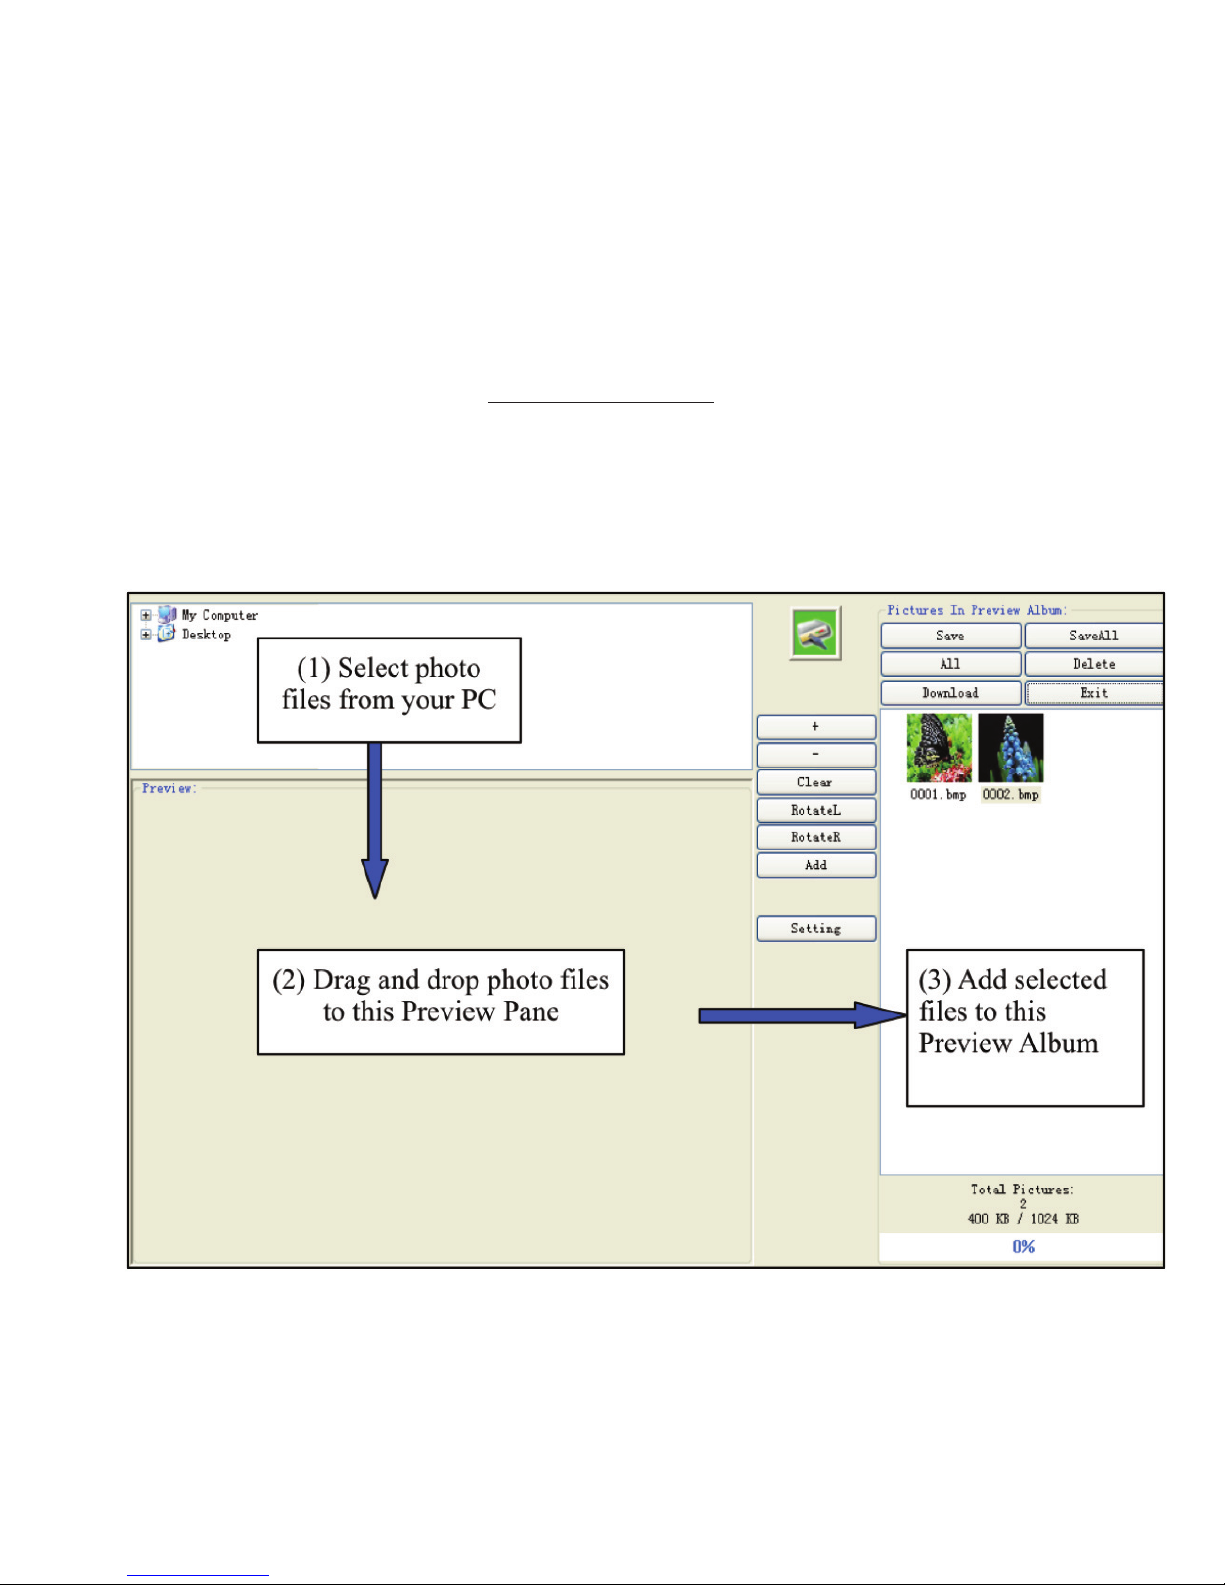
Browse your computer to select photo files, drag and drop the
selected files to the Preview pane.
To adjust the cropped area on the selected photo in the
Preview Pane, use “Zoom-in” and “Zoom-out” to enlarge and
reduce the photo.
To set correct aspect ratio of the selected photo, you may
adjust the cropped area by clicking “Clear” key to clear the
crop; or click “Rect” to return to the cropped area.
Click on “RotateL” to rotate the photo counterclockwise; click
on “RotateR” to rotate the photo clockwise.
After the selected photo in the Review pane is adjusted, click
on “Add” to add the photo file to the Preview Album on the
right.
You also have the option of setting font color and background
color for the Main Menu on your mouse LCD display by clicking
“Setting”.
After all the desired photos are added to the Preview Album,
you may save the individual files to your computer by clicking
“Save” or save all files by clicking “Save All”.
You can also delete individual files from the album by clicking
•
•
•
•
•
•
•
•
Indice
Altri manuali SMK-Link Topo


