SOLAC TROMSO Manuale utente

TOALLERO ELÉCTRICO
TROMSØ
Instrucciones de uso
Návod k použití
Οδηγίες χρήσης
Инстрүкция заупотреба
nstrukcja obsługi
Instrucțiuni de utilizare
Gebruiksaanwijzing
Gebrauchsanleitun
Istruzioni per l’uso
Instruções de utilização
Mode d’emploi
Instructions for use
ES.
EN.
FR.
PT.
IT.
DE.
NL.
RO.
PL.
BG.
EL.
CS.
AR.

E
D
C
B
A
F
X4
J
I
H
G
L
K
G-5
G-4
G-3
G-2
G-1

>80cm
>25cm
60cm
60cm
60cm
>25cm
>80cm
8mm >800mm
410mm >250mm
220mm

.
Fig. 1
Fig. 2 Fig. 3

ES
(Instrucciones originales)
Descripción
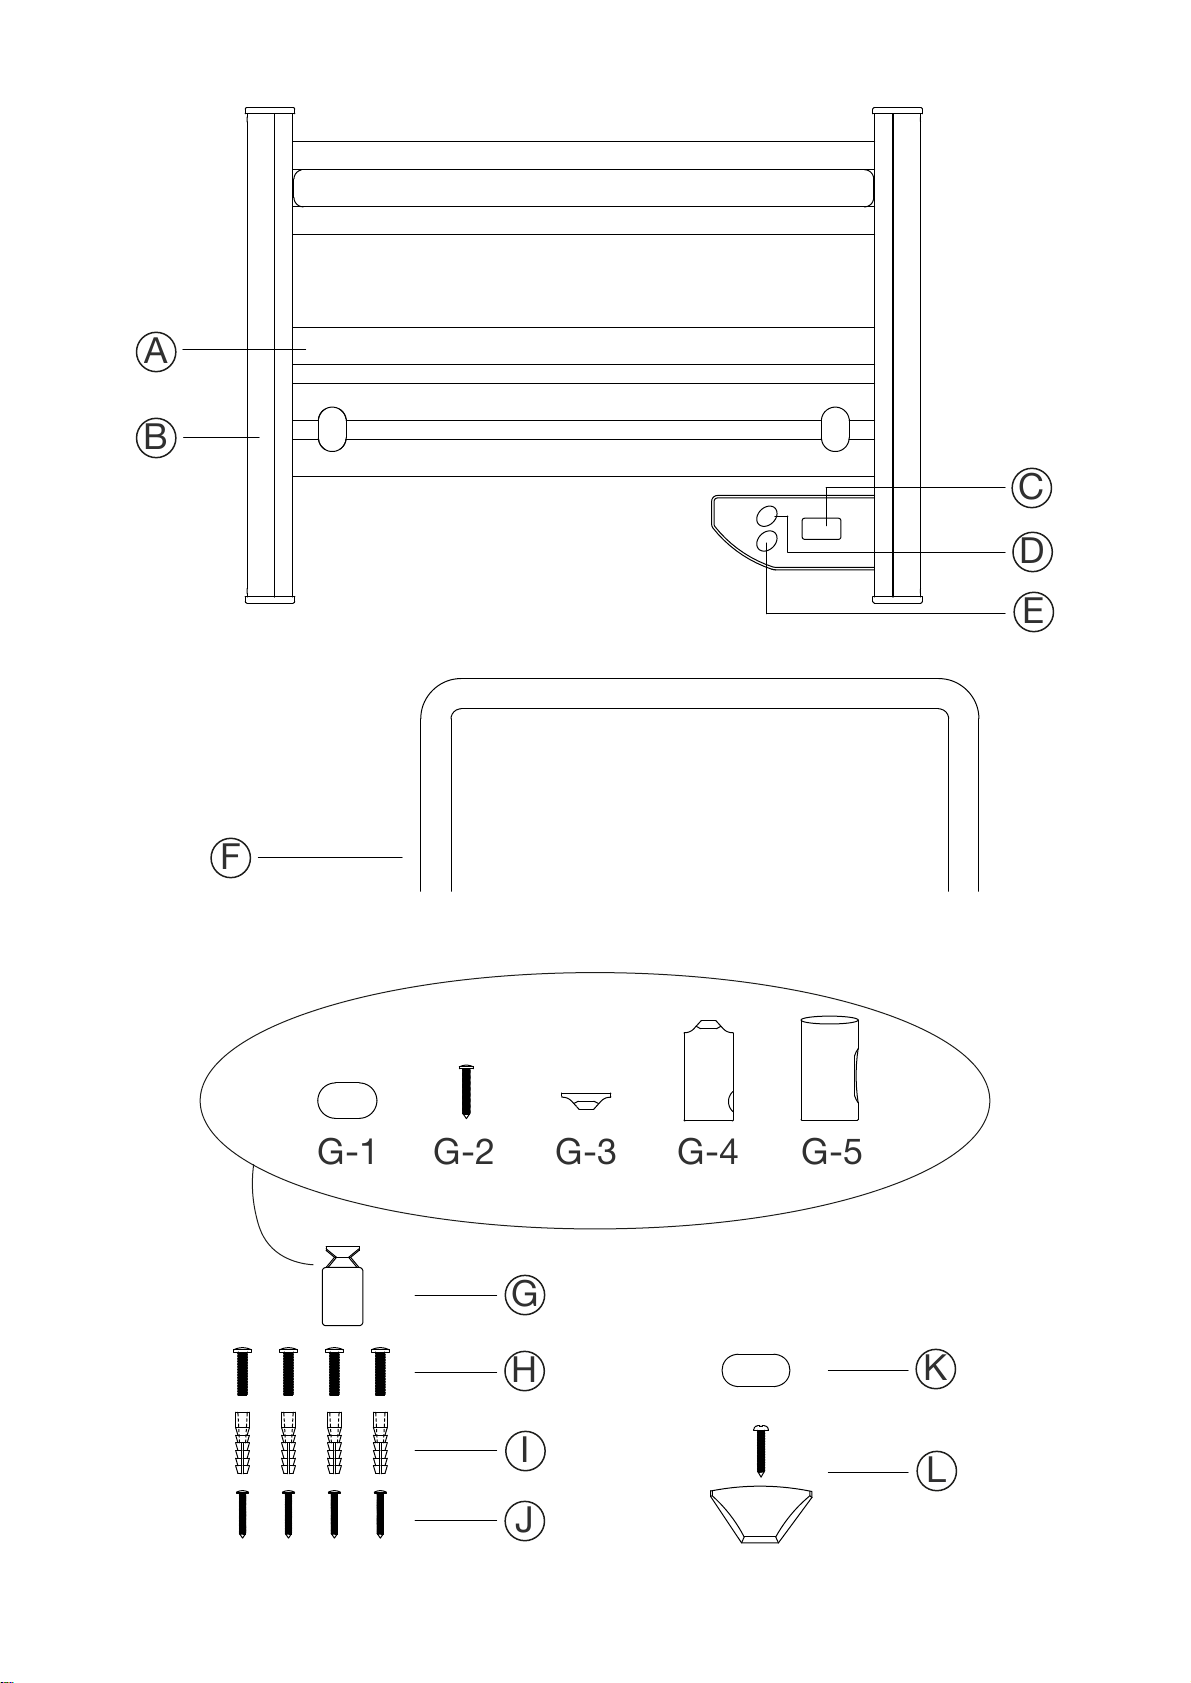
A – Barras calefactoras
B – Soportes laterales
C – Indicador de temperatura y tiempo
D – Temporizador
E – Botón encendido/apagado
F – Estante
G – Soportes de pared
G-1 – Embellecedores
G-2 – Tornillos
G-3 – Accesorios frontales
G-4 – Accesorios internos
G-5 – Accesorios externos
H – Tornillos fijadores
I – Tacos de pared
J – Tornillos de pared
K – Embellecedores
L – Soportes de sujeción
En caso de que su modelo de aparato no
disponga de los accesorios descritos
anteriormente, éstos también pueden
adquirirse por separado en los Servicios
de Asistencia Técnica.
UTILIZACIÓN Y CUIDADOS
-
ATENCIÓN: Este aparato está pensado
solamente para secar textiles mojados
en agua.
ATENCIÓN: Algunas partes del aparato
pueden calentarse mucho, procure no
tocarlo hasta que se haya enfriado.
MONTAJE DEL APARATO
Antes de montar el aparato, asegúrese
que cumple con los siguientes
requisitos:
El panel de control debe quedar en la
parte inferior.
La distancia entre la bañera o ducha y el
aparato debe ser al menos de 60cm.
La distancia entre el techo y el aparato
debe ser al menos de 25cm.
La distancia entre el suelo y el aparato
debe ser al menos de 80cm.
Fijación del estante:
Recuerde que, para fijar el estante, el
aparato no debe estar sujeto a la pared.
Deberá fijar el estante horizontalmente
entre dos barras calefactoras (A), las que
usted desee.
Coloque el estante (F) en posición y
desde la parte trasera del aparato,
usando el accesorio (L) y el tornillo fije un
lado sin atornillarlo del todo.
Ahora repita con el otro lado y cuando el
estante esté sujeto acabe de atornillar
ambos tornillos.
Coloque los dos embellecedores (K)
para que los tornillos no queden visibles.
Fijación a la pared (Fig.1, 2 y 3):
Marque 4 puntos en la pared, dónde
deberá hacer los agujeros. La distancia
horizontal entre los puntos debe ser de
41cm y la distancia vertical de 22cm.
Una vez marcados, haga los cuatro
agujeros de 8mm de diámetro.
Separe las diferentes piezas de los
soportes de pared como en la imagen
de las partes del aparato.
Inserte el taco (I) en el agujero de la
pared y luego introduzca el accesorio
-
-
-
No usar el aparato si los accesorios o
consumibles acoplados a él presentan
defectos. Proceda a sustituirlos
inmediatamente.
No usar el aparato si su botón de
encendido/apagado no funciona.
Mantener este aparato fuera del alcance
de los niños y/o personas con
capacidades físicas, sensoriales o
mentales reducidas o falta de
experiencia y conocimiento.
No utilizar el aparato para otros fines
que no sean el de calentar y secar las
toallas o calentar la habitación.
No colocar el aparato demasiado cerca
de duchas, bañeras, piscinas, etc.
No sumergir el aparato en agua o
cualquier otro líquido.
No utilizar el aparato en el suelo.
Es normal escuchar algunos ruidos
cuando el aparato se está calentando o
enfriando.
-
-
-
-
-
-
-
-
-
-
-
-
-
-
-
-
-
-
-

externo (G-5) fijándolo con el tornillo de
pared (J). Repita este paso en los 4
agujeros.
Fije los accesorios internos (G-4) y los 4
accesorios frontales (G-3) al aparato con
los tornillos (G-2). Después ponga los
embellecedores (G-1) de manera que los
tornillos no sean visibles.
Inserte los accesorios internos (G-4) a los
accesorios externos (G-5) en la pared y
fíjelos con los tornillos fijadores (H) para
que el aparato quede bien sujeto.
Modo de empleo
NOTAS PREVIAS AL USO
Asegúrese de retirar todo el embalaje con
cuidado de no perder ninguna de las
partes.
Siga cuidadosamente las instrucciones de
montaje para montar correctamente el
aparato.
Cuando se use por primera vez, dejarlo
encendido durante 2 o 3 horas en un
espacio ventilado para deshacerse del olor
a nuevo.
USO
Modo calor continuo:
Si pulsamos el botón de encendido (E), el
aparato entrará en modo calor continuo y
emitirá calor hasta que volvamos a pulsar
el botón (E) apagando así el dispositivo.
Modo calienta toallas:
Una vez encendido el dispositivo, pulsar el
botón del temporizador (D).
Puede pulsar el botón (D) las veces que
desee hasta alcanzar un máximo de 8h.
Después del tiempo configurado el
dispositivo se apagará solo.
NOTA: La pantalla LED (C) siempre
muestra la temperatura ambiente.
UNA VEZ FINALIZADO EL USO DEL
APARATO
Apagar el aparato mediante el botón de
encendido/apagado (E).
Desenchufar el aparato de la red eléctrica.
Esperar a que el aparato se enfríe.
ATENCIÓN: Algunas partes del aparato
-
-
-
-
-
-
-
-
-
-
-
-
-
pueden calentarse mucho, procure no
tocarlo hasta que se haya enfriado.
PROTECTOR TÉRMICO DE
SEGURIDAD
El aparato dispone de un dispositivo
térmico de seguridad que protege el
aparato de cualquier
sobrecalentamiento.
Cuando el aparato se conecta y
desconecta alternativamente, no siendo
ello debido a la acción del termostato de
ambiente, verifique que no haya ningún
obstáculo que impida o dificulte la
entrada o salida normal del aire.
Si el aparato se desconecta por si
mismo y no vuelve a conectarse,
proceda a desenchufarlo de la red y
espere unos 15 minutos antes de volver
a conectarlo. Si sigue sin funcionar,
acuda a uno de los servicios de
asistencia técnica autorizados.
Limpieza
Siempre apagar el dispositivo y dejar
que se enfríe antes de realizar cualquier
acción de limpieza.
Limpiar el aparato con un paño suave
húmedo impregnado con unas gotas de
detergente y secarlo después.
No usar un material abrasivo para evitar
dañar la superficie.
No utilizar disolventes, ni productos con
un factor pH ácido o básico como la
lejía, ni productos abrasivos, para la
limpieza del aparato.
No sumergir el aparato en agua ni
cualquier otro líquido, ni ponerlo bajo el
grifo.
-
-
-
-
-
-
-
-
-

EN
(Original instructions)
Description
A - Heater bars
B - Lateral supports
C - Temperature/Timer indicator
D - Timer
E - On/off button
F - Shelf
G - Wall brackets
G-1 - Trim
G-2 - Screws
G-3 - Front accessories
G-4 - Internal accessories
G-5 - External accessories
H - Fixing screws
I - Wall plugs
J - Wall screws
K - Trim
L - Support brackets
If the accessories described above are not
available for your model of appliance, they
can also be purchased separately from
Technical Assistance Services.
USE AND CARE
-
CAUTION: This appliance is intended
only for drying textiles soaked in water.
CAUTION: Some parts of the appliance
can become very hot, so be careful not
to touch it until it has cooled down.
ASSEMBLY OF THE DEVICE
Before mounting the unit, make sure that
it meets the following requirements:
The control panel must be at the bottom.
The distance between the bathtub or
shower and the appliance must be at
least 60cm.
The distance between the ceiling and the
appliance must be at least 25cm.
The distance between the floor and the
appliance must be at least 80cm.
Shelf attachment:
Remember that, to fix the shelf, the
appliance must not be attached to the
wall.
You will need to fix the shelf horizontally
between two heating rods (A), whichever
you wish.
Place the shelf (F) in position and from
the back of the appliance, using the
accessory (L) and the screw fix one side
without screwing it all the way in.
Now repeat with the other side and when
the shelf is secured, finish screwing both
screws.
Place the two trims (K) so that the
screws are not visible.
Wall mounting (Fig.1, 2 and 3):
Mark 4 points on the wall, where the
holes should be drilled. The horizontal
distance between the points should be
41cm and the vertical distance 22cm.
Once marked, drill the four 8mm
diameter holes.
Separate the different parts of the wall
brackets as shown in the picture of the
device parts.
Insert the wall plug (I) into the hole in the
wall and then insert the external
-
-
-
Do not use the device if the accessories
or consumables attached to it are
defective. Replace them immediately.
Do not use the device if its on/off button
does not work.
Keep this appliance out of the reach of
children and/or persons with reduced
physical, sensory or mental capabilities
or lack of experience and knowledge.
Do not use the appliance for purposes
other than heating and drying towels or
heating the room.
Do not place the appliance too close to
showers, bathtubs, swimming pools, etc.
Do not immerse the appliance in water
or any other liquid.
Do not use the appliance on the floor.
It is normal to hear some noises when
the appliance is heating or cooling.
-
-
-
-
-
-
-
-
-
-
-
-
-
-
-
-
-
-
-

accessory (G-5) fixing it with the wall
screw (J). Repeat this step in the 4 holes.
Attach the internal fittings (G-4) and the 4
front fittings (G-3) to the unit with the
screws (G-2). Then place the trims (G-1) so
that the screws are not visible.
Insert the internal fittings (G-4) to the
external fittings (G-5) on the wall and fix
them with the fixing screws (H) so that the
unit is securely fastened.
Instructions for use
NOTES BEFORE USE
Be sure to remove all packaging carefully
so as not to lose any of the parts.
Carefully follow the assembly instructions
to assemble the unit correctly.
When using for the first time, leave it on for
2 to 3 hours in a ventilated space to get rid
of the new smell.
USE
Continuous heat mode:
If we press the power button (E), the
device will go into continuous heat mode
and will emit heat until we press the button
(E) again, thus turning off the device.
Towel warmer mode:
After switching on the device, press the
timer button (D).
You can press the button (D) as many
times as you wish up to a maximum of 8h.
After the set time the device will switch
itself off.
NOTE: The LED display (C) always shows
the room temperature.
AFTER USE OF THE DEVICE HAS BEEN
COMPLETED
Switch the unit off using the on/off button
(E).
Unplug the unit from the mains.
Wait for the unit to cool down.
WARNING: Some parts of the appliance
can become very hot, so be careful not to
touch it until it has cooled down.
-
-
-
-
-
-
-
-
-
-
-
-
-
SAFETY THERMAL PROTECTOR
The appliance is equipped with a thermal
safety device that protects the appliance
from overheating.
When the appliance switches on and off
alternately, and this is not due to the
action of the room thermostat, check
that there is no obstacle preventing or
hindering the normal air inlet or outlet.
If the appliance switches itself off and
does not switch back on, unplug it from
the mains and wait about 15 minutes
before switching it on again. If it still
does not work, contact an authorized
service center.
Cleaning
Always switch off the device and allow it
to cool down before cleaning.
Clean the device with a soft damp cloth
impregnated with a few drops of
detergent and dry it afterwards.
Do not use abrasive material to avoid
damaging the surface.
Do not use solvents, or products with an
acid or basic pH factor such as bleach,
or abrasive products, to clean the
appliance.
Do not immerse the appliance in water
or any other liquid, nor put it under the
tap.
-
-
-
-
-
-
-
-
-

FR
(Instructions originales)
Description
A - Barres de chauffage
B - Supports latéraux
C - Indicateur de température
D - Minuterie
E - Bouton marche/arrêt
F - Étagère
G - Supports muraux
G-1 - Garniture
G-2 - Vis
G-3 - Accessoires frontaux
G-4 - Accessoires internes
G-5 - Accessoires extérieurs
H - Vis de fixation
I - Fiches murales
J - Vis murales
K - Garniture
L - Supports de fixation
Si les accessoires décrits ci-dessus ne
sont pas disponibles pour votre modèle
d'appareil, ils peuvent également être
achetés séparément auprès du service
d'assistance technique.
UTILISATION ET ENTRETIEN
-
AVERTISSEMENT : Cet appareil est
uniquement destiné à sécher des textiles
trempés dans l'eau.
ATTENTION : Certaines parties de
l'appareil peuvent devenir très chaudes,
veillez donc à ne pas le toucher avant
qu'il ait refroidi.
ASSEMBLAGE DE L'APPAREIL
Avant de monter l'appareil, assurez-vous
qu'il répond aux exigences suivantes :
Le panneau de commande doit se
trouver en bas.
La distance entre la baignoire ou la
douche et l'appareil doit être d'au moins
60 cm.
La distance entre le plafond et l'appareil
doit être d'au moins 25 cm.
La distance entre le sol et l'appareil doit
être d'au moins 80 cm.
Fixation de l'étagère :
N'oubliez pas que, pour fixer l'étagère,
l'appareil ne doit pas être fixé au mur.
Vous devrez fixer l'étagère
horizontalement entre deux tiges
chauffantes (A), selon ce que vous
souhaitez.
Placez l'étagère (F) en position et, depuis
l'arrière de l'appareil, à l'aide de
l'accessoire (L) et de la vis, fixez un côté
sans le visser à fond.
Répétez l'opération avec l'autre côté et
lorsque l'étagère est fixée, finissez de
visser les deux vis.
Placez les deux garnitures (K) de façon à
ce que les vis ne soient pas visibles.
Fixation au mur (Fig.1, 2 et 3):
Marquez 4 points sur le mur, où les trous
doivent être percés. La distance
horizontale entre les points doit être de
41 cm et la distance verticale de 22 cm.
Une fois les points marqués, percez les
quatre trous de 8 mm de diamètre.
Séparez les différentes parties des
supports muraux comme indiqué sur la
photo des parties de l'appareil.
Insérez la fiche murale (I) dans le trou du
-
-
-
N'utilisez pas l'appareil si les
accessoires ou les consommables qui y
sont attachés sont défectueux.
Remplacez-les immédiatement.
N'utilisez pas l'appareil si son bouton
marche/arrêt ne fonctionne pas.
Gardez cet appareil hors de portée des
enfants et/ou des personnes ayant des
capacités physiques, sensorielles ou
mentales réduites ou manquant
d'expérience et de connaissances.
N'utilisez pas l'appareil à d'autres fins
que le chauffage et le séchage des
serviettes ou le chauffage de la pièce.
Ne placez pas l'appareil trop près des
douches, des baignoires, des piscines,
etc.
Ne plongez pas l'appareil dans l'eau ou
tout autre liquide.
N'utilisez pas l'appareil sur le sol.
Il est normal d'entendre quelques bruits
lorsque l'appareil chauffe ou refroidit.
-
-
-
-
-
-
-
-
-
-
-
-
-
-
-
-
-
-
-

mur, puis insérez l'accessoire externe (G-
5) et fixez-le avec la vis murale (J).
Répétez cette étape pour les 4 trous.
Fixez les garnitures intérieures (G-4) et les
4 garnitures frontales (G-3) à l'appareil à
l'aide des vis (G-2). Placez ensuite les
garnitures (G-1) de manière à ce que les
vis ne soient pas visibles.
Insérez les ferrures internes (G-4) dans les
ferrures externes (G-5) du mur et fixez-les
avec les vis de fixation (H) de façon à ce
que l'appareil soit solidement fixé.
Mode d'emploi
NOTES AVANT L'UTILISATION
Veillez à retirer tous les emballages, en
prenant soin de ne perdre aucune pièce.
Suivez attentivement les instructions de
montage pour assembler correctement
l'appareil.
Lors de la première utilisation, laissez
l'appareil allumé pendant 2 à 3 heures
dans un espace aéré pour faire disparaître
l'odeur du neuf.
UTILISATION
Mode de chauffage continu:
Si nous appuyons sur le bouton
d'alimentation (E), l'appareil passe en
mode de chaleur continue et émet de la
chaleur jusqu'à ce que nous appuyions à
nouveau sur le bouton (E), ce qui éteint
l'appareil.
Mode Chauffe-serviettes :
Une fois l'appareil allumé, appuyez sur le
bouton de la minuterie (D).
Vous pouvez appuyer sur le bouton (D)
autant de fois que vous le souhaitez
jusqu'à un maximum de 8h.
Après le temps programmé, l'appareil
s'éteindra de lui-même.
REMARQUE : L'affichage LED (C) indique
toujours la température ambiante.
À LA FIN DE L'UTILISATION DE
L'APPAREIL
Éteignez l'appareil à l'aide du bouton
marche/arrêt (E).
Débranchez l'appareil du réseau
électrique.
-
-
-
-
-
-
-
-
-
-
-
-
-
Attendez que l'appareil refroidisse.
AVERTISSEMENT : Certaines parties de
l'appareil peuvent devenir très chaudes,
veillez donc à ne pas les toucher avant
qu'elles aient refroidi.
PROTECTEUR THERMIQUE DE
SÉCURITÉ
L'appareil est équipé d'un dispositif de
sécurité thermique qui protège l'appareil
contre la surchauffe.
Lorsque l'appareil s'allume et s'éteint
alternativement, et que cela n'est pas dû
à l'action du thermostat d'ambiance,
vérifiez qu'aucun obstacle n'empêche ou
ne gêne l'entrée ou la sortie normale de
l'air.
Si l'appareil s'éteint et ne se rallume pas,
débranchez-le du secteur et attendez
environ 15 minutes avant de le rallumer.
S'il ne fonctionne toujours pas,
contactez un centre d'assistance agréé.
Nettoyage
Éteignez toujours l'appareil et laissez-le
refroidir avant de le nettoyer.
Nettoyez l'appareil avec un chiffon doux
et humide imbibé de quelques gouttes
de détergent, puis essuyez-le.
N'utilisez pas de matériel abrasif pour ne
pas endommager la surface.
N'utilisez pas de solvants, ni de produits
dont le pH est acide ou basique, comme
l'eau de Javel, ni de produits abrasifs,
pour nettoyer l'appareil.
Ne plongez pas l'appareil dans l'eau ou
dans tout autre liquide et ne le mettez
pas sous le robinet.
-
-
-
-
-
-
-
-
-
Questo manuale è adatto per i seguenti modelli
1
Indice
Lingue:
Altri manuali SOLAC Stufa
Manuali Stufa popolari di altre marche

Empire Heating Systems
Empire Heating Systems WCC65 Manuale utente

Wetekom
Wetekom 92 86 43 Manuale utente

Desa
Desa SPC170-F Manuale utente

Watlow
Watlow Watrod Electric Tubular Heaters Manuale utente

Haverland
Haverland ECO-DRY GPS Series Manuale elenco delle parti

Stelpro
Stelpro ASILVC2060 Series Manuale utente