Sound-X SMI-1450 Manuale utente
SMI-1450
7 Pad Electronic
Sistema Electrónico del Tambor de
Ensemble Électronique de Tambour de
Drum Set
7 Cojines
7 Garnitures

HANDLING AND TRANSPORT
•
•
•
•
Never apply excessive force to the controls,
connectors or other parts of the instrument.
Always unplug cables by gripping the plug firmly,
but not pulling on the cable.
Disconnect all cables before moving the
instrument.
Physical shocks caused by dropping, bumping, or
placing heavy objects on the instrument can
result in scratches and more serious damage.
Clean the unit with a dry soft cloth.
A slightly damp cloth may be used to remove
stubborn grime and dirt.
Never use cleaners such as alcohol or thinner.
Avoid placing vinyl objects on top of the unit (vinyl
can stick to and discolor the surface).
This instrument contains digital circuitry and may
cause interference if placed too close to a radio
or television receiver. If this occurs, move the
instrument away from the affected equipment.
CLEANING
ELECTRICAL INTERFERENCE
•
•
•
•
•
LOCATION
•Do not expose the unit to the following conditions
to avoid deformation, discoloration, or more
serious damage.
Direct sunlight.
High temperature (near a heat source, or in a
car during the daytime).
Excessive humidity.
Turn the power switch OFF when the instrument
isnotinuse.
The AC adapter should be unplugged from the AC
outlet if the instrument is not in use for an
extended period of time.
Unplug the AC adapter during electric storms.
Avoid plugging the AC adapter into the same AC
outlet as an appliances with high power
consumption, such as electric heaters or ovens.
Also avoid using multi-plug adapters since this
can result in reducing the sound quality,
operation errors, and possible damage.
To avoid damage to the instrument and other
devices to which it is connected, turn OFF the
power switches of all related devices prior to
connecting or disconnecting cables.
•
•
•
•
•
Excessive dust.
Strong vibration.
POWER SUPPLY
•
•
•
•
•
TURN POWER OFF WHEN MAKING CONNECTIONS
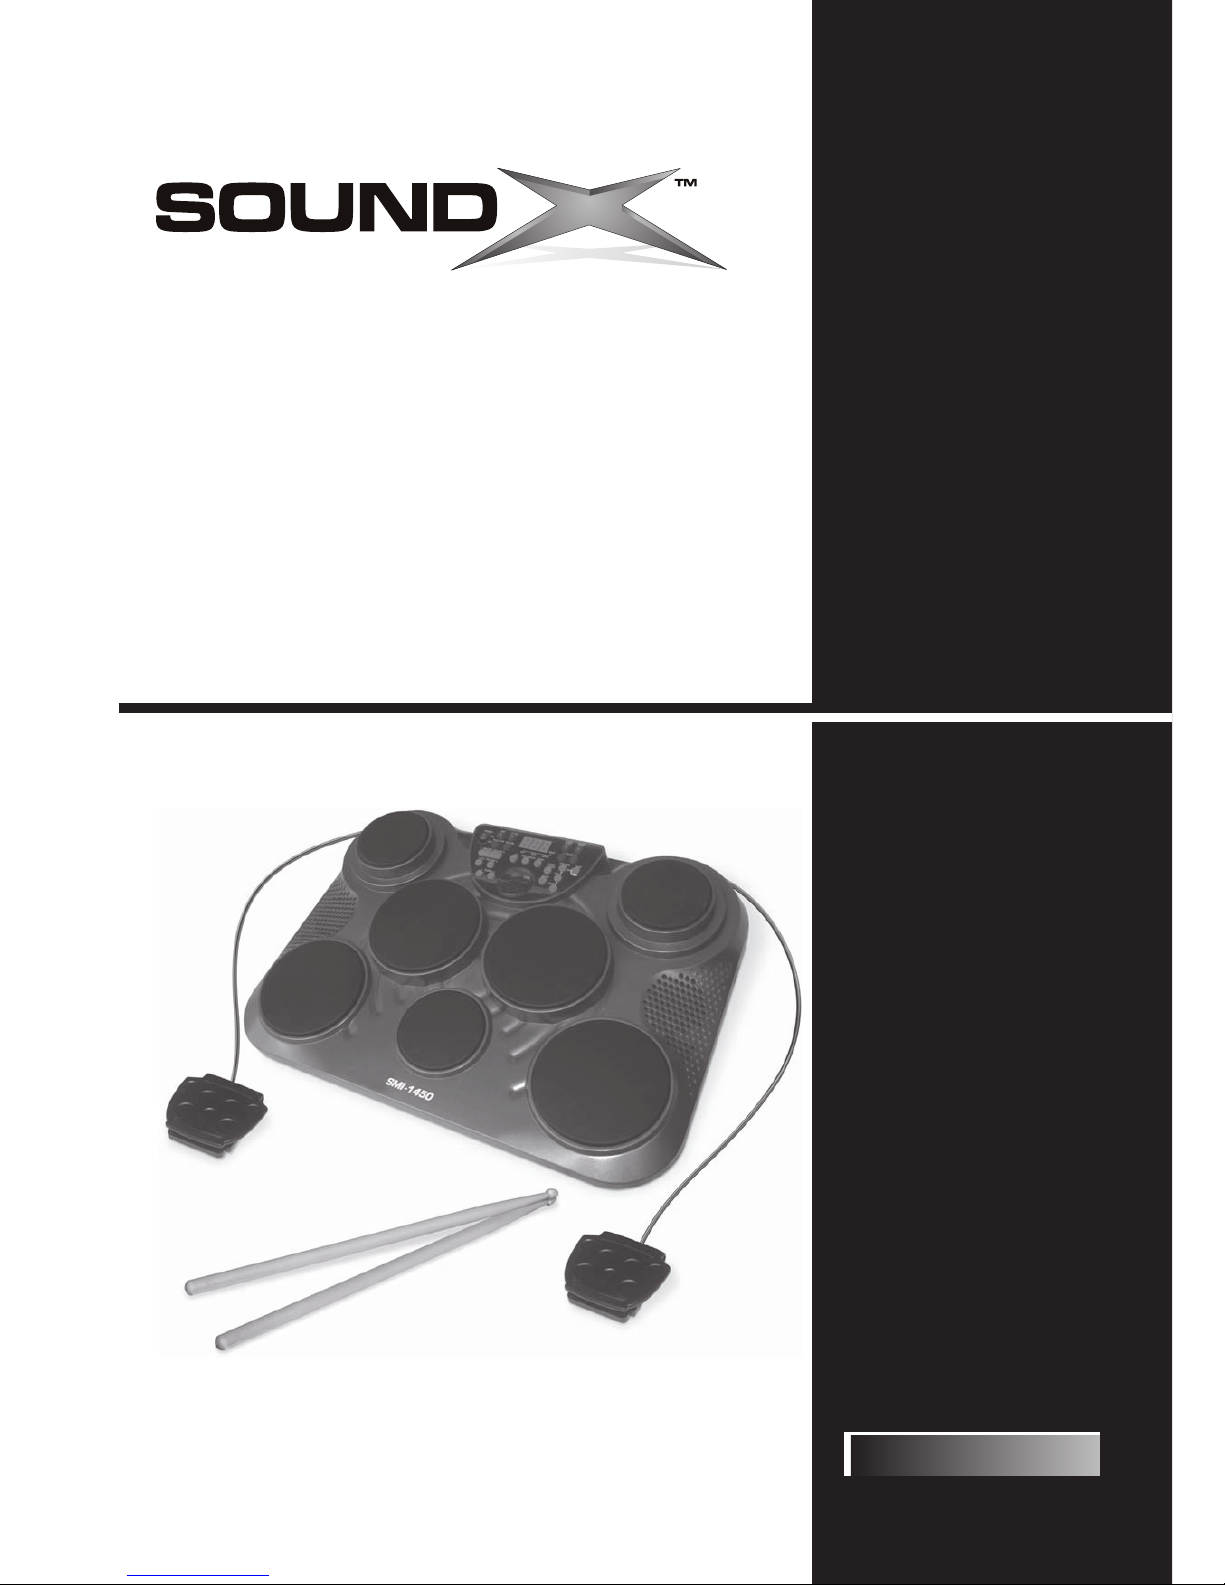
Thank you for purchasing your SOUNDX Portable Digital Drum Set. This Digital Drum Set has been developed to
perform with ease. Before using this instrument, we recommend that you to read through this manual.
please follow the maintenance instructions listed below:For optimum use of your Digital Drum Set,
Congratulations!
Taking care of your Portable Digital Drum Set
English
E02
THIS DEVICE COMPLIES WITH PART 15 OF THE FCC RULES.
OPERATION IS SUBJECT TO THE FOLLOWING TWO CONDITIONS:
(1) THIS DEVICE MAY NOT CAUSE HARMFUL INTERFERENCE, AND
(2) THIS DEVICE MUST ACCEPT ANY INTERFERENCE RECEIVED,
INCLUDING INTERFERENCE THAT MAY CAUSE UNDESIRED OPERATION.

Panel Controls
Setting Up
Functions
Operation
Making The Connection
Specifications
Voice List
Drum Kit List
Song List
MIDI Implementation Chart
............................................................................................. 4
.................................................................................................... 6
..................................................................................................... 7
.................................................................................................. 10
.............................................................................. 13
............................................................................................ 14
........................................................................................... 15 - 16
............................................................................................ 17
............................................................................................ 17 - 18
....................................................................... 19
- Front panel .................................................................................................. 4
- Rear Panel................................................................................................... 5
- Using the AC - Adaptor .................................................................................. 6
- Using Batteries ............................................................................................ 6
- Using Headphones ........................................................................................ 6
- Select a Drum Kit ........................................................................................ 7
- Set Pad Voice .............................................................................................. 7
- Set Pad Volume ........................................................................................... 7
- Set Pad Pan ................................................................................................ 8
- Play Song ................................................................................................. 10
- Adjust Main Volume ................................................................................... 10
- Adjust Accompaniment Volume .................................................................... 10
- Drum Off .................................................................................................. 10
- Adjust Tempo Function ............................................................................... 11
- Metronome ............................................................................................... 11
- Hand Percussion ........................................................................................ 11
- Demo Function .......................................................................................... 11
- Pedals ...................................................................................................... 13
- Phones Output .......................................................................................... 13
- USB Jack ................................................................................................. 13
- Set Pad Gain ............................................................................................... 8
- Save Kit ...................................................................................................... 9
- Adjust Reverb Function ............................................................................... 12
- Record Function ......................................................................................... 12
- Playback Function ...................................................................................... 12
English
E03
CONTENTS
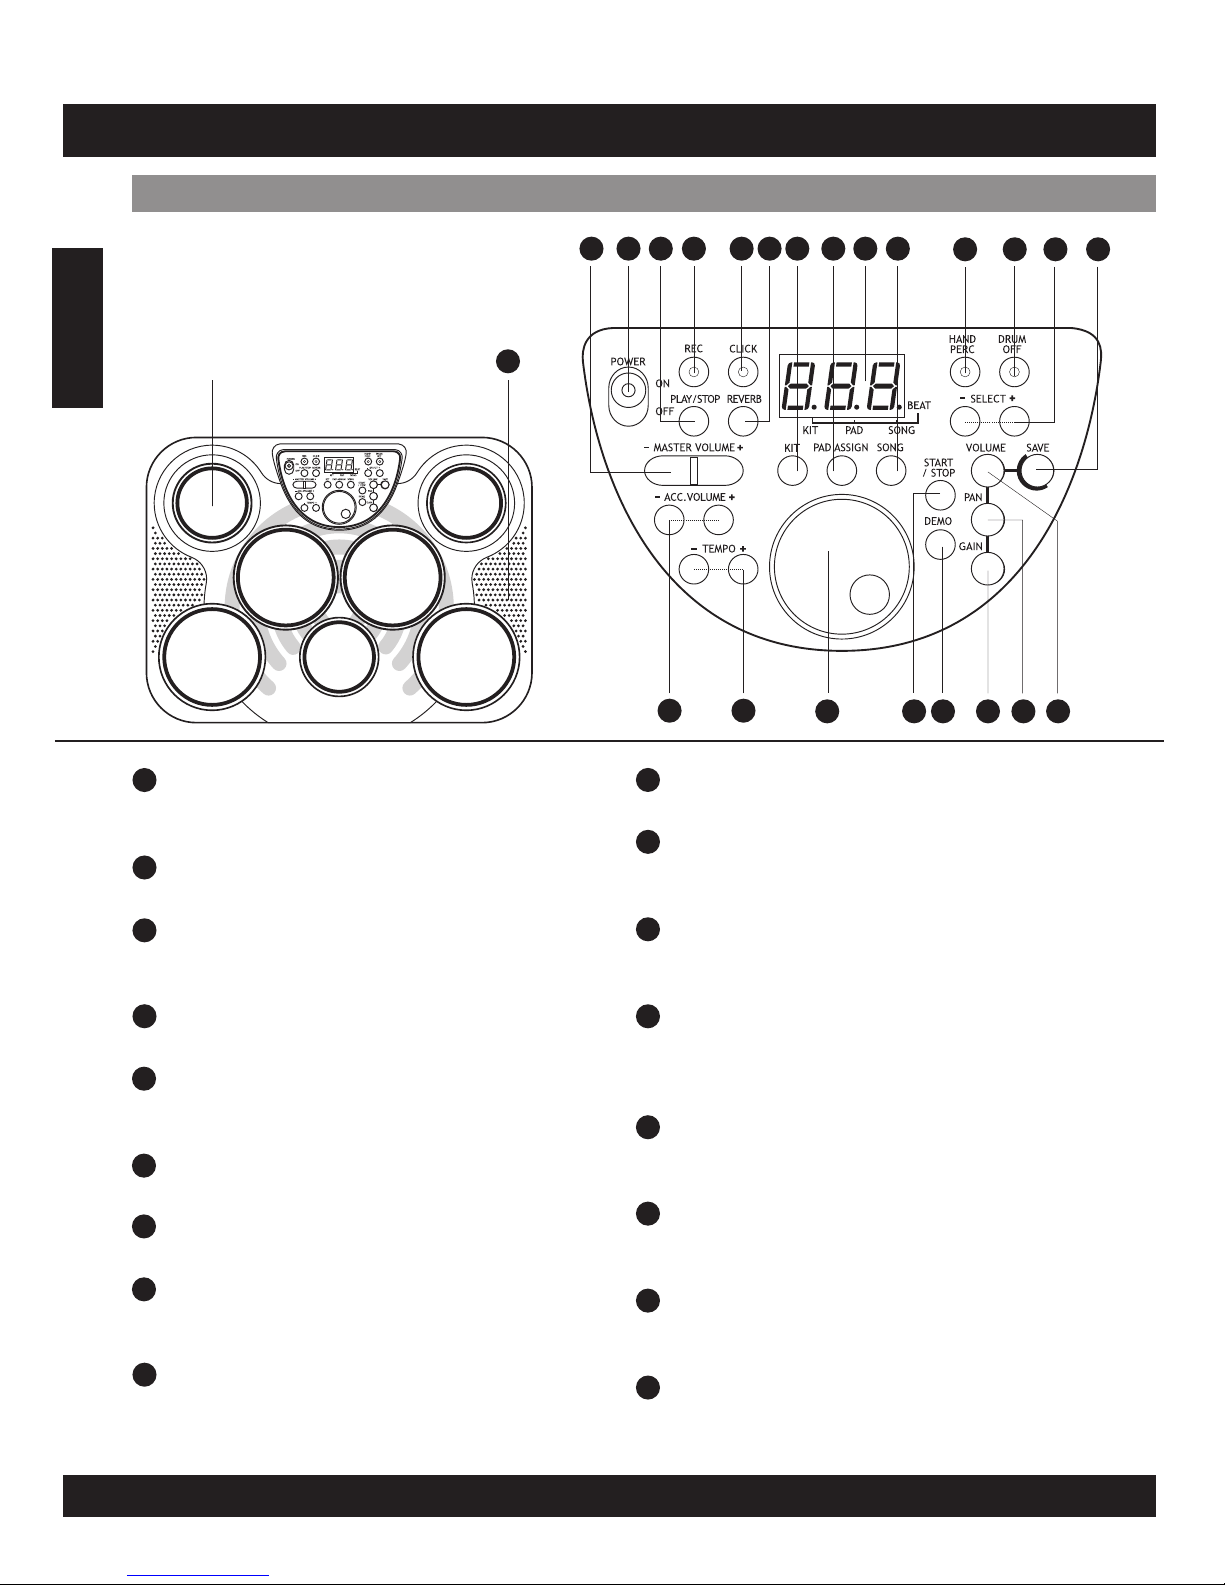
[ Master Volume + & - ] button
[Poweron–off]switch
[ Play / Stop ] button
[ REC ] button and LED indicator
[ Click ] button and LED indicator
[ Reverb ] button
[ Pad Assign ] button
3-Digit LED
These buttons can be used to change the
master volume UP or DOWN.
This switch turns power on / off.
This button is used to start or stop recording
replay.
This button is used to start or stop recording.
This button is used to turn on or off the
metronome.
This button is used to change the reverb level.
This button is used to enter voice or volume
menu.
This LED is the main display device, which will
show the parameters of the current menu.
[ Kit ] button
This button is used to enter kit menu.
[ Song ] button
[ Hand Percussion ] button and LED indicator
[ Drum OFF ] button and LED indicator
[ Select + & - ] buttons
[ Save ] button
[ Acc Volume + & - ] buttons
[ Tempo + & - ] buttons
[ Dial ] button
This button is used to enter song menu.
This button is used to turn the hand
percussion function ON.
This button is used to enable or disable the
drum function when listening to all songs.
These buttons are used to change values (kit
number, voice number, song number, etc.)
when editing.
This button is used to save all current kit
setting to a user kit.
These buttons can be used to change the
accompaniment volume.
These buttons are used to change current the
tempo.
This button is used to change values (kit
number, voice number, song number, etc.)
when editing.
English
E04
5
1
2
3
4
6
7
9
14
13
12
11
Front Panel
PANEL CONTROL
123 4 56 7 8 910 11 13
12
114
15 16 17 19
18 20 21 22
DRUM PAD (x7)
8
10
17
16
15
23
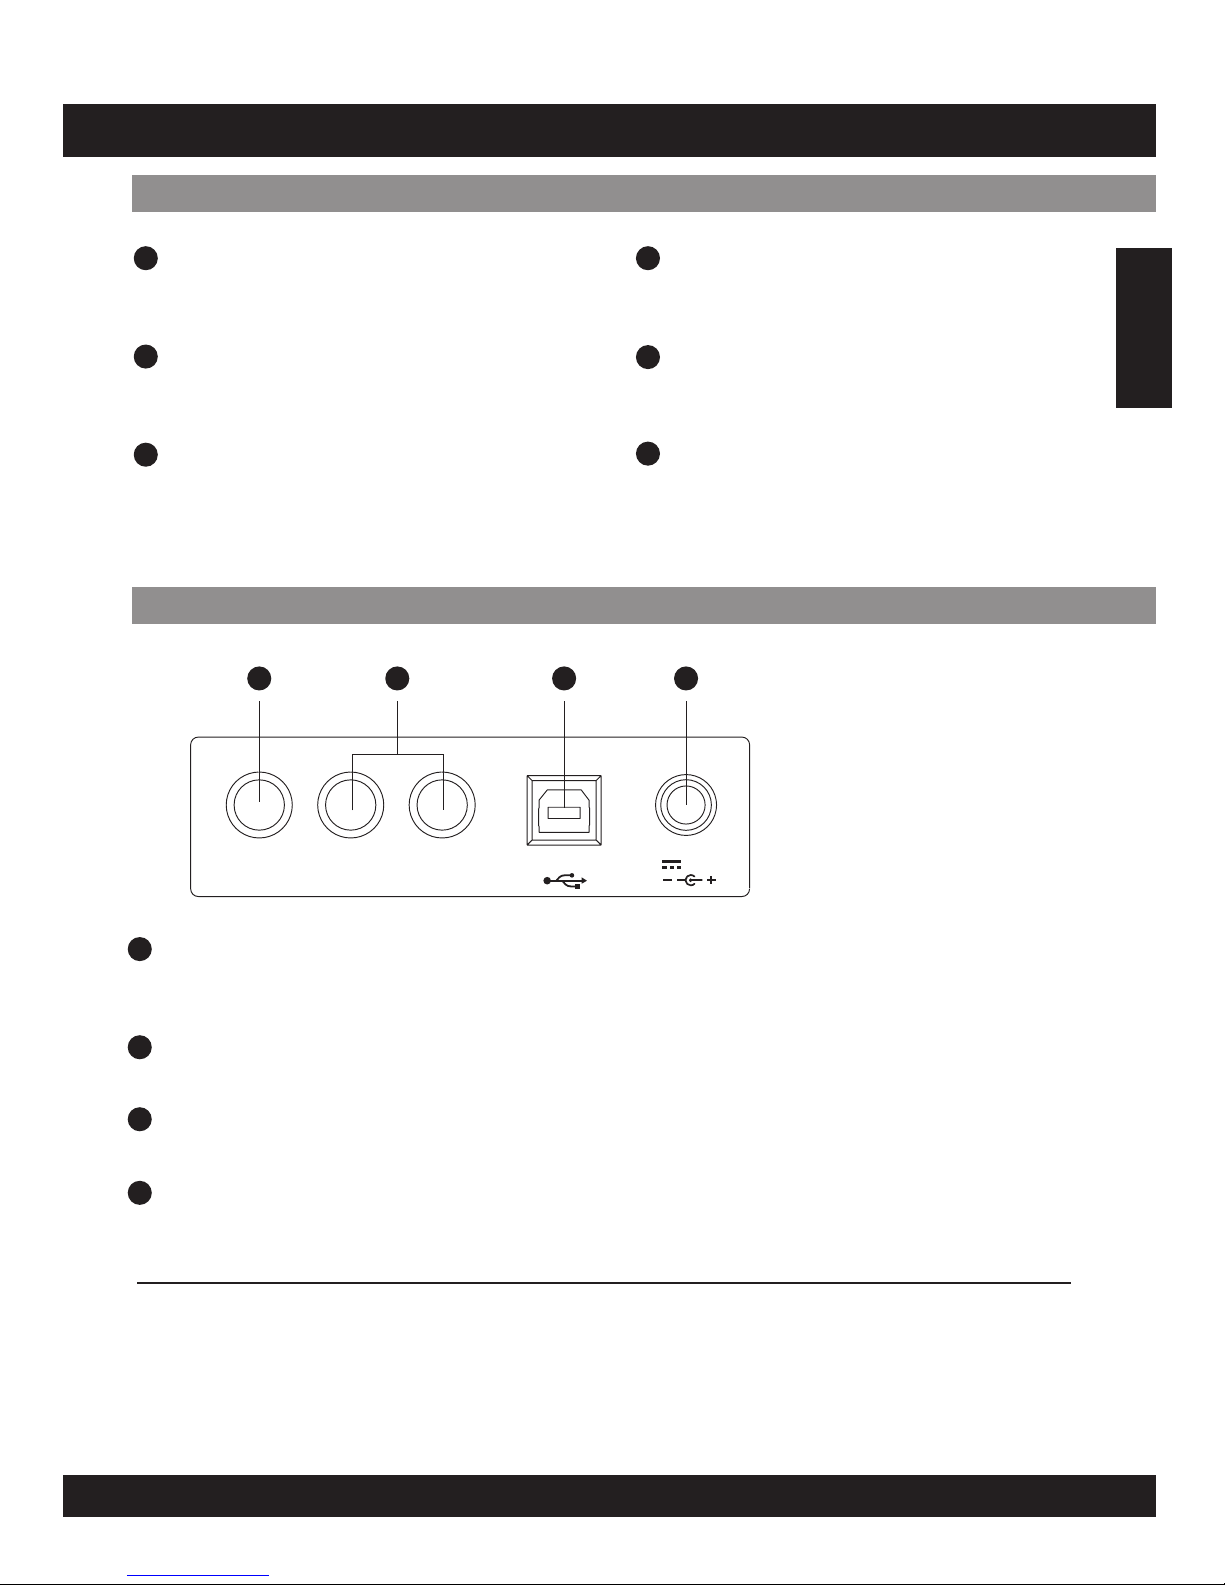
Phones Jack
This jack is used to connect the headphones.
(Connecting the headphones will not mute the output jacks).
[ KICK / HI-HAT ] Pedal Input Jack
USB Jack
DC Jack
Kick and Hi-Hat pedal input jacks.
This port is used to connect all external device.
Connect to a DC 12V power adaptor.
(AsspecifiedonPAGEE06)
[ Pan ] button
[ Volume ] button
Speakers
This button is used to change the pan of all
pad.
This button is used to change the volume of
pad.
[ Start / Stop ] button
[ Demo ] button
This button can be used to start or stop
playing all songs.
This button is used to start or stop a demo
song.
[ Gain ] button
This button is used to change the gain of
pad.
English
E05
PANEL CONTROL
Front Panel
Rear Panel
21
22
20
19
18
23
24 25 26 27
24
25
26
27
Connecting the Foot Pedals (1&2)
Note:
The supplies foot pedals can be connected to the unit to simultaneously play the drum
set’s hi-hat pedal or bass drum voices. They can also be assigned to play other voices.
Do not press the pedal while connecting it to the unit or while turning on the power.
(Connecting in this manner with the power on, the pedal’s function may be reversed.)
PHONES KICK HI HAT USB 12V
SETTING UP
Power Supply
Your digital drum set will operate on either batteries or the supplied power adaptor. Follow the
instructions below according to the power source you intend to use.
Using the AC-Adaptor
Connect the power adaptor to the DC IN jack
located on the rear panel of the unit, and plug the
AC power adaptor into an AC power outlet.
Do not use adaptors other than the one specified.
The technical specification of the adaptor is DC
12V output, center positive type.
Using Batteries
1. Open the battery compartment cover under
the unit.
2. Insert six “C” size, R14 SUM-2 or equivalent
batteries. When inserting the batteries, follow
the polarity markings in the illustration.
Note: We suggest using alkaline batteries.
3. Close the battery compartment securely.
Using Headphones
An optional set of stereo headphones can be connected
to the PHONES/OUTPUT jack located on the rear panel.
When headphones are connected to the jack, the
internal speakers of the unit will switch off automatically
(Perfect for private practice or late night playing). If you
would prefer to use an external sound system, the
headphone jack can also be used to connect the digital
drum set to a stereo system or mixing console.
Turn off the power on all equipment before
making any connections.
Note:
E06
PHONES KICK HI HAT USB 12V
NOTE:
•
•
•
•
•
Power will be automatically drawn from the AC adaptor if an optional AC adaptor is connected while batteries are
installed in the instrument.
It is recommended that you replace worn batteries as soon as possible. When battery voltage drops, the display will
dim and / or the sound will become distorted, when this occurs, replace the batteries with a complete set of six new
batteries of the same type.
NEVER mix old and new batteries, different types of batteries (alkaline, magnesium, etc.), different brand batteries or
batteries from the same brand but of different types. Misuse may cause the instrument to become hot, result in fire,
or battery leakage.
Also, to prevent damage due to battery leakage, remove all the batteries from the instrument when it is not to be
used for an extended period of time.
If batteries are installed in this instrument, and the instrument is unused for a long period, they will loose their power.
CAUTION:
English
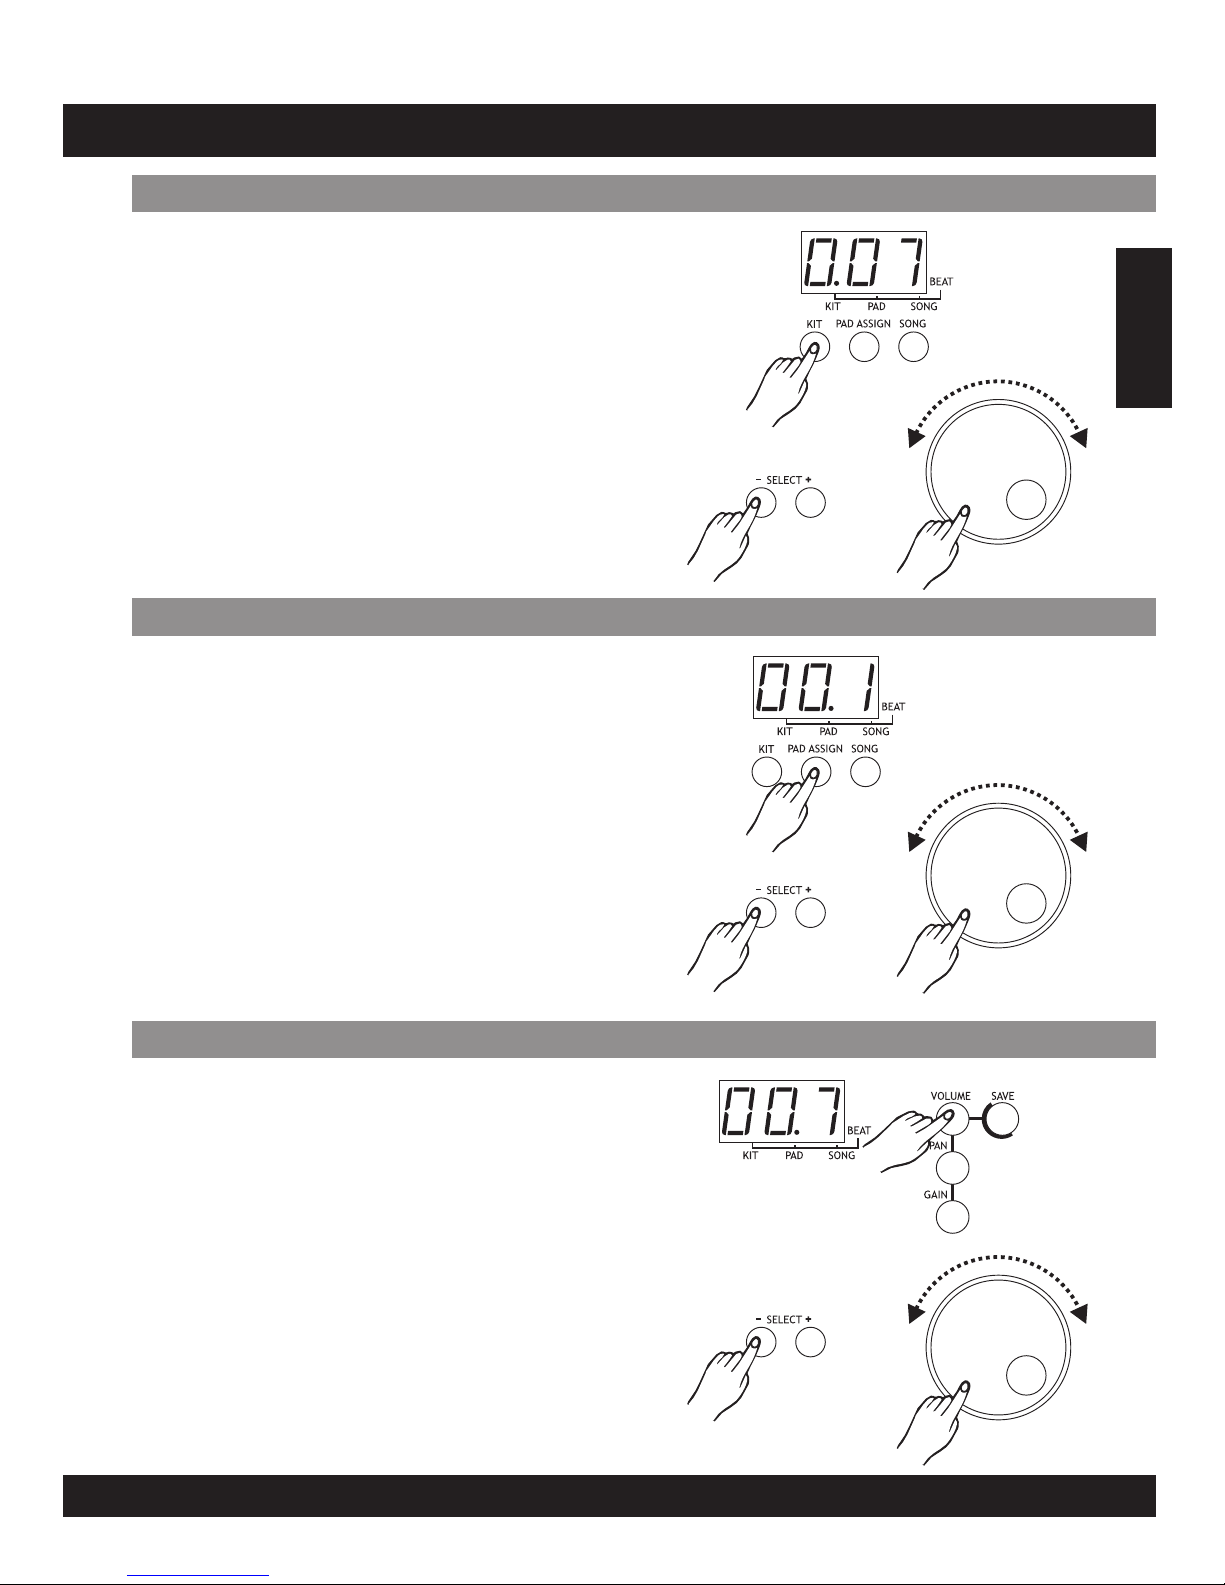
Kit menu is the default menu after powering the unit on
the default value is 001.
Press the [kit] button to enter a kit menu. The 3-digit
LED will display the current kit number with the
corresponding menu indicator illuminating. As shown
on the illustration. The buttons select [+] / [-] or [dial]
can be used to select any kit (1-30, loop) as the
current kit.
Press the [ volume ] button to enter the pad assign
menu. If the pad assign menu is selected, the
corresponding menu indicator will be lit up.
In this menu, the 3-digit LED will display the volume of
current pad, which can be selected by pressing the pad
button on the top panel or by pad striking. The select
[+] / [-] buttons or [dial] can be used to select the
volume (0-9, loop) for the current pad.
Press the pad assign button to enter pad assign menu.
Default value will be the voice value of crash pad based
on different kits selected. For example, if kit 001 has
been selected, then press pad assign, the value on LED
will be 96, as this is the voice value on crash pad.
If the pad assign menu is selected the corresponding
voice will be indication on the LED.
In this menu, the 3-digit LED will display the voice
number of the current pad, which can be selected by
pressing this pad button on the top panel or by pad
striking. The select [+] / [-] or [dial] can be used to
select any voice (1-215, loop) buttons for the current
pad.
E07
Selecta DrumKit
SetPad Voice
SetPad Volume
English
FUNCTION

SetPad Pan
Press the [pan] button to enter the pad assign menu. If
the pad assign menu is selected, the corresponding
menu indicator will be lit up.
In this menu, the 3-digit LED will display the pan of the
current pad, which can be selected by pressing the pad
assign button on the top panel or by pad striking. The
select [+] / [-] buttons or [dial] can be used to select
the pan (0-9, loop) for the current pad.
English
E08
SetPad Gain
Press the [gain] button to enter the pad assign menu. If
the pad assign menu is selected, the corresponding
menu indicator will be lit up.
In this menu, the 3-digit LED will display the gain of the
current pad, which can be selected by pressing the pad
assign button on the top panel or by pad striking. The
select [+] / [-] buttons or [dial] can be used to select
the pan (0-9, loop) for the current pad.
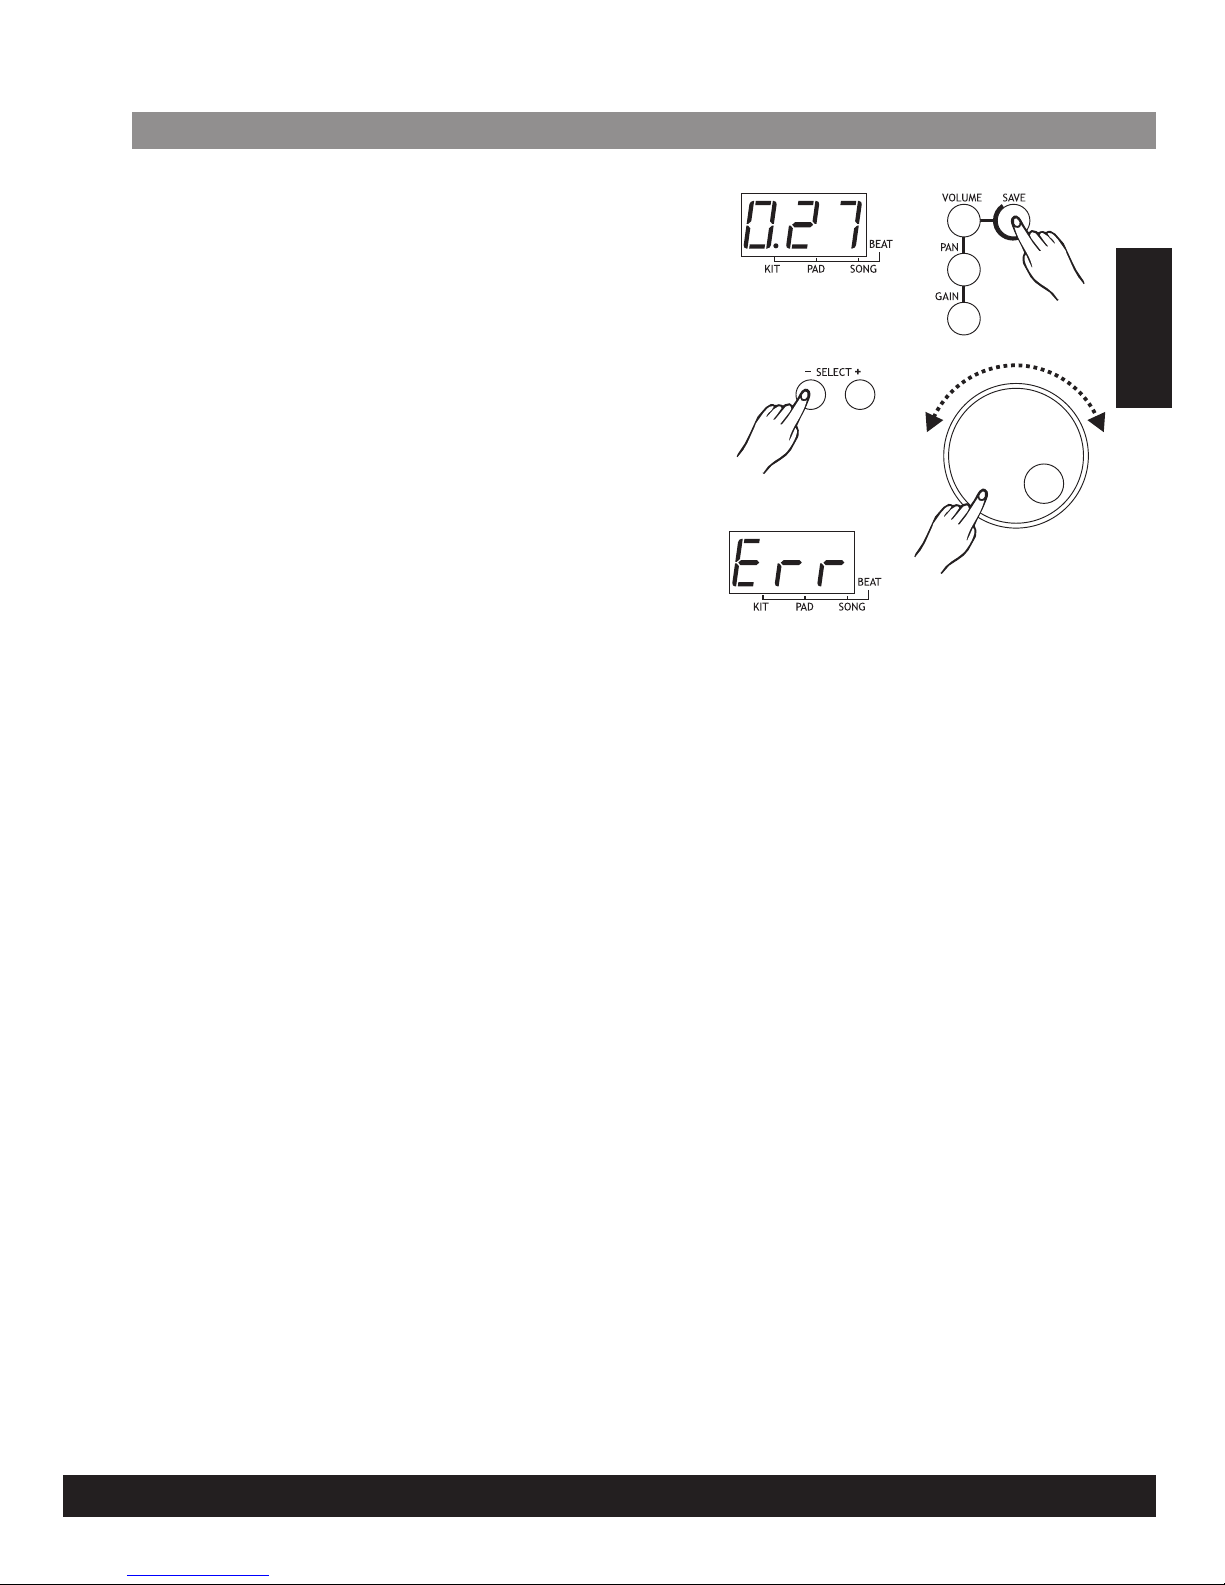
SaveKit
Press the [save] button to enter the kit save menu. The
select [+] / [-] buttons or [dial] can be used to select a
user kit (21-30, loop) on the current kit setting. During
the kit selection, the user kit number will keep flashing.
Press the [save] button again; the current kit setting
will be saved to the selected kit. The unit will suspend
the kit menu and select this user kit as the current one,
if all the data has been saved successfully.
If saving has failed due to error, an ‘Err’ will appear on
the LED.
The unsaved kit setting will be lost after changing the
kit.
Note:
E09
English
In the main volume menu, the digit on the far left side
of the LED will display the letter ‘L’. The two digits on
the right side will display the current main volume. The
select [+] / [-] buttons or [dial] can be used to adjust
the volume (0-9, not loop). This value will be auto-saved
after adjusted.
In the accompaniment volume menu, the digit on the
left side of the LED will display the letter’A’. The two
digits on the right side will dispaly the current
accompaniment volume. The select [+] / [-] buttons or
[dial] can be used to adjust the volume (0-9, not loop).
This value will be auto-saved after adjusted.
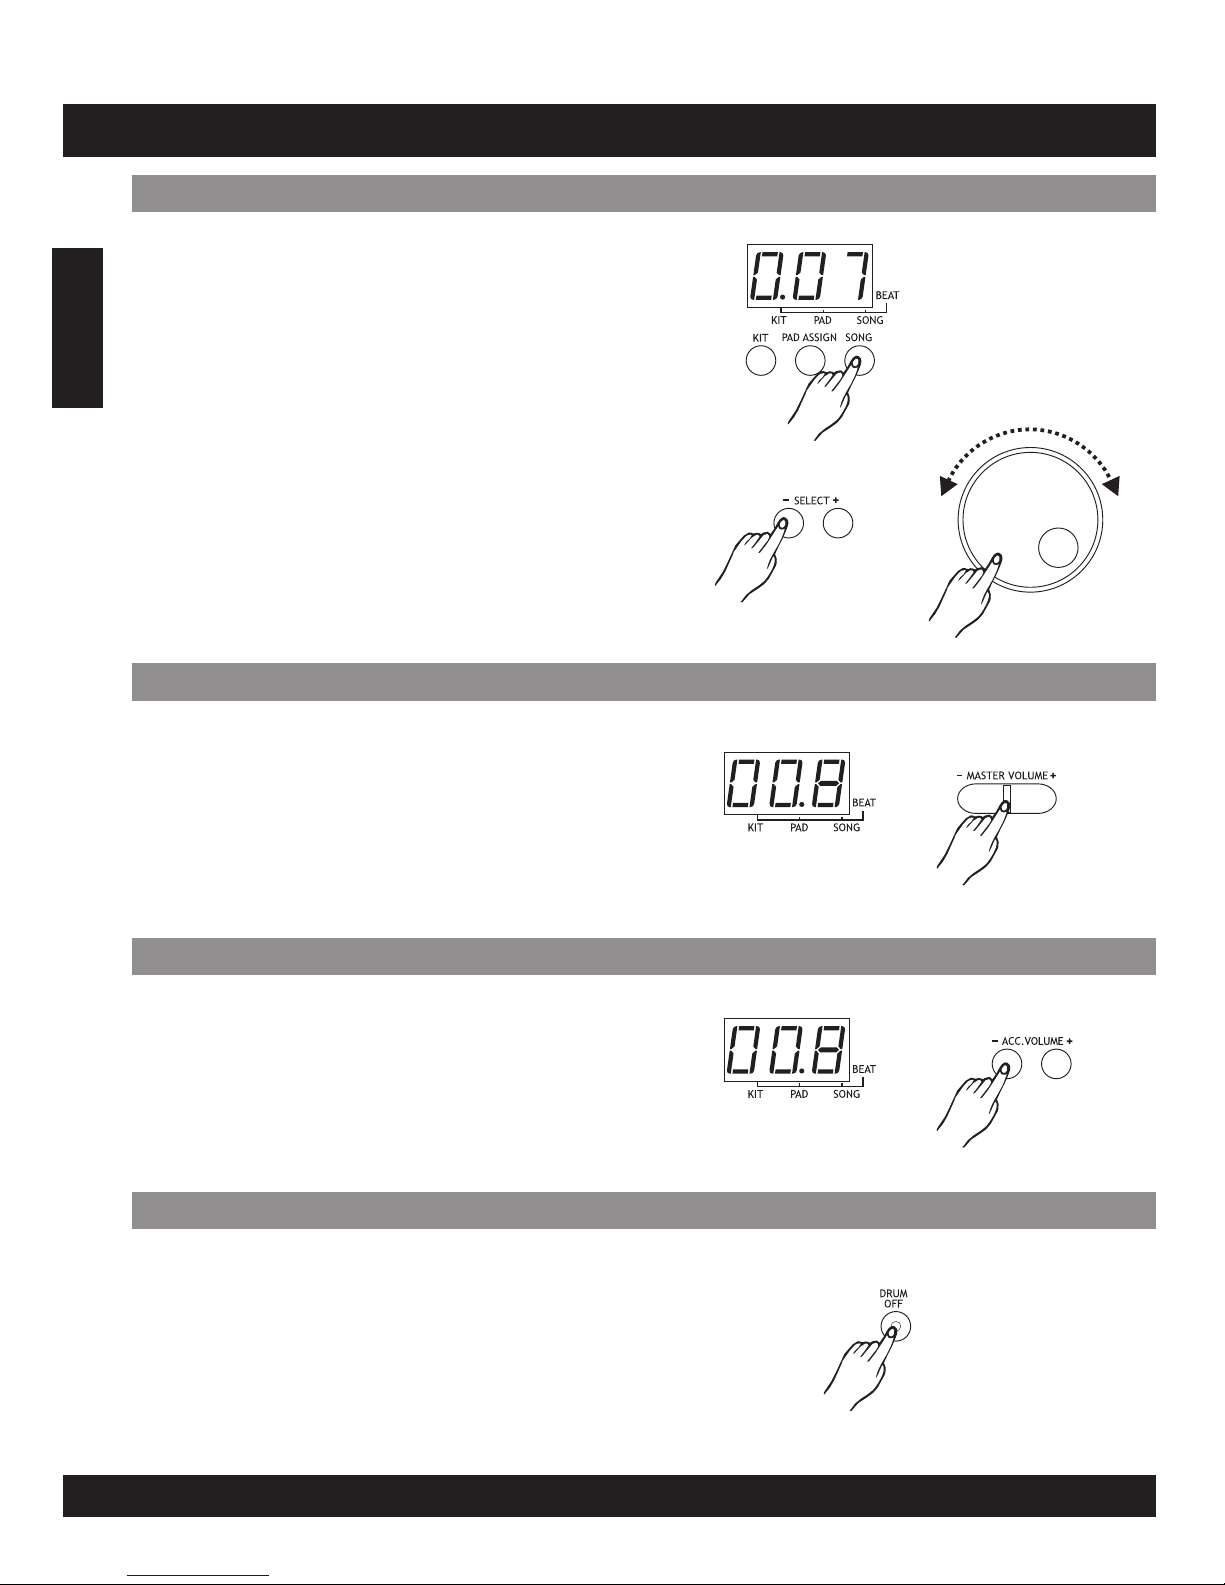
Press the [song] button to enter the song menu. The
default value is 001. The 3-digit LED will display the
current song number with the corresponding menu
indicator lit up. The select [+] / [-] buttons or [dial] can
be used to select the current song (1-100, loop). If
first 80 style playing loop. Press the [start / stop]
button to start or stop the song player. If the song is
switched while it’s playing, the new song will not start
until the end of the current measure.
Each song has its own default tempo and drum kit, the
song player will begin at the current kit and the current
tempo, from the beginning of the song play
E10
OPERATION
PlaySong
AdjustMain Volume
AdjustAccompaniment Volume
Pressing the [drum off] button will enable or disable the
drum off function when a song is playing. If the drum off
is enabled, the drum voice will be turned off and the
drum off indicator will be lit. This function is quite useful
for practicing.
DrumOff
English
Indice
Lingue:


