SPANARCI SANDY 2000 Manuale utente

SANDY 2000
AIR INFLATOR
Read this manual carefully and keep it for future reference.
User Manual

Thank you for choosing Spanarci.
Contents
Thank you for purchasing the Spanarci Sandy 2000 air inflator. With a large LED screen and easy-to-use interface, this excellent air inflator has a
wide range of applications.
1. PRODUCT OVERVIEW
2. PACKAGE CONTENTS
3. BATTERY LEVEL INDICATOR & CHARGING
4. TURNING THE INFLATOR ON/OFF
5. CONNECTING THE AIR TUBE AND NOZZLE
6. DETECTING THE CURRENT PRESSURE
03
04
05
07
08
10
- - - - - - - - - - - - - - - - - - - - - - - - - - - - - - - - - - - - - - - - - - - - - - - - - - - - - - - - - - - - - - - - - - - - - - - - - - - - - - - - - - - -
- - - - - - - - - - - - - - - - - - - - - - - - - - - - - - - - - - - - - - - - - - - - - - - - - - - - - - - - - - - - - - - - - - - - - - - - - - - - - - - - - - - -
- - - - - - - - - - - - - - - - - - - - - - - - - - - - - - - - - - - - - - - - - - - - - - - - - - - - - - - - - - - - - - - - - - - -
- - - - - - - - - - - - - - - - - - - - - - - - - - - - - - - - - - - - - - - - - - - - - - - - - - - - - - - - - - - - - - - - - - - - - - - - - - -
- - - - - - - - - - - - - - - - - - - - - - - - - - - - - - - - - - - - - - - - - - - - - - - - - - - - - - - - - - - - - - - - - - - -
- - - - - - - - - - - - - - - - - - - - - - - - - - - - - - - - - - - - - - - - - - - - - - - - - - - - - - - - - - - - - - - - - - - - - -
- 01 -

7. DETERMINING THE RIGHT PRESSURE VALUE
8. PRESET PRESSURE VALUE
9. LIGHT
10. INFLATING
11. DISCONNECTING THE AIR TUBE
12. POWER BANK FUNCTION
13. TROUBLESHOOTING
14. SPECIFICATIONS
15. SAFETY INSTRUCTIONS
10
13
15
16
17
18
19
22
23
- - - - - - - - - - - - - - - - - - - - - - - - - - - - - - - - - - - - - - - - - - - - - - - - - - - - - - - - - - - - - - - - - -
- - - - - - - - - - - - - - - - - - - - - - - - - - - - - - - - - - - - - - - - - - - - - - - - - - - - - - - - - - - - - - - - - - - - - - - - - - - - - - - -
- - - - - - - - - - - - - - - - - - - - - - - - - - - - - - - - - - - - - - - - - - - - - - - - - - - - - - - - - - - - - - - - - - - - - - - - - - - - - - - - - - - - - - - - - - - - - - - -
- - - - - - - - - - - - - - - - - - - - - - - - - - - - - - - - - - - - - - - - - - - - - - - - - - - - - - - - - - - - - - - - - - - - - - - - - - - - - - - - - - - - - - - - - - - -
- - - - - - - - - - - - - - - - - - - - - - - - - - - - - - - - - - - - - - - - - - - - - - - - - - - - - - - - - - - - - - - - - - - - - - - - - - -
- - - - - - - - - - - - - - - - - - - - - - - - - - - - - - - - - - - - - - - - - - - - - - - - - - - - - - - - - - - - - - - - - - - - - - - - - - - - - - - - -
- - - - - - - - - - - - - - - - - - - - - - - - - - - - - - - - - - - - - - - - - - - - - - - - - - - - - - - - - - - - - - - - - - - - - - - - - - - - - - - - - - - -
- - - - - - - - - - - - - - - - - - - - - - - - - - - - - - - - - - - - - - - - - - - - - - - - - - - - - - - - - - - - - - - - - - - - - - - - - - - - - - - - - - - - - - -
- - - - - - - - - - - - - - - - - - - - - - - - - - - - - - - - - - - - - - - - - - - - - - - - - - - - - - - - - - - - - - - - - - - - - - - - - - - - - - - - - -
- 02 -

1. Battery indicator
2. Pressure unit
3. Pressure value
4. Preset mode
5. Power button
6. Settings button
7.
8.
9.
10.
11.
12.
“+” button
“-” button
Light button
USB-A port
USB-C port
Air outlet
1. PRODUCT OVERVIEW
- 03 -
1
2 4
3 5 6 7 8 9
10 11 12

2. PACKAGE CONTENTS
- 04 -
USB charging
cable × 1 Charger × 1
User manual
× 1
Sandy 2000
Air inflator × 1
Storage bag × 1
Needle valve
adaptor × 1
Schrader-Presta
valve adaptor × 1
Warranty Card
× 1
Warranty Card
Tapered adaptor × 2
Air tube × 1
20W

Battery Level Indicator
The battery level is shown by four bars, with each bar representing 25%.
1 bar = under 25%
2 bars = between 25% and 50%
3 bars = between 50% and 75%
4 bars = between 75% and 100%
Note:The battery indicator will flash when the battery level is below 20%.
3. BATTERY LEVEL INDICATOR & CHARGING
- 05 -

- 06 -
Charging
Fully charge the inflator before using it for the first time. Please use the equipped certified PD20W charger and charging
cable to charge the tire inflator.
While charging:
1 bar flashing = under 25%
1 bar solid, 2nd bar flashing = between 25% and 50%
2 bars solid, 3rd bar flashing = between 50% and 75%
3 bars solid, 4th bar flashing = 75% and 100%
All 4 bars solid = fully charged
Note:
1. The inflator can not be used while charging.
2. Make sure to use a certified charger.

ON
Long-press for 1.5 seconds to turn on.
OFF
When the inflator is turned on, long press 1.5 seconds to turn off.
The inflator will automatically turn off in the cases below:
1. After 1.5 minutes of inactivity.
2. When the charging cable is disconnected during charging.
3. When the inflator is being used as a power bank, after disconnecting the other device.
4. Inflate over 2 minutes when the target pressure value is below 5psi.
5. Inflate over 2 minutes when the target pressure value is above or equates 120psi.
4. TURNING THE INFLATOR ON/OFF
- 07 -

Schrader Valve
Tires on cars, motorcycles, e-bikes, and most mountain bikes use a Schrader valve.
To inflate: The inflator can be directly connected to a Schrader valve to start inflating.
To deflate: Use an proper tool (such as 4mm Allen wrench) to press the pin inside the air valve to release air.
5. CONNECTING THE AIR TUBE AND NOZZLE
- 08 -
Valve Type
Inflation Adapter
Presta Valve Adapter
Road bicycles and certain mountain bikes use a
Presta valve which requires the included
Presta valve adapter to be used.
To inflate:
1.
2.
3.
To deflate: Unscrew the ring of the tire’s Presta
valve, and press the valve stem down to release air.
Connect the Presta valve adapter to the Schrader
valve of the air tube.
Unscrew the ring of the Presta valve of the tire.
Connect the Presta valve adapter to the tire’s
Presta valve to start inflating.
- 09 -
Valve Type
Inflation Adapter
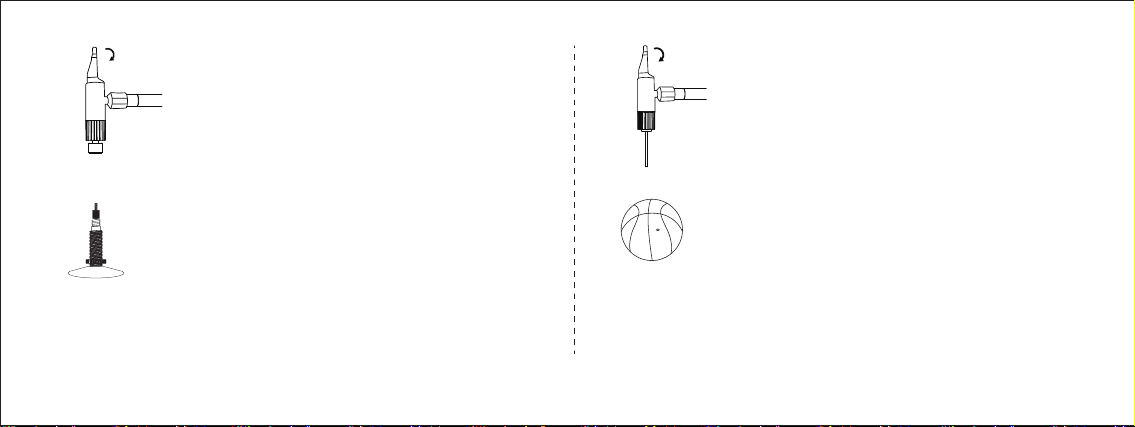
Needle Valve Adapter
To inflate balls like basketballs and footballs, the
included needle valve adapter will need to be used.
To inflate: Screw the needle valve adapter onto the
Schrader valve adapter, then insert the needle into
the valve of the ball to start inflating.
To deflate: Insert the needle valve adapter into the
valve of the ball, and gently apply pressure to the
ball to release air.
Valve Type
Inflation Adapter
Indice


