Sparkfun Electronics WS2812 Manuale utente

WS2812 Breakout Hookup Guide
Introduction
The addressable WS2812 and WS2812B are unassuming RGB LEDs with an integrated control circuit hidden
underneath. We love the simplicity of this little IC/LED combo. It's at the heart of a number of products. To name a
few, the WS2812B is included in the simple WS2812B Breakout Board.
Sewable LEDs
The LilyPad Pixel shares the same circuit as the breakout board, but it comes on a circular, purple LilyPad board.
These are perfect for sewing onto clothing or other fabric, and embedding into an e-textiles project.
SparkFun RGB LED Breakout - WS2812B
BOB-13282

LED Strips
The WS2812B serves as the heart and soul of a variety of LED strips. These strips come in sealed and unsealed:
5 meter sealed, 1m sealed, 5m bare, and 1m bare.
LilyPad Pixel Board
DEV-13264
LED RGB Strip - Addressable, Sealed (5m)
COM-12028
LED RGB Strip - Addressable, Sealed (1m)
COM-12027
LED RGB Strip - Addressable, Bare (5m)
COM-12026
LED RGB Strip - Addressable, Bare (1m)
COM-12025

Looking for smaller, higher density strips, or ones that emit on the side of the strip? The WS2812B's can also be
manufactured in smaller packages such as the ones listed below.
Note: While APA102's are not compatible with the WS2812's, the APA104's are compatible with the
WS2812B's!
Skinny LED RGB Strip - Addressable, 1m,
144LEDs (SK6812)
COM-14732
Skinny Side-Lit LED RGB Strip - Addressable,
1m, 60LEDs (SK6812)
COM-14731
Skinny LED RGB Strip - Addressable, 1m,
60LEDs (SK6812)
COM-14730
LED RGB Strip - Addressable, Sealed, 1m
(APA104)
COM-15205
LED RGB Strip - Addressable, Bare, 1m
(APA104)
COM-15206

Matrices, Rings, and Stick
Depending on the project, they can also be populated on PCBs as a matrix, ring, or stick. These can be useful for
marquees or adding unique animations to your project!
Warm White, Cool White, and Amber
Looking for a more natural white instead of mixing RGB? There are also WS2812's that have warm white, cool
white, and amber color. Add ambient or task lighting to your projects with the tri-color strips.!
Flexible LED Matrix - WS2812B (8x32 Pixel)
COM-13304
NeoPixel NeoMatrix 8x8 - 64 RGB LED
COM-12662
NeoPixel Ring - 16 x WS2812 5050 RGB LED
COM-12664
NeoPixel Stick - 8 x WS2812 5050 RGB LED
COM-12661
NeoPixel Ring - 24 x WS2812 5050 RGB LED
COM-12665
Pimoroni Unicorn HAT
DEV-14037

Through-Hole Packages
Lastly, if you require WS2812B LEDs in through-hole form, they are also available as a through-hole package. The
size of the bulb can either be 8mm or 5mm. The LEDs can be diffused or clear depending on how they were
manufactured: Diffused 8mm (5 Pack), Diffused 5mm (5 Pack), and Clear 5mm (5 Pack).
White Tri-Color LED Strip - Addressable, Sealed
(1m)
COM-13898
LED - RGB Addressable, PTH, 5mm Diffused (5
Pack)
COM-12986
LED - RGB Addressable, PTH, 5mm Clear (5
Pack)
COM-12999
LED - RGB Addressable, PTH, 8mm Diffused (5
Pack)
COM-12877

What makes the WS2812B really special is the way its controlled. The IC embedded into the LED communicates
via a very unique one-wire interface. With the help of some libraries, they're really very easy to control. Plus
they're chain-able -- the output of one LED can be connected to the input of another to create strips of hundreds of
LEDs. The more boards you have linked together, the fancier your animations can be!
In this tutorial we're going to get you familiar with the workings of the WS2812 and WS2812B. We'll go over some
of the ways you might want to hook up to the breakout board, LilyPad, or strips. And we'll close the tutorial out with
some example Arduino code.
Required Materials
WS2812-Based LED Board or Strip
Stating the obvious: you'll need a WS2812-based board or strip. The more the merrier! In the example hookup,
we'll be linking together five breakout boards, but the example should be adaptable to the other WS2812-based
products. Grab however many you think you'll need for your project, regardless of how many you have, it's not
enough.
Microcontroller
Aside from the star of the show, you'll also need a microcontroller. Something that can send the series of 1's and
0's used to control the LEDs. Our go-to is the classic Arduino Uno, but any Arduino board should do.
Limitation on AVR-based Microcontrollers : If you are using an AVR-based microcontroller for large LED
installations, there is a limitation with the number of WS2812s LEDs used. This is dependent on the
Arduino Pro Mini 328 - 5V/16MHz
DEV-11113
Pro Micro - 5V/16MHz
DEV-12640
Arduino Mega 2560 R3
DEV-11061
Arduino Uno - R3 SMD
DEV-11224

microcontroller's memory and the size of the program. For an ATmega328P-based microcontroller (i.e.
RedBoard Programmed with Arduino, Arduino Uno, Arduino Pro Mini, etc.), it can be up to ~300-400 LEDs.
Check out Katerborg's note about using WS2812's with different Arduinos:
KATERBORG: POWERING LOTS OF LEDS FROM ARDUINO
If you want to get really crazy, hackaday demonstrates how to power 1000 NeoPixels with the Arduino’s
limited RAM.
HACKADAY: DRIVING 1000 NEOPIXELS WITH 1K OF ARDUINO RAM
Or you can try to adapt the example code to your favorite microcontroller. Teensy development boards are an
excellent choice when using a large number of WS2812 LEDs.
Note: Depending on the amount of WS2812 LEDs that are being used with the Teensy, you may need to use
the octows2811 adapter board:
PJRC: OCTOWS2811 LED LIBRARY
Teensy LC
DEV-13305
Teensy 3.6
DEV-14057
Teensy 3.5
DEV-14055

Wires
You'll also need some way to connect between the board and an Arduino. You could use a combination of male
headers and breadboard (solderless or solderable). Or you could just go with a few pieces of hookup wire or 3-pin
JST-SM pigtail connectors.
Tools
In order to get a good, solid, electrically-sound connection to the breakout boards, you'll need to solder to the
pins. That means you'll need at least a basic soldering iron, solder, and general soldering accessories. Check out
our how to solder tutorial for help, if this is you first time soldering.
SparkFun Solder-able Breadboard
PRT-12070
Break Away Headers - Straight
PRT-00116
LED Strip Pigtail Connector (3-pin)
CAB-14575
Breadboard - Translucent Self-Adhesive (Red)
PRT-11317
Solder Lead Free - 100-gram Spool
TOL-09325
Soldering Iron - 30W (US, 110V)
TOL-09507

Suggested Reading
These boards aren't too hard to use. If you've done anything with Arduino before, you'll be prepared to work with
the WS2812. If you're not exactly sure what this "Arduino" thing is, or if you're not familiar with the topics below,
consider reading their tutorials:
How to Solder: Through-Hole Soldering
This tutorial covers everything you need to know about
through-hole soldering.
Binary
Binary is the numeral system of electronics and
programming...so it must be important to learn. But,
what is binary? How does it translate to other numeral
systems like decimal?
How to Power a Project
A tutorial to help figure out the power requirements of
your project.
How to Use a Breadboard
Welcome to the wonderful world of breadboards. Here
we will learn what a breadboard is and how to use one
to build your very first circuit.
What is an Arduino?
What is this 'Arduino' thing anyway?

WS2812 Hardware Overview
Note: Make sure to not confuse the WS2812-based IC with the APA102 addressable LEDs. The APA102
LEDs are very similar to WS2812s with a few caveats: APA102s can be controlled with a standard SPI
interface, and they have an extremely high PWM frequency. The APA102 requires the FastLED library to
control. The FastLED library does support the WS2812 chipset. Try checking out the Lumenati Hookup Guide
that uses the APA102-based LEDs for more information.
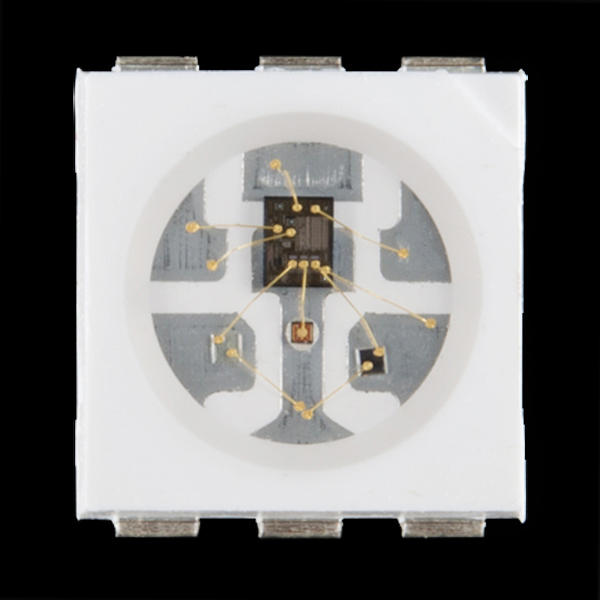
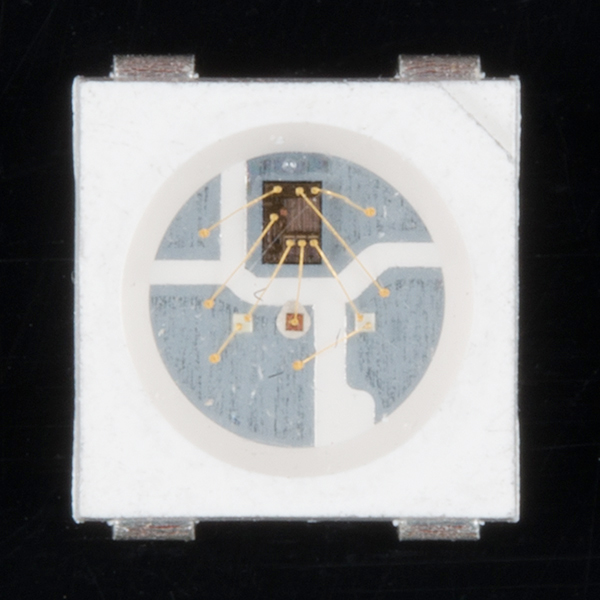
The WS2812-based LED is much more than meets the eye. It may look like a common 5050-sized (5x5mm) LED,
but there's actually an integrated circuit embedded inside there too. If you look really hard, you can see the tiny
black chip hidden in there, along with minuscule gold wires connecting the chip to the LED. Below are images of
the WS2812 and WS2812B zoomed in.
Pretty nifty view at the guts of the WS2812. Another nifty view for the WS2812B.
The LED itself is like any RGB (Red/Green/Blue) LED. The brightness of each color can be adjusted using pulse-
width modulation to one of 256 different levels. That means there are 16,777,216 (256 ) possible combinations of
colors. You can produce any color from white to black (off), or salmon to sienna.
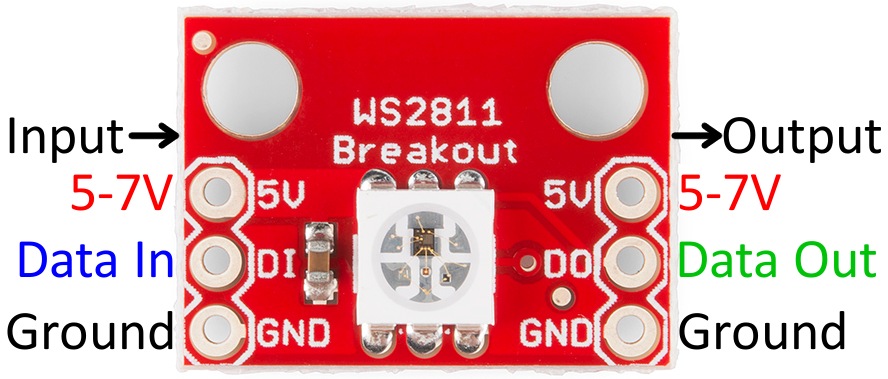
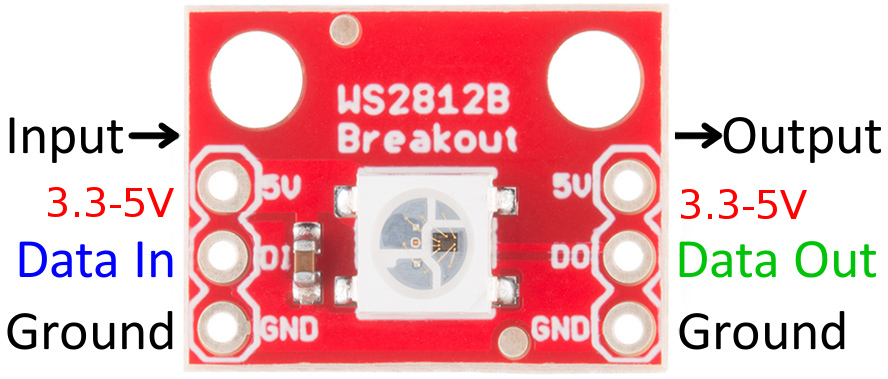
Breakout Board Pinout
The breakout board mounts that multi-talented LED onto a PCB, and breaks out the few pins required to control
the LED.
3
Indice


