SSHC TSSHC-3DNPSB-16A-115F Manuale utente
INS-TSSHC-3DNPSB-16A-115F-1210
For further information or to consult this guide on line,
please visit our Web site.
www.sshcinc.com
“TSSHC-3DNPSB-16A-115F”
Electronic thermostat
User’s guide
www.sshcinc.com
INS-TSSHC-3DNPSB-16A-115F-12102
Before installing and operating this product, the
owner and/or installer must read, understand and
follow these instructions and keep them handy
for future reference. If these instructions are not
followed, the warranty will be considered null
and void and the manufacturer deems no further
responsibility for this product. Moreover, the
following instructions must be adhered to in order
to avoid personal injuries or property damages,
serious injuries and potentially fatal electric shocks.
All electric connections must be made by a qualied
electrician, according to the electric and building
codes effective in your region. Do NOT connect
this product to a supply source other than what the
manufacturer specied and do not exceed the load
limits specied. Protect the heating system with
the appropriate circuit breaker or fuse. You must
regularly clean dirt accumulations on the thermostat.
Do NOT use uid to clean thermostat air vent. Do not
install thermostat in a wet place. However, installing
it in isolated walls is allowed.
WARNING WARNING

INS-TSSHC-3DNPSB-16A-115F-1210 3
1. Description
The TSSHC-3DNPSB-16A-115F non programmable electronic
thermostat can be used to control electric heating units such
as ENERJOY radiant ceiling panels, electric baseboards,
convectors, or aeroconvectors. It keeps the temperature of a
room at the requested set point with a high degree of accuracy.
The Automatic mode feature allows to this thermostat to be
Semi-programmable. This product is designed for installations
with electrical current - with a resistive load - ranging from
0A to 16 A (90 VAC to 240VAC). It possesses a user-friendly
interface. Furthermore, it gives you the possibility to control the
temperature of a room with great precision.
This Thermostat is not Compatible with the Following
Installations:
•electricalcurrenthigherthan16Awitharesistiveload(3840W
@240VAC,3330W@208VACand1920W@120VAC);
•centralheatingsystem;
•inductiveloadhigherthan3A.
Parts Supplied:
•one(1)thermostat;
•two(2)mountingscrews;
•four(4)solderlessconnectorssuitableforcopperwires.

INS-TSSHC-3DNPSB-16A-115F-12104
2. Installation
Selection of Thermostat Location
The thermostat must be mounted on a connection box on a wall
facing the heating unit, at around 1.2 m (4 feet) above the oor
level, on a section of the wall exempt from pipes or air ducts.
Do not install the thermostat in a location where temperature
measurements could be altered. For example:
•close to a window, on an external wall, or close to a door
leadingoutside;
•exposed directly to the light or heat of the Sun, a lamp, a
replaceoranyotherheatsource;
•closeorinfrontofanairoutlet;
•closetoconcealedductsorachimney;and
•in a location with poor air ow (e.g. behind a door), or with
frequentairdraftsconditions(e.g.headofstairs).
INS-TSSHC-3DNPSB-16A-115F-1210 5
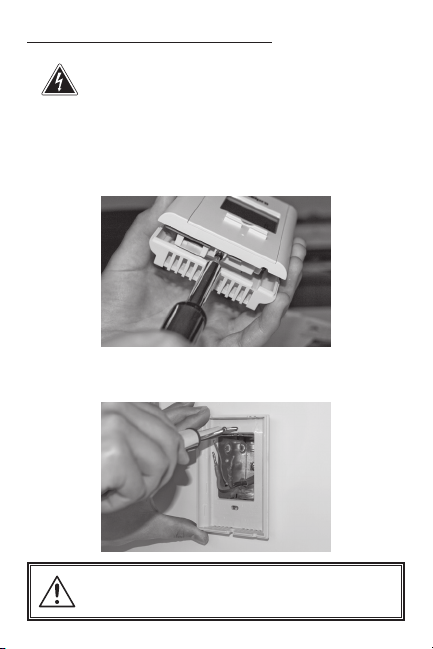
Thermostat Mounting and Connection
1. Cut off power supply on lead wires at the electrical
panel in order to avoid any risk of electric shock.
2.Ensurethattheairventsofthethermostatarecleanandclear
ofanyobstruction.
3.Usingascrewdriver,loosenthescrewretainingthemounting
baseandfrontpartofthethermostat.Removethefrontpart
ofthethermostatfromthemountingbasebytiltingitupward.
4.Alignandsecurethe mounting base tothe connectionbox
usingthetwoscrewssupplied.
Installation work and electrical wiring must be done
by qualied person(s) in accordance with all applica-
ble State/Country codes and standards.

INS-TSSHC-3DNPSB-16A-115F-12106
5.Take the wires from the wall through the hole at the base
of the thermostat and connect them using the supplied
solderless connectors. When making the connection with
aluminum wire, make sure that you are using connectors
identiedCO/ALR.Pleasenotethatthethermostatwiresdo
not have polarity. Therefore, the way they are connected is
notimportant.
Four-wire installation
6.Reinstall the front part of the thermostat on the mounting
baseandtightenthescrewatthebottomoftheunit.
7.Turnonthepower.
8.Setthe thermostat to the desired setting (see the following
section).
Installation work and electrical wiring must be done
by qualied person(s) in accordance with all applica-
ble State/Country codes and standards.
INS-TSSHC-3DNPSB-16A-115F-1210 7
3. Operation
Powering on for the rst time
When powering on for the rst time, the thermostat is initially set
to Day mode. The temperature is displayed in Fahrenheit and is
set at 105°F (41°C) by default.
Language (English/ French)
To switch the display from English to French and conversely,
press down the backlit button for 20 seconds. The display is set
in English by default.
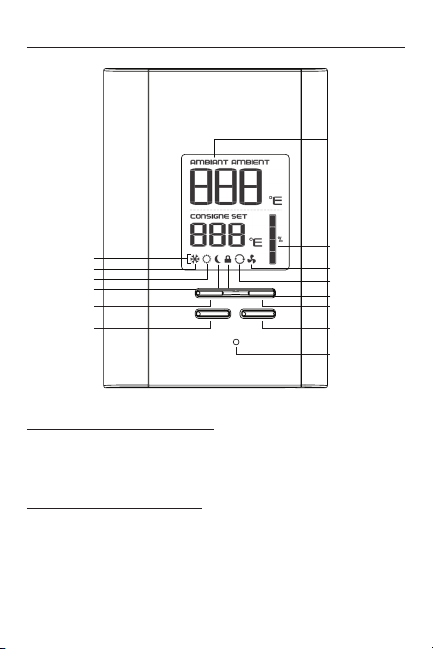
Ambient temperature/
Timer
Heating power used
indicator
Automatic mode
Lock mode
Fan mode
Button (+)
Pictograms
Frost-free warning
Day mode
Night mode
Button (-)
Day/Night button
Red heating indicator
Backlit button

INS-TSSHC-3DNPSB-16A-115F-12108
Backlit screen
The backlight screen lights up when you press down a button.
If you do not press down any button during 15 seconds, the
blacklight screen will turn off. It is possible to turn on the backlit
screen without modifying anything by pressing down the (+) or
(-) button once or by pressing down the Sun or Moon button
when the backlit screen is off. You can also turn on the backlit
screen by pressing down the backlit screen button.
Temperature set points
The gures displayed below the SET pictogram indicate the
temperature set point. It can be displayed in degrees Fahrenheit
or Celsius (see “Display in degrees Fahrenheit/Celsius”).
To adjust the set point, just press down the (+) button to
increase the value, or the (-) button to decrease it. Set points
can be adjusted by increments of 1°F or 1°C. To quickly scroll
through the set point values, press and hold down the button.
The minimum set point is 37°F (3°C), and the maximum set
point is 113°F (45°C).

INS-TSSHC-3DNPSB-16A-115F-1210 9
Day mode and Night mode
The thermostat includes a Day mode (Sun) and a Night mode
(Moon), both of them having their own independently adjustable
and recorded set point. The ambient temperature is displayed
above the set point, in degrees Fahrenheit or Celsius. When
switching from one mode to the other, the system will automati-
cally use the temperature set point corresponding to the Day/
Night mode selected. The standard factory set point adjustment
is 105°F (41°C) for the Day mode, and 90°F (32°C) for the Night
mode.
In order to manually switch from one mode to the other, press
down the Day or Night button and release it immediately.
In order to totally shut off power to the heater, thermostat
has to be in Day mode. Then, lower set point until the screen
displays the word ‘OFF’. Please note that when the word ‘OFF’
is displayed, the ‘frost-free’ minimum temperature feature is
disabled.
Night mode timer
The Night mode features a timer that automatically returns to
the Day mode after a selectable time period. This timer allows
the temporary use of a temperature set point. The standard
factory adjustment of the timer is 8 hours. With this adjustment,
the thermostat automatically returns to Day mode 8 hours after
being switched to the Night mode.
For example, if you want a night temperature lower than the
day temperature, both Day/Night modes set points will rst
have to be set at the desired temperatures. Before bedtime, the
Night mode temperature set point will be activated by switching
manually to the Night mode. The timer is set for the duration of
the night. The thermostat will automatically return to the Day
mode at the end of the night, and the Day mode temperature set
point, which is higher, will become effective at this time.

INS-TSSHC-3DNPSB-16A-115F-121010
Night mode timer adjustment procedure
1.First,switchto the Nightmode by pressingdown the Day/
Nightbuttonandreleasingitimmediately(pressitdowntwice
ifthebacklitscreenisoffandonceifthebacklitscreenison).
2.FromtheNightmode,simultaneouslypressdownthe(+)and
(-) buttons for more than 3 seconds. Then, the number of
programmedhours willbedisplayedbythe threeguresat
thetopofthescreenand‘‘HRS’’willbedisplayedinsteadof
thethreeguresatthebottomofthescreen.Then,youcan
releasethebuttons.
3.Ifneeded, adjustthetimer by pressingdownthe(+)button
to increase the value, or the (-) button to decrease it. The
adjustment range is from 1 hour to 999 hours. To quickly
scrollthroughtimervalues,pressandholddownthebutton.
4.Whentheadjustmentiscompleted,releasethebuttonsand
waitfor5secondstoexittheadjustmentfunction.Then,the
thermostatwillautomaticallyswitchtotheNightmode.
N.B. The Night mode timer will be automatically reinitialized to the
latest recorded value when switching from the Day mode
to the Night mode. It is not necessary to readjust the timer
every time you switch to the Night mode. The timer is also
reinitialized when this value is adjusted.
Once the timer has completed its cycle and when the thermo-
stat is in the Day mode, you must manually return to the Night
mode. If you want to automatically return to the Night mode, the
Automatic mode must be selected.
Indice
Altri manuali SSHC Termostato


