Stagg STP-710 Manuale utente

USER MANUAL
DIGITAL PIANO
STP-710


Using the Instruction Manual
Thank you for purchasing this Digital Piano. The use of high technology and the most advanced
sampling technique brings you high quality sound and enjoyment. The combination of digital piano
and electronic keyboard features let you perform perfectly. We hope this skilfully built digital piano
will able to explore your creativity, and brings you unlimited happiness and music enjoyment.
Before you use the piano, we recommend you to read through this manual. Please keep this
instruction manual for future reference.
Precautions
Please read the following carefully before use:
Do not expose the piano to high temperature, direct sunlight and excessively dusty places.
Do not place the piano too close to other electrical appliances such as television and radio or
it may cause interference.
Do not place the piano to excessive humidity area. Avoid putting container with liquid on top of
the piano, this will prevent the damage of the internal parts of the piano by flowing liquid.
Always unplug cables by gripping the plug firmly, but not pulling on the cable.
Do not apply excessive force to the switches and buttons.
When the piano is not in use or during a thunderstorm, disconnect the power supply.
Avoid adjusting the volume level to the maximum or to the levels that you feel uncomfortable, we
recommend you to limit the volume level to two-third of the max to prevent the damage of
audiory sense
Unplug the power cable before cleaning the piano, never connect or disconnect the power cable
with a wet hand.
Check and clean the power plug periodically.
To avoid damage to the piano and other devices to which it is connected, turn the power
switches of all related device off prior to connecting or disconnecting cables.
Clean the piano with a dry soft cloth, a slightly damp cloth may be used to remove dirt.
Never use cleaners such as thinner or alcohol. To prevent damage the surface of the LED display,
please use lens cleaning tissue to clean the display.
If the piano cable is damaged, do not use the piano, otherwise it may a fire or electrical hazard.
The piano may cause malfunction due to improper handling, if this occurs, switch off the piano
and switch on again after 30 seconds.
Do not attempted to disassemble or repair the piano by yourself, and do not modify the internal
parts. If the piano is not working properly, please contact approved repairer.
1

2
Contents
Digital Piano Set-up Guide
General Guide
The Connectors
- Using the AC power jack
- Using Headphones
- Using the AUX.OUT jack
- Using the Foot Pedals
- Using the MIDI IN/OUT ports
Operation
1. Power Switch & Volume
2. Voice/Dual Voice
3. Metronome
4. DSP (Digital Signal Processor)
5. Transpose
6. Tempo
7. Touch Response
8. Record & Playback
9. Demo Song
10. Foot Pedals
MIDI
- What is MIDI?
- What you can do with MIDI?
Specifications
Voice List
Demo Song List
3-5
6-7
8-9
8
8
8
9
9
10-14
10
10
10
11
11
11
12
12-13
13-14
14
15
15
15
16
17
17

Digital Piano Set-up Guide
1. Open the package, and check whether the following parts are available:
1. Piano body
2. Music stand
3. Right leg component
4. Left leg component
5. Back panel skirt
6. Foot pedal unit
7. Hand screw (4 pcs.)
8. Screws (8 pcs.)
9. Screw caps (8 pcs.)
10. Power cable stabling hook (2 pcs.)
3

Digital Piano Set-up Guide................Continued
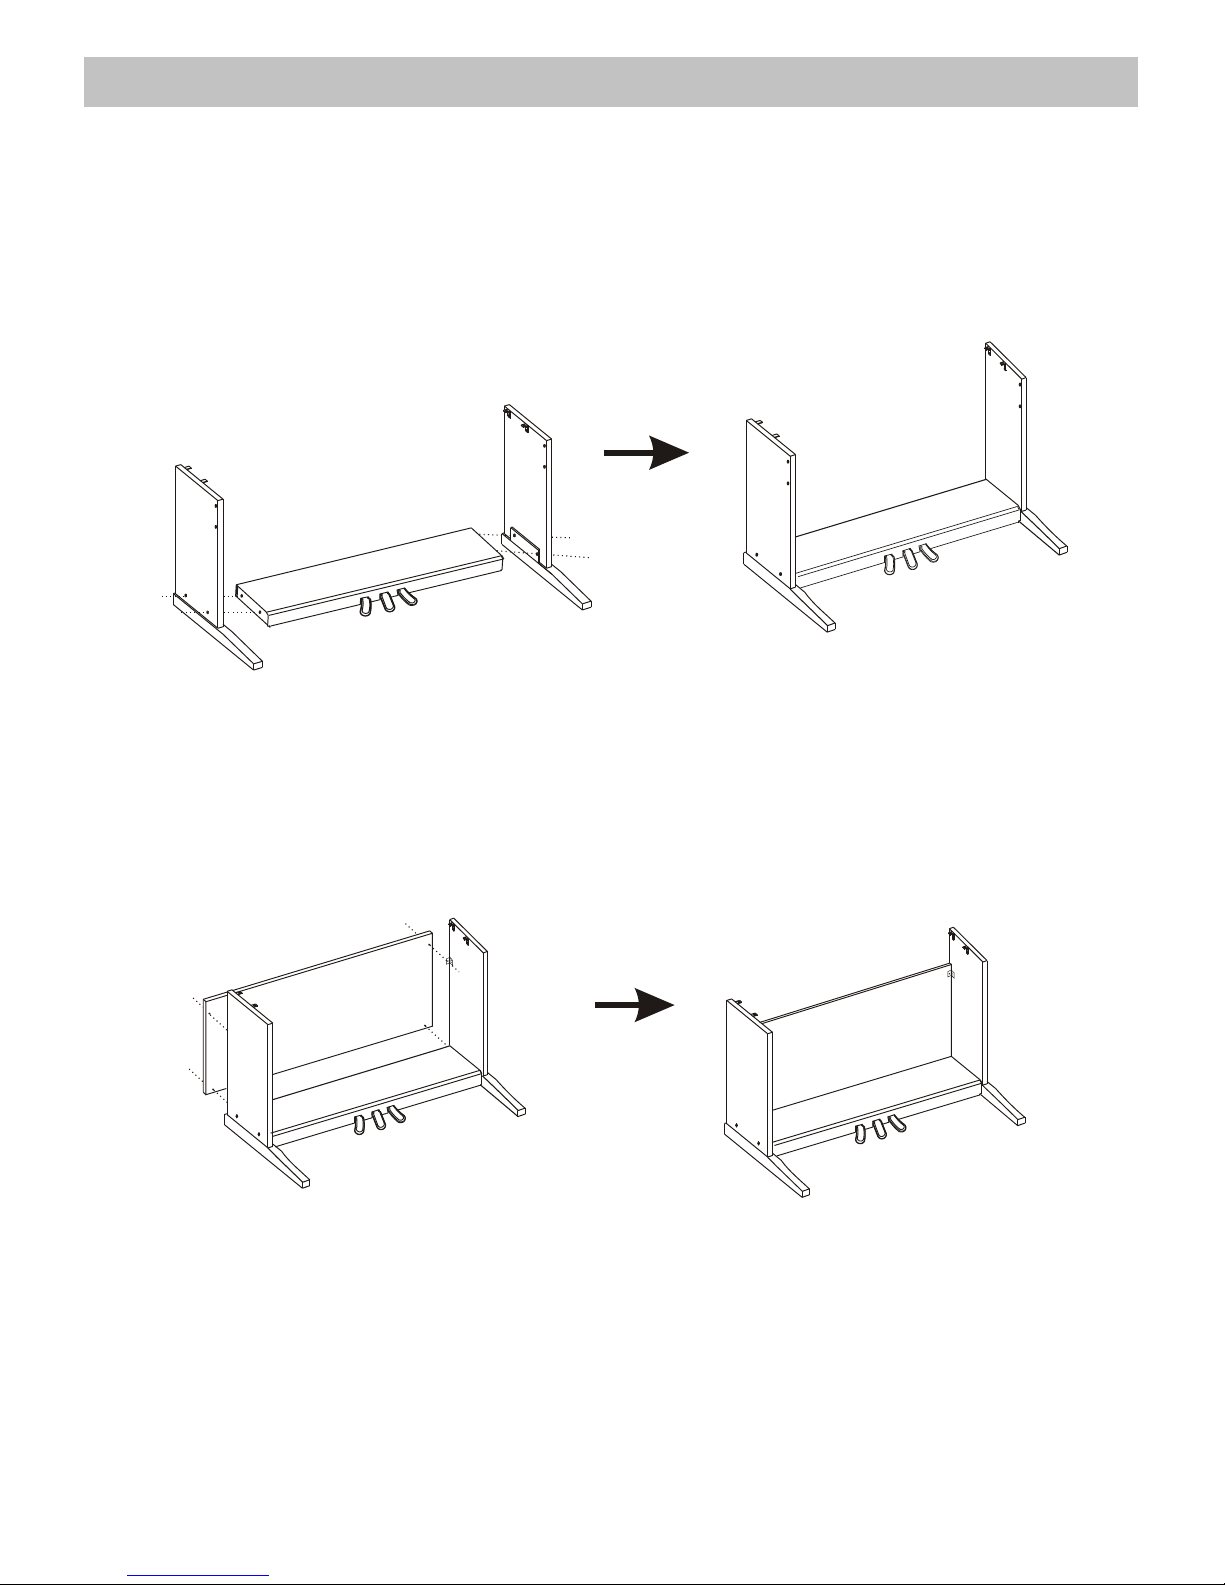
A. Put the foot pedal unit(6) in between the left and right legs components (3&4), use 4 pieces
of screws (2 on each side) to stable the legs onto the foot pedal unit.
(Make sure the direction of the placement is correct before screwing)
2. Follow the illustration below and finish off the set-up procedures.
B. Use 4 pieces of screws (2 on each side) to tighten the back panel skirt (5) onto the
assembly finished in Part A.
4

Digital Piano Set-up Guide................Continued
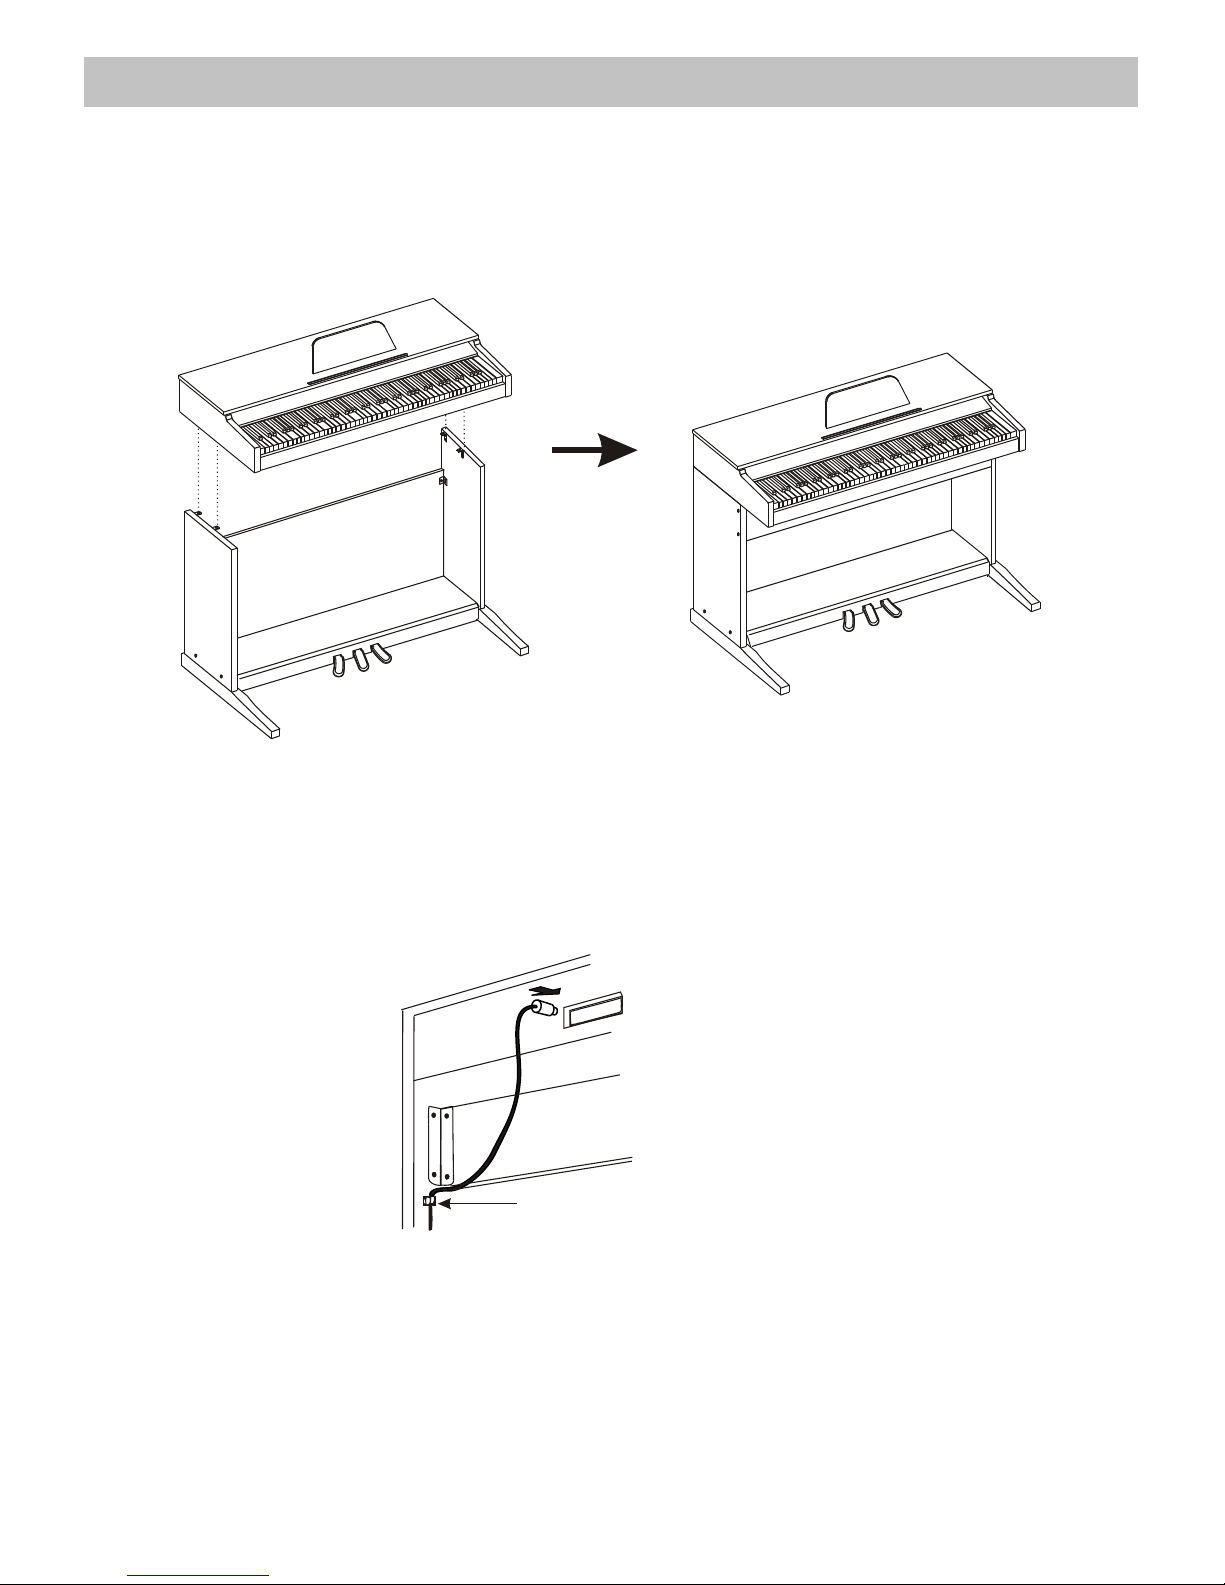
C. Put the piano body(1) on the top of the assembly finished in part B, use 4 pieces of hand
screws to stable afterward.
D. After the initial set-up, stick the cable stabling hook(10) on the internal side of the leg
component (see the below illustration for reference).
Cable stabling hook
5

General Guide
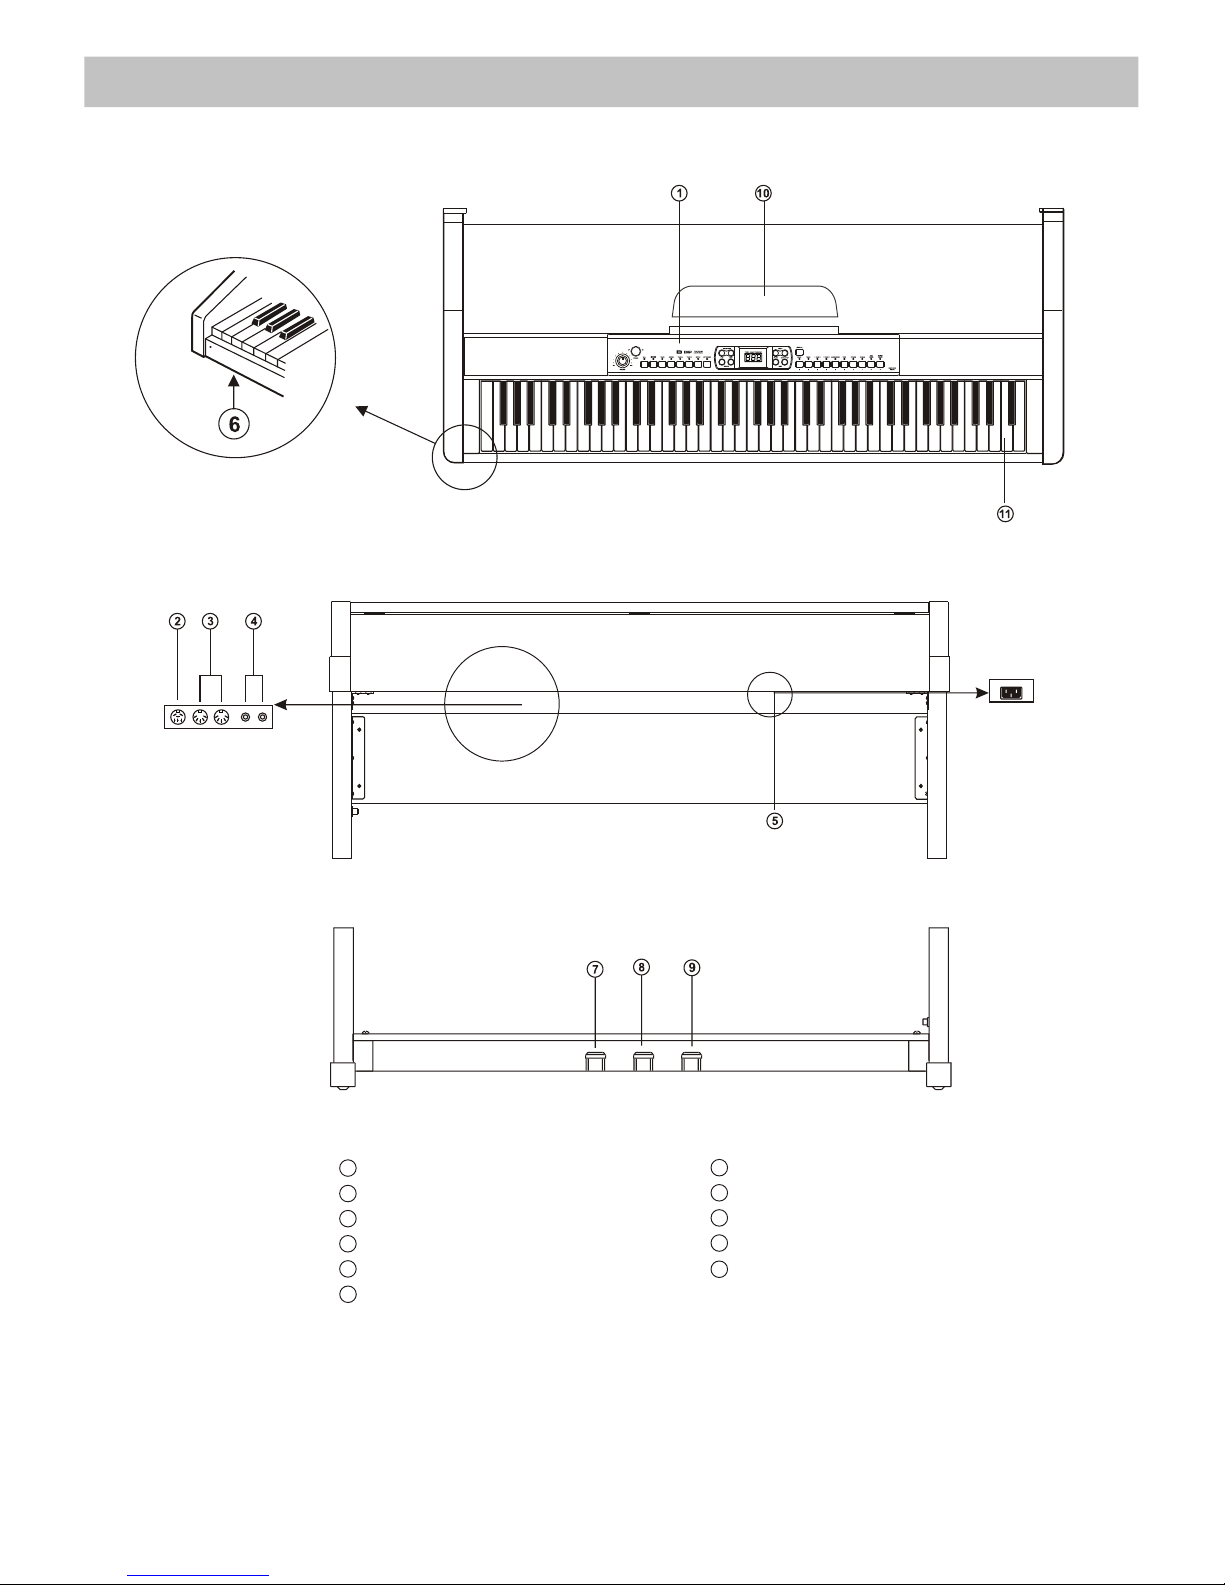
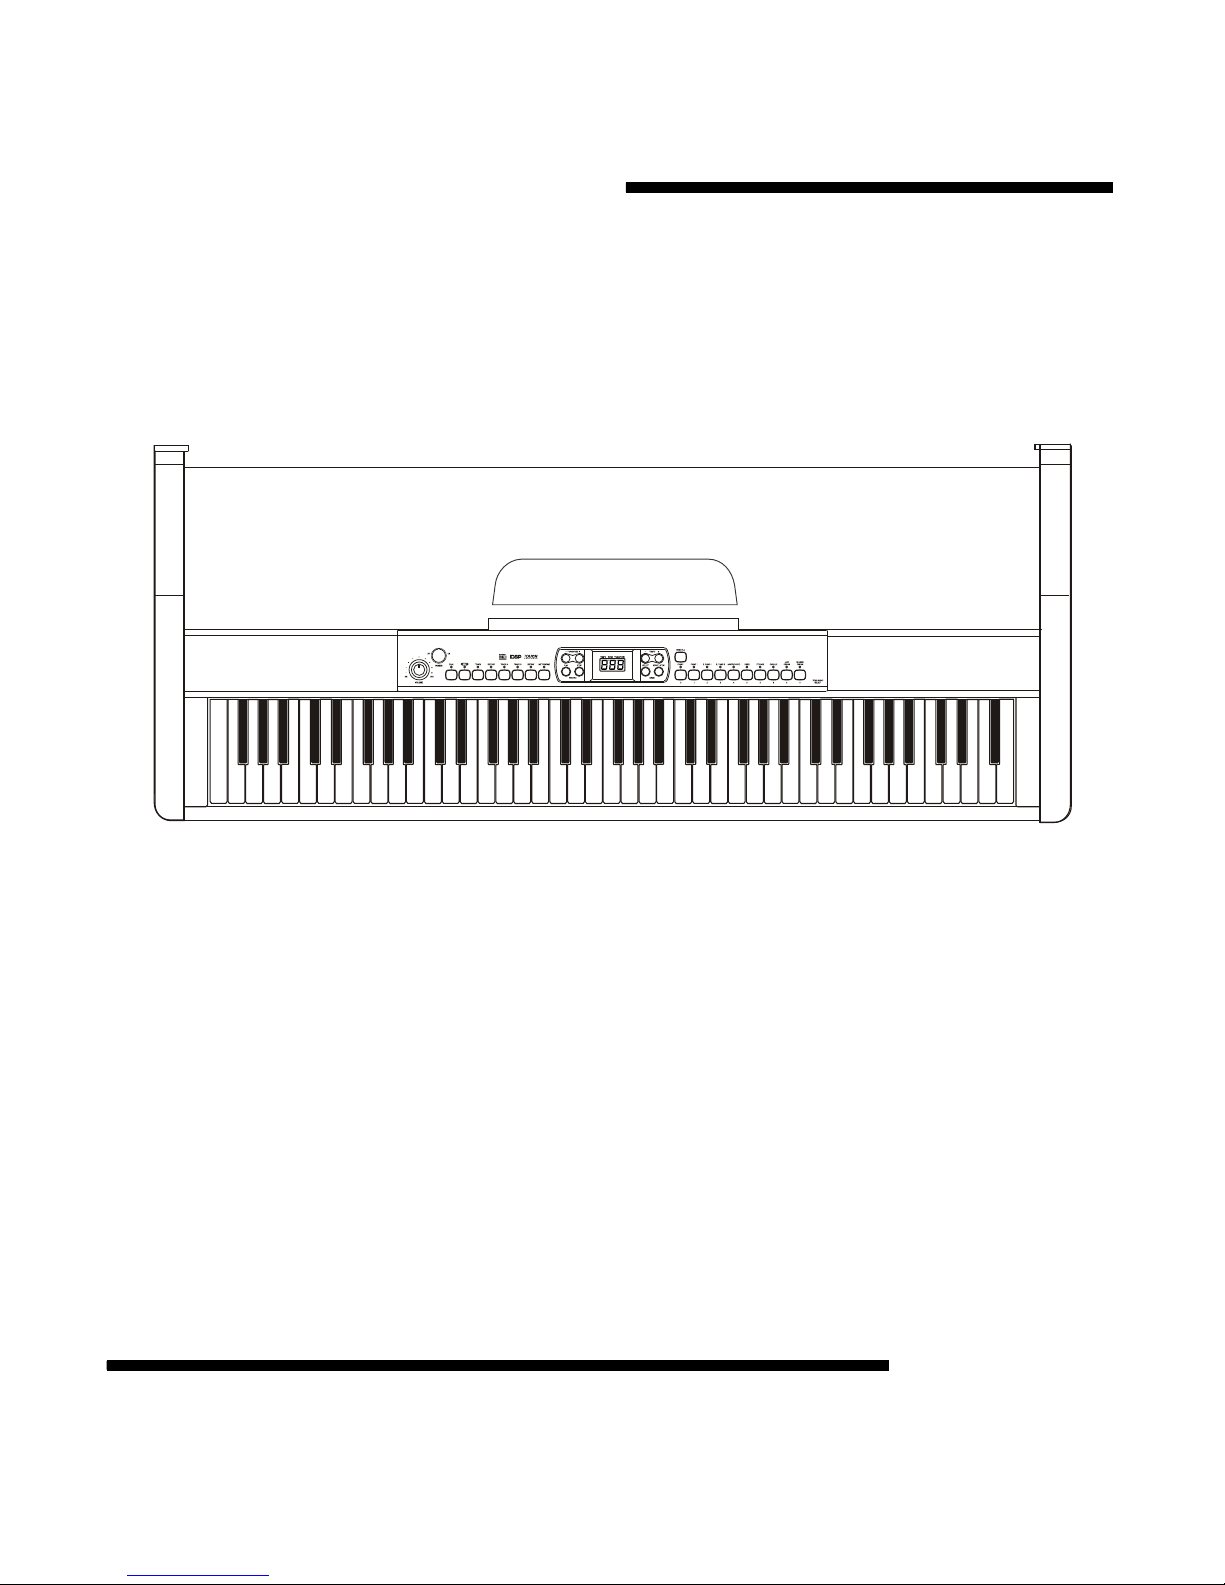
Top View
Rear View
Front View
Control Panel
Footboard DIN socket
MIDI IN/OUT DIN sockets
AUX. OUT jack
AC Mains Power socket
Headphones j ack
Soft Pedal
Sostenuto Pedal
Sustain Pedal
Music Stand
Piano Keyboard
1
2
3
4
5
7
8
9
10
6
11
6

General Guide............Continued
1
2
3
4
5
6
7
8
9
10
11
12
13
14
15
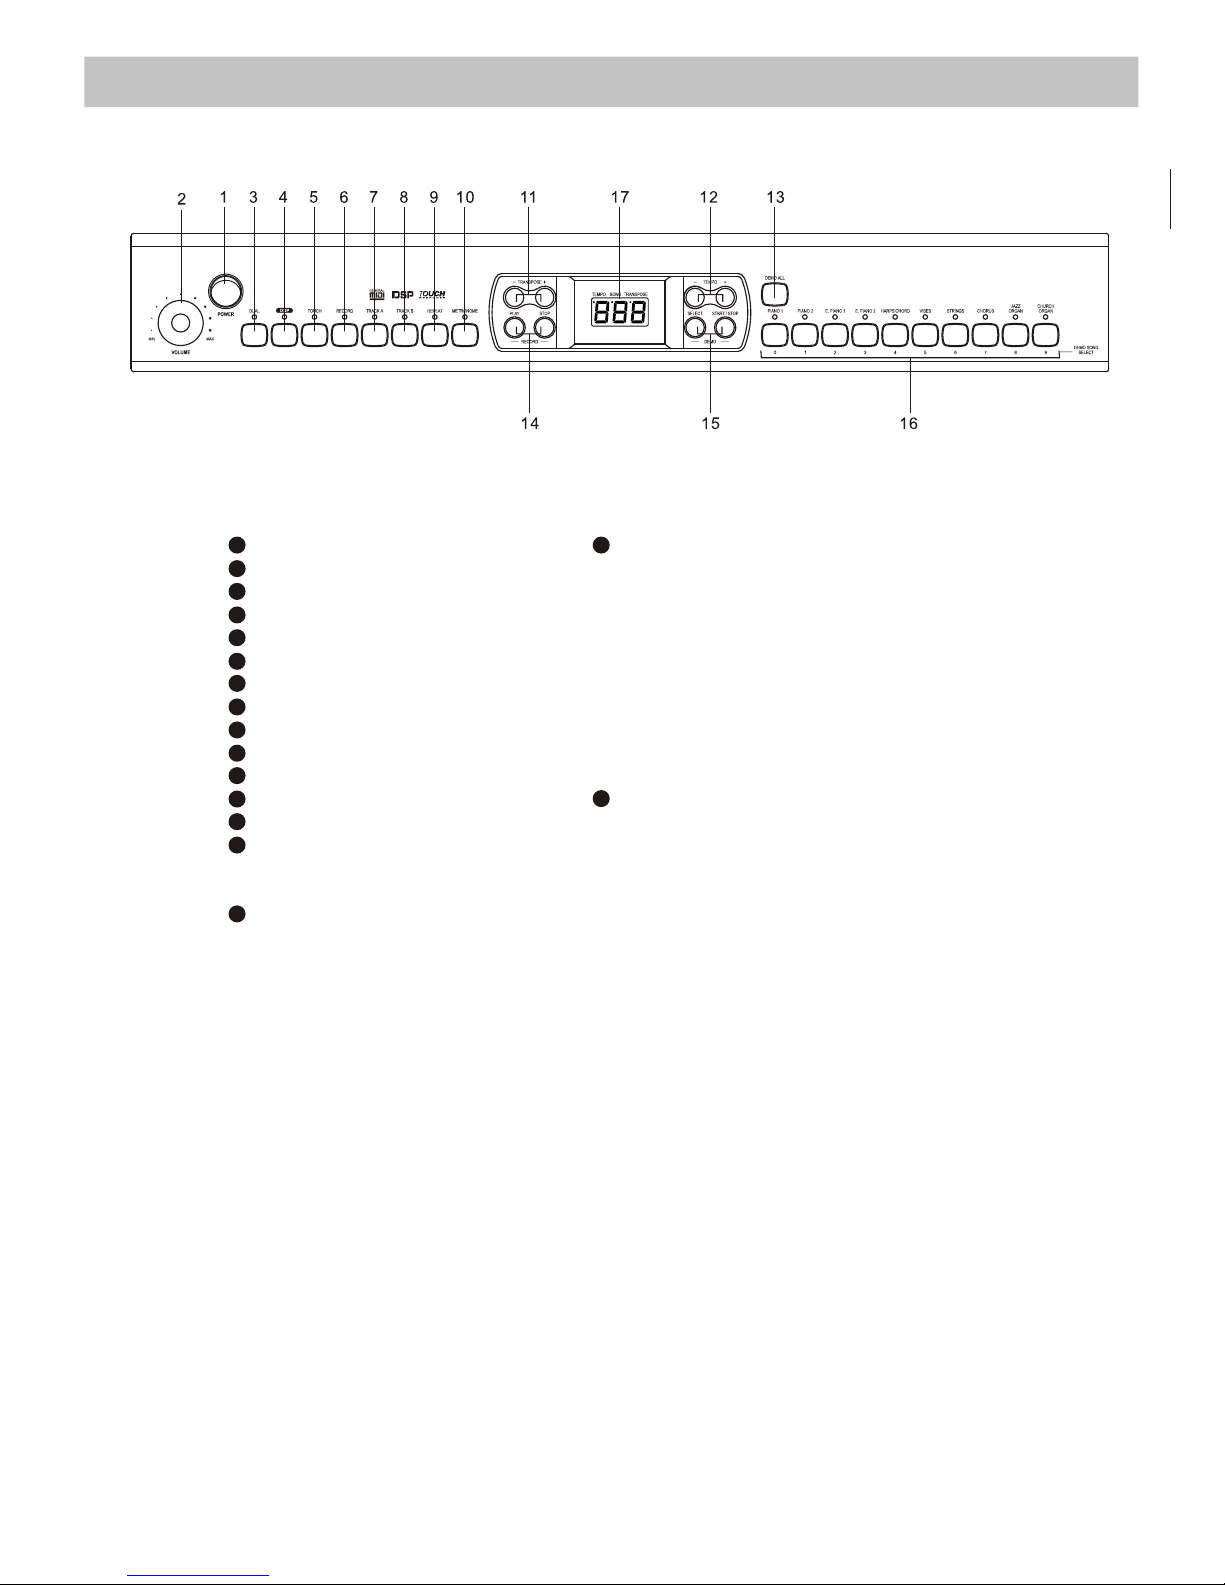
POWER SWITCH
MASTER VOLUME
DUAL
DSP (Digital Signal Processor)
TOUCH
RECORD
TRACK A
TRACK B
REPEAT
METRONOME
TRANSPOSE +/-
TEMPO +/-
DEMO ALL
RECORD
- PLAY
- STOP
DEMO
- SELECT
- START/STOP
16
VOICE TYPE & DEMO SONG SELECT
0 - PIANO 1
1 - PIANO 2
2 - E.PIANO 1
3 - E.PIANO 2
4 - HARPSICHORD
5 - VIBES
6 - STRINGS ENSEMBLE
7 - CHORUS
8 - JAZZ ORGAN
9 - CHURCH ORGAN
LED
- TEMPO
- SONG
- TRANSPOSE
17
7

The Connectors
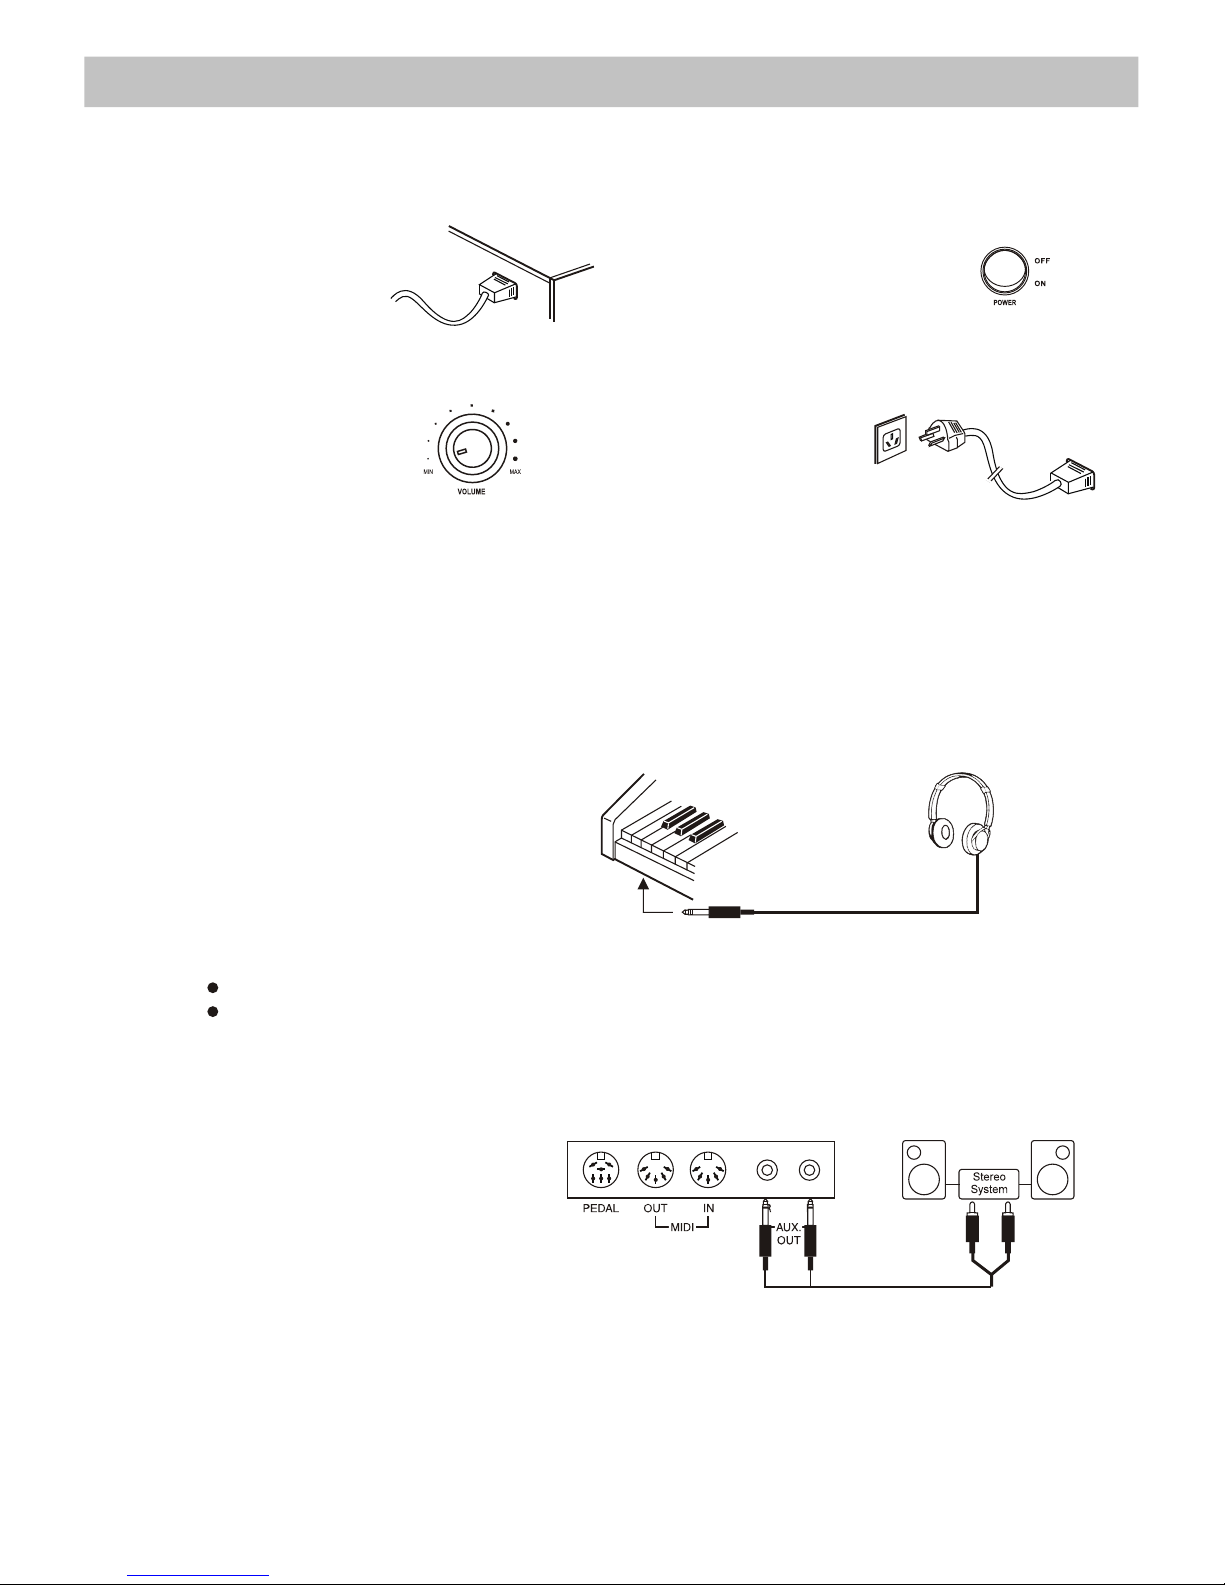
1.
3. Turn the volume control
anti-clockwise to
the minimum volume
level.
2. Ensure the piano
is turned off when
connecting and
disconnecting the
power cable.
4.
5. If you have done the above procedures
you are now safe to turn on the piano.
Caution: When the piano is not in use or during a thunderstorm, disconnect the power for
safety sake.
Caution: Never use the headphone with high volume, as it may damage your sense of hearing.
To prevent the damage of the speakers, ensure that the volume is set to the
minimum level before connecting the power and other device.
Connect the rear-panel AUX.OUT
jack to amplified speakers, amplifiers
or domestic hi-fi-units for external
amplification.
Note: Connect both left(L) and right(R) channels for the stereo result. If you only connect
either one of the channels, the connected channel will only take effect.
8
Connect the power
cable to the AC mains
socket underneath the
piano body.
Plug the power cable
into a proper AC mains
power outlet
Using the AC power socket
Using the Headphones jack
Using the AUX.OUT jacks
An optional set of stereo headphones can be
connected to the headphones jack located on
the lefthand side, underneath the keyboard.
When a pair of headphones is connected to
this jack, the internal speakers will switch off
automatically
Indice
Altri manuali Stagg Strumento musicale