Steren USB-105 Manuale utente


Before using your new USB enclosure, please read this
instruction manual to prevent any damage. Put it away in a
safe place for future references.
IMPORTANT
Before to manipulate the HDD, use an anti-static bracelet to
send electric discharges from your body to the physical ground.
Be careful when you connect the cables, pins may bend and
break.
Do not use or store the equipment near wet places.
Clean only with a soft, dry cloth.
PACKAGE CONTENT
One USB IDE 3.5” Hard Disk enclosure
One AC power adaptor
One power cord
One USB cable
Driver software
One screwdriver
CONTROLS
1. IDE cable
Connect the IDE cable to the HDD
2. Energy cord
Connect the energy cord to the HDD
3. USB connector
Connect the USB cable
4. Power Supply
Power supply connector
5. On / Off
Turn on / turn off the device
•
•
•
•
•
•
ENGLISH
ENGLISH-2
Before usin
g
y
our new USB enclosure, please read this
i
nstruction manual to prevent an
y
dama
g
e. Put it awa
y
in a
s
afe
p
lace for future references
.
1
2
3
4
5

HARDWARE INSTALLATION
1.- Remove the frontal panel of the USB hard disk enclosure.
2.- Connect the IDE cable to HDD, make sure that the
eyelash located on the middle of the IDE cable coincides with the
HDD groove, otherwise you cannot plug the cable.
3.- Connect the power cord to HDD.
ENGLISH
ENGLISH-3
12
3
4
5

4.- Place the HD on the base and fasten it.
5.- Place the HDD into the hard disk enclosure, please pay
attention to put the base in the special slot, otherwise, may not
enter correctly.
6.- Tighten up the frontal panel, screwing by the sides.
ENGLISH
ENGLISH-4

The USB to IDE 3.5” HDD enclosure only works in Master
mode. Make the changes in the jumpers before close the
box and connect the enclosure to the computer.
If you don’t have enough knowledge about HDD internal
configuration, we recommend you ask a technician,
otherwise may cause several damages in the equipment.
SOFTWARE INSTALLATION
If you use Windows ME, Windows 2000 or Windows XP OS, you
need no drivers.
HOW TO USE BY FIRST TIME THE USB TO IDE
3.5” HDD ENCLOSURE
Once you have made the correct internal connections, you can
start to use your new USB to IDE 3.5” HDD enclosure.
1.- Plug the USB cable into the right input jack on the enclosure,
then, insert the opposite extreme into an available USB 2.0 port
in the computer.
2.- Plug the AC power adaptor to the enclosure and connect it
into an AC household outlet.
3.- Automatically, the PC will detects the new hardware, and then
begins an updating process.
ENGLISH
ENGLISH-5
T
he USB to IDE 3.5” HDD enclosure onl
y
works in Maste
r
m
ode. Make the chan
g
es in the
j
umpers before close the
box and connect the enclosure to the com
p
uter
.
I
f
y
ou don’t have enou
g
h knowled
g
e about HDD internal
c
onfi
g
uration, we recommend
y
ou ask a technician,
o
therwise ma
y
cause several dama
g
es in the equipment
.

4.- Once the process ends, the next message appears on the
screen: your new hardware is correctly installed. This message
means that you can start to use the new hardware.
5.- The external HDD appears as USB Mass Storage Device and
you can identify it by a letter (usually by letter F or letter G, but it
could appears another one).
6.- If you want to transfer any kind of files between different
drives, just copy and paste the desired files using Windows
Explorer.
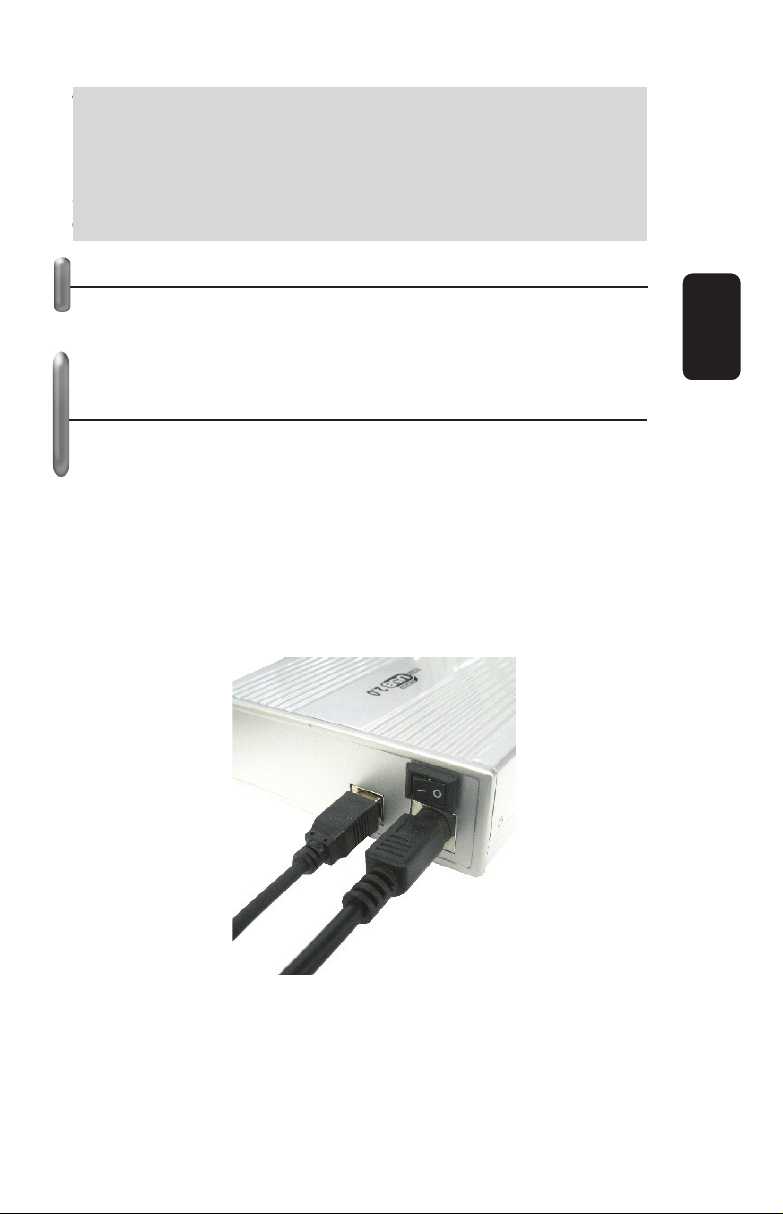
7.- When you want to remove the device, click on the icon in the
system tray “ ” using the left button on the mouse and choose
Safety Remove. When the message: “you may safely remove
this device” appears on the screen, you can unplug the
equipment from the computer.
SPECIFICATIONS
AC / DC Power supply
Input: 100-250V~ 50/60 Hz 0,5A
Output: 5 & 12 V 1,5A
USB input: 5V
Dimensions: 7,6 x 4,4 x 1,2in
Weight: 229g (without HDD and AC power adaptor)
Product design and specifications are subject to change,
without notice.
ENGLISH
ENGLISH-6
P
roduct desi
g
n and specifications are sub
j
ect to chan
g
e,
wi
t
h
out not
i
ce
.


Antes de utilizar su nueva Unidad Externa para Disco Duro
3,5” IDE USB 2.0 lea este instructivo para evitar cualquier
mal funcionamiento. Guárdelo para futuras referencias.
IMPORTANTE
Antes de manipular el disco duro, utilice una pulsera antiestática
para enviar las descargas eléctricas de su cuerpo a tierra física.
Nunca introduzca a presión los cables, podrían doblarse y
quebrarse los pines de conexión.
No use ni almacene este equipo en lugares donde existan
goteras o salpicaduras de agua.
Siempre utilice un paño suave, limpio y seco para limpiar el
equipo.
CONTENIDO
Una Unidad para disco duro
Un adaptador de tensión
Un cable de línea
Un cable USB
Un disco
Un destornillador
CONTROLES
1.- Cable IDE
Cable IDE que se conecta al Disco Duro
2.- Energía
Cable de energía que se conecta al Disco Duro
3.- Conector USB
Entrada de cable USB 2.0
4.- Adaptador de corriente
Conector para el adaptador de corriente
5.- Encendido / Apagado
Enciende o apaga el equipo
•
•
•
•
•
•
ESPAÑOL
ESPAÑOL-2
A
ntes
d
e ut
ili
zar su nueva
U
n
id
a
d
E
xterna
p
ara
Di
sco
D
uro
3
,5” IDE USB 2.0 lea este instructivo
p
ara evitar cual
q
uie
r
m
al funcionamiento. Guárdelo
p
ara futuras referencias
.
1
2
3
4
5

INSTALACIÓN DE HARDWARE
1.- Retire la cubierta frontal del equipo.
2.- Conecte el cable IDE a su disco duro, asegurándose de que
la pestaña ubicada al centro del cable coincida con la ranura del
disco duro, de otra forma no podrá conectar el cable.
3.- Conecte el cable de energía a su disco duro.
ESPAÑOL
ESPAÑOL-3
12
3
4
5

4.- Asegure el disco duro en la base, como muestra la figura.
5.- Coloque el disco duro en el interior de la caja, poniendo
atención de colocar la base en la ranura especial para ella, de
otra forma, podría no entrar o entrar forzada la base.
6.- Asegure el panel frontal por los costados, utilizando los
tornillos pequeños incluidos.
ESPAÑOL
ESPAÑOL-4
Indice
Lingue:
Altri manuali Steren Allegato


