Stereo Optical OPTEC PLUS Manuale utente
Quickstart guide

Copyright 2017 StereoOptical

3
description ............................................. 4
1. Packaging and Accessories 4
2. Overview 5
a. Front view 5
b. Back view 5
first steps............................................... 6
1. Unpack the device 6
2. Turn on and off the device 7
3. Install the Bluetooth key 7
4. Install PC Interface software 8
5. Connect the device and the remote control 9
6. Change the language 10
7. Use the “remoteless” mode 11
8. Use the assistance on the device 11
9. Manage the device options 12
recommendations .................................... 13
1. General guidelines 13
2. Handling 13
3. Connectors and charging 14
4. Position of the person 14
a. Recommendations 14
b. Adjust the height of the device 15
main features ......................................... 16
1. Protocol menu 16
2. Tests menu 16
3. Settings menu 16
4. About Menu 16
5. Assistance for carrying out tests or protocols 16
maintenance & servicing............................ 17
1. Cleaning the device 17
2. Cleaning the ancillary lenses 18
3. Cleaning the face rest 18
4. More information and contact 18
technical data ....................................... 19
general information ................................ 20
introduction
The quick start guide provides an overview of the machine C86 (Optec Plus) it contains:
●basic information on the device,
●its main features,
●its maintenance.
However, the quick start guide is not intended to provide exhaustive information. It does not
cover the details of the functionalities of the device.
For more information on how to use all the features, please refer to the assistance on the
device, which is accessible via the icon on the software’s status bar.
table of contents
4
description
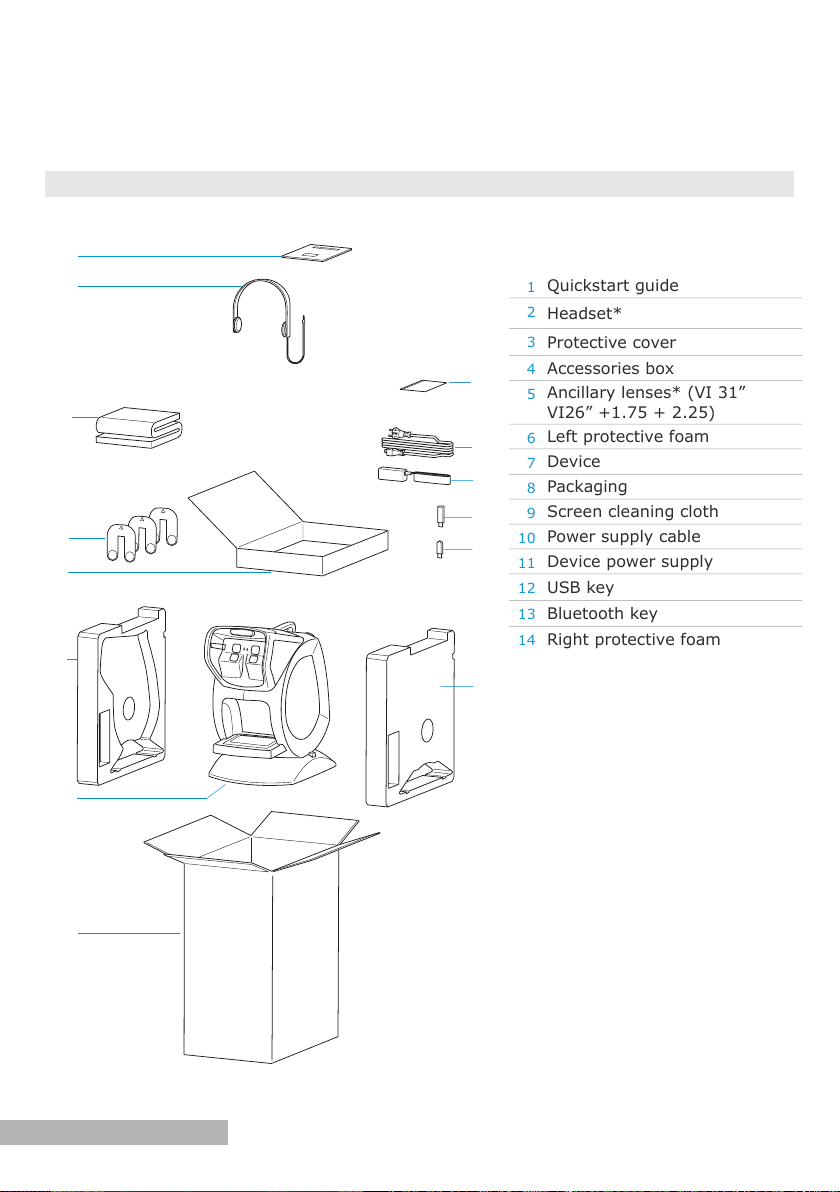
1. packaging and accessories
1Quickstart guide
2Headset*
3Protective cover
4Accessories box
5Ancillary lenses* (VI 31”
VI26” +1.75 + 2.25)
6Left protective foam
7Device
8Packaging
9Screen cleaning cloth
10 Power supply cable
11 Device power supply
12 USB key
13 Bluetooth key
14 Right protective foam
(*) Options included or at extra cost.
3
2
1
4
6
8
7
5
11
12
13
14
o
10
9
5
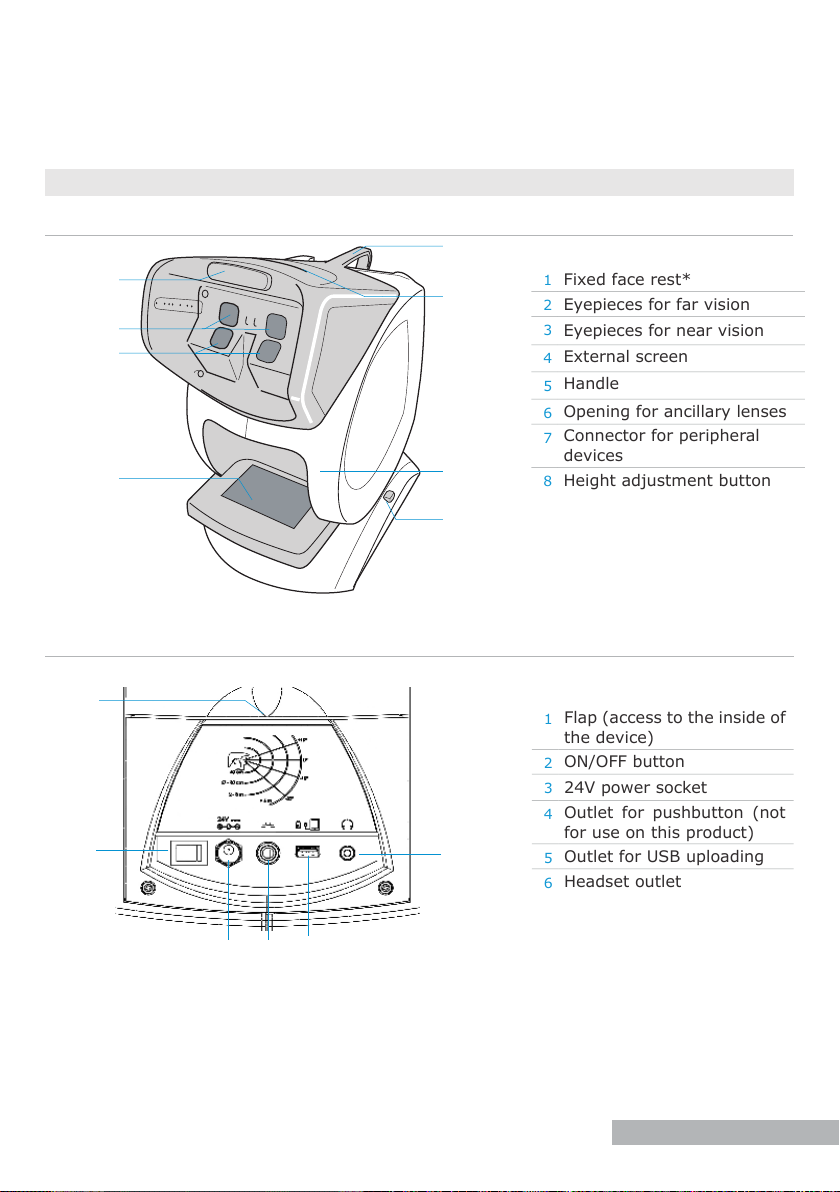
2. overview
1Fixed face rest*
2Eyepieces for far vision
3Eyepieces for near vision
4External screen
5Handle
6Opening for ancillary lenses
7Connector for peripheral
devices
8Height adjustment button
1Flap (access to the inside of
the device)
2ON/OFF button
324V power socket
4Outlet for pushbutton (not
for use on this product)
5Outlet for USB uploading
6Headset outlet
description
1
34
8
7
4
3
2
5
1
o
a. Front view
b. Back view
6
5
6
(*) Applied part
2
6
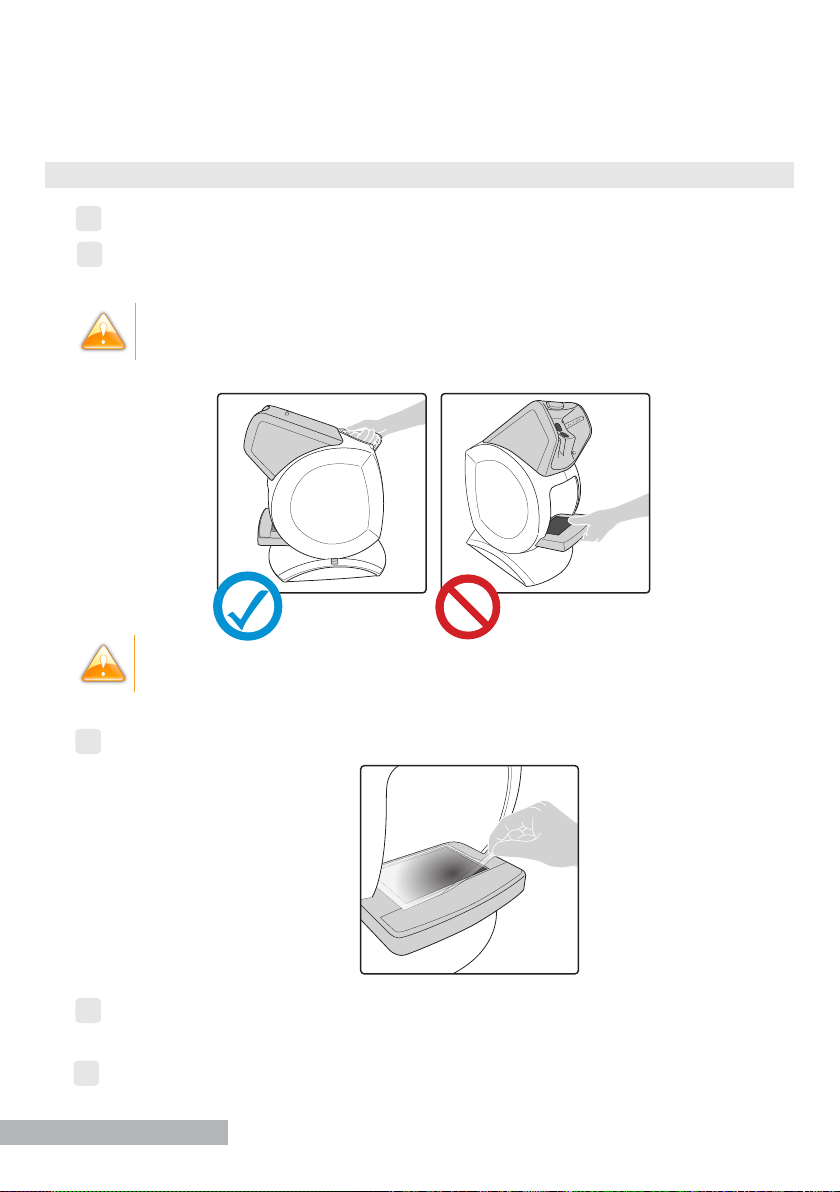
1. unpack the device
Take out the boxes on top and put them on the table.
Take the device out of its protective foam by holding it by the handle and remove the
protective plastic covering it.
Never hold the device by the external screen, to prevent it from damage.
The device must be installed on a stable table, the part in front of the device
approximately 10 centimeters from the edge of the table.
Remove the protective lm on the external screen.
According to the selected options, remove the additional accessories and put them
away.
5Open the box(es) of accessories.
first steps
2
1
3
4
7
2. turn on and off the device
Press on the button located on the back device to turn it on.
Wait several seconds for the software to open up on front of the device.
› the device is turned on.
Perform these steps in reverse to turn off the device.
3. install the bluetooth key
Insert the Bluetooth dongle into one of the USB ports on your computer.
› The Bluetooth dongle installs itself automatically.
If the key does not install automatically, install the USB driver provided or
contact your support technician.
› Once installation has nished , the icon will appear at bottom of your screen.
first steps
1
2
6Remove the protective cover and put it away for later use.
7Remove the charger (cable and power supply), plug it into the power socket then into
the main power supply.
Before plugging in the device, ensure that your power supply voltage
complies with the external power indicated.
8Remove the cleaning cloth and put it away for later use.
The cleaning cloth must be used dry on the screen, eyepieces and remote
control.
9Remove the ancillary lenses and put them away for later use.
10 According to the selected options, remove the additional accessories and put them
away.
Keep the packaging (boxes, protective foam and plastic).
8
4. install pc interface software
The bluetooth key must be installed beforehand (cf preceding chapter).
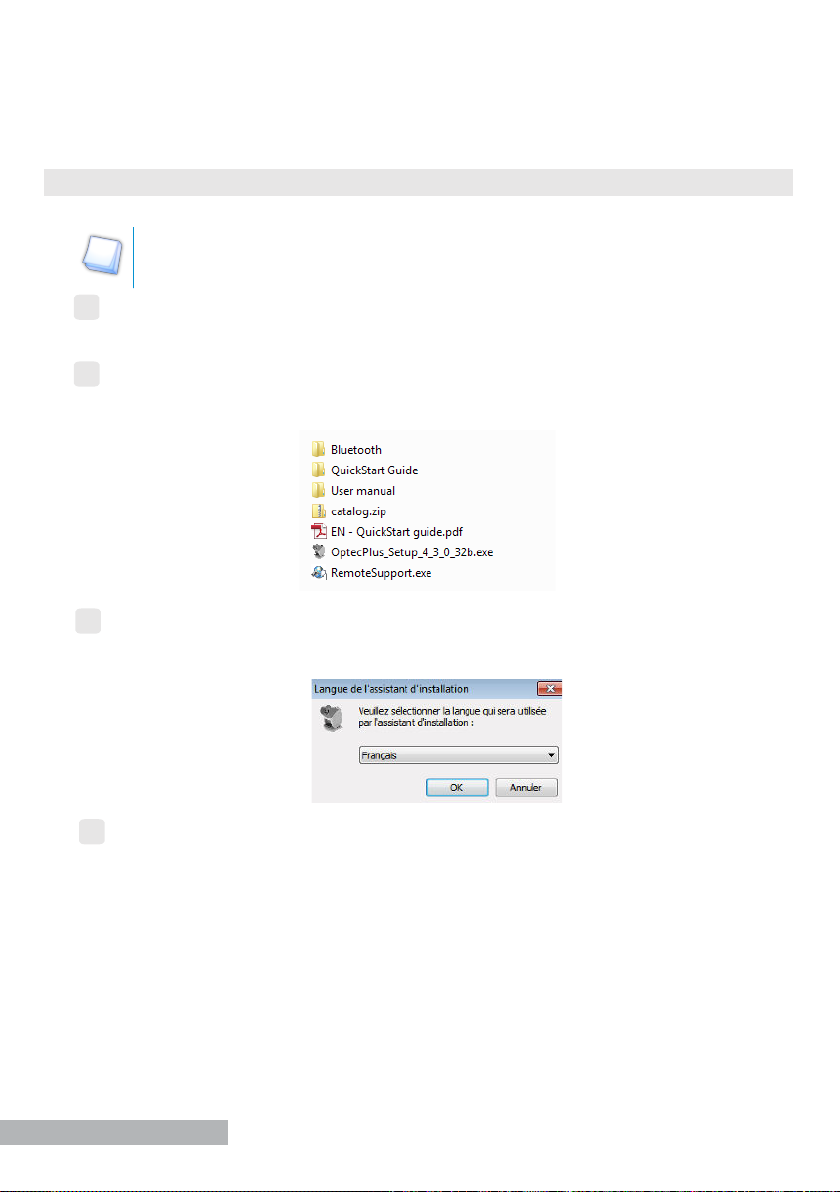
Insert the stick containing the software into one of the USB ports on your computer.
› A new folder will appear in the browser list.
Open the folder.
› The following tree structure is displayed:
Double-click on OptecPlus_Setup_X_X_X_X32b.exe.
› The installation window opens.
Follow the installation instructions.
› The software is installed on your computer.
first steps
1
2
4
3
9
first steps
1
2
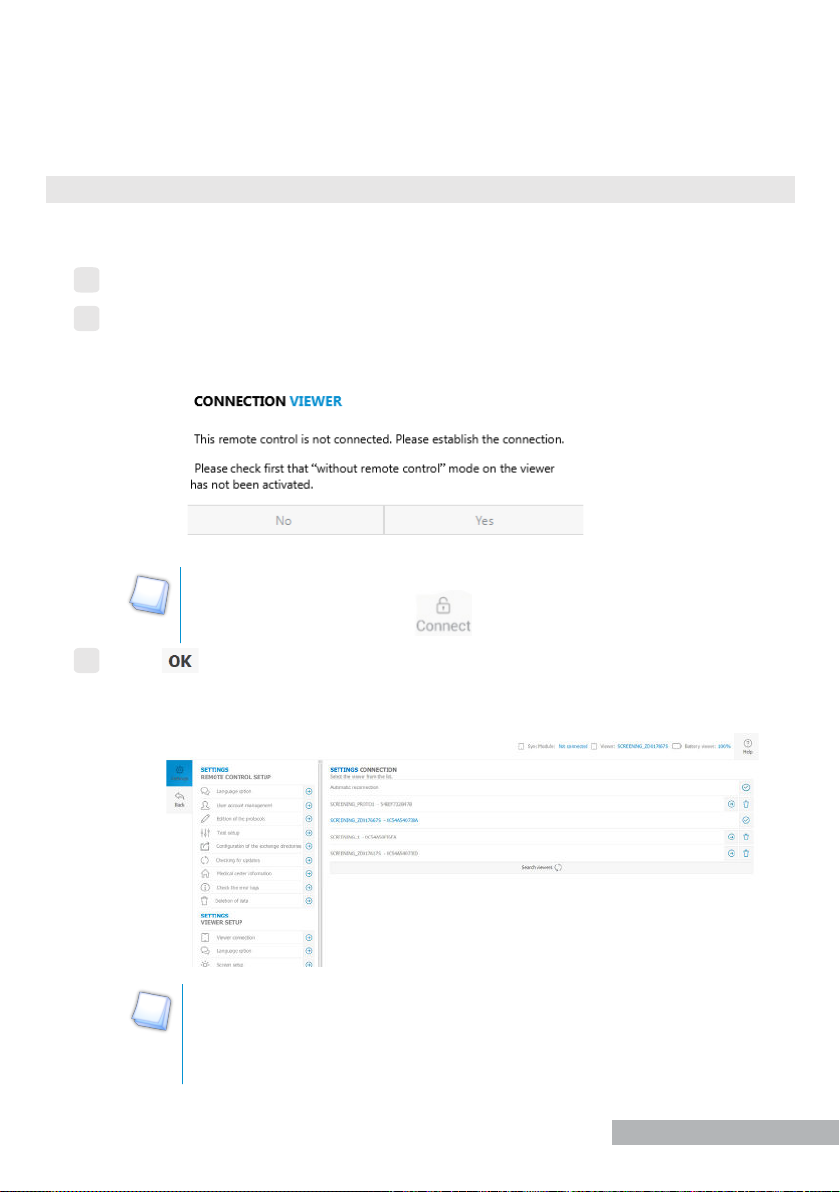
5. connect the device and the remote control
Before you can start your rst tests, it is necessary to connect the remote control and
the device.
Turning on the device and its screen.
Turn on the remote control.
› The following message appears:
To check that the “without remote control” mode is not activated, no menu
can be open and the button in top on the right of the viewer must
be visible.
Press .
› The remote control connection settings is displayed with the list of the available
supported devices.
The name of the device always starts with “Screening_”. If you tick the
Automatic Reconnection box, each time the remote control is started,
it will automatically try to reconnect with the last connected device
(viewer).
3
10
first steps
Select the peripheral you require by pressing .
› The device and remote control are synchronizing.
Press to go back to the main screen.
6. change the language
You can change the language of remote control and the viewer.
Press in menu bar.
› Menu Settings appears.
Press in:
•the Remote control Settings Conguration menu for the remote control,
•the Viewer Settings Conguration menu for the viewer.
The viewer and remote control can be congured in two different languages if
necessary.
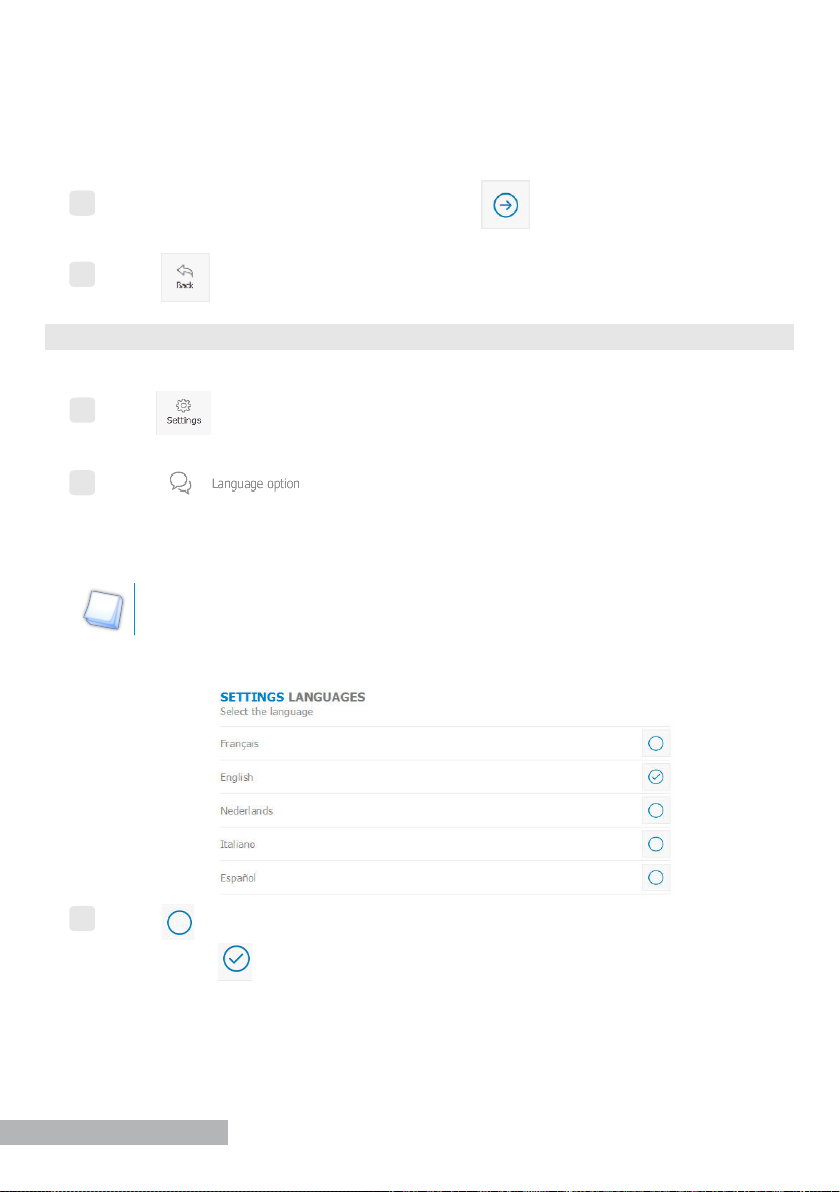
› The languages Settings menu appears.
Press to select your language choice.
› The icon is displayed and the interface application language changes
immediately.
5
4
1
2
3
Altri manuali per OPTEC PLUS
1
Questo manuale è adatto per i seguenti modelli
4
Indice
Altri manuali Stereo Optical Attrezzature mediche


