Stihl BR 800 Manuale utente

Contents
1 Guide to Using this Manual.........................2
2 Safety Precautions and Working Techni‐
ques............................................................ 2
3 Assembling the Unit.................................... 6
4 Adjusting the Throttle Cable........................8
5 Fitting the Harness......................................9
6 Fuel........................................................... 10
7 Fueling...................................................... 11
8 Winter Operation.......................................11
9 Information Before You Start.................... 12
10 Starting / Stopping the Engine.................. 12
11 Operating Instructions...............................15
12 Replacing the Air Filter..............................15
13 Adjusting the Carburetor........................... 15
14 Spark Plug................................................ 15
15 Spark Arresting Screen in Muffler............. 16
16 Storing the Machine.................................. 17
17 Inspections and Maintenance by Dealer...17
18 Maintenance and Care..............................17
19 Main Parts.................................................19
20 Specifications............................................19
21 Maintenance and Repairs......................... 20
22 Disposal.................................................... 20
23 EC Declaration of Conformity................... 21
Dear Customer,
Thank you for choosing a quality engineered
STIHL product.
It has been built using modern production techni‐
ques and comprehensive quality assurance.
Every effort has been made to ensure your satis‐
faction and trouble-free use of the product.
Please contact your dealer or our sales company
if you have any queries concerning this product.
Your
Dr. Nikolas Stihl
1 Guide to Using this Manual
1.1 Pictograms
The meanings of the pictograms attached to the
machine are explained in this manual.
Depending on the model concerned, the follow‐
ing pictograms may be attached to your
machine.
Fuel tank; fuel mixture of gasoline
and engine oil
Intake air: Winter operation
Intake air: Summer operation
Operate manual fuel pump
1.2 Symbols in text
WARNING
Warning where there is a risk of an accident or
personal injury or serious damage to property.
NOTICE
Caution where there is a risk of damaging the
machine or its individual components.
1.3 Engineering improvements
STIHL's philosophy is to continually improve all
of its products. For this reason we may modify
the design, engineering and appearance of our
products periodically.
Therefore, some changes, modifications and
improvements may not be covered in this man‐
ual.
2 Safety Precautions and
Working Techniques
Special safety precautions must be
observed when working with a power
tool.
It is important that you read the
instruction manual before first use
and keep it in a safe place for future
reference. Non-observance of the
instruction manual may result in seri‐
ous or even fatal injury.
Observe all applicable local safety regulations,
standards and ordinances.
If you have not used this model before: Have
your dealer or other experienced user show you
how it is operated or attend a special course in
its operation.
Minors should never be allowed to use this prod‐
uct.
Keep bystanders, especially children, and ani‐
mals away from the work area.
English
2 0458-490-8321-B
© ANDREAS STIHL AG & Co. KG 2022
0458-490-8321-B. VA0.B22.
Printed on chlorine-free paper
Printing inks contain vegetable oils, paper can be recycled.
Original Instruction Manual
0000008632_005_GB

When the power tool is not in use, put it in a
place where it does not endanger others. Secure
it against unauthorized use.
The user is responsible for avoiding injury to third
parties or damage to their property.
Do not lend or rent your power tool without the
instruction manual. Be sure that anyone using
your power tool understands the information con‐
tained in this manual.
The use of noise emitting power tools may be
restricted to certain times by national or local
regulations.
Do not operate your power tool if any of its com‐
ponents are damaged.
Do not use a pressure washer to clean your
power tool. The solid jet of water may damage
parts of the power tool.
2.1 Accessories and replacement
parts
Only use parts and accessories that are explicitly
approved for this power tool by STIHL or are
technically identical. If you have any questions in
this respect, consult a servicing dealer. Use only
high quality parts and accessories in order to
avoid the risk of accidents and damage to the
machine.
STIHL recommends the use of original STIHL
replacement parts and accessories. They are
specifically designed to match the product and
meet your performance requirements.
Never attempt to modify your machine in any
way since this may increase the risk of personal
injury. STIHL excludes all liability for personal
injury and damage to property caused while
using unauthorized attachments.
2.2 Physical Condition
To operate this power tool you must be rested, in
good physical condition and mental health.
If you have any condition that might be aggrava‐
ted by strenuous work, check with your doctor
before operating a power tool.
Persons with pacemakers only: The ignition sys‐
tem of your power tool produces an electromag‐
netic field of a very low intensity. This field may
interfere with some pacemakers. To reduce
health risks, STIHL recommends that persons
with pacemakers consult their physician and the
pacemaker manufacturer before operating this
power tool.
Do not operate the sprayer if you are under the
influence of any substance (drugs, alcohol)
which might impair vision, dexterity or judgment.
2.3 Intended Use
The blower is designed for blow-sweeping
leaves, grass, paper and similar materials, e.g. in
gardens, sports stadiums, car parks and drive‐
ways. It is also suitable for blow-sweeping forest
paths.
Do not blow-sweep hazardous materials.
Do not use the machine for any other purpose
because of the increased risk of accidents and
damage to the machine. Never attempt to modify
the product in any way since this may result in
accidents or damage to the product.
2.4 Clothing and Equipment
Wear proper protective clothing and equipment.
Clothing must be sturdy but allow
complete freedom of movement.
Wear snug-fitting clothing, an overall
and jacket combination, do not wear
a work coat.
Avoid clothing with loose drawstrings,
laces and ribbons, scarves, neckties,
jewelry or anything that could be
sucked into the air intake in the side
and bottom of the machine. Tie up
and confine long hair so that it cannot
be sucked into the machine.
Wear sturdy shoes with non-slip soles.
WARNING
To reduce the risk of eye injuries,
wear close-fitting safety glasses in
accordance with European Standard
EN 166. Make sure the safety
glasses are a comfortable and snug
fit.
Wear hearing protection, e.g. earplugs or ear
muffs.
STIHL offers a comprehensive range of personal
protective clothing and equipment.
2.5 Transporting the Power Tool
Always shut off the engine.
Transporting in a vehicle:
–Properly secure your power tool to prevent
turnover, fuel spillage and damage.
2 Safety Precautions and Working Techniques English
0458-490-8321-B 3

2.6 Fueling
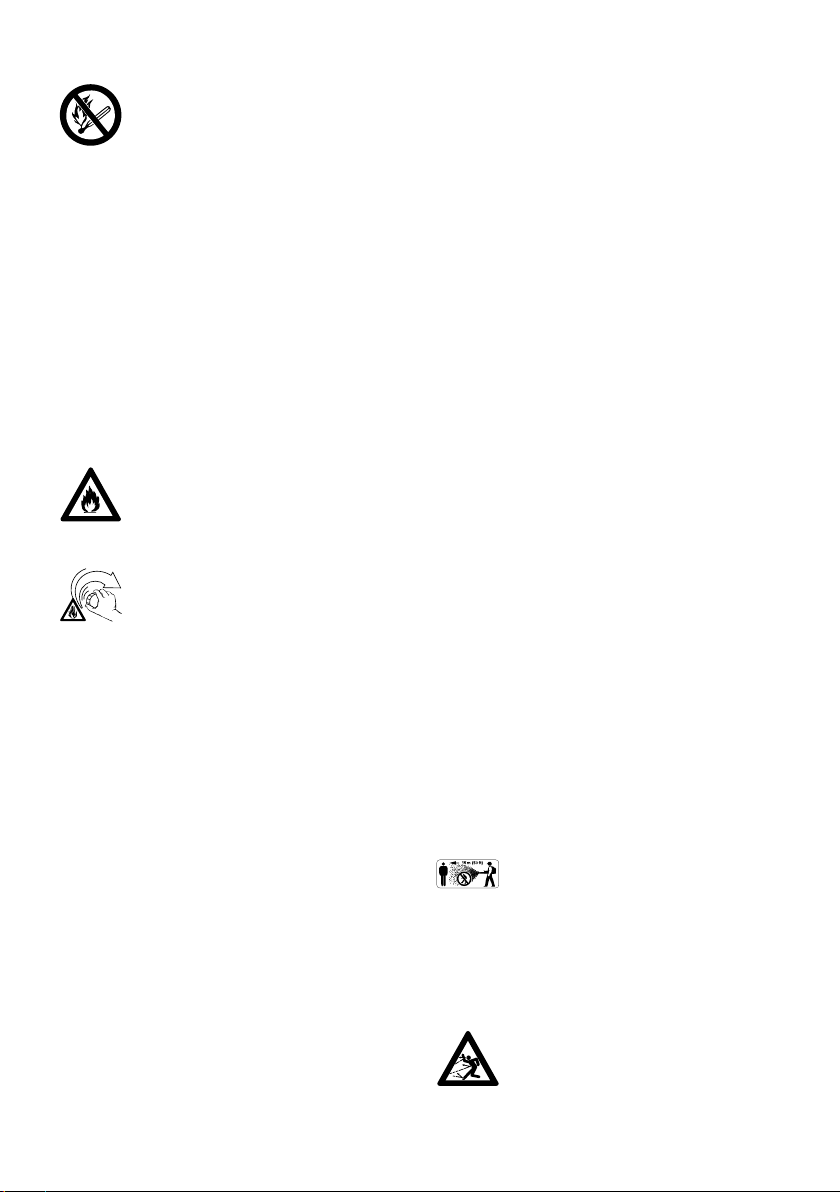
Gasoline is an extremely flammable
fuel. Keep clear of naked flames. Do
not spill any fuel – do not smoke.
Always shut off the engine before refueling.
Do not fuel a hot engine – fuel may spill and
cause a fire.
Always remove the power tool from your back
and put it on the ground before refueling. Fuel
the machine only when it is standing on the
ground.
Open the fuel cap carefully to allow any pressure
build-up in the tank to release slowly and avoid
fuel spillage.
Fuel your power tool only in well-ventilated
areas. If you spill fuel, wipe the machine immedi‐
ately – if fuel gets on your clothing, change
immediately.
Check for leakage. To reduce the risk
of serious of fatal burn injuries, do not
start or run the engine until leak is
fixed.
Screw-type fuel cap
After fueling, tighten down the screw-
type fuel cap as securely as possible.
This reduces the risk of unit vibrations causing
the fuel cap to loosen or come off and spill quan‐
tities of fuel.
2.7 Before Starting
Check that your power tool is properly assem‐
bled and in good condition – refer to appropriate
chapters in the instruction manual.
–Check the fuel system for leaks, paying spe‐
cial attention to visible parts such as the tank
cap, hose connections and the manual fuel
pump (on machines so equipped). If there are
any leaks or damage, do not start the engine –
risk of fire. Have your machine repaired by a
servicing dealer before using it again.
–Throttle trigger must move freely and spring
back to the idle position when released.
–The setting lever must move easily to STOP or
0
–The blower tubes must be properly assem‐
bled.
–Keep the handles dry and clean – free from oil
and dirt – for safe control of the power tool.
–Check that the spark plug boot is secure – a
loose boot may cause arcing that could ignite
leaking fuel-air mixture and cause a fire.
–Never attempt to modify the controls or the
safety devices in any way.
–Check condition of blower housing.
–Check condition of harness straps and back‐
pack – replace damaged or worn straps.
A worn blower housing (cracks, nicks, chips)
may result in an increased risk of injury from
thrown foreign objects. If the blower housing is
damaged, consult your dealer – STIHL recom‐
mends you contact a STIHL servicing dealer.
To reduce the risk of accidents, do not operate
your power tool if it is not in a safe condition.
For emergencies: Practice quickly opening the
fastener on the waist belt, loosening the shoulder
straps and setting down the unit.
2.8 Start the engine.
Start the engine at least 3 meters from the fuel‐
ing spot, outdoors only.
Your power tool is designed to be operated by
one person only. Do not allow other persons in
the work area – even when starting.
Do not drop start the power tool – start the
engine as described in the instruction manual.
Place the power tool on level ground, make sure
you have secure footing, hold the power tool
securely.
As soon as the engine starts, the air flow may
throw small objects (e.g. stones) in your direc‐
tion.
2.9 During Operation
In the event of impending danger or in an emer‐
gency, switch off the engine immediately by mov‐
ing the setting lever to STOP or 0.
To reduce the risk of injury from thrown objects,
do not allow any other persons within 15 meters
of your own position.
To reduce the risk of damage to property, also
maintain this distance from other objects (vehi‐
cles, windows).
Do not direct the air blast towards
bystanders or animals since the air
flow can blow small objects at great
speed – risk of injury.
English 2 Safety Precautions and Working Techniques
4 0458-490-8321-B

When blow-sweeping (in open ground and gar‐
dens), watch out for small animals to avoid harm‐
ing them.
Never leave a running machine unattended.
Take special care in slippery conditions – damp,
snow, ice,
on slopes and uneven ground.
Watch out for obstacles: Be careful of refuse,
tree stumps, roots and ditches which could
cause you to trip or stumble.
Never work on a ladder or any other insecure
support.
Be particularly alert and cautious when wearing
hearing protection because your ability to hear
warnings (shouts, alarms, etc.) is restricted.
Work calmly and carefully – in daylight conditions
and only when visibility is good. Stay alert so as
not to endanger others.
To reduce the risk of accidents, take a break in
good time to avoid tiredness or exhaustion.
Your power tool produces toxic
exhaust fumes as soon as the engine
is running. These fumes may be col‐
orless and odorless and contain
unburned hydrocarbons and benzol.
Never run the engine indoors or in
poorly ventilated locations, even if
your model is equipped with a cata‐
lytic converter.
To reduce the risk of serious or fatal injury from
breathing toxic fumes, ensure proper ventilation
when working in trenches, hollows or other con‐
fined locations.
To reduce the risk of accidents, stop work imme‐
diately in the event of nausea, headache, visual
disturbances (e.g. reduced field of vision), prob‐
lems with hearing, dizziness, deterioration in abil‐
ity to concentrate. Apart from other possibilities,
these symptoms may be caused by an exces‐
sively high concentration of exhaust gases in the
work area.
To reduce the risk of fire, do not smoke while
operating or standing near your power tool. Note
that combustible fuel vapor may escape from the
fuel system.
If dust levels are very high, always wear a suita‐
ble respirator.
Operate your power tool so that it produces a
minimum of noise and emissions – do not run the
engine unnecessarily, accelerate the engine only
when working.
After finishing work, put the unit down on a level,
non-flammable surface. To reduce the risk of fire,
do not put it down near easily combustible mate‐
rials (e.g. wood chips, bark, dry grass, fuel).
If your power tool is subjected to unusually high
loads for which it was not designed (e.g. heavy
impact or a fall), always check that it is in good
condition before continuing work – see also
"Before Starting Work". Check the fuel system in
particular for leaks and make sure the safety
devices are working properly. Do not continue
operating your power tool if it is damaged. In
case of doubt, consult your servicing dealer.
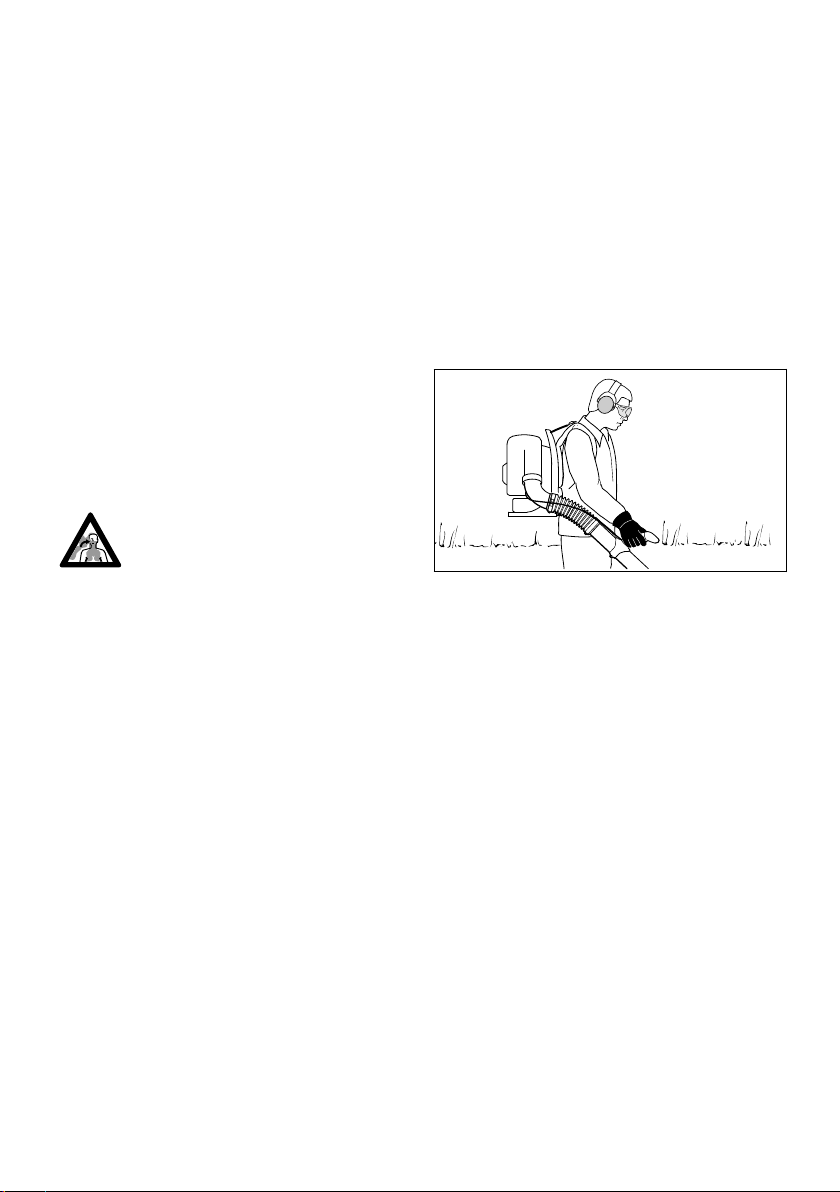
2.10 Using the Blower
0009BA001 KN
The machine is carried as a backpack. Hold and
control the blower tube with your right hand on
the control handle.
Walk slowly forwards as you work – observe the
nozzle outlet at all times – do not walk back‐
wards – risk of stumbling.
Always shut off the engine before taking the
machine off your back.
2.11 Working Technique
To minimize blowing time, use a rake and broom
to loosen dirt particles before you start blowing.
–If necessary, dampen the surface to be
cleaned in order to avoid creating too much
dust.
–Do not blow particles in the direction of
bystanders, in particular in the direction of chil‐
dren, pets, open windows or freshly washed
vehicles. Take special care in such situations.
–Remove the blow-swept debris in rubbish bins
– do not blow it onto the neighbor's land.
–Operate your power tool at reasonable times
only – not early in the morning, late at night or
during midday rest periods when people could
be disturbed. Observe local rest periods.
–Operate blowers at the lowest engine speed
necessary to accomplish the task.
2 Safety Precautions and Working Techniques English
0458-490-8321-B 5

–Check your blower before starting work. Pay
special attention to the muffler, air intakes and
air filter.
2.12 Vibrations
Prolonged use of the power tool may result in
vibration-induced circulation problems in the
hands (whitefinger disease).
No general recommendation can be given for the
length of usage because it depends on several
factors.
The period of usage is prolonged by:
–Keeping your hands warm
–Work breaks
The period of usage is shortened by:
–Any personal tendency to suffer from poor cir‐
culation (symptoms: frequently cold fingers,
itching).
–Low outside temperatures.
–Gripping force (a tight grip hinders circulation).
Continual and regular users should monitor
closely the condition of their hands and fingers. If
any of the above symptoms appear (e.g. tingling
sensation in fingers), seek medical advice.
2.13 Maintenance and Repairs
Service the machine regularly. Do not attempt
any maintenance or repair work not described in
the instruction manual. Have all other work per‐
formed by a servicing dealer.
STIHL recommends that you have servicing and
repair work carried out exclusively by an author‐
ized STIHL servicing dealer. STIHL dealers are
regularly given the opportunity to attend training
courses and are supplied with the necessary
technical information.
Only use high-quality replacement parts in order
to avoid the risk of accidents and damage to the
machine. If you have any questions in this
respect, consult a servicing dealer.
STIHL recommends the use of genuine STIHL
replacement parts. They are specifically
designed to match your model and meet your
performance requirements.
To reduce the risk of injury, always shut off the
engine before carrying out any maintenance or
repairs or cleaning the machine. – Exception:
Carburetor and idle speed adjustments.
Do not turn the engine over on the starter with
the spark plug boot or spark plug removed since
there is otherwise a risk of fire from uncontained
sparking.
Do not service or store your machine near open
flames.
Check the fuel filler cap for leaks at regular inter‐
vals.
Use only a spark plug of the type approved by
STIHL and make sure it is in good condition –
see "Specifications".
Inspect the ignition lead (insulation in good con‐
dition, secure connection).
Check the condition of the muffler.
To reduce the risk of fire and damage to hearing,
do not operate your machine if the muffler is
damaged or missing.
Do not touch a hot muffler since burn injury will
result.
Vibration behavior is influenced by the condition
of the AV elements – check the AV elements at
regular intervals.
Shut off the engine before rectifying problems.
3 Assembling the Unit
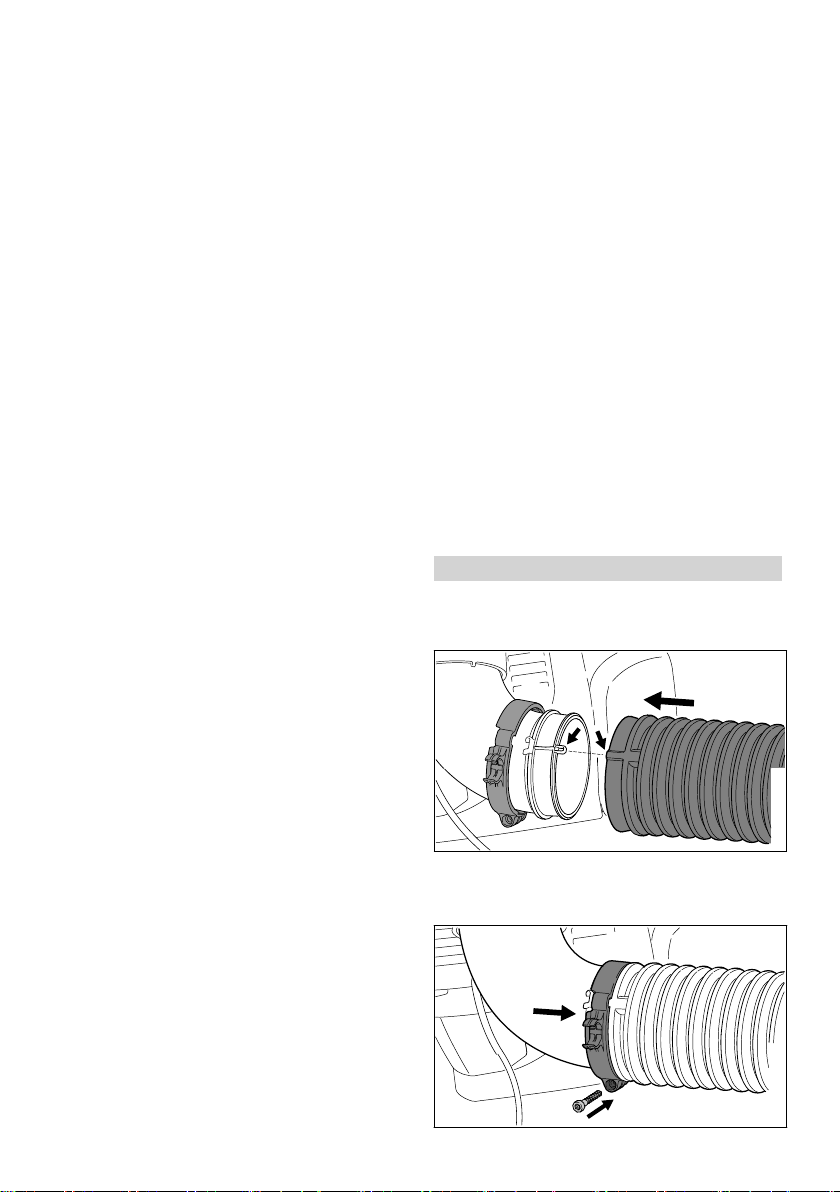
3.1 Mounting the Hose Clamps and
Pleated Hose
1
0416BA001 KN
2
3
► Push the hose clamp (1) (with retainer for
throttle cable) onto the elbow (3).
► Push the pleated hose (2) over the elbow (3).
2
1
4
0416BA002 KN
3
English 3 Assembling the Unit
6 0458-490-8321-B

► Push the hose clamp (1) onto the pleated
hose (2) – screw boss facing down.
► Secure the hose clamp (1) with the screw (4).
0416BA003 KN
56
2
► Push the hose clamp (5) (without retainer for
throttle cable) onto the blower tube (6).
► Push the blower tube (6) into the pleated
hose (2).
56
2
0416BA004 KN
7
► Push the hose clamp (5) onto the pleated
hose (2).
► Line up the hose clamp (5) and blower
tube (6) – as shown.
► Secure the hose clamp (5) with the screw (7).
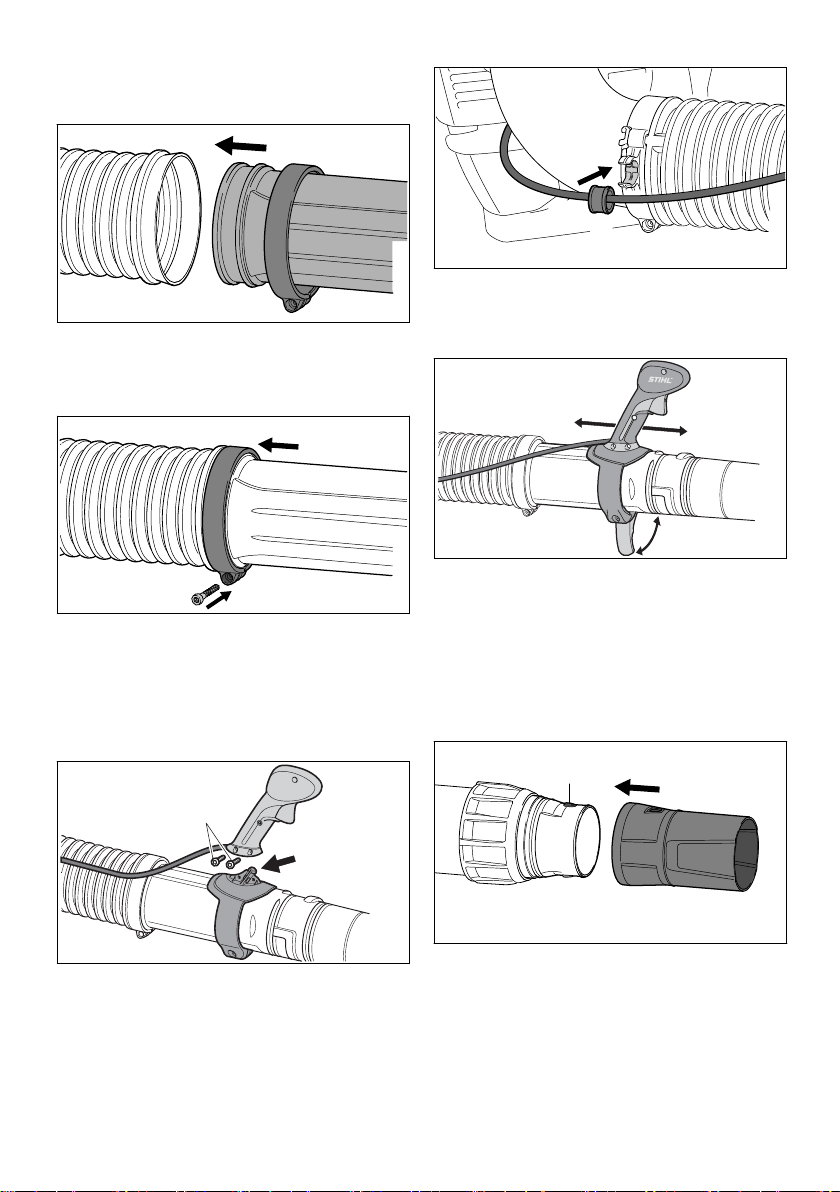
3.2 Mounting the Control Handle
1
3
2
0000-GXX-2045-A1
► Push the control handle (1) onto the
mount (2) .
► Insert and tighten down the screws (3) firmly.
4
6
5
0416BA008 KN
► Engage the throttle cable (4) with sleeve (5) in
the retainer (6).
3.3 Adjusting the Control Handle
0416BA007 A1
1
2
3
► Open the clamping lever (3).
► Move the control handle (1) along the blower
tube (2) to the most comfortable position.
► Close the clamping lever (3).
3.4 Mounting, Adjusting and
Removing the Nozzle
3.4.1 Mounting the Nozzle
3
0416BA005 KN
1
2
► Push the nozzle (1) onto the blower tube (2)
and engage it on the lugs (3).
3 Assembling the Unit English
0458-490-8321-B 7

3.4.2 Removing the Nozzle
1
3
0416BA006 KN
2
► Rotate the nozzle (1) in the direction of the
arrow until the lugs (3) are covered.
► Pull the nozzle (1) off the blower tube (2).
3.5 Adjusting the Blower Tube
1
0416BA015 KN
2
► Loosen the union nut (1).
► Pull the blower tube (2) out to the required
length.
► Tighten the union nut (1).
3.6 Wear Mark on Nozzle
0416BA009 KN
The front end of the nozzle wears away due to
abrasive ground contact during operation. The
nozzle is subject to normal wear and tear and
must be replaced when the wear mark is
reached.
3.7 Transport Aid
The blower tube can be hooked to the blower
housing for storage and transport.
0000-GXX-5383-A0
► Attach D-ring to the hook on the blower hous‐
ing.
WARNING
Air or dirt particles can be blown into the user’s
face and eyes if the engine is started while the
blower tube is still on the hook.
► Unhook the blower tube before starting the
engine.
NOTICE
If clothing or other objects are hung on the hook,
the intake openings may be covered and cause
the engine to overheat.
► Use the hook only for hanging up the blower
tube for storage or transport.
► Do not hang clothing or other items on the
hook.
4 Adjusting the Throttle
Cable
It may be necessary to correct the adjustment of
the throttle cable after assembling the machine
or after a prolonged period of operation.
Adjust the throttle cable only when the unit is
completely and properly assembled.
002BA655 KN
► Set the throttle trigger to the full throttle posi‐
tion.
English 4 Adjusting the Throttle Cable
8 0458-490-8321-B

► Carefully rotate the screw in the throttle trigger
in the direction of the arrow until you feel initial
resistance. Then rotate it another half turn in
the same direction.
5 Fitting the Harness
5.1 Adjusting the Harness
A
B
271BA047 KN
A Pull the straps to tighten the harness
B Lift the tabs of the adjusters to loosen the
straps
C
D
271BA048 KN
C Close the buckle by pushing the two parts
together.
D Squeeze the hooks to open the buckle.
5.2 Fitting the harness
1
2
0000-GXX-6235-A0
► Put the blower on your back.
► Close the buckle on the waist belt (1).
5 Fitting the Harness English
0458-490-8321-B 9

► Close the buckle on the chest strap (2).
► Tighten the straps until the waist belt fits
snugly on your hips and the back padding is
against your back.
5.3 Removing the Harness
► Loosen the straps.
► Open the buckles on the chest strap and waist
belt.
► Take the blower off your back.
6 Fuel
The engine requires a mixture of gasoline and
engine oil.
WARNING
Avoid direct skin contact with fuel and breathing
in of gasoline fumes.
6.1 STIHL MotoMix
STIHL recommends using STIHL MotoMix. This
pre-blended fuel is free of benzene and lead, is
distinguished by a high octane rating, and
always provides the proper mixing ratio.
STIHL MotoMix uses STIHL HP Ultra two-stroke
engine oil for optimum engine life.
MotoMix is not available in all markets.
6.2 Mixing fuel
NOTICE
Unsuitable fuels or a mixing ratio that deviates
from the specification can lead to severe engine
damage. The engine, seals, fuel lines and fuel
tank may be damaged if low-quality gasoline or
engine oil is used.
6.2.1 Gasoline
Use only high-quality gasoline with an octane rat‐
ing of at least 90 ROC – leaded or unleaded.
Gasoline with an alcohol component exceeding
10% can cause impaired engine performance in
engines with manually adjustable carburetors
and thus should not be used in these engines.
Engines with M-Tronic deliver full engine per‐
formance using gasoline with an alcohol compo‐
nent of up to 27% (E27).
6.2.2 Engine oil
If you mix the fuel yourself, use only STIHL two-
stroke engine oil or another high-performance
engine oil classified as JASO FB, JASO FC,
JASO FD, ISO-L-EGB, ISO-L-EGC or ISO-L-
EGD.
STIHL specifies STIHL HP Ultra two-stroke
engine oil or an equivalent high-performance
engine oil in order to maintain emission limits
over the machine’s service life.
6.2.3 Mixing ratio
with STIHL two-stroke engine oil 1:50; 1:50 =
1 part oil + 50 parts gasoline
6.2.4 Examples
Quantity of gaso‐
line
STIHL two-stroke
engine oil 1:50
Liters Liters (ml)
1 0.02 (20)
5 0.10 (100)
10 0.20 (200)
15 0.30 (300)
20 0.40 (400)
25 0.50 (500)
► Pour oil into an approved safety fuel canister
first, then add gasoline and mix thoroughly
6.3 Storing fuel mixture
Store in approved safety fuel canisters only in a
dry, cool and secure place protected against light
and sunlight.
Fuel mixture deteriorates with age – mix only as
much as needed for a few weeks. Do not store
fuel mixture for longer than 30 days. The fuel
mixture can become unusable more quickly if
exposed to light, sunlight or low or high tempera‐
tures.
STIHL MotoMix however can be stored for up to
5 years without any problems.
► Shake the canister containing the fuel mixture
thoroughly before refueling
WARNING
Pressure may have built up in the canister –
open it carefully.
► The fuel tank and the canister in which fuel
mixture is stored should be cleaned thoroughly
from time to time
Residual fuel and the liquid used for cleaning
must be disposed of in accordance with regula‐
tions and without harming the environment!
English 6 Fuel
10 0458-490-8321-B
Altri manuali per BR 800
3
Questo manuale è adatto per i seguenti modelli
1
Indice
Altri manuali Stihl Soffiatore

Stihl
Stihl KGA 770 Manuale utente

Stihl
Stihl BG 55 Manuale utente

Stihl
Stihl SR 430 Manuale utente

Stihl
Stihl BGE 61 Manuale utente

Stihl
Stihl BGA 60 Manuale utente

Stihl
Stihl BG 56 Manuale utente

Stihl
Stihl BGA 85 Manuale utente

Stihl
Stihl BGA 45 Manuale utente

Stihl
Stihl BR 380 Manuale utente

Stihl
Stihl BGA 86 Manuale utente

Stihl
Stihl BG 50 Manuale utente

Stihl
Stihl BGA 60 Manuale utente

Stihl
Stihl BR 800 Manuale utente

Stihl
Stihl BR 200 Manuale utente

Stihl
Stihl BR 45 Manuale utente

Stihl
Stihl BG 56 Manuale utente

Stihl
Stihl 450 Manuale utente

Stihl
Stihl BR 500 Manuale utente

Stihl
Stihl BGA 56 Manuale utente

Stihl
Stihl BGA 300.0 Manuale utente