Summit Treestands 81080 Manuale utente

Climbing Treestands
INSTRUCTIONS
WARNING
!
You must fully read, understand and follow these warnings
and instructions (written and video)! Failure to follow these
instructions may cause serious injury or death!!
• WHEN HUNTING FROM A TREESTAND FALLS CAUSING INJURY OR DEATH CAN OCCUR ANY TIME AFTER
LEAVING THE GROUND! FOR THOSE REASONS ALWAYS WEAR A FALL ARREST SYSTEM (FAS) COMPRISING A
FULL BODY HARNESS AT ALL TIMES AFTER LEAVING THE GROUND. YOU MUST STAY CONNECTED AT ALL TIMES
AFTER LEAVING THE GROUND WHILE USING ANY ELEVATED HUNTING PLATFORM. SINGLE SAFETY BELTS AND
CHEST HARNESSES ARE NO LONGER ALLOWED AND SHOULD NEVER BE USED. IF YOU ARE NOT WEARING A
FULL BODY HARNESS THAT IS PROTECTING YOU FROM A FALL, DO NOT LEAVE THE GROUND!
• READ AND UNDERSTAND ALL OF THE MANUFACTURER’S WARNINGS AND INSTRUCTIONS AND USE ALL SAFETY
DEVICES PROVIDED. CONTACT SUMMIT TREESTANDS FOR ANY QUESTIONS. FAILURE TO DO SO COULD RESULT
IN INJURY OR DEATH!
• A SIGNAL DEVICE SUCH A MOBILE PHONE, RADIO, WHISTLE, SIGNAL FLARE OR PERSONAL LOCATOR DEVICE
(PLD) MUST BE ON YOUR PERSON AND READILY AVAILABLE AT ALL TIMES! ALWAYS INFORM SOMEONE OF
YOUR HUNTING LOCATION, WHERE THE TREESTAND WILL BE LOCATED AND THE EXPECTED DURATION OF THE
HUNT!
• DO NOT USE ANY TREESTAND UNLESS YOU ARE IN GOOD PHYSICAL SHAPE AND HAVE NO PHYSICAL
LIMITATIONS OR MEDICAL CONDITIONS WHICH MAY PREVENT YOU FROM SAFELY USING THIS PRODUCT.
ALWAYS CONSULT A PHYSICIAN IF YOU HAVE ANY QUESTIONS ABOUT YOUR PHYSICAL ABILITY TO USE THIS
PRODUCT.
• NEVER USE A TREESTAND WHILE TAKING DRUGS, ALCOHOL OR CERTAIN PRESCRIPTION DRUGS! ALWAYS
CONSULT A PHYSICIAN IF YOU HAVE ANY QUESTION ABOUT TAKING SPECIFIC MEDICATIONS AND USING THIS
PRODUCT!
• NEVER USE A TREESTAND DURING INCLEMENT WEATHER SUCH AS RAIN, LIGHTNING, WINDSTORMS OR ICY
CONDITIONS! END YOUR HUNT AND RETURN TO THE GROUND IF ANY OF THESE INCLEMENT CONDITIONS ARISE.
• NEVER USE A TREESTAND WHEN FEELING ILL, NAUSEOUS, DROWSY OR DIZZY!
• BE WELL RESTED AND NEVER HURRY. HURRYING CAUSES ACCIDENTS!
• NEVER USE A TREESTAND ON A DEAD, LEANING, DISEASED, LOOSE BARKED TREE, ON A UTILITY POLE OR ON
TREES THAT HAVE ANY OBSTRUCTIONS THAT MAY LIMIT TREESTAND USE! NEVER RELY ON A TREE BRANCH
FOR SUPPORT!
• NEVER JUMP OR BOUNCE ON A TREESTAND TO SECURE IT TO THE TREE!
• PULL UP A BOW, BACKPACK, FIREARM OR OTHER EQUIPMENT ONLY AFTER BEING SECURE IN THE TREESTAND.
FIREARMS MUST BE PULLED UP UNLOADED, CHAMBER OPEN AND MUZZLE DOWN!
• UNDER NO CIRCUMSTANCE SHOULD YOU EVER RELEASE THE CABLE FROM THE PLATFORM OR SEAT CLIMBER TO
MAKE ADJUSTMENTS ONCE YOU ARE OFF THE GROUND!!!
• NEVER MODIFY YOUR STAND IN ANY WAY BY MAKING REPAIRS, REPLACING PARTS, OR ALTERING, ADDING OR
ATTACHING ANYTHING TO IT EXCEPT IF EXPLICITLY AUTHORIZED IN WRITING BY THE MANUFACTURER!
• PRACTICE INSTALLING, ADJUSTING AND USING YOUR TREESTAND AT GROUND LEVEL PRIOR TO USING IT AT
ELEVATED POSITIONS!
• INSTRUCTIONS (WRITTEN AND VIDEO) SHOULD BE KEPT IN A SAFE PLACE AND REVIEWED AT LEAST ANNUALLY.
IT IS THE RESPONSIBILITY OF THE TREESTAND OWNER TO FURNISH THE COMPLETE INSTRUCTIONS TO ANY
PERSON WHO BORROWS OR PURCHASES THE TREESTAND! THIS SUMMIT TREESTAND IS DESIGNED TO BE USED
AS A COMPLETE SYSTEM - NEVER LOAN OR SELL ONLY A PORTION OF THE CLIMBING TREESTAND SYSTEM.
• BEFORE EACH USE OF YOUR SUMMIT TREESTAND, ALWAYS INSPECT THE TREESTAND AND HARNESS FOR ANY
DAMAGE, CRACKS, TEARS, CABLE WEAR OR ABRASION THAT MAY HAVE OCCURRED IN TRANSPORTING /
STORING YOUR TREESTAND. DO NOT USE IF ANY DAMAGE IS FOUND! CONTACT CUSTOMER SERVICE FOR THE
APPROPRIATE REPAIR / REPLACEMENT PROCEDURE!
• DO NOT LEAVE YOUR TREESTAND OUTDOORS OR STORE IT OUTDOORS WHEN IT IS NOT BEING USED! ANY
STAND TUBING THAT IS ALLOWED TO FILL WITH RAINWATER AND FREEZE WILL RUPTURE OR BURST - DO NOT
USE YOUR TREESTAND IF THIS OCCURS!
FORM# 18073 - 2/2011
GENERAL WARNINGS AND PRECAUTIONS PG 1
SECTION 1 - INDEX PG 2
SECTION 2 - TREE SIZE / WEIGHT LIMITS PG 2
SECTION 3 - PARTS LIST PG 2-4
SECTION 4 - SETUP AND USE (ALL STAND MODELS) PG 4-6
GROUP A STANDS (81080, 81081, 81109, 81110, 81069, 81506, 81507, 81533, 81052, 81529, 81082, 81083, 81090)
SECTION 5A - CLIMBING UP / CLIMBING DOWN (GROUP A STANDS) PG 6-9
SECTION 5B - BACKPACKING (GROUP A STANDS) PG 9-10
GROUP B STANDS (81085, 81086)
SECTION 6A - CLIMBING UP / CLIMBING DOWN (GROUP B STANDS) PG 10-13
SECTION 6B - BACKPACKING (GROUP B STANDS) PG 13-14
GROUP C STANDS (81091, 81092)
SECTION 7A - CLIMBING UP / CLIMBING DOWN (GROUP C STANDS) PG 13-18
SECTION 7B - BACKPACKING (GROUP C STANDS) PG 18-19
SECTION 8 - TIPS PG 19
SECTION 9 - MAINTENANCE AND CARE PG 19
SECTION 10 - HARNESS SUSPENSION PG 20
SECTION 11 - LIMITED WARRANTY PG 20
BOX CONTENTS (ALL MODELS)
DESCRIPTION
PLATFORM (ASSEMBLED)
INCLUDES RAPIDCLIMB STIRRUPS, BACKPACK
STRAPS, UMBILICAL ROPE
SEAT CLIMBER (ASSEMBLED)
INCLUDES ARM PADS, UTILITY STRAP
FOAM SEAT - STYLE AND CAMO MAY VARY
CLIMBING CABLES
ACCESSORY PACKET
ACCESSORY PACKET (ALL MODELS)
PN DESCRIPTION QTY
83054 SUMMIT 4 POINT SAFETY HARNESS W/ 1
ATTACHED SRS STRAP
HARNESS SAFETY STRAP 1
18007 WARRANTY CARD 1
10915 SUMMIT DECAL 1
18072 WRITTEN HARNESS INSTRUCTIONS 1
18071 SAFETY AND INSTRUCTIONAL DVD 1
Please call 256-353-0634 or visit http://www.summitstands.com/contactus/
if you have any questions, if you need replacement parts, if you have any missing parts or if the
included DVD does not play.
Stand Minimum and Maximum Tree Size:
8-20” Diameter
Weight Limits: (includes hunter’s weight PLUS weight of all gear carried into the treestand)
DO NOT EXCEED THESE LIMITS!
300 lb Rated Stands:
81080 Viper SD 81081 Ultimate Viper SD 81110 Viper SDC
81109 Viper SD XXX 81533 Viper SD Infinity 81069 180 SS
81085 Razor SD 81086 OpenShot SD
81091 Dagger SD 81092 Blade SD
350 lb Rated Stands:
81082 Goliath SD 81083 Titan SD 81090 180 Max SD
81532 Goliath Xtreme
You MUST also view the enclosed DVD BEFORE using your new treestand!!
INDEX
1
TREE SIZE / WEIGHT LIMIT
2
WARNING
!
You must fully read, understand and follow these
warnings and instructions (written and video)! Failure
to follow these instructions may cause serious injury or
death!!
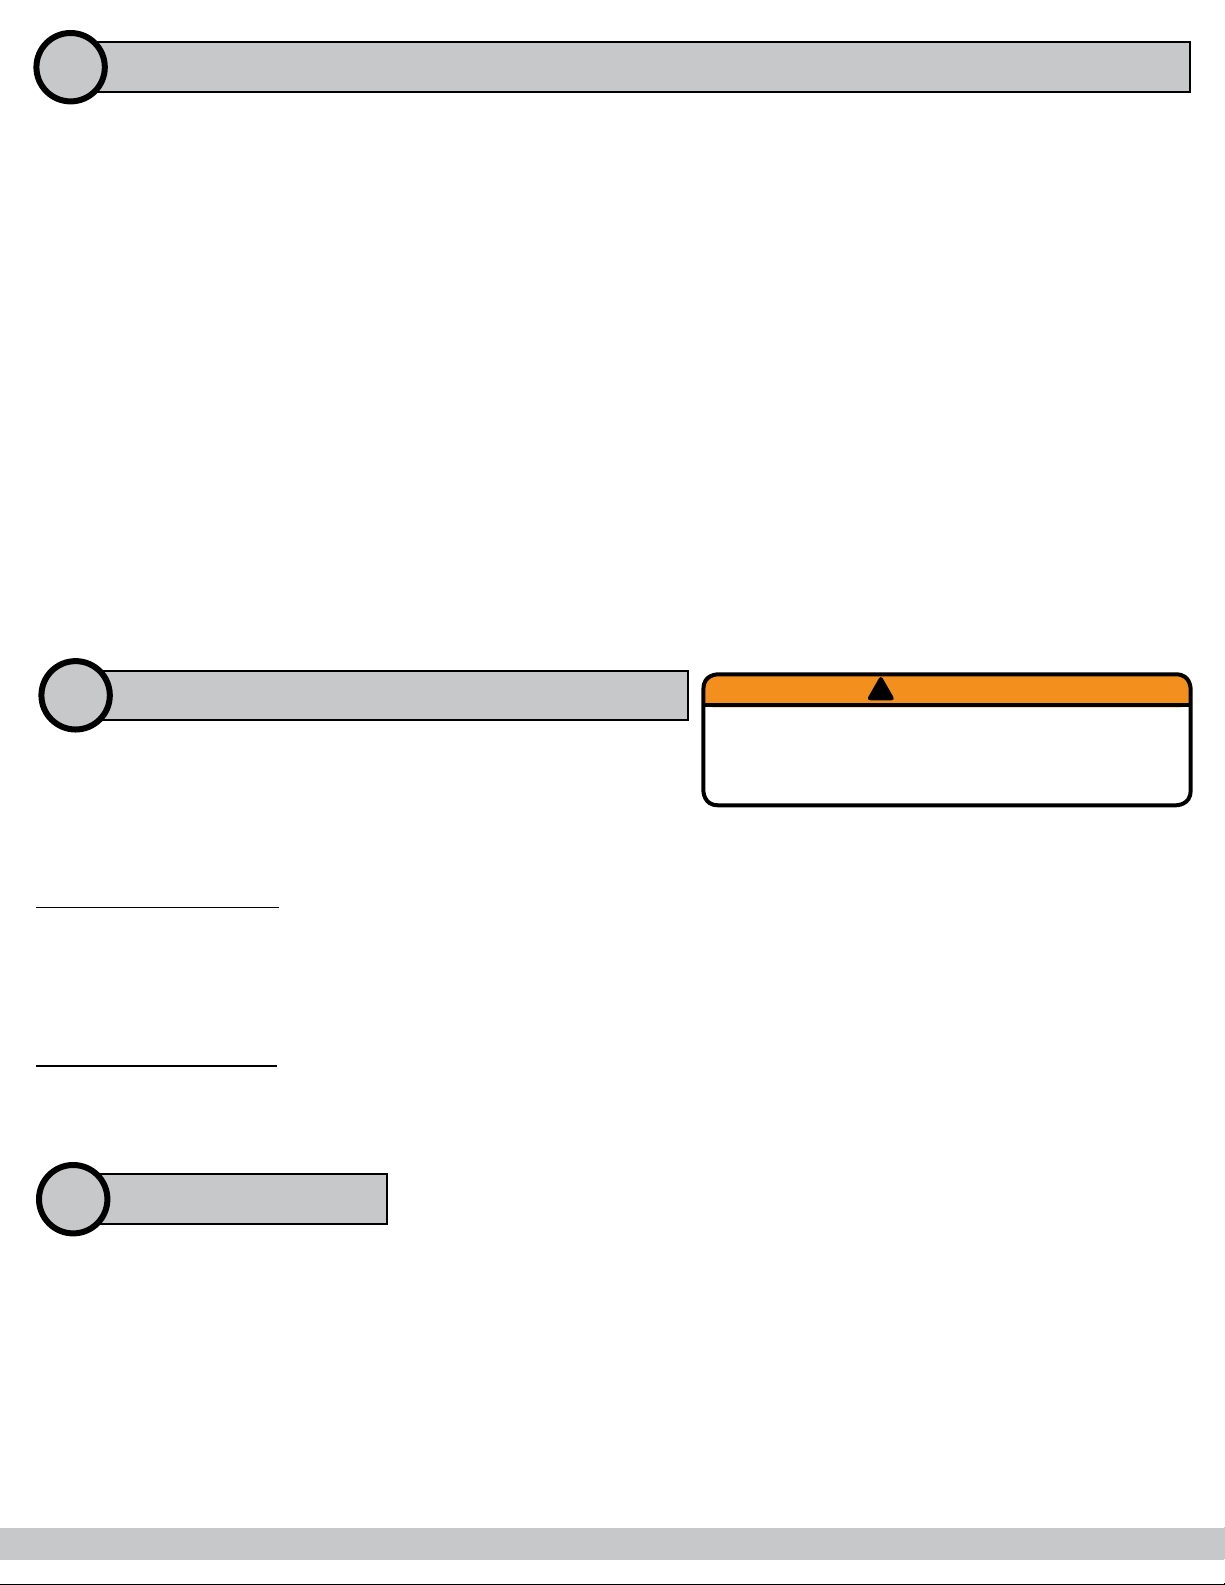
PARTS LIST
3
page 2
VIPER (ALL MODELS), GOLIATH SD, SUMMIT 180, TITAN SD, 180 MAX SD
page 3
PN DESCRIPTION QTY
70222 A. 16” CAMO ARM PADS 3
(180 MODELS USE ONE 72” ARM PAD PN 70226)
10656 B. IN-LINE CABLE TIE (2 PER PAD) 6
VARIES C. CAMO SEAT 1
30700 D. CLIMBING CABLE 2
30341 E. STIRRUP BUNGEE WITH HOOK 1
40274 F. BACKPACK STRAP ASSEMBLY 1
USE PN 70258 FOR 81109
USE PN 70257 FOR 81110
30536 G. STAND UMBILICAL ROPE 1
30285 H. GREEN TOURNIQUET STRAP 1
10534 I. RAPIDCLIMB STIRRUP 2
USE PN 10536 FOR 81109
USE PN 20534 FOR 81110
10621 J. STIRRUP BOLT 2
10623 K. STIRRUP WING NUT 2
A
A
A
D
D
J
I
K
C
B
STIRRUP ASSEMBLY
E
BACKPACK STRAP ASSEMBLY
F
G
H
PN DESCRIPTION PLATFORM SEAT CLIMBER
81080 VIPER SD 5 CHANNEL STANDARD
81081 ULTIMATE VIPER SDE 5 CHANNEL STANDARDA
81110 VIPER SDCB, F 5 CHANNEL CAMO
81109 VIPER SD XXXC, F 5 CHANNEL BLACK
81533 VIPER SD INFINITYD 5 CHANNEL STANDARD
81069 180 SS 5 CHANNEL CURVED FRONT
81082 GOLIATH SD 5 CHANNEL WIDE
81532 GOLIATH XTREMED 5 CHANNEL WIDE
81083 TITAN SD 6 CHANNEL WIDE - LONG
81090 180 MAX SD 6 CHANNEL CURVED FRONTA
81085 RAZOR SD 5 CHANNEL HAND CLIMBER - FOLDING BAR
81086 OPENSHOT SD 4 CHANNEL HAND CLIMBER
81091 DAGGER SD 5 CHANNEL FOLDING HAND CLIMBER FOLDING
81092 BLADE SD 5 CHANNEL FOLDING STANDARD FOLDING
A. SURROUND SEAT
B. CAMO STIRRUPS
C. BLACK STIRRUPS
D. FOOTREST
E. GUN REST, CAMO MAT, DROP BLIND INCLUDED
F. DELUXE BACKPACK STRAPS
STAND CONFIGURATION
PART NUMBERS
OPENSHOT SD 81086
DAGGER SD 81091, BLADE SD 81092
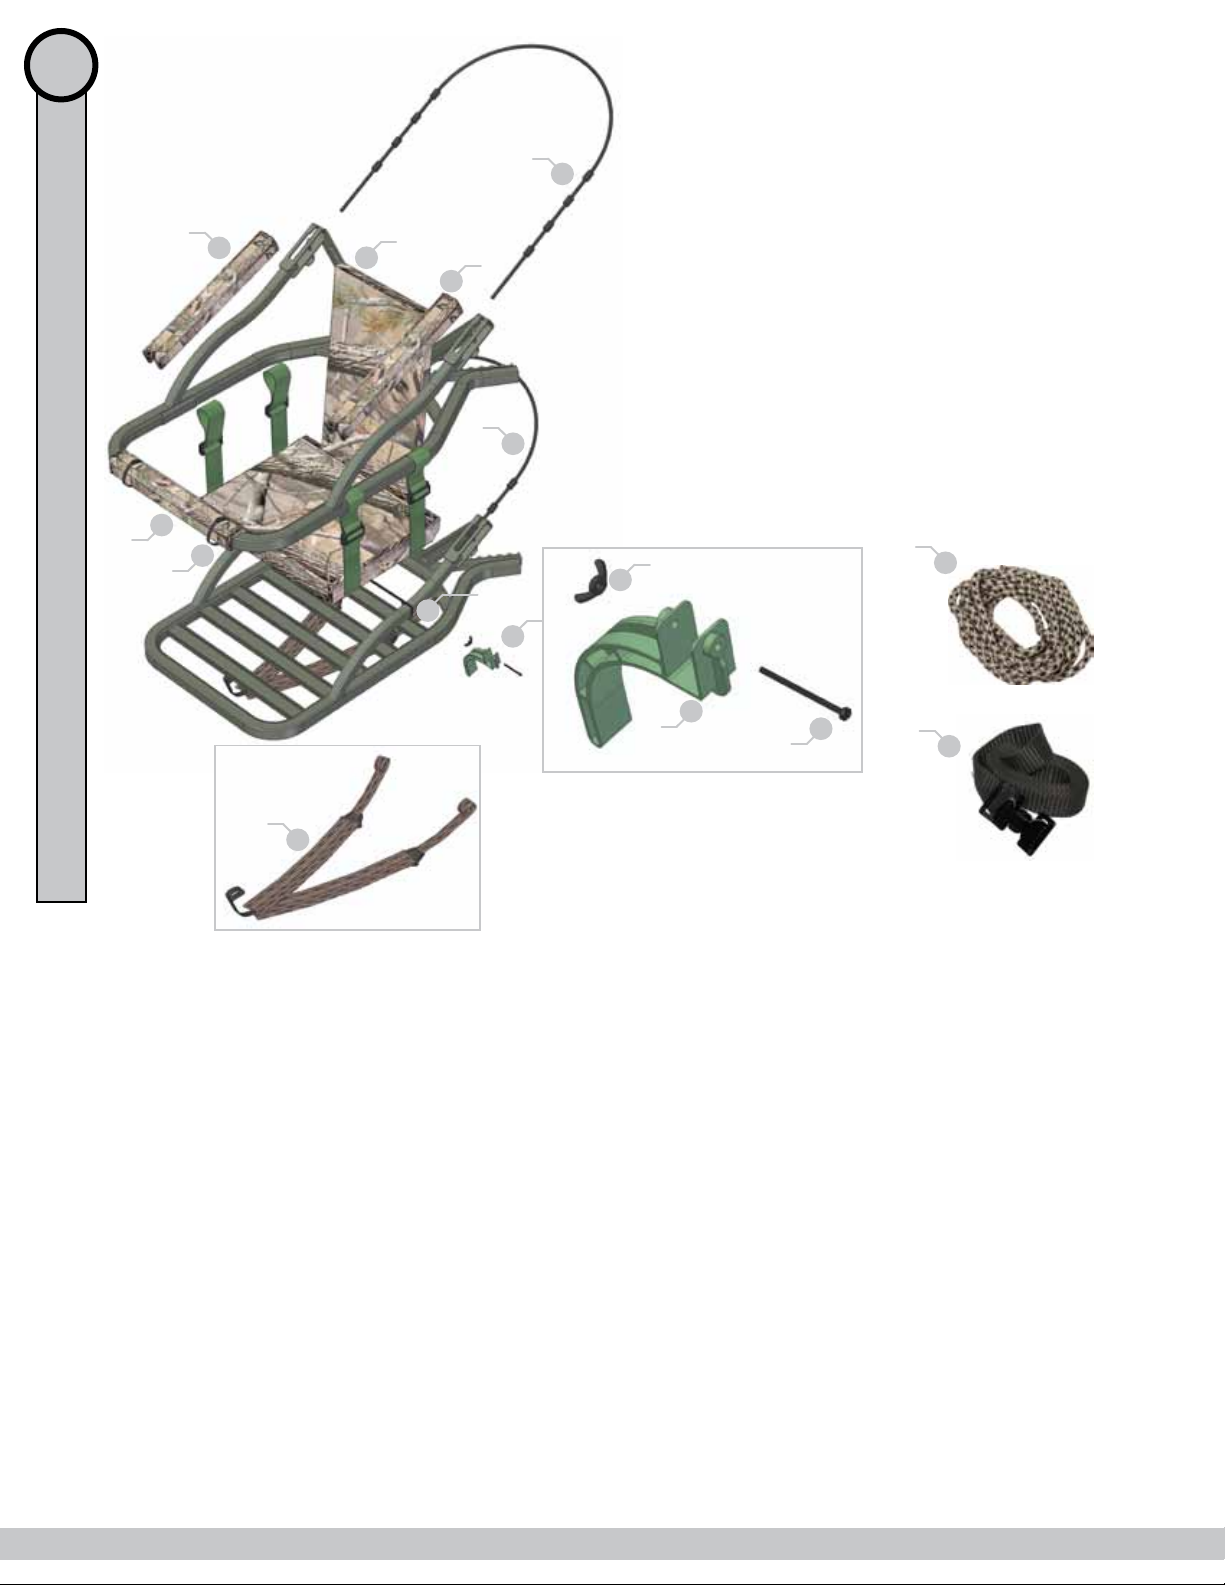
page 4
PN DESCRIPTION QTY
70223 A. 12” CAMO ARM PADS
BLADE - 3 | DAGGER - 2 | OPENSHOT - 0
10656 B. IN-LINE CABLE TIE (2 PER PAD)
BLADE - 6 | DAGGER - 4 | OPENSHOT - 0
VARIES C. CAMO SEAT 1
30700 D. CLIMBING CABLE 2
30341 E. STIRRUP BUNGEE WITH HOOK 1
40274 F. BACKPACK STRAP ASSEMBLY 1
30536 G. STAND UMBILICAL ROPE 1
30285 H. GREEN TOURNIQUET STRAP 1
10534 I. RAPIDCLIMB STIRRUP 2
10621 J. STIRRUP BOLT 2
10623 K. STIRRUP WING NUT 2
10666 L. KNOB WITH STUD (BLADE, DAGGER) 2
PART NUMBERS
A
A
D
C
STIRRUP ASSEMBLY
E
D
BACKPACK STRAP ASSEMBLY
F
G
H
L
J
I
K
B
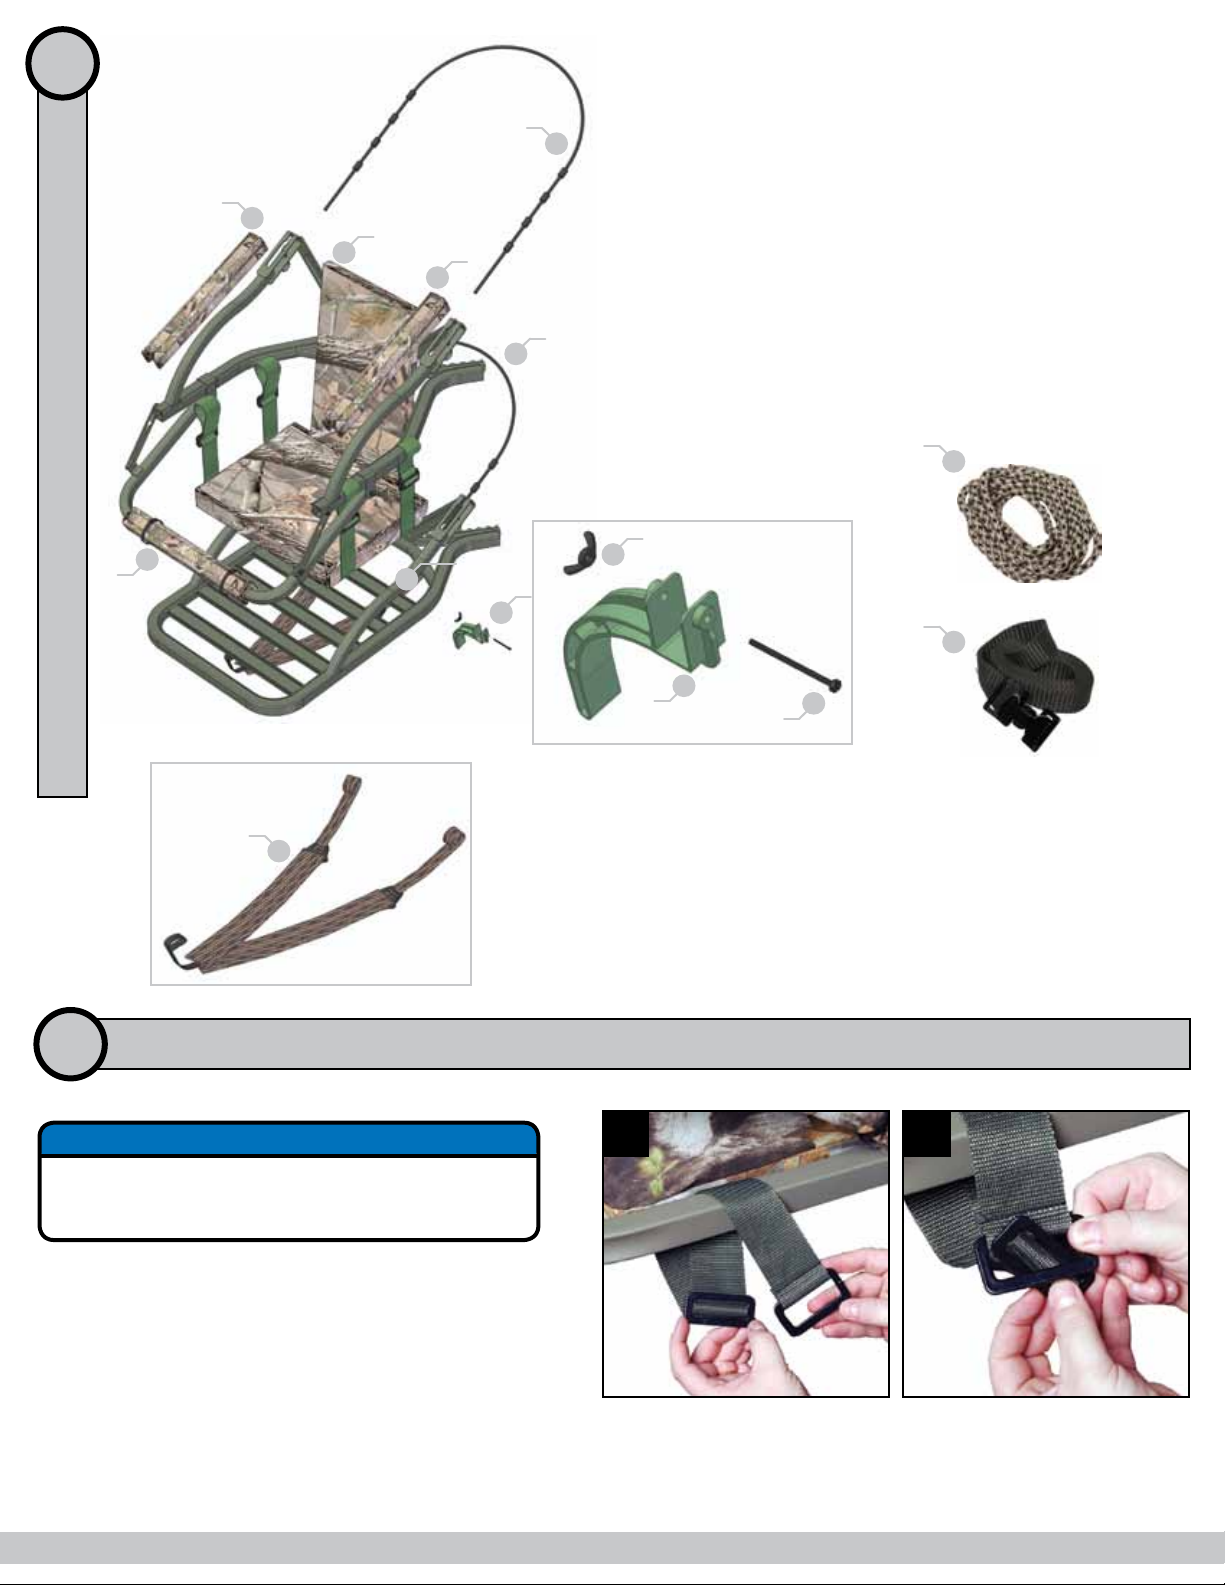
SETUP AND USE (ALL TREESTAND MODELS)
4
FOAM SEAT
NOTICE
The foam seat included with these treestands is
removable for storage. DO NOT leave your stand
outdoors when it is not being used.
1
1. Position the seat inside of the seat climber frame.
2. Wrap the seat strap webbing over the frame from the
inside out as shown in figure 1.
3. Turn the three bar slide slightly sideways and push it
through the metal D buckle that is sewn onto the end of the
strap (figure 2).
2
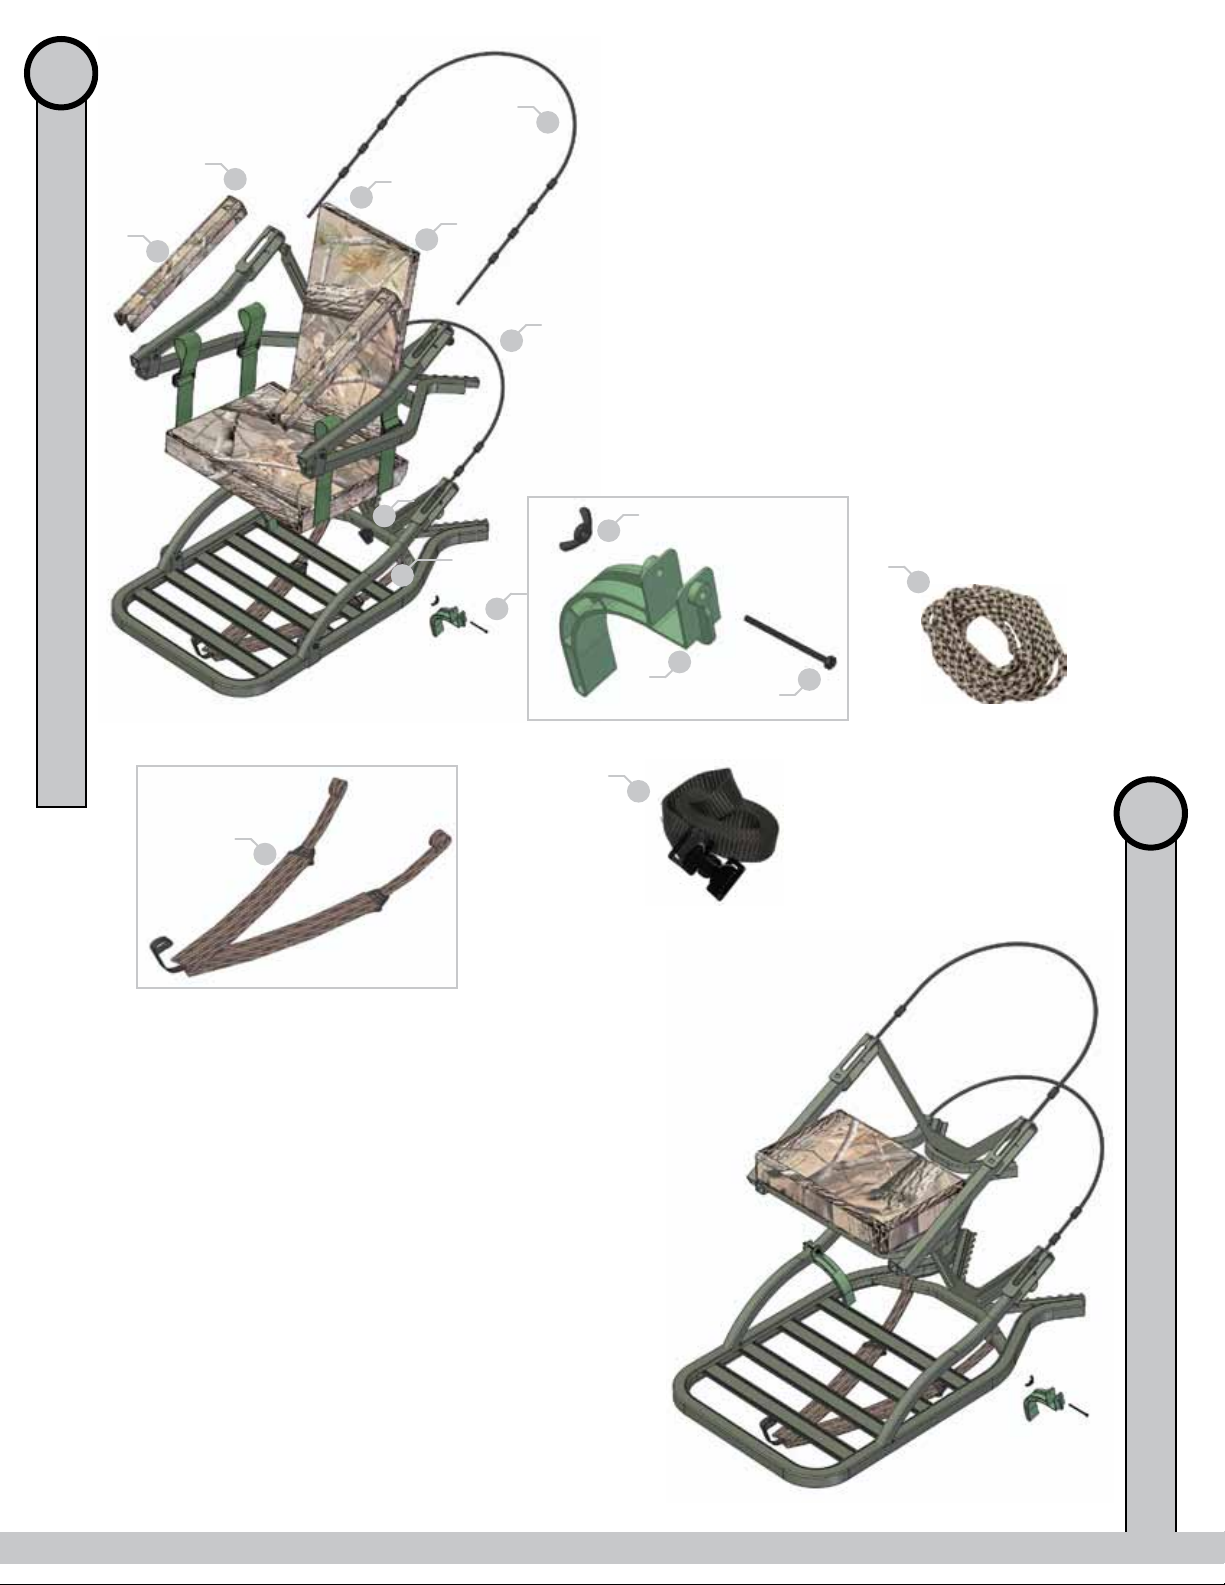
RAZOR SD 81085
RAPIDCLIMB STIRRUPS
Occasional readjustment might be necessary as your footwear needs change or so that the stirrup will fit between the platform
rungs when folding the platform down. To adjust, simply loosen the wing nut and slide the stirrup up or down. It is not
necessary to completely remove the nut to adjust the stirrup.
page 5
PN DESCRIPTION QTY
70223 A. 16” CAMO ARM PADS 2
10656 B. IN-LINE CABLE TIE (2 PER PAD) 6
70200 C. CAMO SEAT 1
30700 D. CLIMBING CABLE 2
30341 E. STIRRUP BUNGEE WITH HOOK 1
40274 F. BACKPACK STRAP ASSEMBLY 1
30536 G. STAND UMBILICAL ROPE 1
30285 H. GREEN TOURNIQUET STRAP 1
10534 I. RAPIDCLIMB STIRRUP 2
10621 J. STIRRUP BOLT 2
10623 K. STIRRUP WING NUT 2
PART NUMBERS
A
A
D
C
STIRRUP ASSEMBLY
E
D
BACKPACK STRAP ASSEMBLY
F
G
H
J
I
K
B
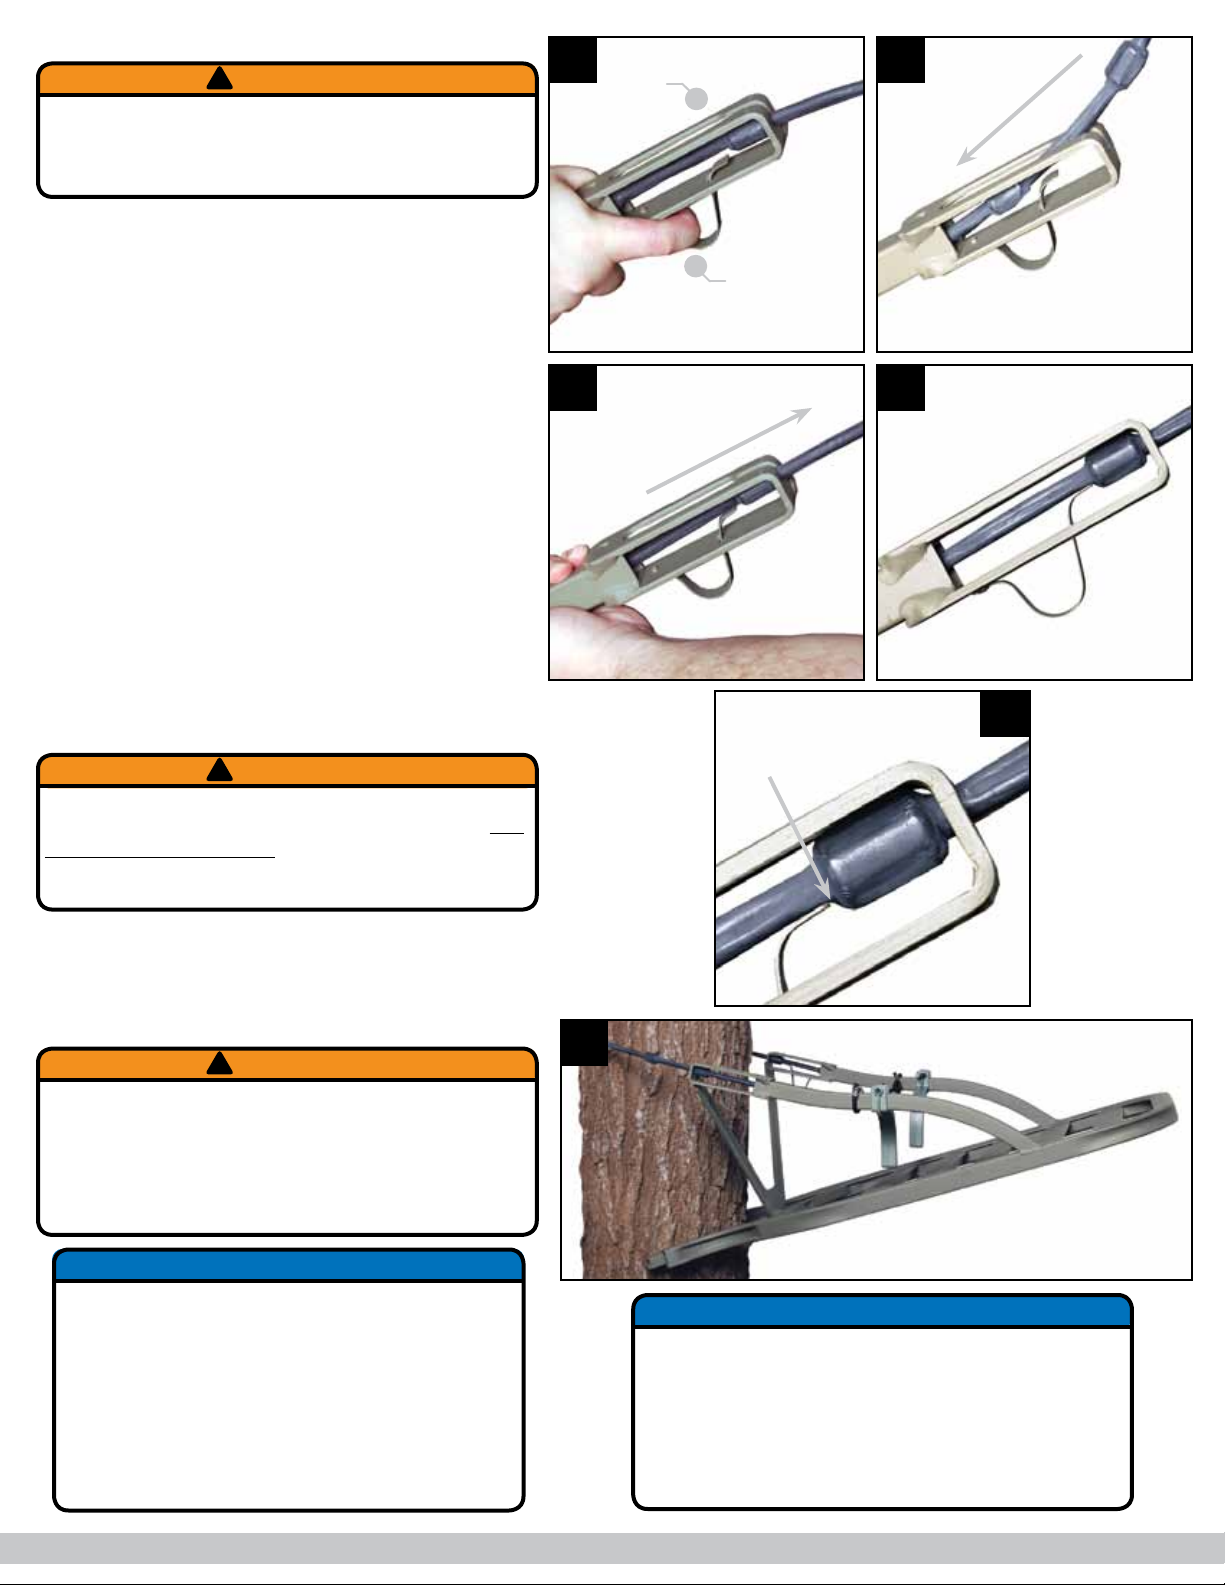
ATTACHMENT TO THE TREE
1. Attach the base platform to the tree first. To do
this, pull down and hold the QuickDraw cable spring
as shown in figure 3. This will release the locking tab
from the cable, allowing the cable to be pushed past
the locking tab. Once the cable has been pushed past
the locking tab, you can release the trigger.
2. Push the cable into the stand tubing until the cable
stop can be lifted up out of the bracket. The cable
should be loose at this point. You can now pull the
cable out of the stand.
3. Take one end of the cable around the tree and
begin to slide it down into the tubing as shown in
figure 4. Once the cable slides easily into the tubing
(it helps to bend the cable upward while pushing
down on it as it is inserted), you are ready to place it
in its final position.
4. Pull the cable towards the back of the tree and
“seat” the cable stop against the back of the bracket,
as shown in figure 5. The QuickDraw cable spring will
“lock” into place behind one of the cable stops.
You do not have to hold the QuickDraw trigger to
lock the cable in place.
5. Your cable bracket should now look like figure 6.
6. If necessary, go to the other side of the tree and
position the other end of the cable by repeating the
steps of pulling the QuickDraw cable spring, sliding
the cable into the tubing, and assuring that the
QuickDraw cable spring has locked into position.
WARNING
!
Read and understand the harness usage
instructions before attempting to climb! Be sure
to maintain full body safety harness attachment to
the tree at all times after leaving the ground.
WARNING
!
If the QuickDraw cable spring does not lock into
place behind the cable stop as shown in figure 7, DO
NOT USE THE TREESTAND since the cable can release
resulting in a user to fall! Contact summit to obtain
the proper corrective action.
NOTICE
The sole purpose of the plastic coating on the
cable is to eliminate noise. After some use you
may notice some abrasions, peeling or possibly cuts
in the coating. This coating does not affect the
performance or safety of your treestand. It is there
to eliminate unnecessary noise when sliding the cable
down into the tubing.
4
5 6
SPRING FULLY
SEATED BEHIND
CABLE STOP
7
8
WARNING
!
It is VERY IMPORTANT to inspect the cable on your
climbing treestand to ensure that there is no sign
of frayed, damaged or broken strands. DO NOT
USE THE CABLE IF IT HAS BROKEN OR DAMAGED
METAL STRANDS! Call immediately to order a
replacement if this should occur.
QUICKDRAW
SPRING
3CABLE BRACKET
NOTICE
Based on usual taper - in order to ensure the
platform and seat climber are level at hunting
height, the front edge of the treestand (the edge
away from the tree) should be 4-6 inches higher
than the edge against the tree (see figure 8).
The treestand seat climber attaches above the
standing platform and should also have the same
basic angle as the platform before you start to
climb.
page 6
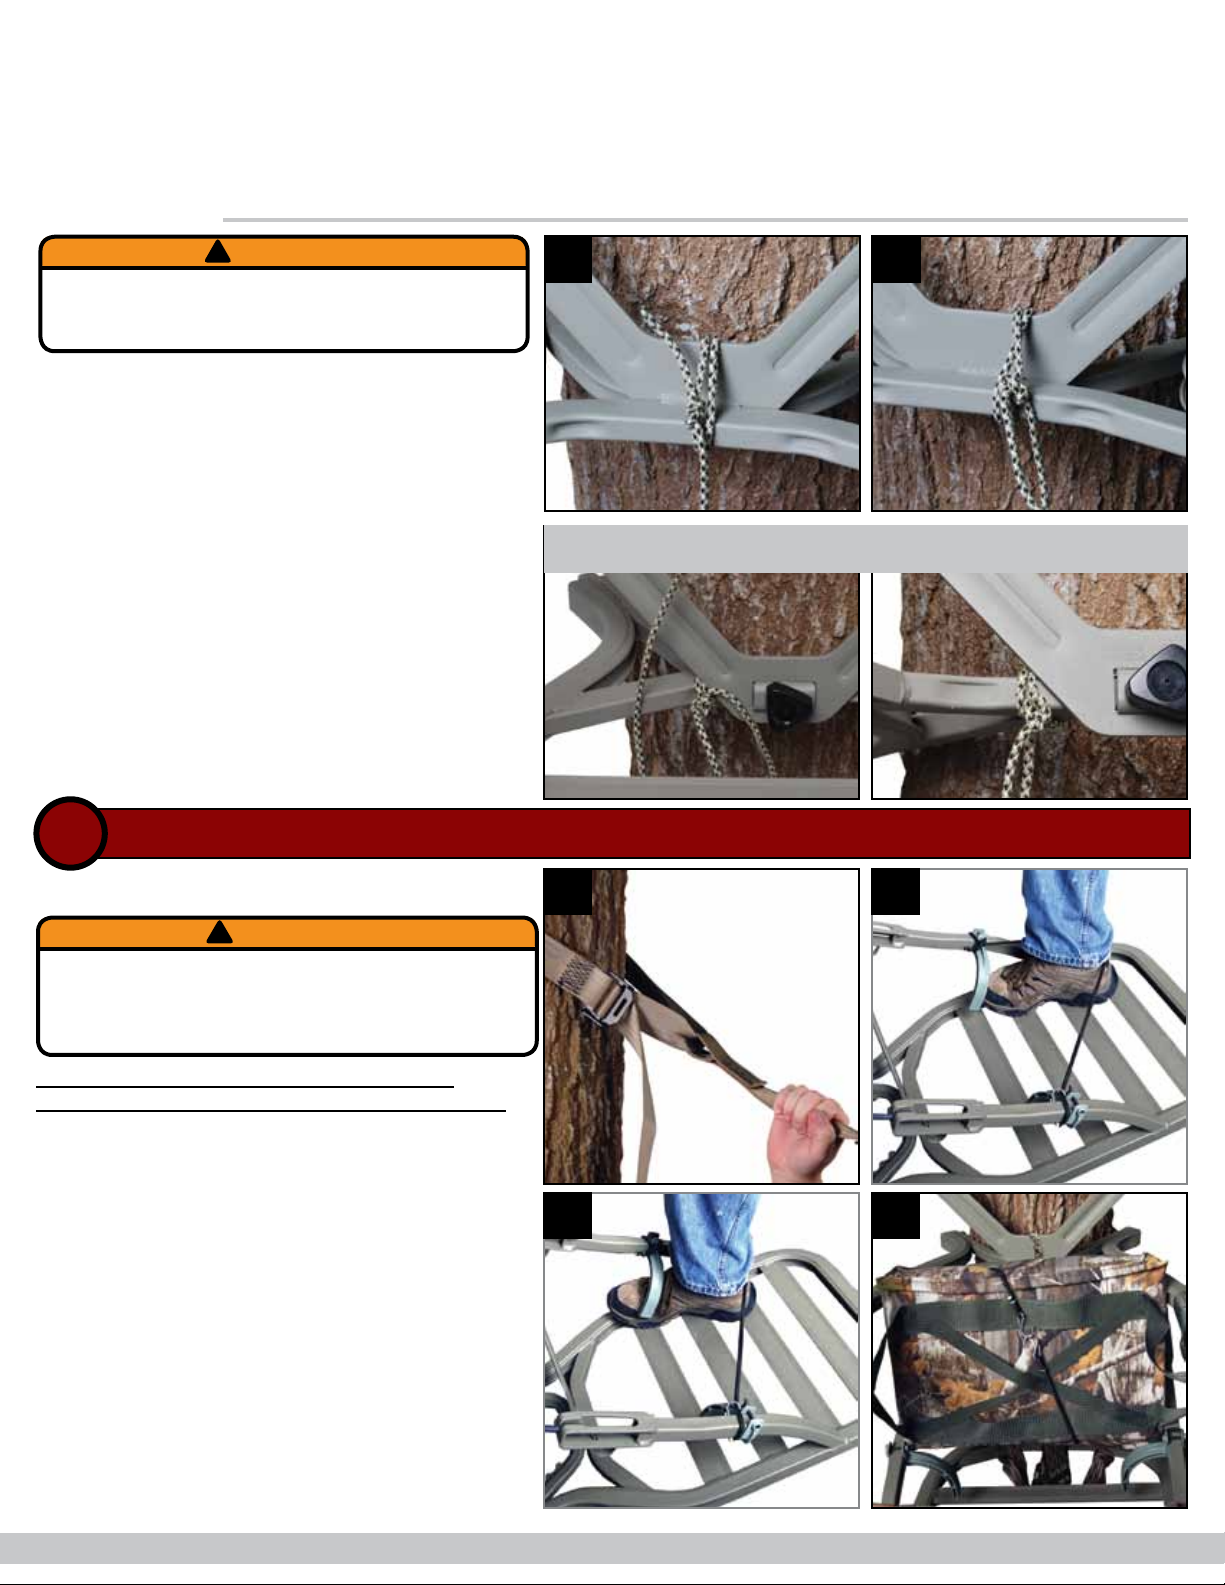
ATTACHMENT TO THE TREE (continued)
To ensure that your treestand is level at the height at which you will be hunting, observe the relative change in the tree diameter
between the base of the tree and the final treestand height. It is very important to adjust the treestand base platform and seat
at the base of the tree such that the treestand base platform will be level at the height you hunt. Trees commonly found in
swamp or marsh areas have a tendency to swell at their base, and these may require a greater starting angle in order for your
treestand to be level - as compared to a normally tapered tree.
7. Repeat Steps 1-6 for the Seat Climber portion of the Treestand.
9
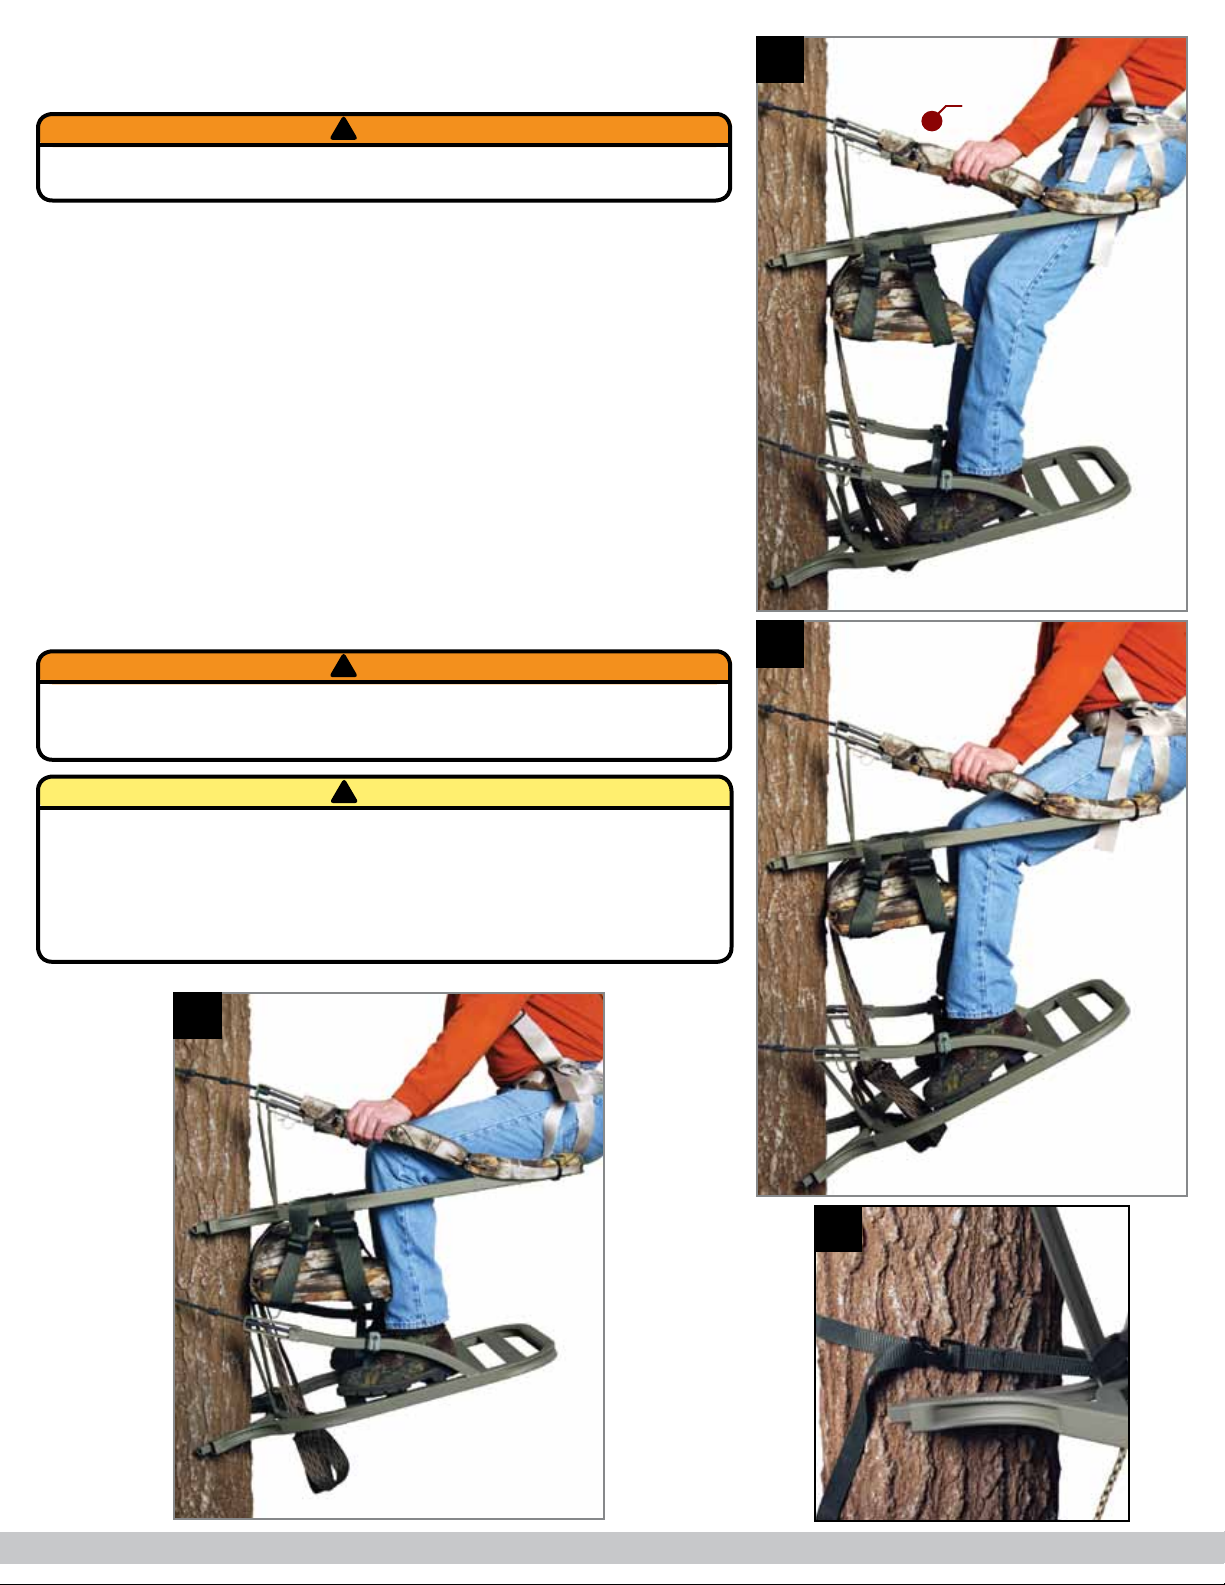
CLIMBING UP WITH YOUR NEW STAND
ALWAYS refer to the written safety harness
instructions for proper use of your safety harness.
1. Following the Harness Instructions, attach the
harness tether to the safety strap. Loop the strap
around the tree to secure it. See figure 11.
2. Your RapidClimb stirrups and bungee heel cord
should be already attached to your treestand. To use,
back your heel into the bungee heel cord (figure 12)
then simply slide your boot under the RapidClimb
stirrup. Make sure that your boot is secure under the
stirrup as shown in figure 13.
3. On all models except the 180 and 180 Max, hook
the black elastic bungee cord around the seat as
shown in figure 14 to keep it secure while you climb.
On the 180 and 180 Max you will sit in the seat and
face the tree to climb.
WARNING
!
At this point IT IS MANDATORY AND REQUIRED
that you attach your safety harness to the safety
strap around the tree and remain connected at all
times after leaving the ground.
11 12
13 14
UMBILICAL ROPE
The included umbilical rope attaches the seat climber
to the platform. In the event that control of the
platform is lost, the platform will only fall the length
of the umbilical rope. This should allow you to
retrieve the platform and re-seat it onto the tree.
Umbilical rope length should be minimized so that
the platform can be retrieved with your feet if it is
hanging from the rope.
1. Loop the umbilical rope around the platform yolk
twice and tie off with a double knot as shown in
figure 9.
2. Loop the umbilical rope around the seat climber
yolk twice and tie off with a double knot as shown in
figure 10.
3. The platform should now be connected to the seat
climber. You should only have to untie one knot to
remove the rope for backpacking.
WARNING
!
The seat climber and platform MUST BE attached
to each other with the umbilical rope, as shown in
figure 9 and figure 10 before climbing.
10
CLIMBING UP / DOWN (GROUP A STANDS)
5a
Dagger / Blade Attachment Location
page 7
CLIMBING UP WITH YOUR NEW STAND (continued)
4. To begin climbing, raise your seat climber up to just below waist height
and grasp the upright arms very firmly as shown in figure 14.
5. With all of your weight back on the padded bar, or in the seat on the
180 models, disengage the platform by lifting as shown in figure 15. Pulling
up and slightly out on the platform while pointing your toes down should
disconnect the platform from the tree.
6. Bring the platform up by bending your knees and raising your legs
straight up. Take care not to snag the cable on tree bark or limbs.
7. To re-engage the platform, rotate the platform down until the teeth
make contact with front of the tree and then rotate the platform down until
the cable makes contact with the back of the tree as shown in figure 16.
The RapidClimb stirrups are located in such a position that equal distribution
of weight will secure the platform to the tree while climbing.
8. Now ease your weight back onto the platform (to ensure that you have
not placed it on an unseen knot or limb on the backside of the tree). Once
the platform is secure, stand and slide your safety harness tether up the tree.
9. Once the platform is fully supporting your weight you can disengage the
seat climber and raise it back up to just below waist height as shown again in
figure 14. Repeat steps 4-9 until you are at your hunting height.
WARNING
!
DO NOT TIP YOUR WEIGHT ONTO YOUR TOES unless you are ready to
move the platform. This will tend to disengage the platform from the tree.
UPRIGHT
ARMS
14
16
LIFT UP
AND OUT
15
DO NOT JUMP OR BOUNCE ON THE PLATFORM OR SEAT to attempt to
cause it to “dig” into the tree. It is not necessary and may cause you to
inadvertently disengage the platform or seat.
WARNING
!
17
!
CAUTION
DO NOT USE the Viper, Goliath, 180, 180 Max or Titan without a Viper,
Golaith, 180, 180 Max or Titan seat or other climber. NEVER attempt to
climb without a seat climber. The climbers provided with these stands are
designed to aid you in the correct operation of the treestand while climbing
by keeping your weight away from the tree. The seat climber is also built so
that it fits securely with the platform for carrying.
page 8

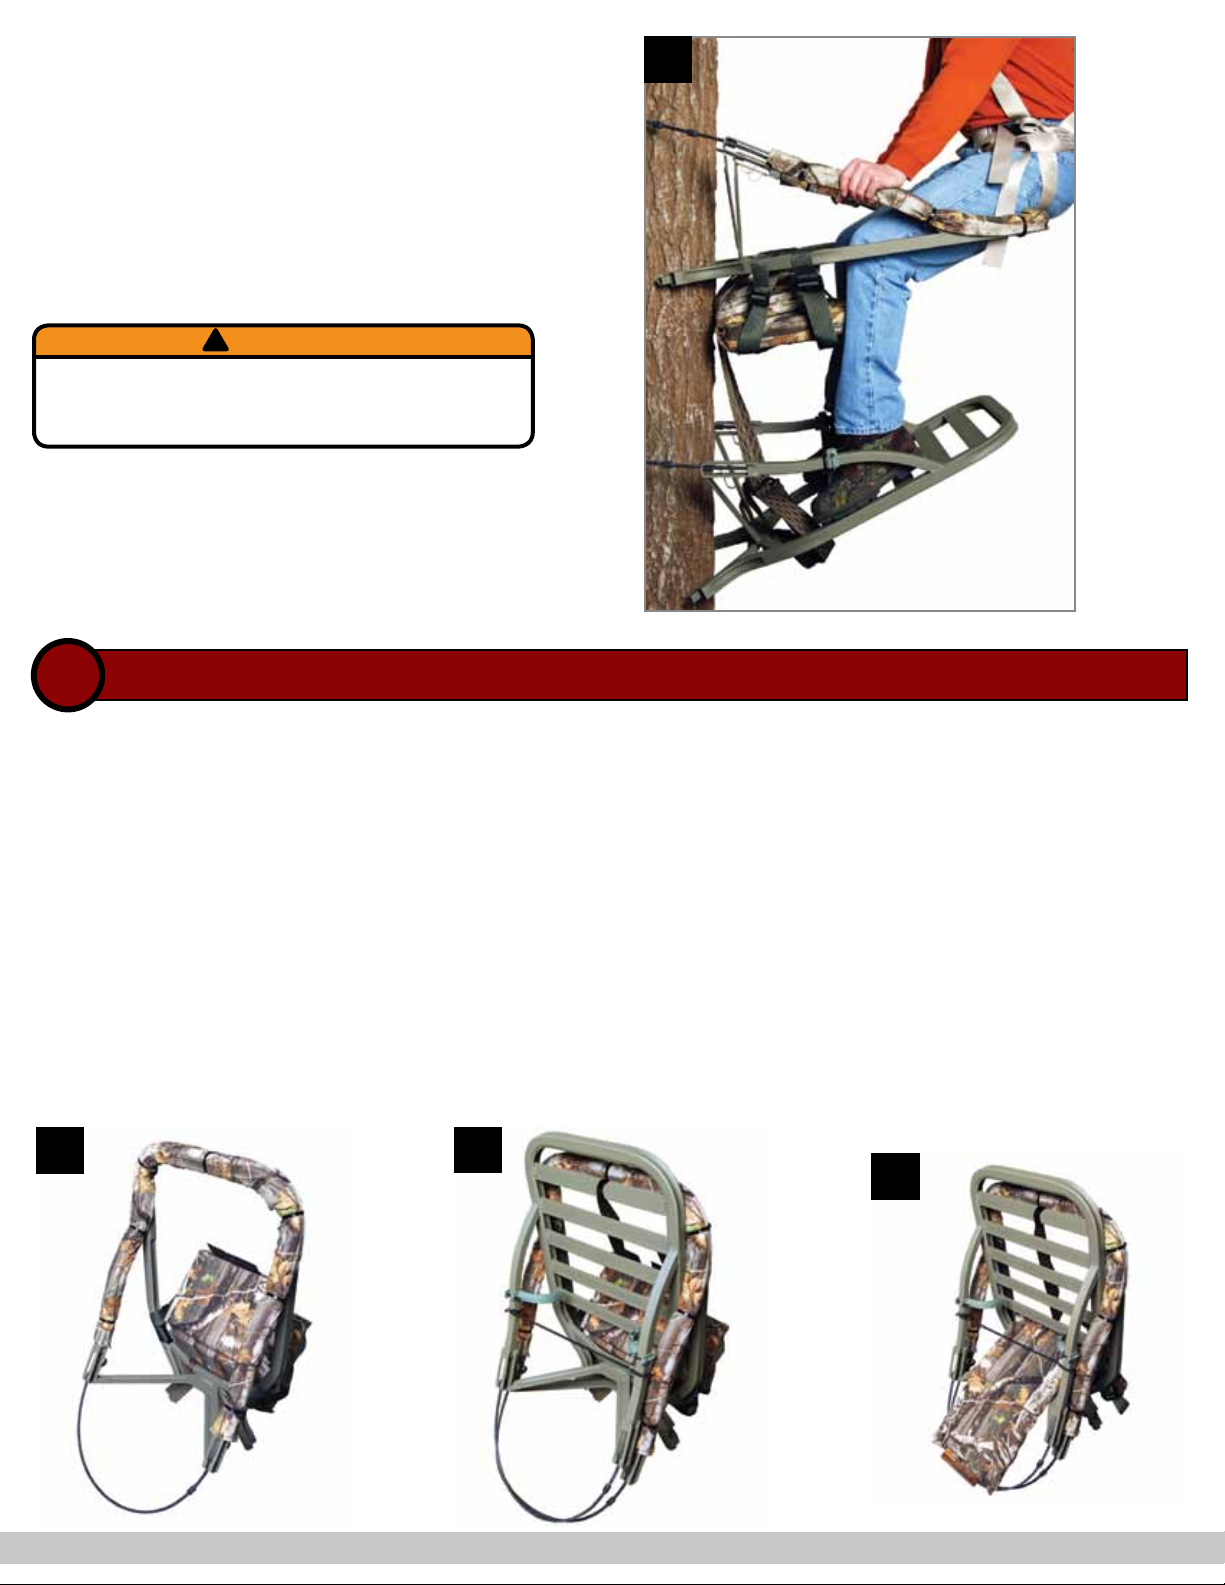
USE
1. When you get to your hunting height (do not
climb higher than 15 feet; it is unnecessary) and you
have assured that your treestand is level, position your
seat climber slightly below waist level. Slightly lower
will be more comfortable but higher makes for less
movement when you stand.
2. With your safety harness attached to the tree
above the climber, pull your feet, one at a time, from
their secured position under the RapidClimb stirrups.
3. Wrap the supplied green tourniquet buckle strap
(1” green strap with spring loaded buckle) around the
tree and through the seat frame as shown in figure
17. Securely tighten the strap to prevent the notched
teeth area from losing contact with the tree.
4. Unhook the bungee cord that held the seat back
rest secure while you were climbing. Position the
seat back rest by wrapping each end of the bungee
cord around the climbing cable and hooking the two
hooks together as shown in figure 18 or by wrapping
it around the tree. The bungee cord will prevent the
seat backrest from falling forward if you stand up.
5. The treestand seat will provide maximum comfort
when the seat pad is near horizontal rather than
tipped down in the front. The seat height can be
easily raised (for bow hunting) or lowered (for gun
hunting) by adjusting the two piece buckles up or
down the webbing.
Both seat sides must be adjusted evenly so the seat
is level side to side. Sliding the webbing straps
forward or backward on the frame provides additional
comfort.
WARNING
!
NEVER DISCONNECT FROM YOUR SAFETY HARNESS
OR SAFETY LINE ONCE YOU LEAVE THE GROUND!!
!
CAUTION
Seat strap adjustments must be made on the ground.
18
WARNING
!
ALWAYS position the safety harness to minimize
the amount of slack in the safety line.
19 20
21 22
CLIMBING DOWN
1. Reattach your treestand platform to your feet.
Back your heel into the bungee heel cord (figure 19)
then slide your boot under the RapidClimb stirrup.
Make sure that your boot is secure under the stirrup
as shown in figure 20.
2. Disconnect the elastic cord that has been holding
the foam seat in place and fold the seat up. Secure
the backrest and seat as shown in figure 21.
Disconnect and store the strap that has held the seat
frame to the tree (figure 22).
WARNING
!
NEVER DISCONNECT FROM YOUR SAFETY HARNESS
OR SAFETY LINE ONCE YOU LEAVE THE GROUND!!
23
page 9
24
WARNING
!
DO NOT JUMP OR BOUNCE ON THE PLATFORM OR
SEAT to attempt to cause it to “dig” into the tree. It
is not necessary and may cause you to inadvertently
disengage the platform or seat.
BACKPACKING
Your treestand is designed to “nest” together as one unit making it easy to transport. Viper shown, others similar.
1. Untie the umbilical rope from the seat climber and wrap it around the platform yolk several times to secure it.
2. Start with the seat climber portion of the stand, set it on its end as shown in figure 25.
3. Take the platform and slide it into the seat climber so that its upright braces and cable bracket are next to the same areas on
the seat climber as shown in figure 26.
4. The teeth area on the platform should come into contact with the “V” brace on the seat climber. From this position, pull the
seat backrest through the large gap in the platform as shown in figure 27.
5. Secure the seat to the stand by running the seat bungee around the frame and clipping it off. (figure 28)
6. The backpack straps straps will most likely be wedged in behind the seat at this point. Pull them out and around the seat
webbing and push the seat as far down in the frame as possible (see figure 29).
7. Secure the top and platform together with the 1” wide green strap with the spring loaded tourniquet buckle as shown in
figure 30. This will prevent seat the seat and the platform from making noise as you hike to your hunting location.
8. Use the backpack straps to carry the unit on your back, tree teeth down, as shown in figure 31. Pull the loose end of the
straps to tighten and pull up on the buckle to release.
25
BACKPACKING (GROUP A STANDS)
5b
CLIMBING DOWN (continued)
3. Place the seat climber at about knee level, sit on
the padded bar (or in the seat on the 180 models),
and grasp the upright arms as you did when climbing
(see figure 23).
4. While firmly grasping the seat climber upright
arms, disengage the platform by lifting up and tipping
the edge closest to the tree downward. Once the
platform has been dislodged, you can lower it down
(see figure 24). Make slow, even movements of 10-12
inches at a time.
5. To re-engage, rotate the top edge of the treestand
closest to the tree upwards. Now carefully place your
weight back on the platform.
6. Once the platform is secure, stand and slide your
safety harness tether strap down to about chest
height and repeat steps 3-6 until you have reached
the bottom of the tree.
26 27
page 10
Questo manuale è adatto per i seguenti modelli
16
Indice


