SUNBA NVR-F8009SE Manuale utente

2020/09
Visit http://nvr.sunba.net to access the step by step YouTube video
tutorials for setting up Sunba NVR.
Version 2.0
(NVR-F8009SE / NVR-F2008PL)
SUNBA H.265/H.264
Network Video Recorder
User Manual
Dedicated PTZ Camera Professional
SUNBA
All pictures shown are for illustration purpose only. Actual
product may vary due to product enhancement.
Copyright © 2014 - 2020 All Rights Reserved Powered by:
Sunba Technology Co., Ltd.

- 01 -
FCC Warning (U.S.A)
The device has been tested in compliance with limits set by Part 15 of Federal
Communication Commission (Class B). The operation of the device is thus limited by
the following two conditions:
1) It is not permitted to cause harmful interference to any authorized radio communi-
cations.
2) It must accept any interference it receives.
MENU
1. Overview and Specication
2. Front Panel and Rear Panel
3. HDD Installation
4. Connecting to IP Camera
5. Operations and Setting
6. Add Device to NVR
7. Record
8. Playback
9. Backup
10. IE/Desktop Client Operation
11. Remote Access
12. Face Capture
02
03
04
05
05
17
22
23
28
29
31
34

- 02 -
1. Overview and Specication
Feature
Main Processor Hi3536DV100
Operating System Embedded Linux
System Resources Simultaneous muti-channel real-time view, recording,
playback, network operation & USB backup
Operator Interface 16-bit true color graphic menu operation interface, support mouse operation
Preview 1/4/8/16
Video Input(IP) 9*5MP/9*1080P
Video Standard PAL(25F/S); NTSC(30F/S)
Display Quality 2K(2560*1440)/1920*1080/1440*900/1280*1024/1280*720/1024*768
Playback Quality 5MP/1080P
Motion Detection Sunba cameras: supported;
3rd party camera: depending on ONVIF compatibility, not guaranteed
Audio Compressio G.711A
Recording Mode Manual (Continuous)>Schedule>Video Dection
Local Playback 1CH*5MP/2CH*1080P
Search Mode Search by Time/Date/Event/Channel/Face
Record Storage HDD/Network
Backup Mode Network Backup, USB Hard Disk, USB Burner, SATA Burner
Video Output HDMI/VGA
Audio I/O 0/1 (3.5mm stereo jack)
Alarm I/O 0/0
Network Interface 1*10M/100M Adaptive Enternet port
USB Interface 2*USB 2.0 Port
Hard Disk 1*SATA(Up to 8TB for Each Disk)
PTZ Control Control PTZ Device by Network
ONVIF Support
Power Supply DC 12V/2A
Power Consumption <10W (Without HDD)
Work Environment Temperature: 0℃~55℃, Humidity: 10%~90%RH, Atm:86kpa~106kp
Model NVR-F8009SE
The series NVR is an 9 channel high performance embedded network video
recorder. The system is dedicated to store digital videos captured by front-end
devices such as IP Camera (IPC). This series NVR can perform live video preview,
recording, playback, remote access, and backup. simultaneously.
- 03 -
Power System on
Record HDD installed and recording normally
Net
Red
Green
Green Net connected
ICON LED DESCRIPTION
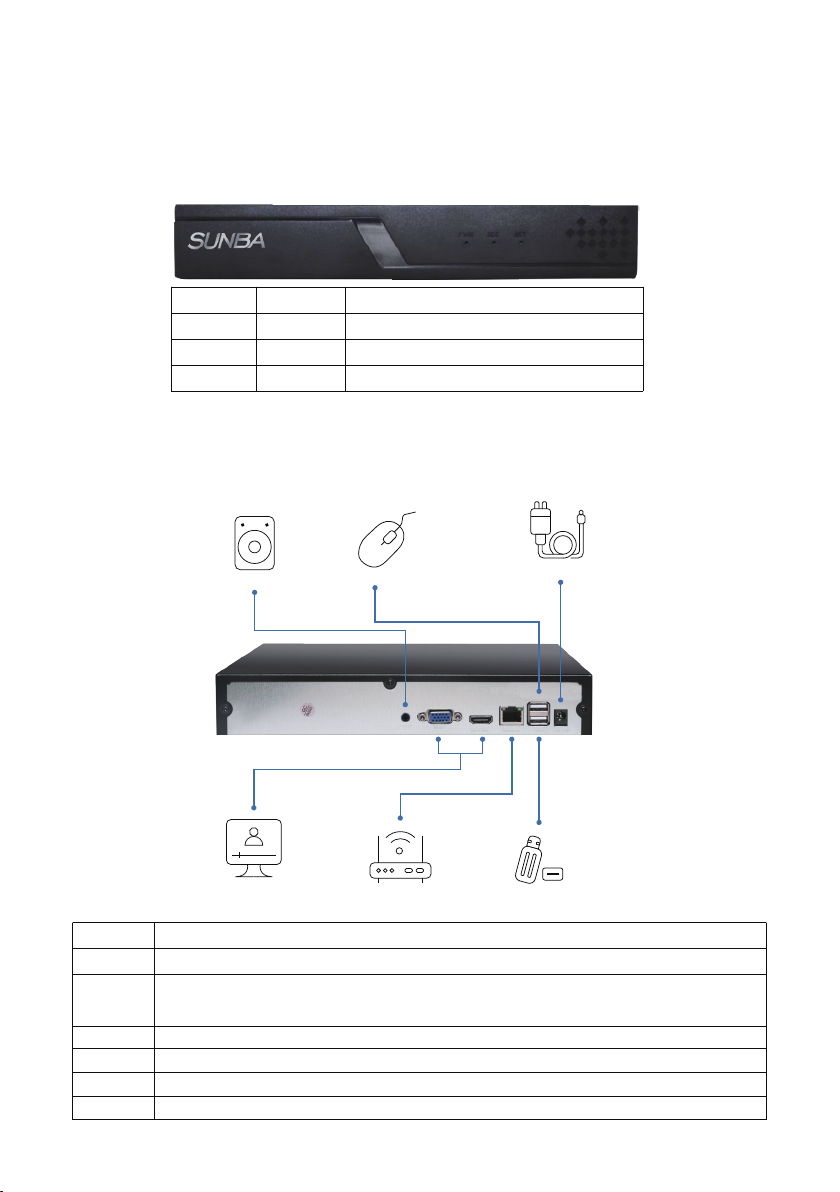
2. Front Panel and Rear Panel
2.1 Front Panel
Mouse
Speaker Power Adapter
Monitor Router USB Drive for Backup
2.2 Rear Panel
Disclaimer: the following diagram and pictures are adopted from NVR-F8009SE and
may vary slightly from the actual model you received.
VGA VGA video output port can connect to a monitor or TV to view analog video.
DC 12v Connects to 12V DC power adapter.
USB Ports USB 2.0 Ports that can connect to a mouse for control and to USB drives for backup.
LAN Port 10M/100M self-adaptive Ethernet port. Connects to router or other network adapters.
Audio Connects to a speaker (not included).
HDMI High definition multimedia signal output port transmit
uncompressed high definition video and multiple-channel data to the HDMI port of the display device.
ICON DESCRIPTION

- 04 -
3. HDD Installation
Step 1.Remove the 4 screws
on both sides of the NVR
Step 2.Slide out the NVR upper case
Step 3.Put in the HDD
Step 6.Put back the NVR upper case
Step 4.Install and secure the HDD on the NVR from
the bottom with given screws
Step 5.Plug-in the data and power cable for
the HDD into the slot of the PCB board
Step 7.Install the screws back on the sides of the NVR

- 05 -
4. Connecting to IP Camera
Note: 3rd party IP Camera MUST BE ONVIF compliant to be added to Sunba NVR.
5. Operations and Setting
Access the NVR Main Menu by either pressing the “MENU” button on the NVR front
panel or by making a right click on the screen and select the first item from the right
click (context) menu.
Note: For security purposes, please modify your password after your first login.
Note the UI and snapshots below were taken from NVR-F8009SE. The actual
interface may vary slightly among different firmware versions. For any questions,
The default account for the NVR is:
Username: admin
Password: (leave it blank)
- 06 -
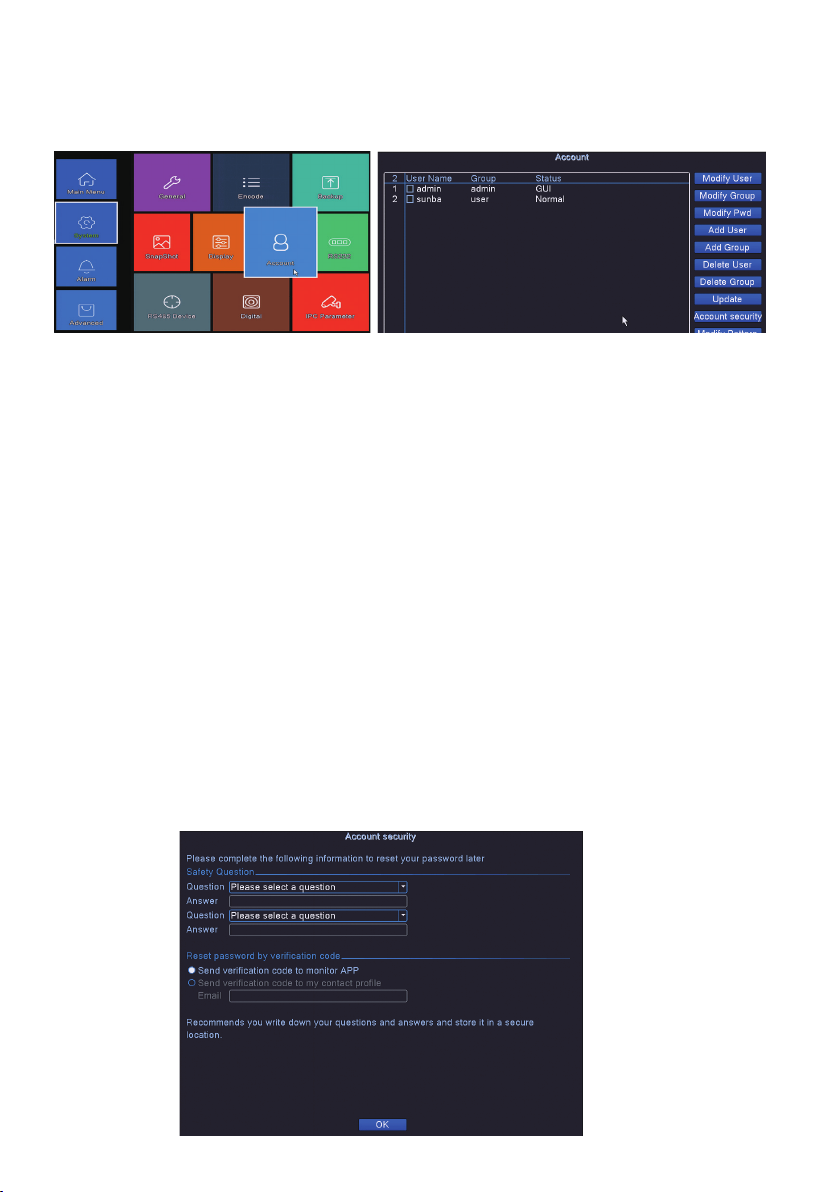
You can add additional accounts and modify your administrator account password in
Main Menu-System-Account.
5.1 Account Management
By default, there are two existing accounts associated with the NVR.
Username:admin Password:(blank) [Administrator]
Username:default Password:default [User]
The user “default” is a reserved user for system interior use only and cannot be deleted. It
only has the rights to access live view and check playbacks, but has no access to any
other advanced features. This default user is suitable so that you can view some channels
without logging in or you can assign the account to Security Guards/Police without
granting access to other features.
Modify Password: Select a user from the account list, and click “Modify Pwd”.
Add/Delete/Modify Group: A user can belong to a certain group. For example, the admin-
/blank password set belongs to the administrator group. You can set specific purviews of
certain user groups. By default users under the “admin group” gets access to all features of
the NVR while users under the “user group” gets access to limited features of the NVR. You
can click “Modify Group” to assign/set specific rights of a group.
Add/Delete/Modify User: You can add a user by clicking “Add User”, delete a user from
NVR by “Delete User.” Specifically, you can also set the rights and privileges of the user by
selecting a user from the account list and click “Modify User.”
Update: Refresh the account list.
Safety Question: Set the safety question to reset account password and retrieve access in
case that the original password has been forgotten.

- 07 -
5.2 Network
The network setting page can be accessed from Main Menu-Network.
The network menu shows the current IP, submask, gateway, DNS, TCP port and http port
of the device.
DHCP is a network protocol that enables a server to automatically assign an IP address
to a network machine. We suggest assigning a Sunba NVR with a static IP address (by
default) and disable this function to avoid potential IP conflict especially if you have
multiple network machines connected to a same server (eg., a router or a switch). Also
do not enable DHCP if you set port forwarding on your server for external connection to
the NVR on the LAN.
Please make sure the NVR Gateway/IP Address matches the Gateway of the server
(router). For example, if the router IP is 192.168.0.1, you need to modify the Gateway of
NVR to 192.168.0.1 and IP Address to 192.168.0.X where X can be any integer between 2
to 255. However, no two devices on the same network shall share the same IP Address.
Make sure your NVR doesn’t conflict with other devices on the LAN Network. Failure to
properly configure the NVR network will affect remote access of the device.
Media Port: Same as TCP Port. Default is
34567. If modified, please power cycle
the device.
Http Port: Default is 80. If modified,
please power cycle the device. If this
value is modified, in the web browser,
users must login to the NVR using
http://IP:http port.
DNS: Domain Name Server that trans-
lates domain name into IP address.
It is recommended to set the DNS by the
same value as offered by your ISP.
Transfer Policy: there are three strategies: Self-adaptive, Quality preferred or Fluency
preferred. The video stream will adjust according to the setup. Quality preferred transfer
policy delivers best quality but the video may be lagged. Self-adaptive is the tradeoff
between quality preferred and fluency preferred. Fluency preferred and self-adaptive are
valid only when the sub stream is turned on.
Click NetService to open the submenus of network configuration.

- 08 -
5.2.1 PPPoE
PPPOE connection stands for a dial-up
internet connection. User needs to input
a valid username and password offered
by the ISP to connect the device to the
internet. This only takes effect when the
NVR is directly connected to the modem.
5.2.2 NTP
NTP means Network Time Protocol. NTP
function will automatically sync the NVR
system time with a remote server to
ensure all channels on the NVR have the
same time stamp. It is useful for custom-
ers to calibrate the time and also for
regions that have constant daylight
saving.
5.2.3 Email Alert
5.2.3 Email Alert
Users can enable this function for email alert with any motion detection. For details on how
to use this function (example of gmail will be provided), please refer to the FAQ page:
https://sunbatech.com/faq/enable-motion-detection-email-photo-alerts-sunba-ip-cameras/
5.2.4 IP Filter
5.2.4 IP Filter
In this submenu, all IP address on the blacklist are blocked from accessing to the camera.
If you enable the whitelist function, only IP address on the whitelist are able to access to
the camera.

- 09 -
5.2.5 DDNS
DDNS means Dynamic DNS. If your external IP address is dynamically assigned , you
will need to frequently update settings used to connect to your camera over the Internet
whenever a new public IP address is assigned by your ISP. This is time consuming. A
DDNS service communicates with your router and translates the dynamic IP address
into a static URL. You will need to register with a DDNS service provider such as NO-IP
or DynDNS before using this function.
However, this function is rarely used over NVR as many routers (ASUS, TP-LINK,
NETGEAR etc) now support DDNS configuration within the router, which is more
convenient and support most popular DDNS service providers.
5.2.6 FTP
FTP function allows the NVR to upload a video or snapshot to a remote FTP server when
an event (such as motion detection, video masking, video loss) occurs.
Note: Video will NOT upload to your FTP server if a memory card (hard drive) is not
inserted into the memory card slot because the camera has limited RAM that is unable
to serve as a media to store videos before uploading to the FTP server. However,
snapshot upload does not require a hard disk to be installed.
5.2.7 ARSP
Setup a server to add devices and manage it remotely in the server. This is a conven-
tional way of connecting your NVR remotely and is not widely used today.
In case that the NVR's external IP changes due to ISP, the ARSP option enables remote
browser login to the NVR. This would allow you to remotely look up the NVR's current IP,
and manually update it in the app settings. This can be useful if you choose not to use
dynamic DNS.
5.2.8 Alarm Server
The alarm server interface is shown as below. The NVR can upload alarm signal to the
syslog server when local alarm occurs. Before you use alarm server, please set up and
specify server IP, port and etc. When an alarm triggers, the NVR can send out data as
defined by the protocol, so that the syslog server can get the data.
Questo manuale è adatto per i seguenti modelli
1
Indice
Altri manuali SUNBA Hardware di rete

Manuali Hardware di rete popolari di altre marche

Matrix Switch Corporation
Matrix Switch Corporation MSC-HD161DEL Manuale utente

B&B Electronics
B&B Electronics ZXT9-IO-222R2 Manuale utente

Yudor
Yudor YDS-16 Manuale utente

D-Link
D-Link ShareCenter DNS-320L Manuale utente

Samsung
Samsung ES1642dc Istruzioni per l’uso

Honeywell Home
Honeywell Home LTEM-PV Istruzioni per il montaggio


