Tab T6-Pro Manuale operativo

(Note: Please read this instruction carefully before operation to avoid danger or damage to the product.)
Smart Cordless Wet Dry Vacuum Cleanerand Mop
Model: T6-Pro
Product User Manual

Contents
1. Safety Instruction
2. Packing List
3. Packing Icon
4. Product Assembly
5. How to Use
6. Instructions for Icon of Host Screen
7. Product Care and Maintenance
8. Failure Recovery
9. Product Specifications
08
11
12
14
15
05
04
03
01

1
Please read the following safety instructions. Make sure all conditions are compliant with the conventional safety
precautions before operating the product. Please keep the instructions properly in case of temporary or urgent need.
Any inappropriate operation beyond the instructions may cause damage to the product.
Safety precautions related with host and accessories
01. Keep your hands dry or protective during operation in case of electric shock.
02. Operate the product on solid ground instead of high platform of tables, chairs and rooms.
03. Keep the product in shady place in case of damages of the precision electronic equipment.
04. Avoid operation in humid environment, like bathroom.
05. Keep the product away from cigarette butts, lighters and other open flames.
06. Before charging, clean the product first and make sure the charging is disconnected.
07. Remove the battery when it remains unused.
08. In case of damages to the products, make sure the power adapter is connected properly before operation.
09. Remove such items as glasses, lamps, wires and curtains on the ground before operation.
10. Clean the dirty water tank with the product before operation.
11. Cleaning the construction waste is not allowed.
12. Keep the operating temperature range from 0 ° C to 40 ° C.
13. Remove the battery from the machine before scrapping. Do not remove battery before powering off. Please dispose
the waste battery safely and environmentally.
Warning:
01. Unauthorized dismantle, repair or modification to the product is strictly prohibited in case of damages or safety
risks.
02. Keep the product away from fire in case of explosion.
03. Use the original power adapter only.
04. No standing or sitting on the product in case of product damage or slippery.
05. Wipe metal part of the power plug with a dry rag in case of dust.
06. The AC voltage for power adapter is 100-240V. Place it to somewhere beyond children’s reaches.
07. No washing or soaking the host and electronic components.
08. No alteration of the processing power cable, or placing heavy objects on the power cable, or heating the power
cable or pulling or bending the power cord.
09. Pay attention to the safety of young children and elders at home to avoid tripping and danger when the product is
under operating and cleaning. Touching the wheel and side brush with the hands is not allowed to avoid injury from
stranding (Especially, the care to the young children.).
10. No operation outdoor is allowed as it is an indoor product.
11. No contacting the battery with metal and conductive substances, or there will be a risk of short circuit.
12.Children under 8 are not allowed to use the product. Make sure the thorough understanding of the instructions
before operation.
Safety Instructions
Cautions:
Safety Instruction

2
Safety precautions related to rechargeable battery
Danger!
01. Operating with special battery adapter is highly appreciated. Otherwise, there will be a risk of leakage, heating or
cracking.
02. Causing circuit to battery or disassembling the battery is strictly prohibited. Otherwise, there will be a risk of
leakage, heating or cracking.
03. Transporting or storing with metal items, including the necklaces and hairpins is strictly prohibited. Otherwise it will
lead to short circuit, or causing liquid leakage, heating or cracking.
04. Putting the battery into the fire or heating the battery is strictly prohibited. Otherwise, there will be a risk of leakage,
heating or cracking.
Caution!
01. In case of abnormal overheating during charging, you are recommended to stop operating immediately. Otherwise,
there will be a risk of leakage, heating or cracking.
02. You are recommended to pull out the battery and place it in a cool and dry environment in case of long time rest,
which can prolong the service life of the battery.
03. Immersing in water or contacting with liquid is strictly prohibited. Otherwise, there will be a risk of leakage, heating
or cracking.
04. In case of abnormality (including discoloration or deformation), you are recommended to stop operating
immediately. Otherwise, there will be a risk of leakage, heating or cracking.
05. You are recommended to apply adhesive tape to insulate the electrode part when recycling or discarding.
06. You are recommended to wipe the battery with a dry rag and recycle it in time or discard it in case of battery’s leakage.
07. You are recommended to put the recycled batteries in the battery recycling bins or hazardous garbage cans placed
in communities, hotels, schools, large shopping malls, supermarkets, which are collected by professional recycling
institutions. The battery must be removed and discarded in accordance with local laws and regulations in case of
discarding the product battery.
Warning!
01. You are recommended to wash skin or clothes with clean water immediately in case the battery leakage comes into
contact. If failed to handle in time, symptoms of skin inflammation may occur.
02. Applying the rechargeable battery of the product on other equipment is strictly prohibited. The battery is applicable
to intelligent floor washer only.
03. Charging or continue to operating is strictly prohibited to avoid that the outer box of the battery is deformed and
expanded, and the electrolyte flows out.
04. Strongly impacting or throwing the battery is not allowed. Otherwise, there will be a risk of leakage, heating or
cracking.
05. Disassembling to the battery pack is strictly prohibited. Otherwise, there will be a risk of broken battery pack and
the electrolyte will flow out, resulting in fire, explosion and other hazards.
How to remove the battery
You are recommended to hold the key indicated by the arrow in the
figure (located at the protruding position on both sides above the
battery) tightly with your thumb and index finger. Lift it up with proper
force.
(Turn off the power before removing the battery.)
Attention:
When first used, the pump is normal to have an odd sound for a few seconds before it actually starts pumping water.
Safety Instruction

3
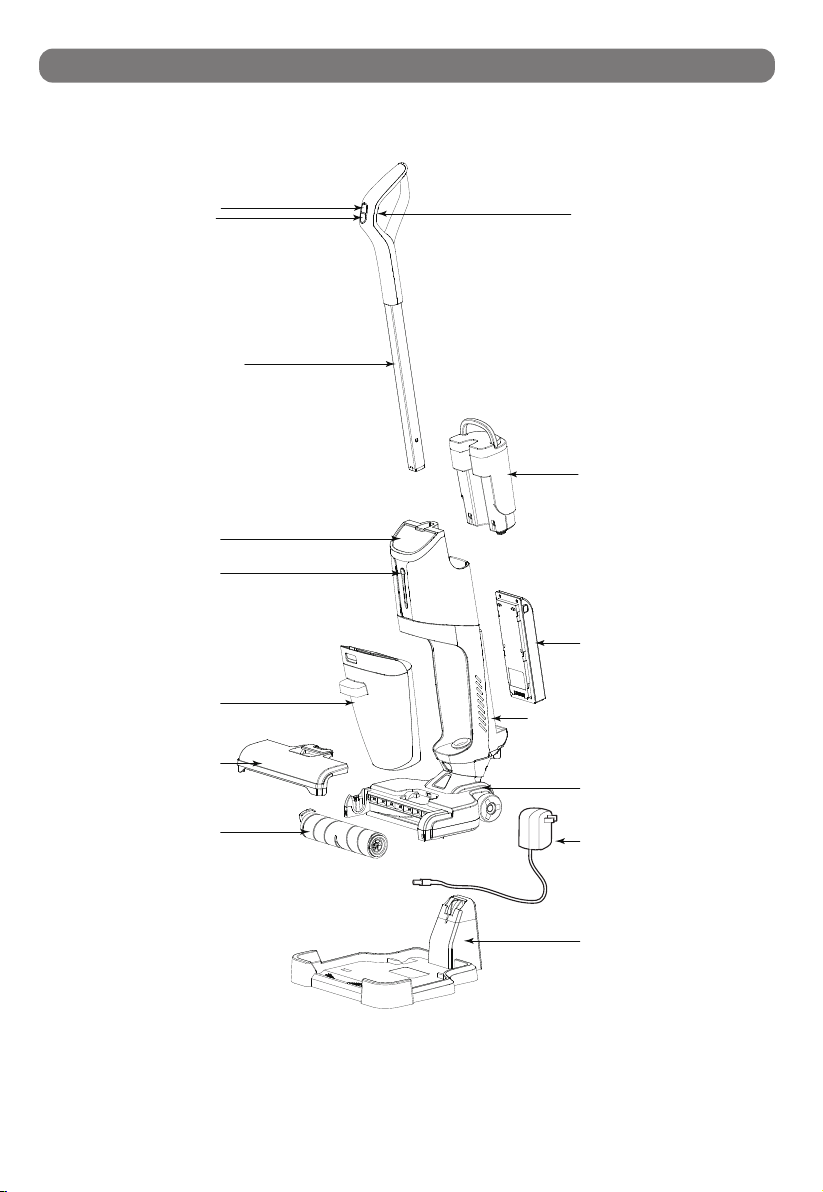
There might be some differences in the attached accessories, which shall be subject to actual product received.
Host
Power adapter
Cleaning tools HEPA filter
Roller brush
Accessories storage box
Charging stand
Handle components Clean water tank
hex key
Packing List
4
Part name
Voice switch
MAX
Switch key Self-cleaning key
Handle components
Screen
Dirty water tank
Battery
Clean water tank
Charging stand
Machine body components
Tractor components
Roller brush
Roller cover
Adapter
Packing Icon

5
Tractor components
Rear wheel
Caster
Roller brush
Scraper
As instructed in the Figure, insert the handle component in the top position corresponding
to the machine body until you hear a “snap” sound.
When removing, insert the hex key into the snaphole of the body until it reaches the
bottom. Please slowly pull out the handle components to be removed by hand at this time.
1.Assembly of Body and Handle Components
Hole of Snap
Product Assembly
Packing Icon
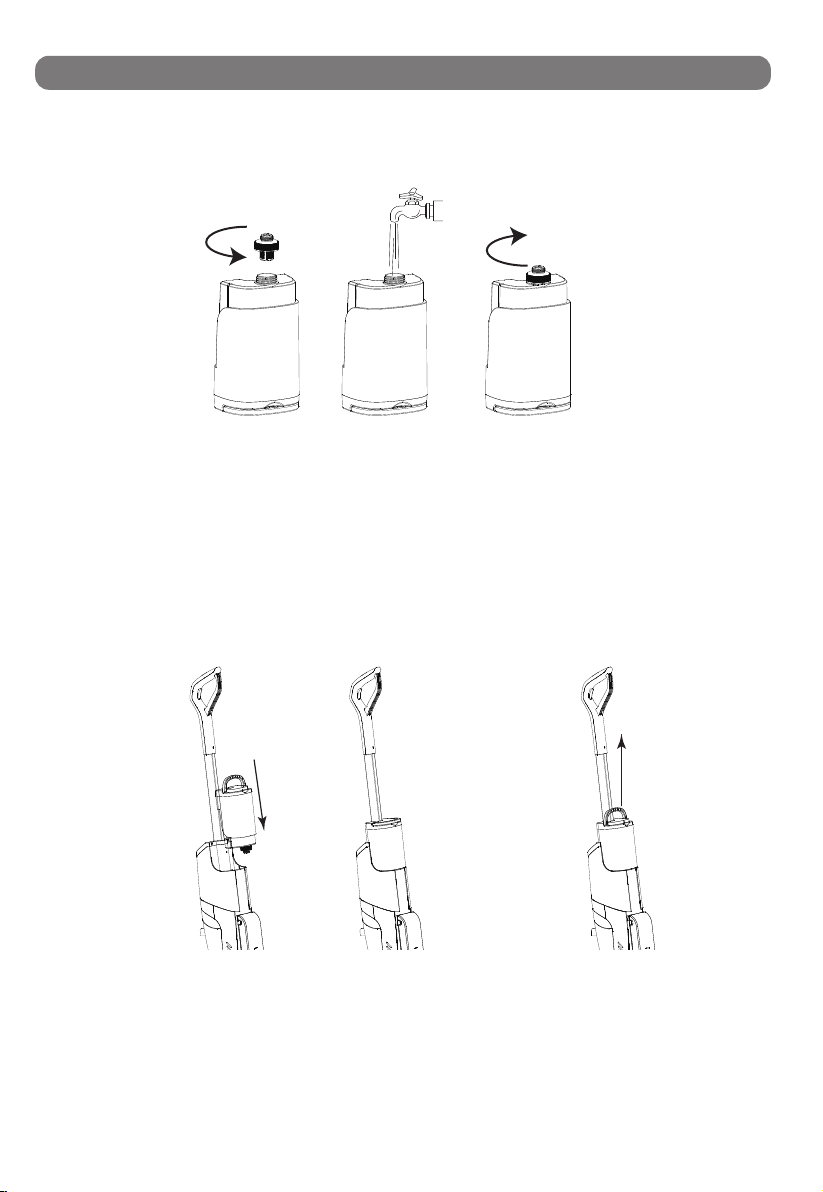
2.Installation of clean water tank components
Please rotate counterclockwise to open the cover of the clean water tank and add an
appropriate amount of clean water, and then rotate clockwise to tighten the cover.
Please plug it in the corresponding position of the body in the direction shown in the figure.
There is a snap positioning inside. The assembly shall be completed once you hear the sound
of “Click” after plugging in. You can pull up the handle of clean water tank and lift it up
slightly to remove the tank.
6
Product Assembly

7
3.Installation of dirty water tank components
Please plug dirty water tank components into the corresponding position of the body in
the direction shown in the figure. There is a snap positioning inside of dirty water tank
components. The installation shall be completed once you hear the sound of “Click”
after plugging in.
4.Installation of roller brush components
Please plug roller brush components into the corresponding position of the tractor
components in the direction shown in the figure. There is a snap positioning inside of roller
brush components. The installation shall be completed once you hear the sound of “Click”
after plugging in
Product Assembly

8
5.Installation of roller brush cover
Please plug the roller brush cover into corresponding buckle holes at the bottom of both
sides of the floor brush components in the direction shown in the figure. The installation
shall be completed once you hear the sound of “Click” after plugging in.
buckle hole
buckle hole
Product Assembly
How to Use
*Tip: Please try to complete a complete charging and discharging process before
using the product to ensure the accuracy of the electric quantity program.
1.Water injection of clean-water tank
1.1 Pull up the handle of clean water tank and lift it up slightly to remove the tank. (as shown in
Figure 1).
1.2 Please rotate counterclockwise to open the cover of the clean water tank and add an
appropriate amount of clean water, and then rotate clockwise to tighten the cover. (as shown in
Figure 2).
1.3 Plug the tank in the corresponding position of the body. The assembly shall be completed
once you hear the sound of “Click” after plugging in.(as shown in Figure 3).
1 2 3
Indice
Altri manuali Tab Aspirapolvere


