Telefunken TF-MSM2.102 Manuale utente
MUSIC MICRO SYSTEM 2.1
МУЗЫКАЛЬНЫЙ МИКРО ЦЕНТР 2.1
TF-MSM2.102
Instruction manual
Руководство по
эксплуатации

Instruction manual
3
Dear customer!
Thank you for purchasing our product. For safety, it is strongly recommended to read
this manual carefully before connecting, operating and/or adjusting the product and keep
the manual for reference in future.
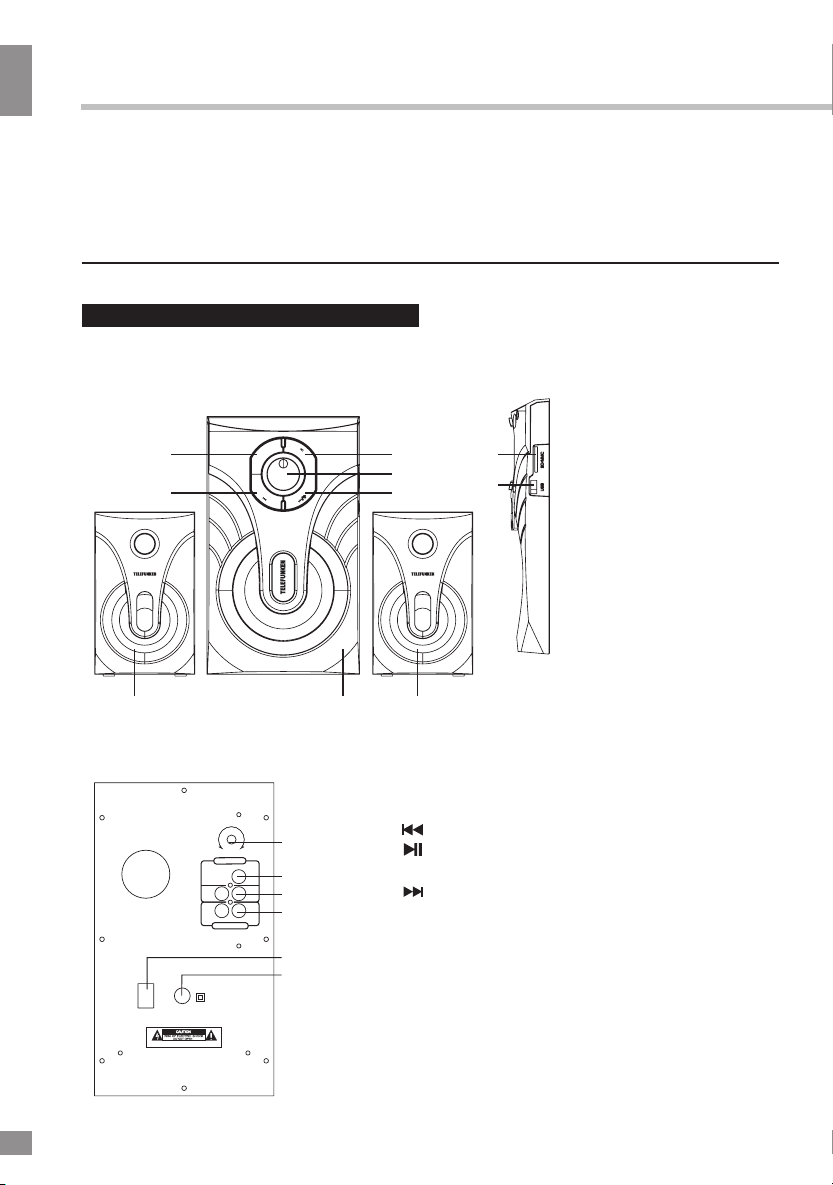
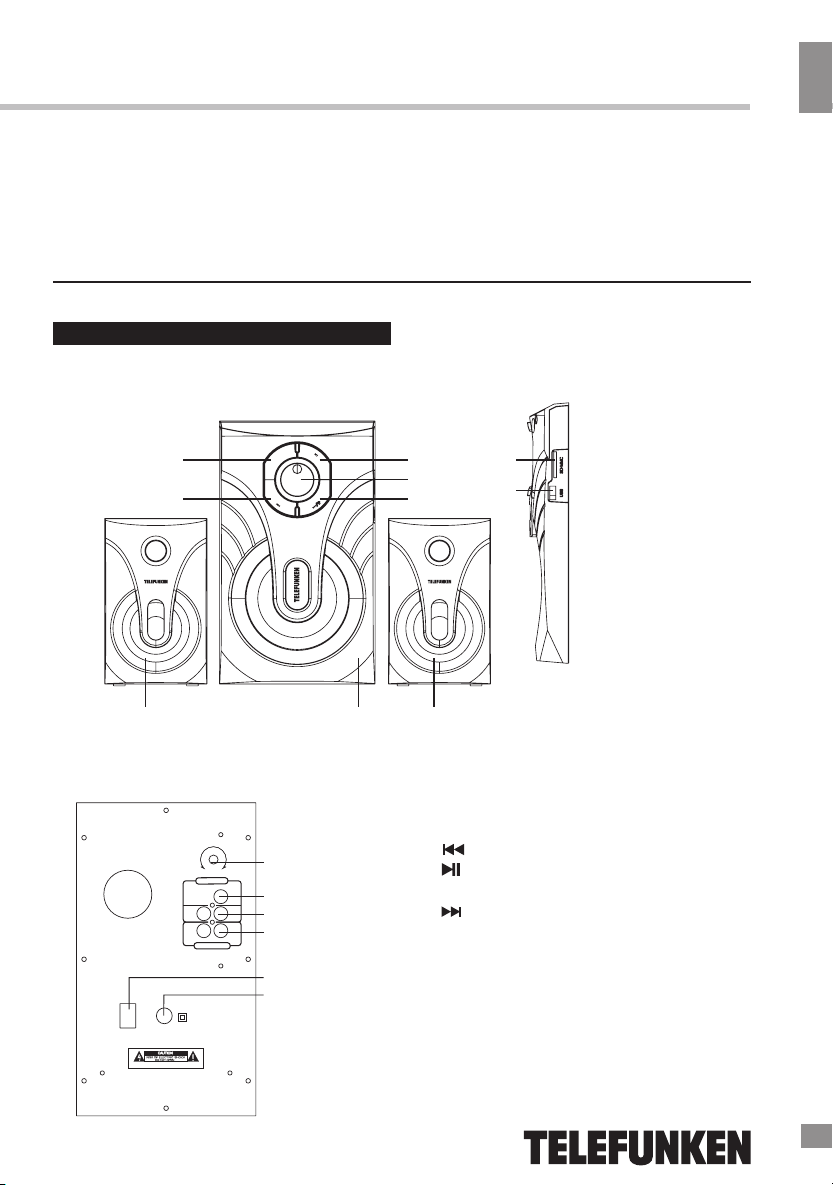
Description
Front panel
1. Subwoofer
2. Satellite speakers
3. MODE button
4. (PREVIOUS) button
5. (PLAY/PAUSE) / SCAN button
6. Volume knob
7. (NEXT) / LED ON/OFF button
Back panel
~22 0V/ 50H z
ON
OFF
BAS S
A
F
N
M
T
LR
LR
AUD IO INPU T
AUD IO OUTP UT
10
11
12
13
13
15
8. SD card slot
9. USB port
10. BASS button
11. FM antenna
12. Audio input socket
13. Audio output socket
14. Power ON/OFF switch
15. AC IN
2 21
3
4
5
MODE
8
9
6
7
WARNING:SHOCK HAZARD-DO NOT OPEN
Сделано в Китае
Instruction manual
4
Utilization of the product
If you want to dispose of this product, do not
mix it with general household waste. There is a
separate collection system for used electronic
products in accordance with legislation that
requires proper treatment, recovery and
recycling.
Please contact your local authorities for
the correct method of disposal. By doing so,
you will ensure that your disposed product
undergoes the necessary treatment, recovery
and recycling and thus prevent potential
negative effects on the environment and
human health.
Important safeguards
• The instruction manual contains important
operating and maintenance instructions. For
your safety, it is necessary to refer the manual.
Keep the manual for use in future.
• Do not hit or drop the unit.
• Do not expose the unit to vibration, direct
sunlight, too high or low temperature or humidity.
• Do not disassemble the unit yourself.
Refer servicing to qualified service personnel.
Power supply
• Before the first connecting of the appliance
check that voltage indicated on the rating label
corresponds the mains voltage in your home.
• Insert the plug into power supply.
Caution: Always unplug the appliance from a
power supply, when it is not used for a long time.
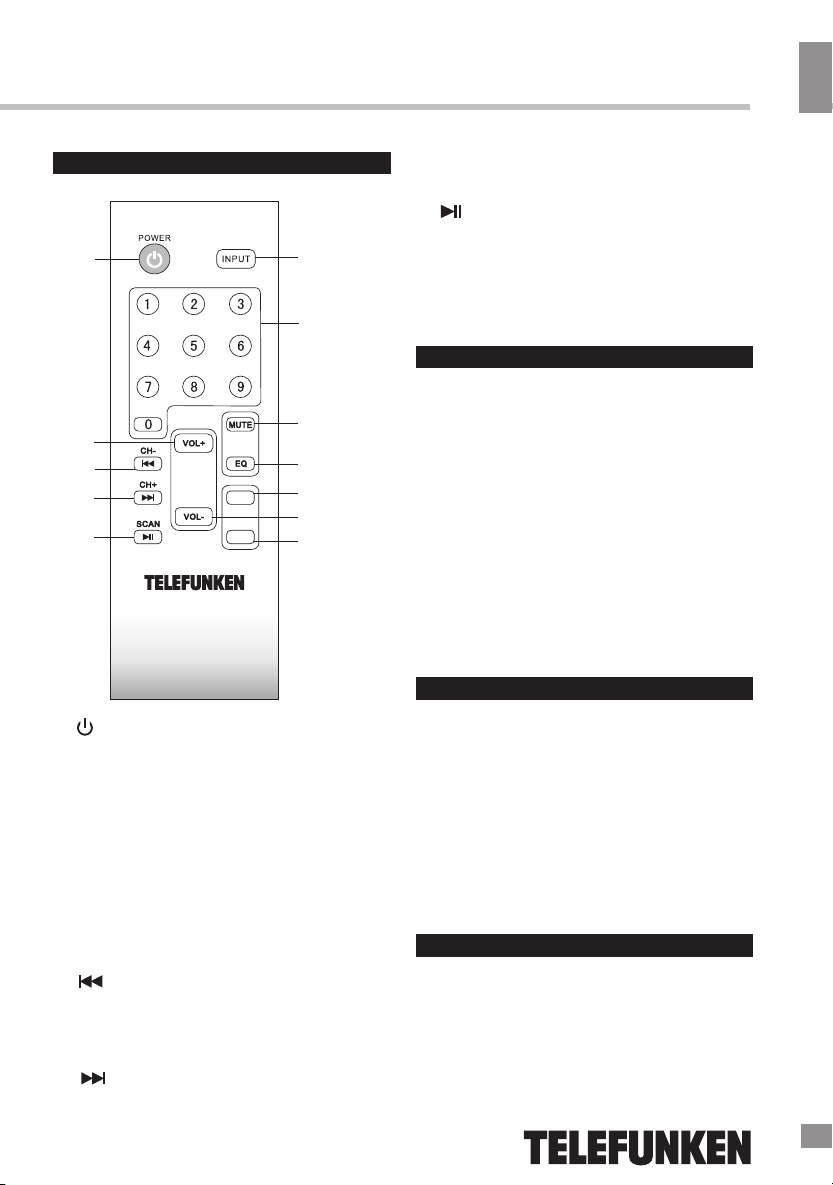
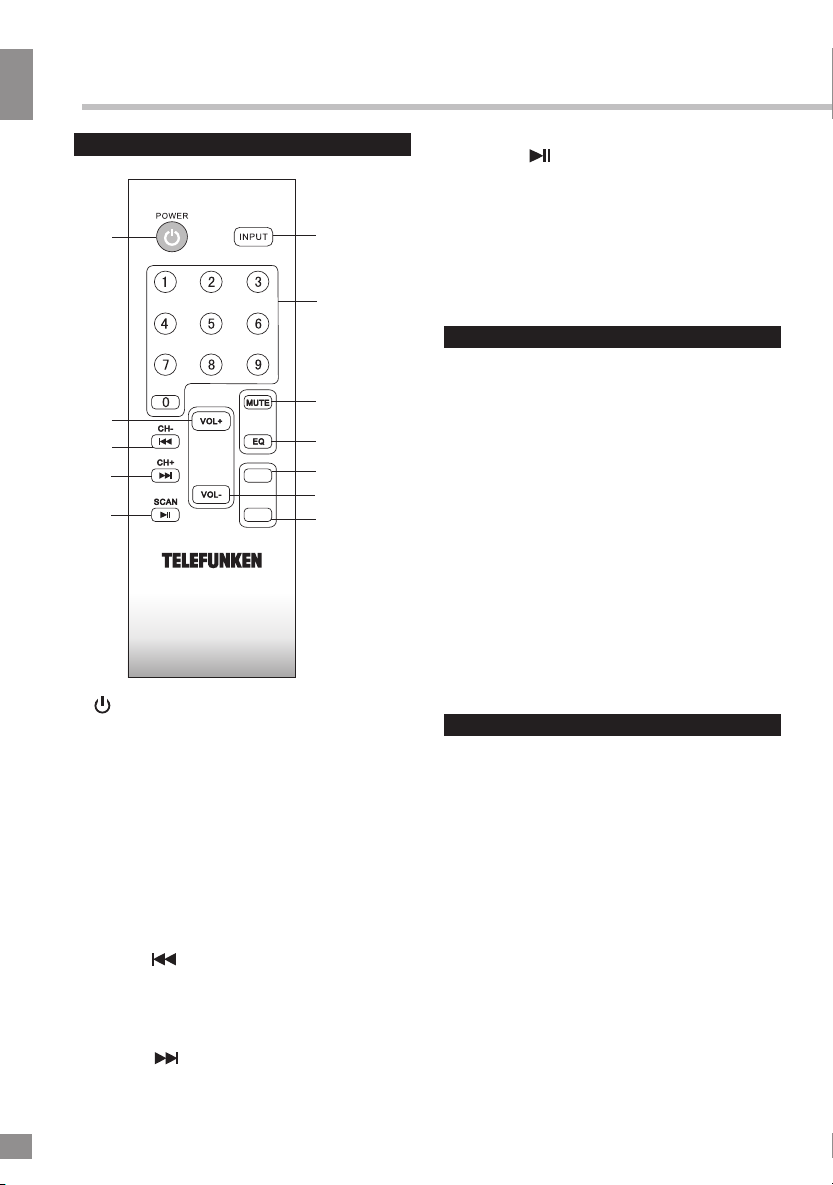
Remote controller
10+
10-
TUNING+
TUNING-
2
3
4
6
8
12
1
5
7
9
11 10
1. /POWER button. Press once to switch
the unit on. Press and hold to switch
the unit off.
2. INPUT button. Press to select an input
mode: AUX - USB - SD - FM - BT.
3. Number buttons. Press to choose a
track or a radio channel.
4. MUTE button. Press to mute/unmute the
sound.
5. VOL+ button. Press to increase the
volume level.
6. EQ button. Press to adjust the equalizer
(in USB/SD mode).
7. /CH- button. Press to select a
previous track or radio channel.
8. 10+/TUNING+ button. Press to jump 10
tracks forward or increase the radio
frequency.
9. /CH+ button. Press to select a next
track or radio channel.
10. VOL- button. Press to decrease
the volume level.
11. /SCAN button. Press to play and pause
the playback. In FM mode press and hold to
automatically scan and save available radio
stations.
12. 10-/TUNING- button. Press to jump 10 tracks
backward or decrease the radio frequency.
4
Instruction manual
5
~22 0V/5 0Hz
ON
OFF
BAS S
A
F
N
M
T
LR
LR
AUD IO INPU T
AUD IO OUTP UT
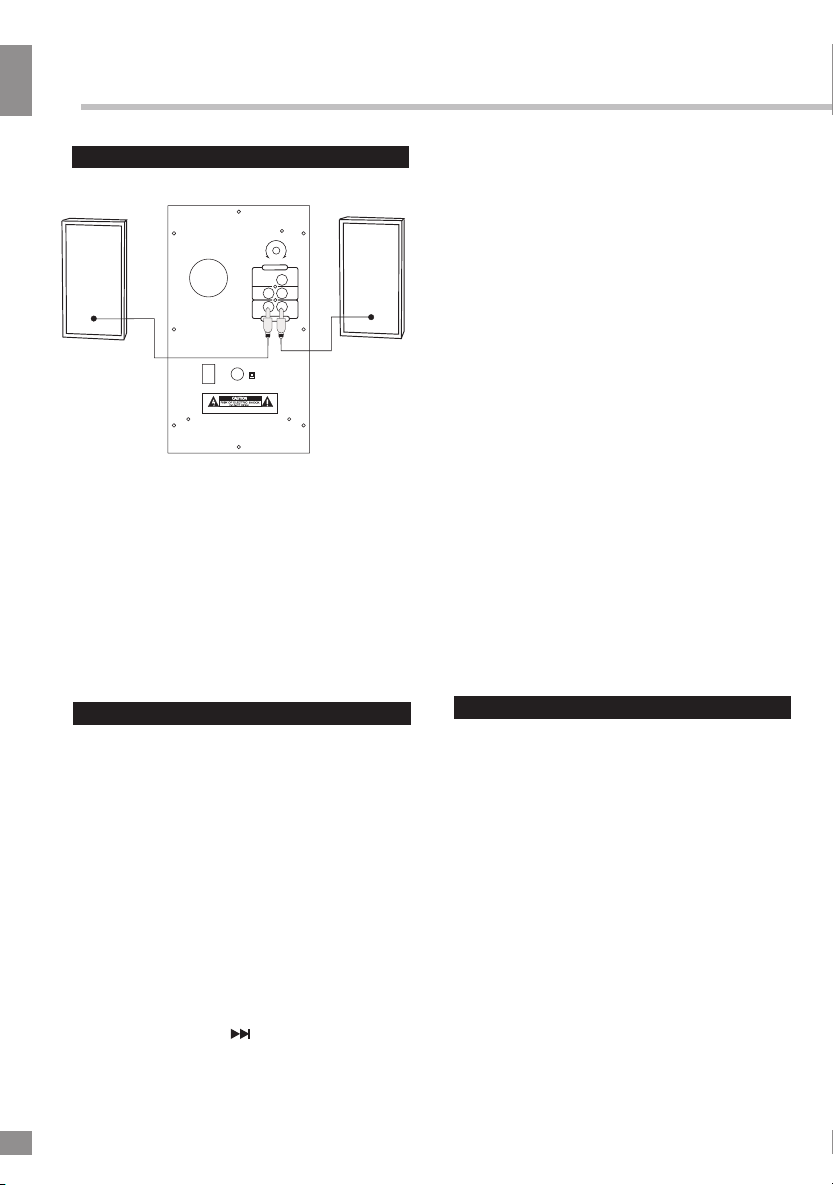
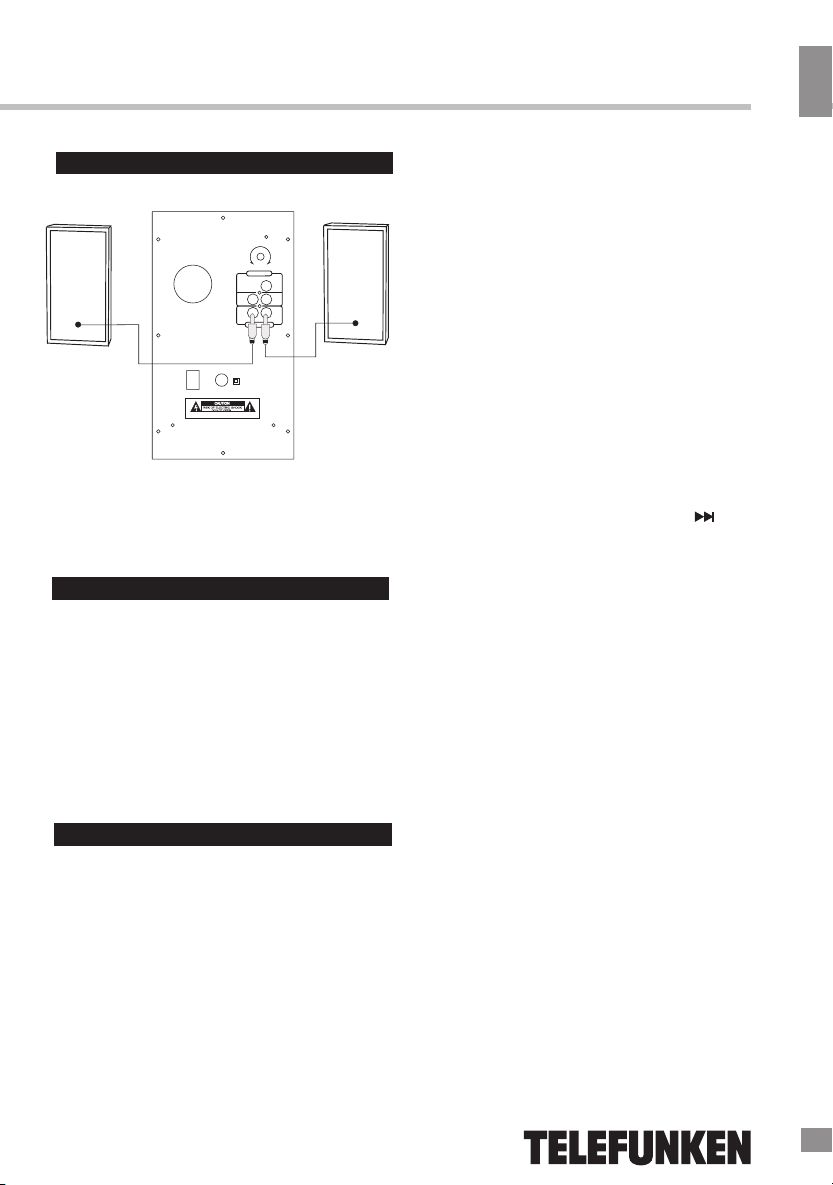
Connections
• Connect the satellite speakers audio plug
to the corresponding subwoofer audio output
socket (Left and Right).
• Connect a 3.5mm stereo or RCA plug to
the audio input socket. The other end to
sound source.
• Connect the power plug to AC power
source, switch on the power and adjust the
volume to your satisfaction.
General operations
Power on/off
When the unit is connected to the current
supply mains, press the POWER button
once to switch the unit on. Press this button
again to restart the unit. Press and hold this
button to switch the unit off.
Audio input
You can connect the audio output of an
external device to this unit, to listen to the sound
of that device through the speakers of this unit.
• To connect an external audio device,
please use a standard audio cable with 3.5-
mm-to-3.5 mm plugs to connect the input
terminal AUDIO IN (RCA L and R inputs)
on the unit.
Press MODE button on the unit or INPUT
button on the RC to switch to AUX mode.
• Turn on the external device. You cannot
control playback with the buttons of this unit
except adjusting the volume.
Volume control
Rotate the volume knob or press the VOL
+/VOL- buttons on the RC to adjust the
volume level of the unit. Press the MUTE
button on the RC to mute/unmute the
sound.
Audio output
Use a standard RCA audio cable to
connect the L and R audio outputs (satellite
speaker outputs) to the corresponding audio
inputs of an external media device (CD, DVD,
VCR, VCD, etc.).
Modes
Press the MODE button on the unit or the
INPUT button on the RC to select an operation
mode: AUX - USB - SD - FM - BT.
Radio operation
• Press the MODE button repeatedly
to select the RADIO (FM) mode.
• For FM reception extend the FM antenna.
• Press and hold the SCAN button
to automatically scan for available broadcasting
channels, press this button again to stop
scanning.
• Shortly press the NEXT button to jump
to the next preset station. Press and hold the
TUNING+ button to manually increase (fine-
tune) the radio frequency.
• Shortly press the PREVIOUS button to
jump to the previous preset station. Press
and hold the TUNING- button to manually
decrease (fine-tune) the radio frequency.
LED lighting
Press and hold the (NEXT) button on
the panel to switch the LED lighting of the
unit on and off.
WARNING:SHOCK HAZARD-DO NOT OPEN
Сделано в Китае
5
Instruction manual
6
USB/SD operation
Connecting USB/SD
• Insert a USB device into the USB port or
insert a memory card into the memory card
slot. The unit will switch to USB or SD mode
automatically. The unit will start reading the
device.
• When the device and tracks on it are
detected, the display shows the currently
playing track number and track playback time.
Playback operations
• During playback press button
to pause playback. Press this button again
to resume playback.
• During playback press / buttons to
go to previous or next track.
General USB notes
• This unit is equipped with a USB socket
that can read and play MP3 files stored on
standard USB flash (compatible with USB
version 2.0) up to 32 GB.
Always switch off the unit or change
mode to another one before removing a USB
flash drive to prevent damage to your USB
device.
Note: Although this product is fully
compatible with USB 2.0 standard, a small
percentage of USB flash drives might not be
readable, due to those device manufacturers’
non-compliance with the full (official) USB
standards.
• FAT/FAT32 file system are supported.
According to the USB 1.1/2.0
Standard, usage of a USB device with power
current consumption exceeding 500 mA is not
recommended without supplementary power
supply.
Bluetooth operations
Bluetooth wireless playback
• This unit can wirelessly playback audio
from any device with Bluetooth A2DP
function.
• The wireless range is approximately within
10 meters.
• Wireless audio streaming requires pairing
of a Bluetooth device (e.g. smartphone).
HOW TO PAIR YOUR DEVICE TO THIS
UNIT:
• Make sure the Bluetooth function is
switched on in your device (e.g. smartphone,
tablet).
• Switch on the unit and press
MODE/INPUT to select the Bluetooth mode.
• Once the Bluetooth pairing indicator
begins flashing, you will find the unit listed in
the Bluetooth connections list of your device
(as TF-MSM2.102).
• If asked for a passcode, enter “0000”
• The initial setup is required only once
per device. To pair another device repeat the
above steps.
Failure to use supplementary power for
connected USB drives with power consumption
exceeding this value as well as defective USB
drives may cause mechanical or thermal
changes of elements of this unit as well as
failure of internal elements of the USB port.
Such damages are not warranty cases.
Warning: use of external USB drives
containing BIN files in root directory may cause
malfunction of unit or damage to the software.
Instruction manual
7
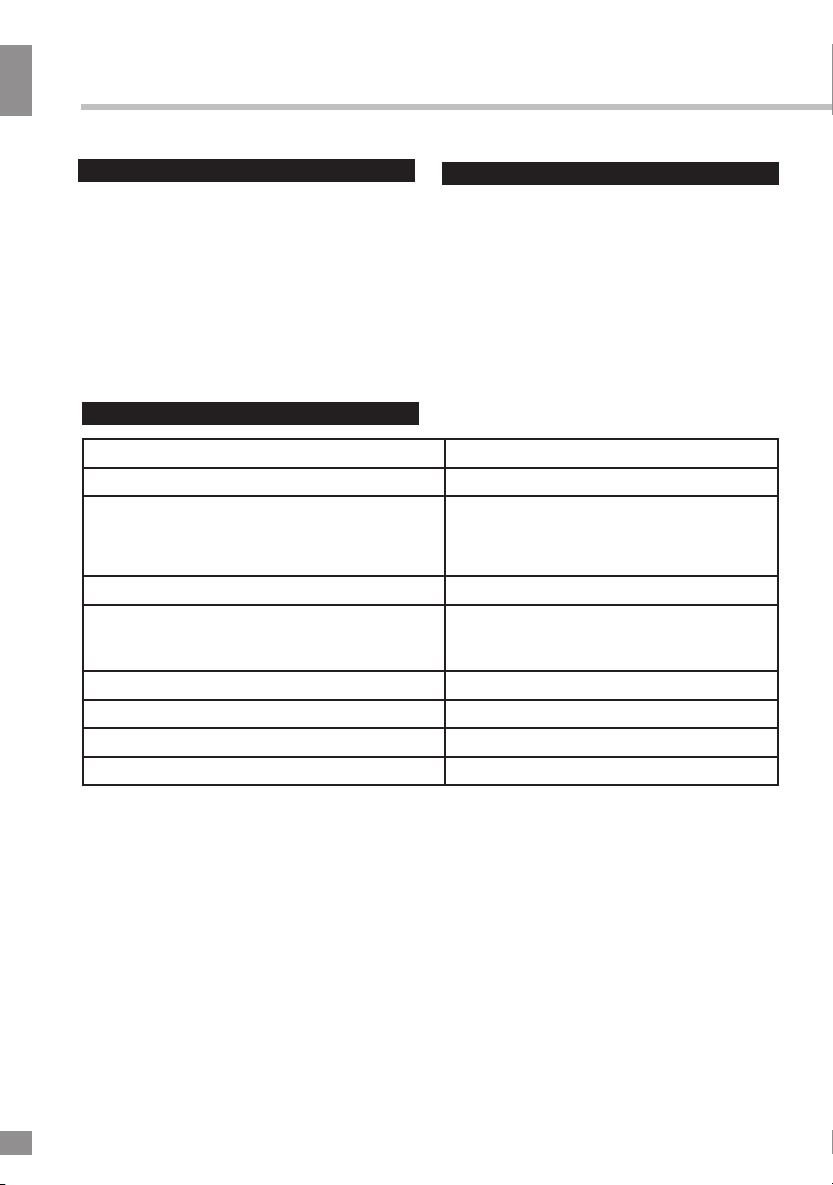
Specifications
Rated voltage ~ 220 V, 50 Hz
Rated power consumption 55 W
Total output power 40 W
S/N ratio ≥ 65 Db
Frequency response
Subwoofer
Satellites
20 Hz - 150 Hz
150 Hz - 20 Hz
Subwoofer driver size 5" (127 mm)
Satellite driver size 3" (76.2 mm)
Subwoofer unit size (L*D*H) 165*260*273 mm
Satellite unit size (L*D*H) 105*103*172 mm
Specifications and functions are subject to change without notice. It is connected with continual
improvement of the device.
Maintenance and care
If necessary, clean the unit with a piece of
cloth dampened with water only (be sure the
power cord is disconnected). The unit shall not
be exposed to dripping or splashing and no
objects filled with liquids, such as vases, shall
be placed on the unit. Normal ventilation of the
unit shall not be impeded for intended use.
Accessories
1 pc
2 pcs
1 pc
1 pc
Subwoofer
Satellite speaker
Remote control
Instruction manual
MANUFACTURED AND DISTRIBUTED BY TECHNO ELECTRIC LIMITED,
Legal address: 801 Luk Yu Building, 24 - 26 Stanley Street, Central, China
TELEFUNKEN and the TELEFUNKEN logo are trademarks of TELEFUNKEN Licenses
GmbH and are used under a trademark license.
Subwoofer RMS 16 W
Satellites RMS 2 x 12 W
7
8
Руководство по эксплуатации
Уважаемый покупатель!
Благодарим Вас за покупку нашего изделия. Чтобы понять, как правильно и без-
опасно пользоваться Вашей моделью изделия, рекомендуется тщательно изучить
настоящее руководство перед включением, регулировкой и эксплуатацией изделия.
Сохраняйте руководство для использования в будущем.
Описание
Передняя панель
1. Сабвуфер
2. Колонки-сателлиты
3. Кнопка MODE
4. Кнопка (PREVIOUS)
5. Кнопка (PLAY/PAUSE) / SCAN
6. Регулятор громкости
(NEXT) / LED ON/OFF
Задняя панель
~22 0V/ 50H z
ON
OFF
BAS S
A
F
N
M
T
LR
LR
AUD IO INPU T
AUD IO OUTP UT
10
11
12
13
14
15
7. Кнопка
8. Разъем для SD карты
9. USB-порт
10. Кнопка BASS
11. FM-антенна
12. Аудиовход
13. Аудиовыход
14. Переключатель POWER ON/OFF
15. Разъем кабеля питания
2 21
3
4
5
MODE
8
9
6
7
WARNING:SHOCK HAZARD-DO NOT OPEN
Сделано в Китае
Руководство по эксплуатации
9
Утилизация изделия
Если вы желаете утилизировать данное
изделие, не выбрасывайте его вместе с
обычным бытовым мусором. Существует
отдельная система сбора использованных
электронных изделий в соответствии с
законодательством, которая предполагает
соответствующее обращение, возврат и
переработку.
Обращайтесь в органы местного
управления за инструкциями по правиль-
ной утилизации продукта. Тем самым Вы
обеспечите утилизацию Вашего изделия с
соблюдением обязательных процедур по
обработке, утилизации и вторичной пере-
работке и, таким образом, предотвратите
потенциальное негативное воздействие на
окружающую среду и здоровье людей.
Меры безопасности
• В руководстве присутствуют важные
указания по эксплуатации и уходу. Перед
использованием устройства ознакомьтесь с
руководством и сохраните его для после-
дующего использования.
• Не наносите ударов по устройству, не
роняйте его.
• Не подвергайте устройство вибрации,
воздействию прямых солнечных лучей, вы-
соких или низких температур и влажности.
Не включайте радиоприемник в ванных
комнатах, около кухонных плит, отопитель-
ного оборудования.
• Не разбирайте корпус устройства само-
стоятельно. Доверяйте ремонт устройства
только квалифицированным специалистам.
В приборе находятся оголенные провода
высокого напряжения. Напряжение внутри
устройства достаточно высокое, чтобы вы-
звать удар электрическим током.
Пульт дистанционного управления
10+
10-
TUNING+
TUNING-
2
3
4
6
8
12
1
5
7
9
11 10
1. /POWER. Нажмите, чтобы включить
устройство. Нажмите и удерживайте,
чтобы отключить устройство.
2. Кнопка INPUT. Переключает режимы
работы: AUX - USB - SD - FM - BT.
3. Кнопки с цифрами. Используются для
выбора трека или радиостанции.
4. Кнопка MUTE. Включает и отключает
звук.
5. Кнопка VOL+. Увеличивает громкость
звука.
6. Кнопка EQ. Настраивает эквалайзер
7.
(в режимах USB/SD).
Кнопка /CH-. Переход к
предыдущему треку или радиостанции.
8. Кнопка 10+/TUNING+. Переход на 10
треков вперед или ручная настройка
радио вверх по диапазону.
9. Кнопка /CH+. Переход к
следующему треку или радиостанции.
10. Кнопка VOL-. Уменьшает
громкость звука.
11. Кнопка /SCAN. Запускает
воспроизведение и ставит его на паузу.
В режиме радио нажатие и удержание
кнопки автоматически сканирует и
сохраняет доступные радиостанции.
12. Кнопка 10-/TUNING-. Переход на 10
треков назад или ручная настройка радио
вниз по диапазону.
10
Руководство по эксплуатации
Питание устройства
• Перед первым использованием устрой-
ства проверьте, соответствует ли электро-
питание устройство, указанное в таблице с
техническими характеристиками, электро-
питанию в Вашей локальной сети.
• Вставьте вилку электрошнура в розетку.
Внимание: Всегда отключайте устрой-
ство от сети питания, если оно не будет
эксплуатироваться долгое время.
Общие операции
Включение/отключение питания
Когда устройство подключено к сети
электропитания, установите переключатель
POWER на задней панели в положение ON,
чтобы устройство перешло в режим
ожидания. Нажмите кнопку POWER на
ПДУ, чтобы включить устройство из
режима ожидания. Подсветка на передней
панели загорится. Чтобы перевести
устройство в режим ожидания, нажмите
кнопку POWER на ПДУ. Для выключения
устройства установите переключатель
POWER в положение OFF.
Громкость
Чтобы отрегулировать уровень
громкости звука, нажимайте кнопки VOL+ и
VOL- на ПДУ или вращайте регулятор
громкости.
Для приглушения звука нажмите кнопку
MUTE на ПДУ; для включения звука
нажмите эту кнопку еще раз.
Режимы работы
Нажимайте кнопку INPUT на ПДУ или
MODE на панели, чтобы выбрать режим
работы устройства: "6964#4%'.
#5.
~22 0V/5 0Hz
ON
OFF
BAS S
A
F
N
M
T
LR
LR
AUD IO INPU T
AUD IO OUTP UT
Подключения
•Подключите колонки-сателлиты к
соответствующим аудиовыходам
сабвуфера (левому и правому).
Аудиовход
Вы можете прослушивать внешнее ау-
диоустройство через динамики данной
музыкальной системы, подключив внешнее
устройство к левому (L) и правому (R)
аудиовходам.
•Чтобы подключить внешнее
устройство используйте стандартный
кабель со штекерами 3,5 мм для
подсоединения левого и правого
аудиовыходов внешнего аудиоустройства
к левому и правому RCA аудиовходам с
тыльной стороны музыкальной системы.
или MODE на панели для перехода к
режиму AUX.
•Включите внешнее устройство.
Музыкальная система позволяет только
регулировать громкость звука; управление
другими операциями воспроизведения
невозможно.
•Нажимайте кнопку */165ʽ¬¡°
Подсветка
Нажмите и удерживайте кнопку
(NEXT) на панели для включения и
отключения светодиодной подсветки.
WARNING:SHOCK HAZARD-DO NOT OPEN
Сделано в Китае
Indice
Lingue:


