Tesla 32T315BH Manuale utente

32T315BH
32T317BH
MKD S LV SRBENG BiH/
MNE HRV
TV
USER
MANUAL
SPDIF
USB 2.0
5V
50 0m A
ANTENNA
IN
HD MI 2 HD MI 1
LI NE OU T
VIDEOAUDIO
AV IN
R
L
32T315BH
SPDIF
USB 2.0
5V
50 0m A
ANTENNA
IN
HD MI 2 HD MI 1
LI NE OU T
VIDEOAUDIO
AV IN
R
L
SPDIF
USB 2.0
5V
50 0m A
ANTENNA
IN
HD MI 2 HD MI 1
LI NE OU T
VIDEOAUDIO
AV IN
R
L
32T317BH

OPERATING INSTRUCTION
Please read these instructions before operating
your set and retain them for future reference.
UPUTSTVO ZA UPOTREBU
Prije upotrebe uređaja pročitati ova uputstva
i zadržati ih radi kasnijih referenci.
UPUTE ZA KORIŠTENJE
Prije korištenja uređaja pažljivo pročitati
upute i sačuvati ih za buduću upotrebu.
NAVODILA ZA UPORABO
Pred uporabo pozorno preberite navodila
in jih shranite za morebitno uporabo v prihodnosti.
UPUTSTVO ZA UPOTREBU
Pre upotrebe uređaja pročitati ova uputstva
i zadržati ih radi kasnijih referenci.
УПАТСТВО ЗА КОРИСТЕЊЕ
Ве молиме прочитајте го ова упатство пред да го
инсталирате и употребувате вашиот уред.
ENG
BiH/
MNE
HRV
MKD
S LV
SRB

6
ENG
1x safety instructions/warranty cards, 1x remote control, 2x AAA batteries
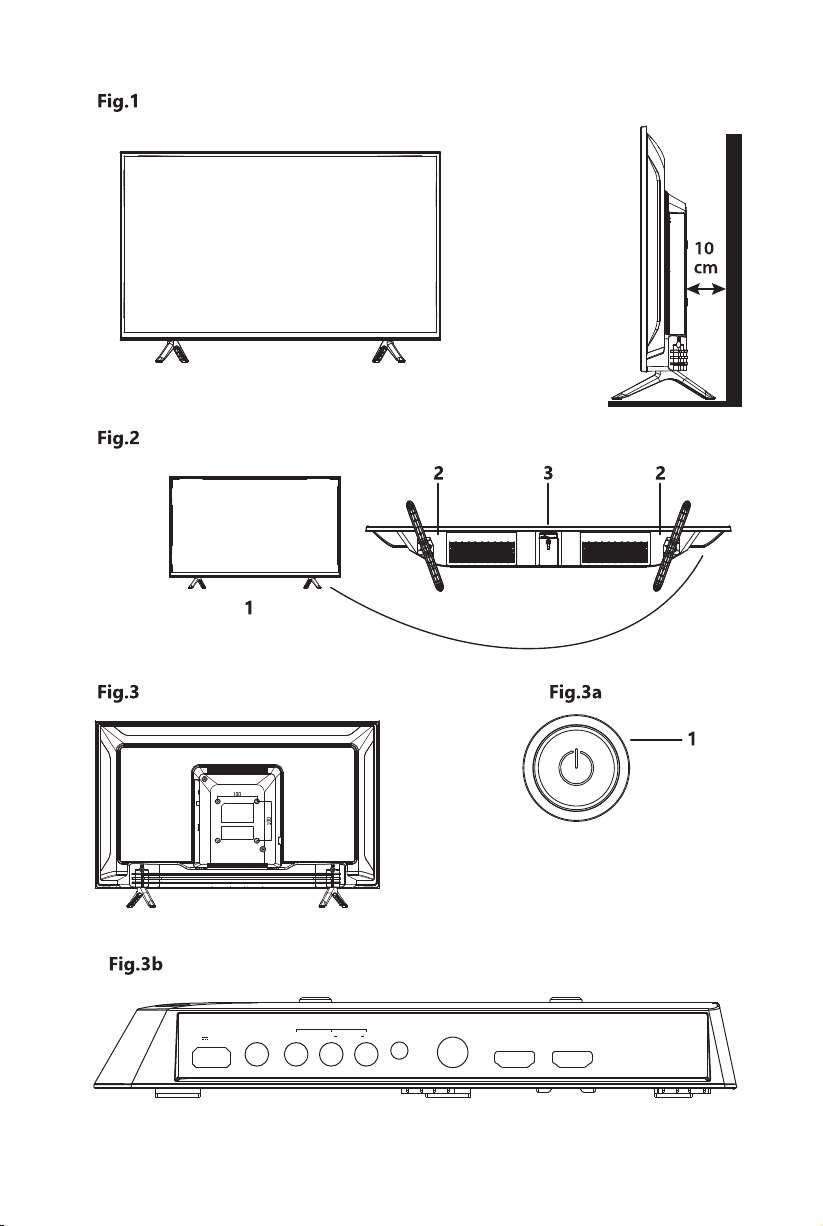
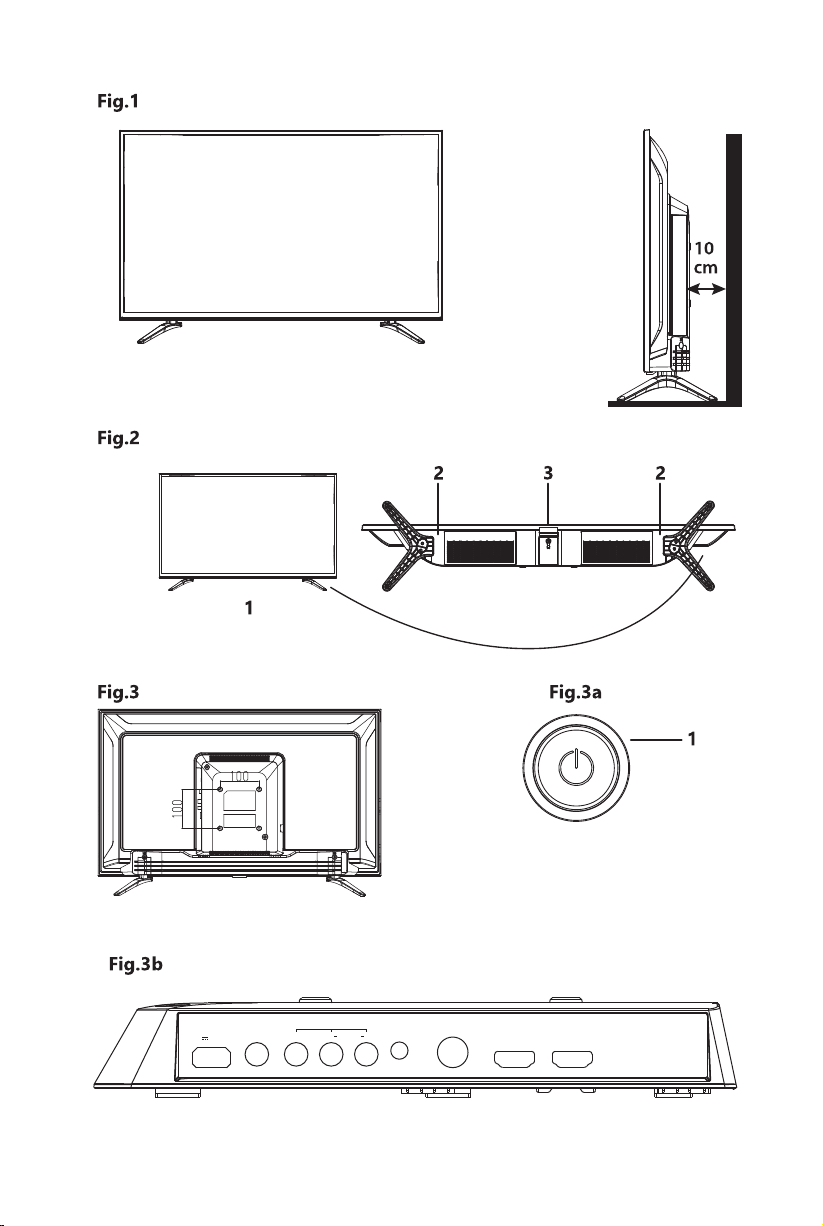
Install the display on a solid horizontal surface such as a table or desk. For ventilation, leave a space of at
least 10 cm free all around the set. To prevent any fault and unsafe situations, please do not place any
objects on top of the set. This apparatus can be used in tropical and/or moderate climates.
The symbols serve as follows:
1. Power indicator /remote sensor
2. Speakers
3. Buttons: Power
WARNING Indicates warning information.
NOTE Indicates any other additional important or helpful information.
MENU Represents a button on the remote control or the TV. (Bold characters)
Move to Represents a menu item within a window. (Italic characters)
1. AC INPUT (FIXED CABLE) Main power cable (180 – 240 V ~ 50/60 Hz)
2. Vesa 100 x 100 4 x screws holes to mount TV to the wall
INSTRUCTION
INSTALLATION
Accessories
Equipment set-up
Default PIN code: 0000
Front panel/underside
Rear panel
NOTE: The graphics are for representation only.
NOTE: The graphics are for representation only.
NOTE: The graphics are for representation only.
NOTE: The graphics are for representation only.
Fig.1
Fig.2
Fig.3
Fig.3a
button
1. Turn on the TV.
2. The TV is on, press it to display Button menu.
3. In the Button menu, short press it to select the menu, long press it to confirm the selection.

7
ENG
USB Connect a USB device for playback of multimedia les
AV IN Video and left/right audio connection.
HDMI 1 Connect HDMI input signal from a signal source such as DVD, Blu-ray
player or game console.
HDMI 2 (ARC) Connect HDMI input signal from a signal source such as DVD, Blu-ray
player or game console.
ANTENNA IN Connect a terrestrial antenna or cable connection from your provider to
the TV for searching programmes.
S/PDIF Use an RCA cable to connect your TV to a compatible digital amplifier or
Home theatre set.
AUDIO OUT (composite) AUDIO OUT (composite) socket (output)
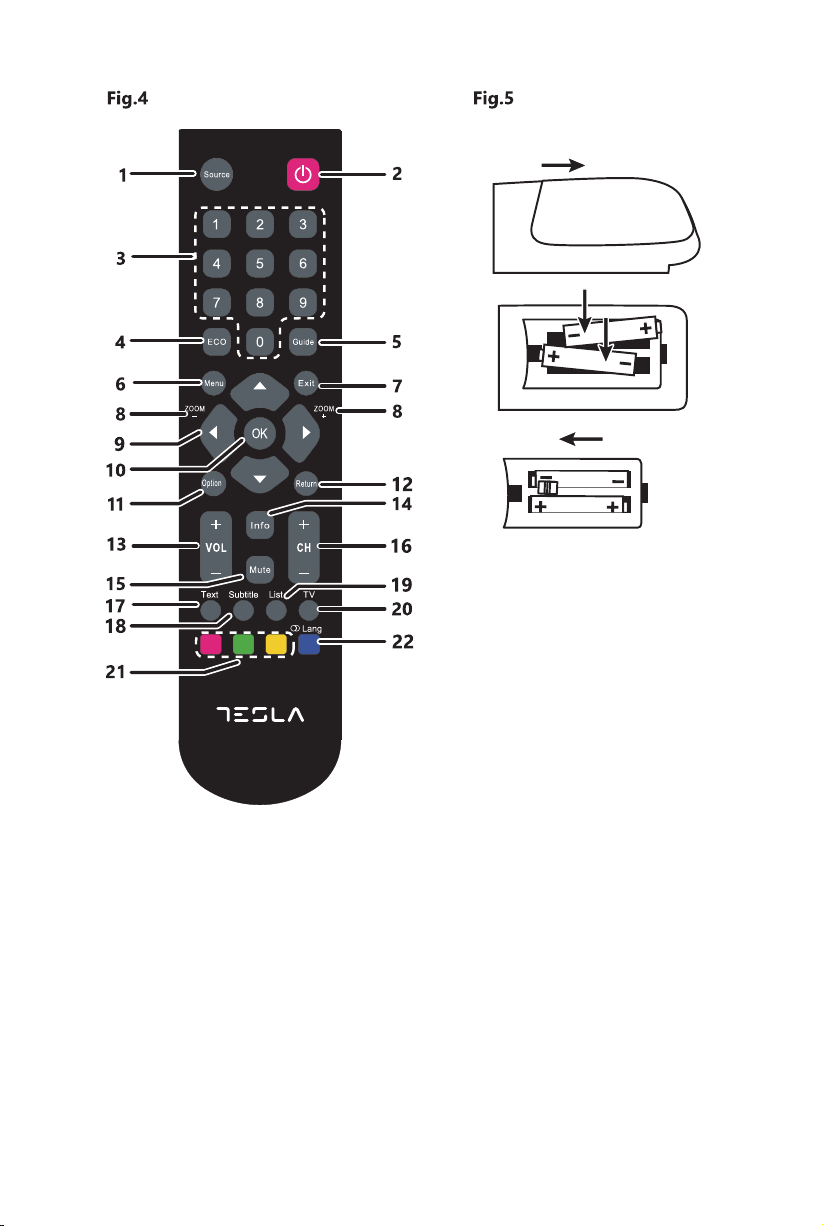
1. SOURCE Select the input source mode.
2. qPress to turn the TV on or standby.
3. 0 ~ 9 Choose channel directly.
4. ECO Screen brightness modes for energy saving
5. GUIDE Toggles the Electronic Programme Guide between on and off. Only available for
digital channels.
6. MENU Open the menu options.
7. EXIT Exit the current menu.
8. ZOOM -/+ Press to select the desired screen format. (In USB mode, it is unavailable.)
9. Navigate the menu.
10. OK Confirms your selection. Under the TV source, press the OK key to open the
Channel list.
11. OPTION Displays the function menu to perform certain operations. Press to enter the
Picture mode directly.
12. RETURN Returns you to the previous channel in TV mode.
13. VOL +/- Adjust the volume up or down.
14. INFO Display the status information.
15. MUTE Press to mute or restore the volume.
16. CH +/- Change programmes up or down.
17. TEXT Teletext.
18. SUBTITLE Press to display the Subtitle Language menu.
19. LIST Press to enter into the channel list.
20. TV Goes to the TV mode.
21. Red, Green,
Yellow button
In corresponding mode, press it to enter the right function as hint.
22. Blue button In corresponding mode, press it to enter the right function as hint.
In USB mode, press to select sound track mode.
In DTV mode, press to select Audio Languages.
In ATV mode, press to select Sound Type.
Side panel
Remote control
NOTE: The graphics are for representation only.
NOTE: The graphics are for representation only.
Fig.3b
Fig.4

8
ENG
Installing the batteries
Using the remote control
FIRST TIME INSTALLATION
NOTE: Pictures are only for reference. Actual items may differ.Fig.5
Precautions for using the battery
Improper using of the battery will cause leakage. Carefully follow these instructions.
1. Please note the batteries’ polarity to avoid short circuit.
2. When the battery’s voltage is insu cient which a ect the use range, you should replace it wit ha new
battery. Remove the batteries from the remote control unit if you do not intend to use it for a long time.
3. Do not use di erent types of batteries (for example Manganese and Alkaline batteries) together.
4. Do not put the battery into fire, and charge or decompose the battery.
5. Please dispose batteries abide by relevant environmental protection regulation.
• Use the remote control by pointing it towards the remote sensor. Items between the remote control and
the remote sensor could block normal operation.
• Do not cause the remote control to vibrate violently.Also, do not splash liquid on the remote control, also
do not put the remote control in a high humidity place.
• Do not place the remote control under direct sunlight which will cause deformation of the unit by heat.
• When the remote sensor is under direct sunlight or strong lighting, the remote control will not work. If so,
please change the lighting or TV’s position, or operate the remote control closer to the remote sensor.
After all connections have been made properly, switch on your TV. Insert the main power plug into the wall
outlet, now the red LED light should light up. Press the qbutton on your remote control to wake the TV up.
The language and country selection will appear on the screen. Use to select the OSD Language of your
preference. Use to select the Country and use again to select the region you are using this TV. This
country/region selection is an important setting, it will set the time zone and will try to sort region channels at
first or in a specific order.
If all settings are made, confirm with OK on your remote control and follow the next steps.
On the next screen, you can select which tuner you like to use and which channels you’d like to search for.
Choose Tuner Type and by pressing you can choose between DTV, ATV or DTV + ATV (DTV to search
digital broadcasts; ATV to search analogue broadcasts). After you made your selection, press to proceed
to Digital type. In this menu you can select which input source you would like to use:
• DVB-T to receive terrestrial broadcasts (by using indoor or outdoor antenna)
• DVB-C to receive cable broadcasts. (Connection to cable outlet box)
Then the next screen appears depending from the tuner selection you choose.
DVB-T/T2 installation
Terrestrial Setting
Here you only need to press OK to start searching.
All settings are automatically set by country selection you made in first step.
NOTE: If you have an active antenna, please check the user manual of the antenna for external power supply.
The TV can NOT supply power used for an active antenna.

9
ENG
Sound menu
Sound Mode Select your favourite sound mode for each input. Choices are Standard, Music,
Movie, Sports and Personal.
Treble Adjusts the higher frequency of the sound.
Bass Adjusts the lower frequency of the sound.
Balance Control the sound balance between the right and left loudspeaker (earphone).
Auto Volume Level Adjust the volume corresponding to the input audio level. Options are On
and Off.
SPDIF Mode When SPDIF output is connected to digital home audio system you can
select Auto to output Dolby audio* automatically. When you choose PCM,
stereo audio is selected only and with Off you can switch off this output.
AD Switch Turn on the Audio description, you can activate the setting of AD volume.
When turn on the audio description, a narrator will describe what is
happening on the screen for blind or visually impaired viewers. (Only if
available in DTV mode.)
*Availability depending on broadcaster
DVB-C installation
MENU SETTINGS
Menu control (DTV mode)
Picture menu
Press MENU to enter the main menu. Press to select an item. Press and OK to select the
submenus. Press MENU to exit the item.
NOTE: Full scan will have a duration of approximately 20 minutes, depending on your cable network.
NOTE: Please check the settings for your cable system used by your provider!
Cable Setting
Press to highlight your settings.
Scan type You can select Network Scan, Full or Blind Scan. (Default Network Scan for quick
search advised)
Frequency Please enter (with 0 ~ 9) the main frequency used by your provider in KHz.
Network ID Please enter (with 0 ~ 9) the used Network ID from your provider.
Symbol Please enter (with 0 ~ 9) the used Symbol from your provider. (Ks/s)
Picture Mode Select the automatic picture control mode. Available choices are Dynamic,
Standard, Mild and Personal.
Colour Temp Select the overall colour tone of the picture. Available choices are Cold,
Normal and Warm.
Noise Reduction Eliminates noise in the picture. Available choices are:Off, Low, Middle, High and
Default
In the Personal mode, settings can be changed for Brightness, Contrast, Colour, Tint, Sharpness and
Backlight.

10
ENG
Using PVR
GENERAL DATA
Operating voltage: 180 ~ 240 V AC 50/60 Hz
Power consumption: 50 W
Power consumption in standby: <0.5 W
Operating temperature: +5 °C ~ +35 °C
Storage temperature: -15 °C ~ +45 °C
Operating humidity: 20% ~ 80% RH, non-condensing
Storage humidity: 10% ~ 90% RH, non-condensing
Allows you to record your favourite TV programme to a USB device.
Before you use the function, connect a USB memory device to the set first.
Press Menu to display the Main menu, select “ PVR File System” and press OK button to enter.
1. Selects Disk
2. Adjusts the recording ooptions
3. Press RED button to start recording.
To watch the recorded programme, enter the USB mode> Video.
Select the folder MSTPVR, then select the related record file.
Press OK to play. (It is the same if you record a digital radioprogramme).
Questo manuale è adatto per i seguenti modelli
1
Indice
Lingue:
Altri manuali Tesla TV

Tesla
Tesla T617 Manuale utente

Tesla
Tesla 40T319 Manuale utente

Tesla
Tesla 32M325BHS Manuale utente

Tesla
Tesla 43T319 Manuale utente

Tesla
Tesla M325 SMART Manuale utente

Tesla
Tesla DVB-T2 Manuale utente

Tesla
Tesla TV T319 SMART Manuale utente

Tesla
Tesla 32M312BH Manuale utente

Tesla
Tesla 32T303SH Manuale utente

Tesla
Tesla 32D615BHS Manuale utente


