Thrax Audio Lyra Manuale utente

Lyra
Speaker system
by Thrax Audio
Operating Manual
Manual issued 25/11/2014
CAUTION
THE UNIT CONTAINS NO USER SERVICEABLE PARTS. DO NOT REMOVE THE COVERS AND
NEVER OPERATE THE SPEAKERS WITH CHASSIS COVERS REMOVED.
DO NOT OPERATE THE UNIT IF WET OR NEAR WATER.
DO NOT EXPOSE TO DRIPPING OR SPLASHING AND ENSURE THAT NO OBJECT FILLED WITH
LIQUIDS, SUCH AS VASES, ARE PLACED ON THE SPEAKERS.
DO NOT INSTALL NEAR ANY HEAT SOURCES SUCH AS RADIATORS, STOVES OR OTHER
APARATUS THAR PRODUCE HEAT.
PROTECT THE SIGNAL CORDS FROM BEING WALKED ON OR PINCHED.
THE SPEAKERS ARE FAIRLY HEAVY. BE SURE TO USE PROPER LIFTING TECHNIQUES TO AVOID
BACK STRAIN AND INJURY. BE CERTAIN TO INSTALL IT ON DEDICATED STANDS IN A SECURE
LOCATION.
TIME SPENT FAMILIARIZING YOURSELF WITH THIS MANUAL WILL BE WELL REWARDED.

1. Important Safety Instructions …...................………….................................... 3
2. Introduction ………........................................................................................… 4
3. Specification ……..........................................................................................… 4
4. Front Panel ……..............................................................................................… 5
5. Back Panel ……..............................................................................................… 5
6. Unpacking and Installation
- Unpacking …..…..................................................................................… 6
- Positioning ……...........…......................................................................… 6
- Connecting ……..................................................................................… 8
- Listening test …….................................................................................… 9
7. Care and maintenance ………................................................................… 10
CONTENTS
2

READ ALL INSTRUCTIONS: All the safety and operating instructions of your Thrax Audio
equipment should be read before power is applied to the equipment.
RETAIN OWNER'S MANUAL: TThese safety and operating instructions should be retained
for future reference.
HEED WARNING: All warnings on the unit and in the operating instructions should be
adhered to.
FOLLOW INSTRUCTIONS: All operating and use instructions should be followed.
CLEANING: The unit should be cleaned only as recommended by the manufacturer.
SERVICING Refer all servicing to qualified service personnel. Servicing is required when
the speaker has been damaged in any way, liquid has been spilled inside the appliance
or it has been exposed to moisture, the speaker does not operate normally, or has been
dropped.
DO NOT OPEN THE CABINET: There are no user serviceable components inside this
product. Opening the cabinet may present a shock hazard, and any modification to the
product will void your warranty.
WARNING: To reduce the risk of fire or electric shock, do not expose this apparatus to rain
or moisture.
IMPORTANT SAFETY INSTRUCTIONS
3

Congratulations on choosing the Thrax Audio LYRA - a powerful stand mount, two-way
loudspeaker of outstanding performance.
Please, take a few moments to read this manual. The advice it contains will enable you to
get the very best performance out of your Lyra loudspeakers.
The LYRA utilizes a new type of tweeter featuring a proprietary ultra short horn and two
mid-bass drive units in the well known D’Apolito arrangement. Thrax Lyra loudspeakers
are finished in anodized aluminum (black or silver). The body is machined from solid
plates.
INTRODUCTION
4
• Impedance: ..................................................................................................... 4Ω
• Max Power Handling ………….............................................................….. 250W
• Dimensions ………………....................................…….. 210W x 385D x 520H mm
• Weight ………………............................................................................…….. 35Kg
• Finish ……..........................................…….. Black or Silver anodized aluminum
• Sensitivity: ………….............................................................................…….. 90db
• Frequency band: ………….......................................................….. 34~20 000Hz
SPECIFICATION
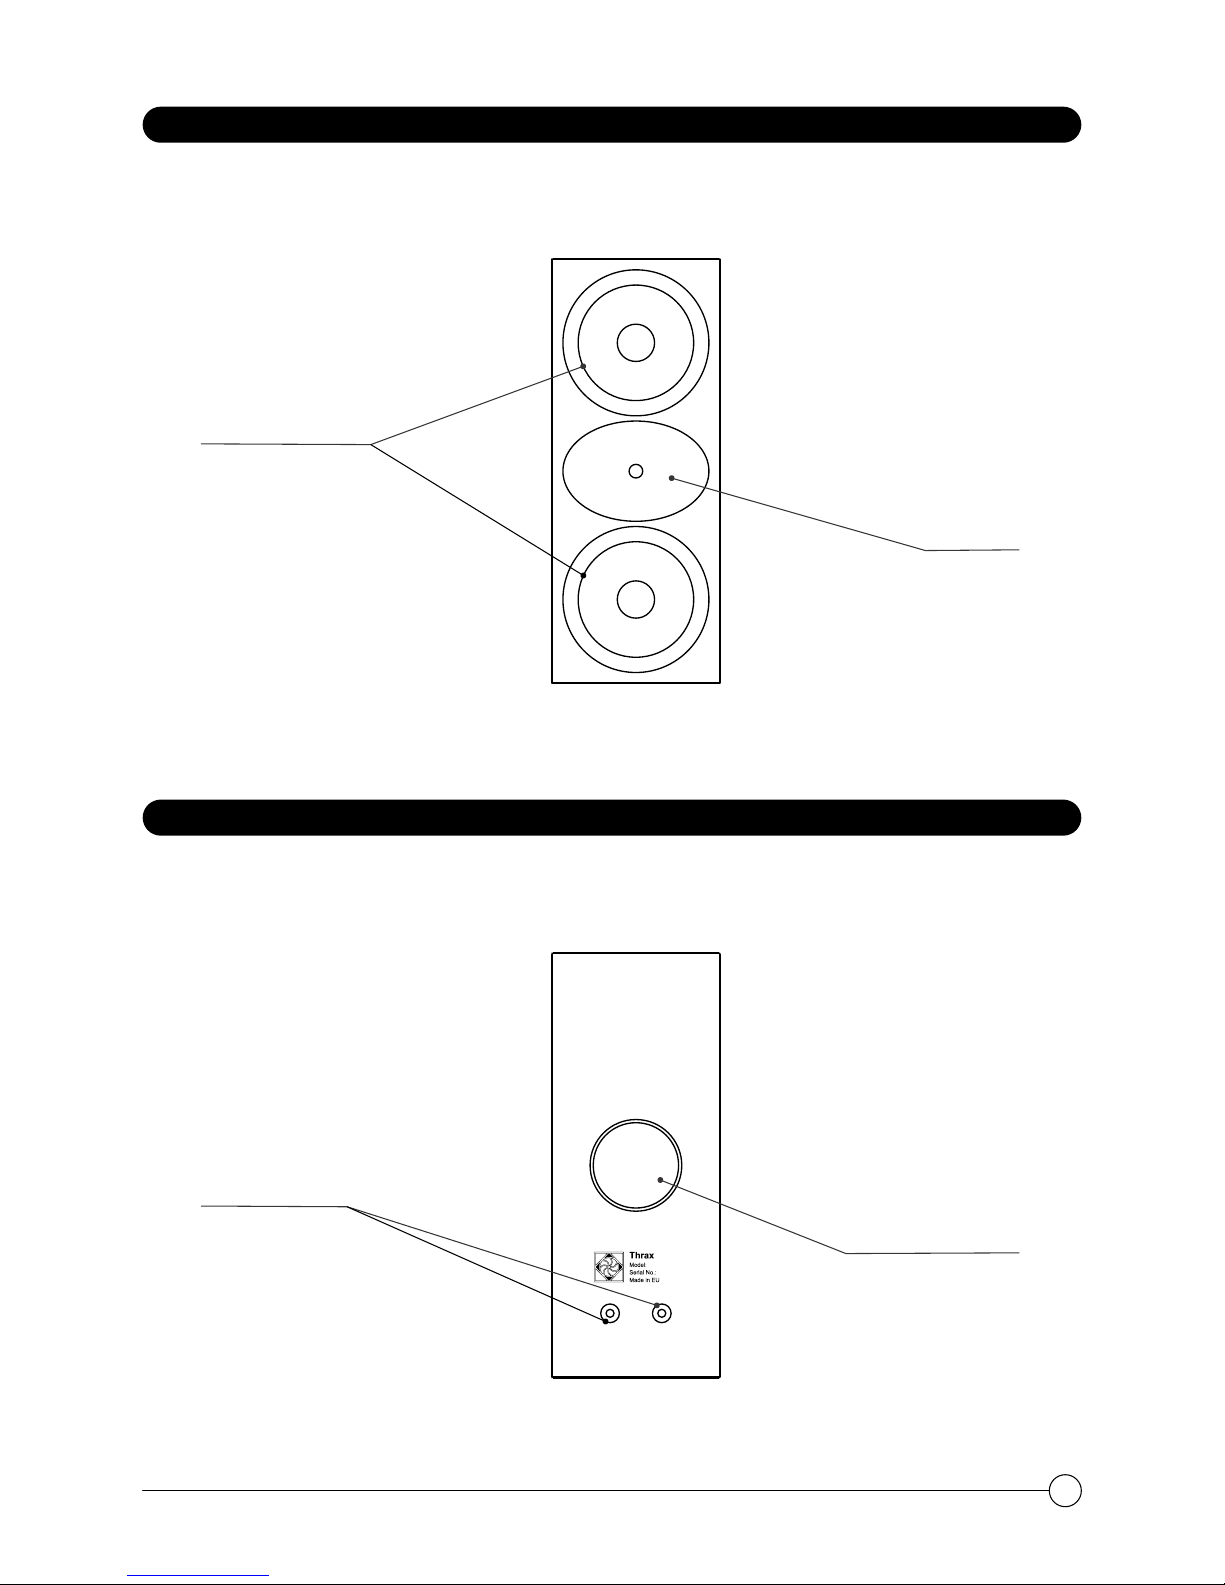
FRONT PANEL
BACK PANEL
Mid-Low
Frequency Units
Tweeter
Lyra
000004
Bass Reflex Port
Speaker
Binding Posts
5
Unpacking
All Thrax Audio shipping boxes have been specially designed to protect their contents
and special care has been taken to prevent damage under normal shipping conditions.
Mishandling should be evident upon inspection of the shipping container. Carefully
remove your new speakers from their packing and examine closely for signs of shipping
damage.
We strongly recommend saving all original packing to protect your speakers from
damage, should you wish to store or ship them at a later date.
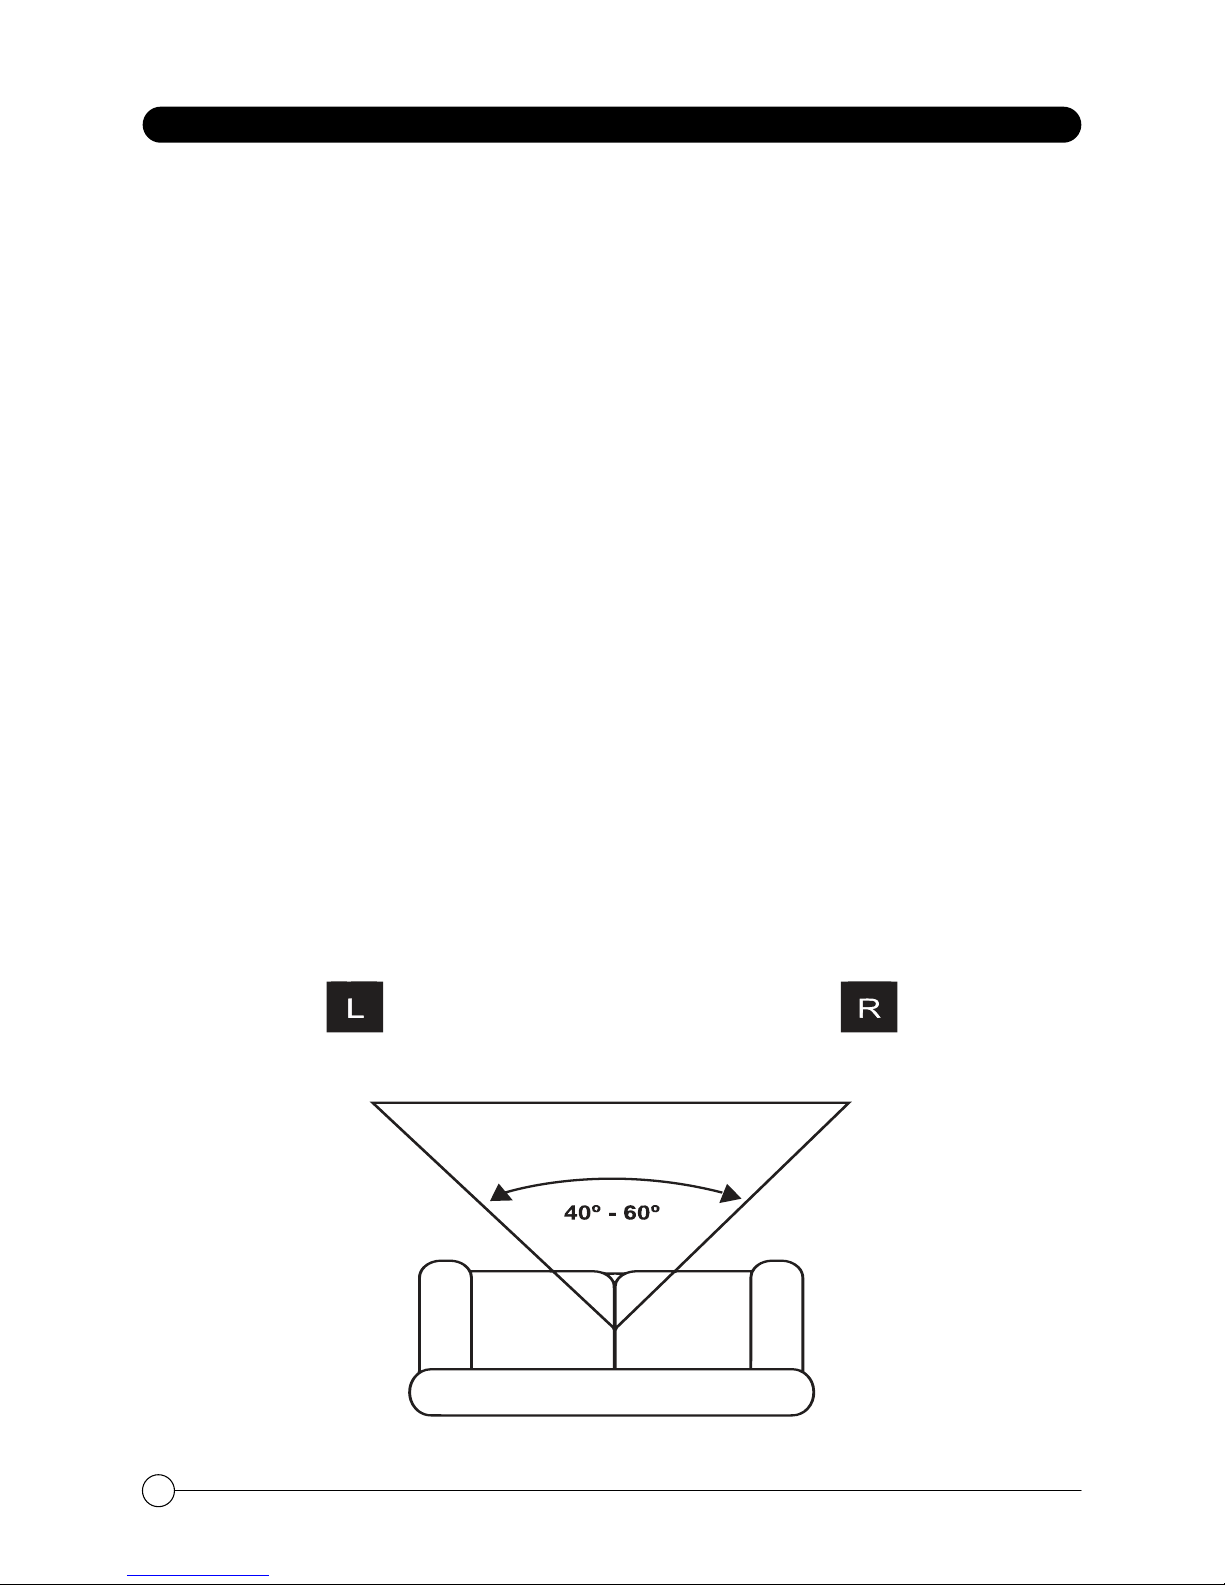
Positioning
Rigid support is essential for the speaker to develop its full detail and dynamic
performance. Choose quality, high-mass stands for your speakers.
The Lyra is best heard with the tweeters at, or just below, ear height when the listener is
seated. Placement of your loudspeakers will greatly affect their performance. The
following guidelines should be considered:
• Placing the loudspeakers at least 1.8-2.5m (6-8 feet) apart will provide the
best stereo sound and image.
• The shape of the room will affect the bass performance, especially when
loudspeakers are placed in the corner of the room.
• Positioning the tweeters so that they play at the listeners ear level provides
for optimum playback.
• Keeping the loudspeaker wire away from AC outlets will reduce interference.
aging the speakers should be as far apart as they are from the listening position.
UNPACKING AND INSTALLATION
LISTENING POSITION
LEFT
CHANNEL
RIGHT
CHANNEL
6

The shape of the listening room and the furnishings will change the way your system
sounds. The bass frequencies will generally be affected by the positioning and treatment
of the room. There will be more perceived bass when a speaker is moved closer to a wall
boundary. In general, however, loudspeakers should be kept away from side walls as
much as possible, as these surfaces can adversely affect the stereo imaging
experienced at the listening position. Positioning the loudspeakers at least 30-40 cm (2-
15”) away from the side walls will generally provide the best performance.
Closeness to room boundaries has a major impact on the low frequency performance.
The speakers should be kept away from corners (which will produce booming). The
speakers can be positioned fairly close to a back or side wall but should not be the same
distance off the ground as they are from the rear or side wall.
For best stereo imorce when tightening the terminals as this might damage your cable
connectors.
UNPACKING AND INSTALLATION
7

Connecting your loudspeakers
Before any connections are made, please ensure that all equipment in the system is
turned OFF.
Be sure to observe the amplifier’s rated load impedance. Connecting an impedance
load outside the amplifier's rated range can damage the amplifier.
Make sure that your power amplifier output matches the speakers’ power capacity. Even
if the amplifier’s power output is lower than the speakers’ PGM (program) power
capacity, the speakers may be damaged when clipping of a high input signal occurs.
The following may cause damage to speakers:
• Continuous high sound pressure level produced by electronic instruments.
• Continuous high-power output of distorted signals.
• Popping noises caused by turning on equipment, or by connecting or disconnecting
system components while the amplifier is turned on.
When turning on the AC power in your audio system, always turn on the power amplifier
LAST, to avoid speaker damage. When turning the power off, the power amplifier should
be turned off FIRST for the same reason.
Loudspeaker wire throughout the system should be high quality, loudspeaker grade
audio cable with polarity coding. High quality connectors are also essential, however
you may use bare wire as well as spades or banana plugs. If bare wire is used, be careful
that no stray strands get loose that could cause a short-circuit.
Connect the positive lead of the loudspeaker wire (indicated with a "+" or other marking)
to the Red (or positive) loudspeaker terminal. Connect the other loudspeaker wire lead
to the Black (or negative) loudspeaker terminal.
Connect the opposite end of the loudspeaker wire to your amplifier making sure that the
polarity is preserved ("+" to "+" or Red to Red, and "-" to "-" or Black to Black – see diagram).
Bare wires and spade plugs must be tighten by rotating the ratchet screw clockwise. Do
not apply excessive force when tightening the terminals as this might damage your cable
connectors.
UNPACKING AND INSTALLATION
8

LISTENING TEST
To ensure that all connections have been made correctly, turn on your system and
begin playback of material you are familiar with. Start off by listening at a low volume,
then slowly raise the volume to a comfortable listening level. A proper stereo image
should be present. If the loudspeakers do not produce a solid stereo image, please
verify the wiring to ensure that the polarity of the connection is not reversed.
Note that although your Thrax Audio System has been run for 72 hours at the factory, it
will continue to "break in" for approximately 150 hours. Also be aware that many
components display the need for a new break in period after being transported in
unheated cargo aircraft.
9

CARE AND MAINTENANCE
Your Thrax Lyra speakers will provide many years of listening pleasure if you follow
these guidelines:
Please make sure no one will abuse the speakers and especially the most delicate
parts – its drivers. Do not touch the drivers, block the horn or insert foreign objects in
the speaker openings.
Avoid exposure to extreme cold (below freezing temperatures). Allow for warming up
before operating and start with low-level signal for about 10 minutes, prior to high-
power operation.
Please take care of yourself - do not operate your audio system at extreme volume
levels or at a level that is uncomfortable, since your Lyra speakers are capable of
producing sound levels that could cause permanent hearing loss. If you experience
any discomfort or ringing in the ears, or suspect any hearing loss, you should consult an
audiologist.
Dusting your speakers with a soft cloth is normally sufficient, but you may clean the
loudspeakers also with a slightly damp cloth with a mild soap solution. Abrasives or
aggressive chemical cleaners should be avoided, as they may damage the finish.
Clean the speakers only when the system is turned off. Avoid getting moisture into any
openings of the cabinet, particularly where the drivers are located.
For any service you should contact your local dealer or reseller.
10
Indice
Manuali Sistema di altoparlanti popolari di altre marche


Sondpex
Sondpex Active Speaker System and Digital Music... Manuale utente

JVC
JVC NX-PN7 Manuale utente

Marshall Amplification
Marshall Amplification AR-DM61-BT Manuale utente

Yamaha
Yamaha NX-A01 - Speaker Sys Manuale utente

SE Audiotechnik
SE Audiotechnik I-LINE Manuale utente

Gemini
Gemini WRX-843 Series Manuale utente