TIVA SNBHTR Manuale utente

Owner’s Manual
Carbon Infrared Heater
AU
TIVA Heater Indoor-Outdoor - User Manual - BDV2.indd 1TIVA Heater Indoor-Outdoor - User Manual - BDV2.indd 1 17/06/2021 2:08:50 p.m.17/06/2021 2:08:50 p.m.

Congratulations on purchasing the TIVA™Heater Indoor/Outdoor.
Before installing and using the heater, please read this owner’s
manual carefully, and keep it somewhere safe for future reference.
TIVA Heater Indoor-Outdoor - User Manual - BDV2.indd 2TIVA Heater Indoor-Outdoor - User Manual - BDV2.indd 2 17/06/2021 2:08:52 p.m.17/06/2021 2:08:52 p.m.

3
SAFETY INSTRUCTIONS
Read all instructions before installing and using this heater.
When using electrical appliances, basic safety precautions should always be
followed to reduce the risk of fire, electric shock and injury to persons, including the
following:
WARNINGS:
• This appliance is not intended for use by persons (including children) with
reduced physical, sensory or mental capabilities, or lack of experience and
knowledge, unless they have been given supervision or instruction concerning
use of the appliance by a person responsible for their safety.
• Children of less than 3 years should be kept away unless continuously supervised.
• Children aged from 3 years and less than 8 years should only switch on/
off the appliance provided that it has been placed or installed in its intended
normal operating position and they have been given supervision or instruction
concerning use of the appliance in a safe way and understand the hazards
involved. Children aged from 3 years and less than 8 years should not plug in,
regulate and clean the appliance or perform user maintenance.
• Children should be supervised to ensure they do not play with the appliance.
• CAUTION — Some parts of this product can become very hot and cause burns
Particular attention has to be given where children and vulnerable people are
present.
• WARNING: In order to avoid overheating, do not cover the heater.
• If the supply cord is damaged,it must be replaced by the manufacturer,its service
agent or similarly qualified persons in order to avoid a hazard.
• This heater is not equipped with a device to control the room temperature.
• Do not use this heater in small rooms when they are occupied by persons not
capable of leaving the room on their own,unless constant supervision is provided.
WARNING: FIRE RISK EXISTS IF THE HEATER
IS COVERED BY OR POSITIONED CLOSE
TO CURTAINS OR OTHER COMBUSTIBLE
MATERIALS.
IMPORTANT:
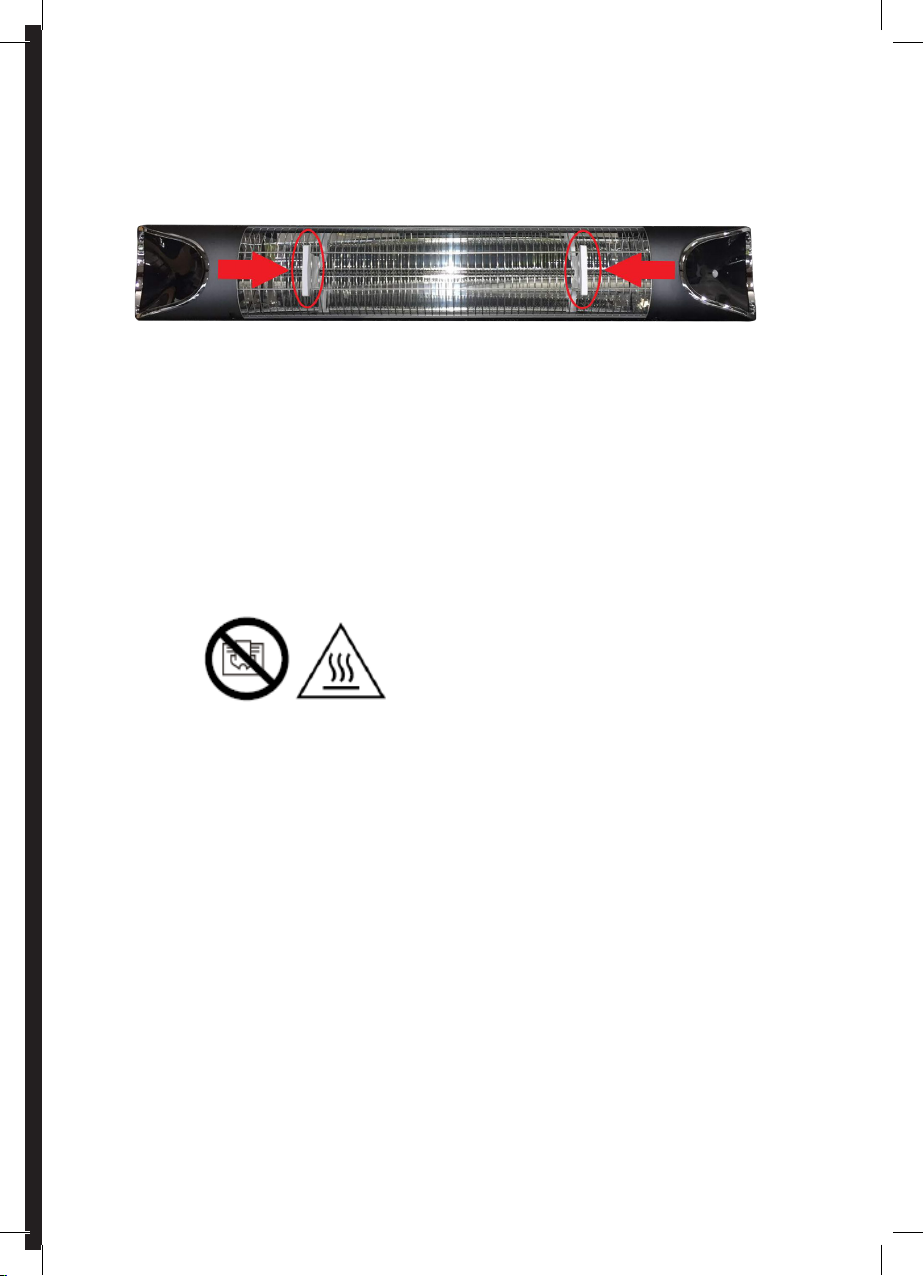
The support tabs holding the heating element must be removed before use.Any
damage caused by leaving these tabs in and using the heater is not covered
under warranty and will incur a refurbishment fee to cover the cost of new parts
and a servicing charge.
When returning a TIVA™Heater Indoor/Outdoor it must be returned in it’s original
packaging, including all packaging inserts. If a returned heater is damaged in
transit and does not have the correct packaging, the customer will be held
responsible for the damage and be required to pay a refurbishment fee to
cover the cost of new parts and a servicing charge.
REMOVE REMOVE
TIVA Heater Indoor-Outdoor - User Manual - BDV2.indd 3TIVA Heater Indoor-Outdoor - User Manual - BDV2.indd 3 17/06/2021 2:08:52 p.m.17/06/2021 2:08:52 p.m.

4
• The heater must be installed at least 1.8m (6 ft) above the floor.
• This heater is designed for use on a 220-240V AC supply only.
• Use this heater only as described in this manual.Any other use not recommended
by the manufacturer may cause fire, electric shock, or injury to persons.
• The fireguard of this heater is intended to prevent direct access to heating
elements and must be in place when the heater is in use.
• The fireguard does not give full protection for young children and persons with
reduced physical, sensory or mental capabilities.
• This heater must be earthed. Connect to properly grounded outlets only.
• Ensure both plug and socket are clean and free from dust when using.
• To disconnect the heater from the power supply, turn off the heater, switch off the
power point, grip the plug and pull from the power socket.
• Never pull by the cord.
• Never touch the plug with wet or moist hands.
• If using an extension lead, ensure that the lead it is rated 10A or higher and all
connections are protected from the weather and water ingress.
• Regularly inspect the power cord and plug for wear or damage and do not
operate the heater with a damaged cord, plug or loose socket or after the heater
malfunctions, or has been dropped or damaged in any manner.
• We recommend not using a multi-board with your heater.
• Do not use the heater if the heating element is cracked or broken.
• The heater must not be located immediately below or in front of a socket outlet
or connection box.
• Keep combustible materials such as furniture, pillows, bedding, paper, clothes
and curtains at least 1.5m (5 ft) from the front of the heater and keep them away
from the sides and rear.
• Do not allow the supply cord to sit or hang in front of the heater while in use.
• Do not use the heater in areas where gasoline, paint, flammable liquids or highly
combustible dusts are used or stored.
• If this heater is to be used in bathroom, it is to be installed so that switches and
other controls cannot be touched by a person in the bath or shower or using a
sink or anything else that may involve wet hands or skin.
• Never locate heater where it may fall into a bathtub or other water container.
• Extreme care should be taken whenever the heater is left operating and
unattended.
• Never use the heater while sleeping.
• Do not cover the heater.
• Do not insert any object into the heater.
• Never touch the heater while in use.
• Always disconnect the heater from the electricity supply and allow it to cool
before adjusting the position or attempting to work on it.
• The heater is in stand-by mode when plugged in and can be turned on by the
remote.When not in use,remove the plug from the wall socket outlet to completely
turn off the heater.
• When used outdoors, always use a weatherproof power outlet and a residual
current device (RCD).
• The TIVA™Heater Indoor/Outdoor is protected from rain sprays. Do not direct
water at the heater, e.g. splashing or from a garden hose.
TIVA Heater Indoor-Outdoor - User Manual - BDV2.indd 4TIVA Heater Indoor-Outdoor - User Manual - BDV2.indd 4 17/06/2021 2:08:53 p.m.17/06/2021 2:08:53 p.m.

5
INTRODUCTION
Your TIVA™Heater Indoor/Outdoor is a robust and weatherproof heater, ideal for
both indoor and outdoor use. Requiring no time to heat up, it provides comfortable
heat instantly.
That’s because the TIVA™Heater Indoor/Outdoor’s carbon infrared lamp
produces instant radiant heat. Unlike conventional convection heating, the
TIVA™Heater Indoor/Outdoor doesn’t heat the air. Rather, it transfers radiant
heat from the TIVA™Heater Indoor/Outdoor lamp to an object, just like the
warmth of the sun heating a rock, or the feeling of sunshine on your face.
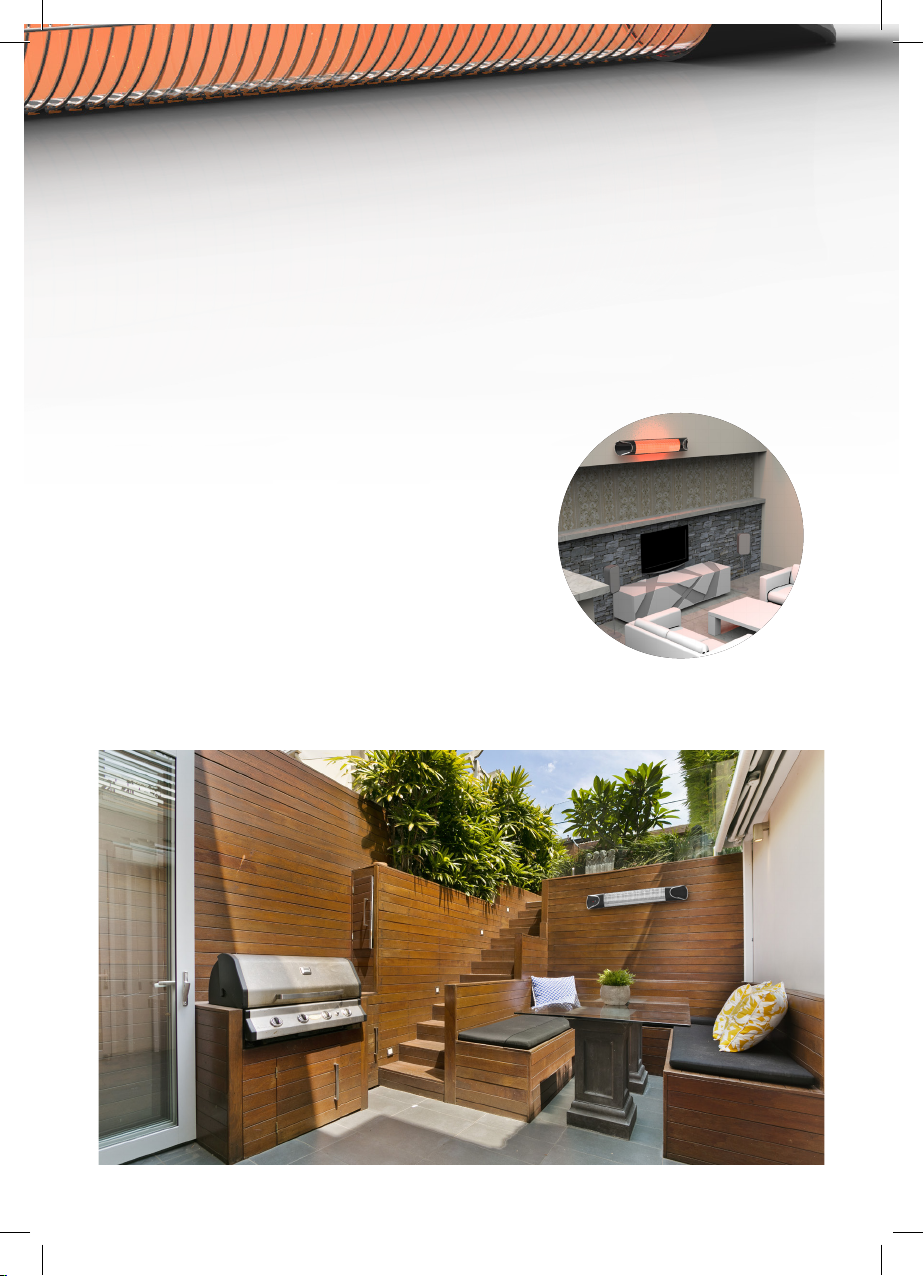
INDOORS
Used indoors, your TIVA™Heater Indoor/Outdoor will
only warm you and objects in the room, such as
carpets or furniture.It won’t heat and dry out the air.
OUTDOORS
In an outdoor environment, the surrounding air is
constantly moving. This makes convection heating
impractical because once the air is heated, it just
blows away – leaving you without the warmth you
desire. But the TIVA™Heater Indoor/Outdoor enables you to
target outdoor areas,warming only the people and objects in the heater’s path, for
maximum warmth and maximum efficiency.
TIVA Heater Indoor-Outdoor - User Manual - BDV2.indd 5TIVA Heater Indoor-Outdoor - User Manual - BDV2.indd 5 17/06/2021 2:08:54 p.m.17/06/2021 2:08:54 p.m.

6
WALL MOUNTING INSTALLATION
• The TIVA™Heater Indoor/Outdoor must be mounted horizontally only. If using the
standard plug, an electrician is not required for installation.A qualified electrician
is only required if the Instant Heater is being hard wired into the wall.
• DO NOT install the heater on an inflammable surface.
• The lowest part of the heater must be located at or above a minimum height
of 1.8m (6 ft) from ground level, so that the heater cannot be touched when in
operation.
• When mounting, do not angle the face of the heater higher than 90° or lower
than 45° from the surface (Refer to the installation diagram on the next page).
• NOTE: If this range of angles is exceeded, the heater it will automatically
switch off.
• Ensure the orientation is correct. The end with the cord and display panel should
be to the left-hand side.
• Keep the power cord away from the body of the heater, as the body will get hot
when the heater is in use.
• When mounting the heater, pay attention to the minimum safe distance between
the heater body and inflammable surfaces.
• The heater should always have a minimum clearance of 0.3m (1 ft) from a ceiling
and adjacent walls.
• When used outdoors, always use a weatherproof power outlet and a residual
current device (RCD).
• Before drilling mounting holes, make sure there are no wires or
water pipes behind the wall or ceiling onto which the heater is to
be mounted.
• The heater must be installed using the mounting brackets provided.
• Fasten the brackets securely to the mounting surface and the back of the heater
using the nuts and bolts supplied.
• Fasten the heater securely onto the brackets using the nuts and
bolts supplied.
• The brackets can be used to adjust the direction of the heater.Adjust the heater
angle by loosening the two bolts that connect the bracket halves, adjust and
retighten.
TIVA Heater Indoor-Outdoor - User Manual - BDV2.indd 6TIVA Heater Indoor-Outdoor - User Manual - BDV2.indd 6 17/06/2021 2:08:54 p.m.17/06/2021 2:08:54 p.m.

7
Towards Wall
Front View Side View
Min: 450
Min: 300mm
(1 ft)
Min: 300mm (1 ft)
Min: 1800mm
(6 ft)
Max: 900
Floor
Wall
Ceiling
Wall
TIVA Heater Indoor-Outdoor - User Manual - BDV2.indd 7TIVA Heater Indoor-Outdoor - User Manual - BDV2.indd 7 17/06/2021 2:08:55 p.m.17/06/2021 2:08:55 p.m.

8
PARTS & ASSEMBLY
WALL MOUNTING
4x mounting brackets
2x plasterboard
anchors
2x m5
tapping screw
2x m8
coach bolts
2x m8
nut
2x m6
nut
(drawings not to scale)
1. Measure & secure 2 mounting brackets on a wall up to a maximum of
530mm horizontally apart, measured from the hole centres. Where possible
locate solid fixing points in the wall such as in the studs which will provide the
most secure fixing point and usually will not require plasterboard anchors. If
the studs cannot be located or are not in a convenient location then ensure
you use the correct wall anchors for your wall, plasterboard anchors are
supplied.
Maximum 530mm
TIVA Heater Indoor-Outdoor - User Manual - BDV2.indd 8TIVA Heater Indoor-Outdoor - User Manual - BDV2.indd 8 17/06/2021 2:08:55 p.m.17/06/2021 2:08:55 p.m.

9
2. Bolt the remaining 2
mounting brackets to the
wall mounted brackets
loosely using the supplied
M8 coach bolts and nuts.
3. Lift the heater up to the
wall mounted brackets,
feed the bolts on the back
of the heater through the
brackets and secure using
the supplied M6 nuts,
tightening fully.
4. Adjust the heater to the desired
angle, then tighten the M8 bolts
and nuts once in the desired
position.
TIVA Heater Indoor-Outdoor - User Manual - BDV2.indd 9TIVA Heater Indoor-Outdoor - User Manual - BDV2.indd 9 17/06/2021 2:08:55 p.m.17/06/2021 2:08:55 p.m.

10
HEATER OPERATION
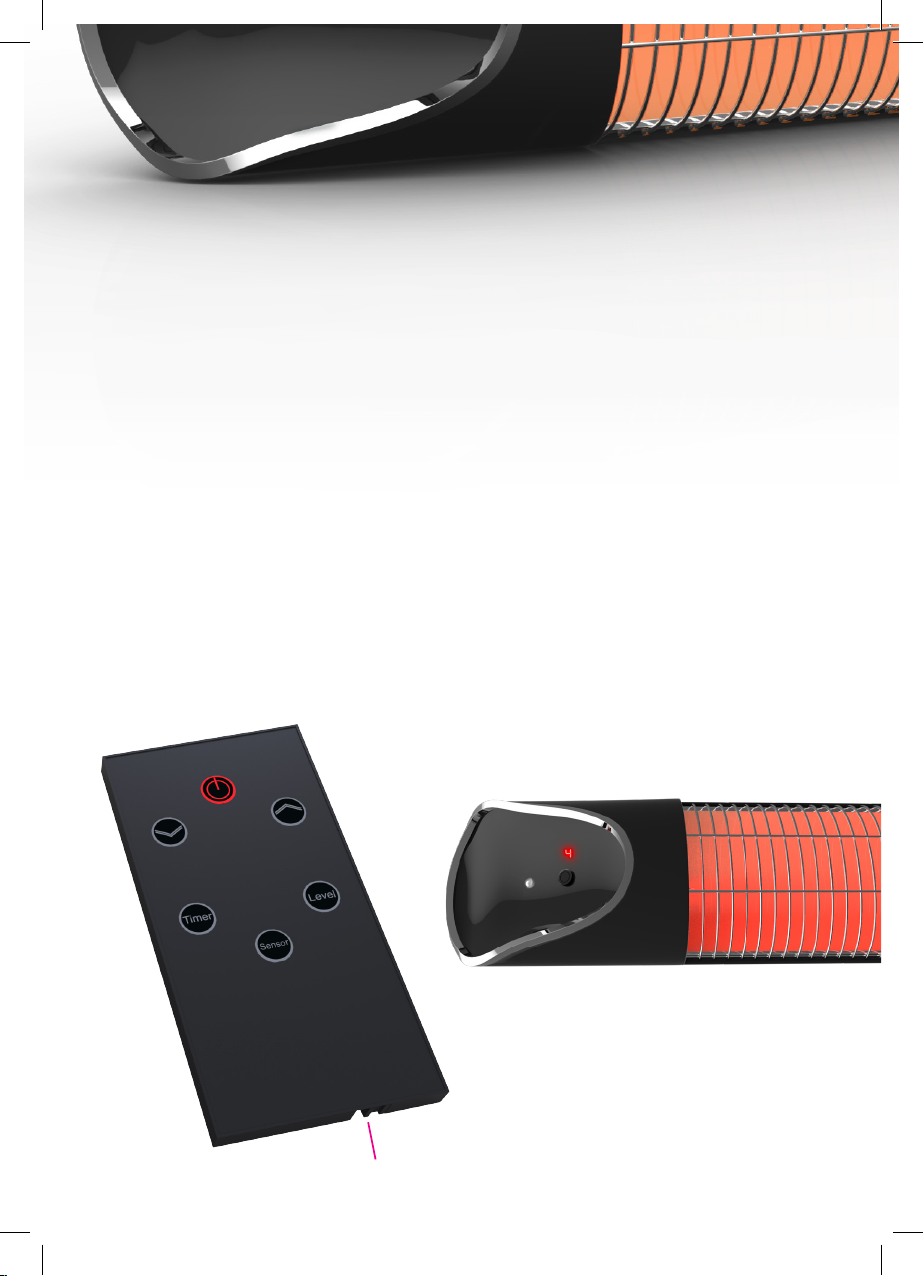
• To turn the heater on, press the stand-by button on the unit or on the remote.
• Using the remote,press the level button then change the power setting by pressing
the up or down arrow buttons.
• Press the timer button then set the sleep timer by pressing the arrow buttons.
• To go back to stand-by mode, press the stand-by button on the unit or on the
remote.
• Press the sensor button on the remote to set to the motion sensor mode. While
in this mode, when motion is detected, heater will stay on for 15 minutes. if no
motion is detected during this 15 minute period, the heating element will turn off
(during this mode, the LED will display A-).
If no motion is detected within 1 hour of this state, the heater
will revert to the normal standby mode (need to press stand-by
button to turn on heater, and no longer in motion sensor mode).
To activate motion sensor mode again, press the sensor button on the remote.
stand-by button
LED Display
stand-by button
Battery Compartment
TIVA Heater Indoor-Outdoor - User Manual - BDV2.indd 10TIVA Heater Indoor-Outdoor - User Manual - BDV2.indd 10 17/06/2021 2:08:56 p.m.17/06/2021 2:08:56 p.m.
Indice
Altri manuali TIVA Stufa
Manuali Stufa popolari di altre marche

Empire Heating Systems
Empire Heating Systems WCC65 Manuale utente

Wetekom
Wetekom 92 86 43 Manuale utente

Desa
Desa SPC170-F Manuale utente

Watlow
Watlow Watrod Electric Tubular Heaters Manuale utente

Haverland
Haverland ECO-DRY GPS Series Manuale elenco delle parti

Stelpro
Stelpro ASILVC2060 Series Manuale utente