tne Q4-v3 Manuale utente
TNE-SCOOTER Q4-v3
FEATURES
TNE-SCOOTER Q4-v3
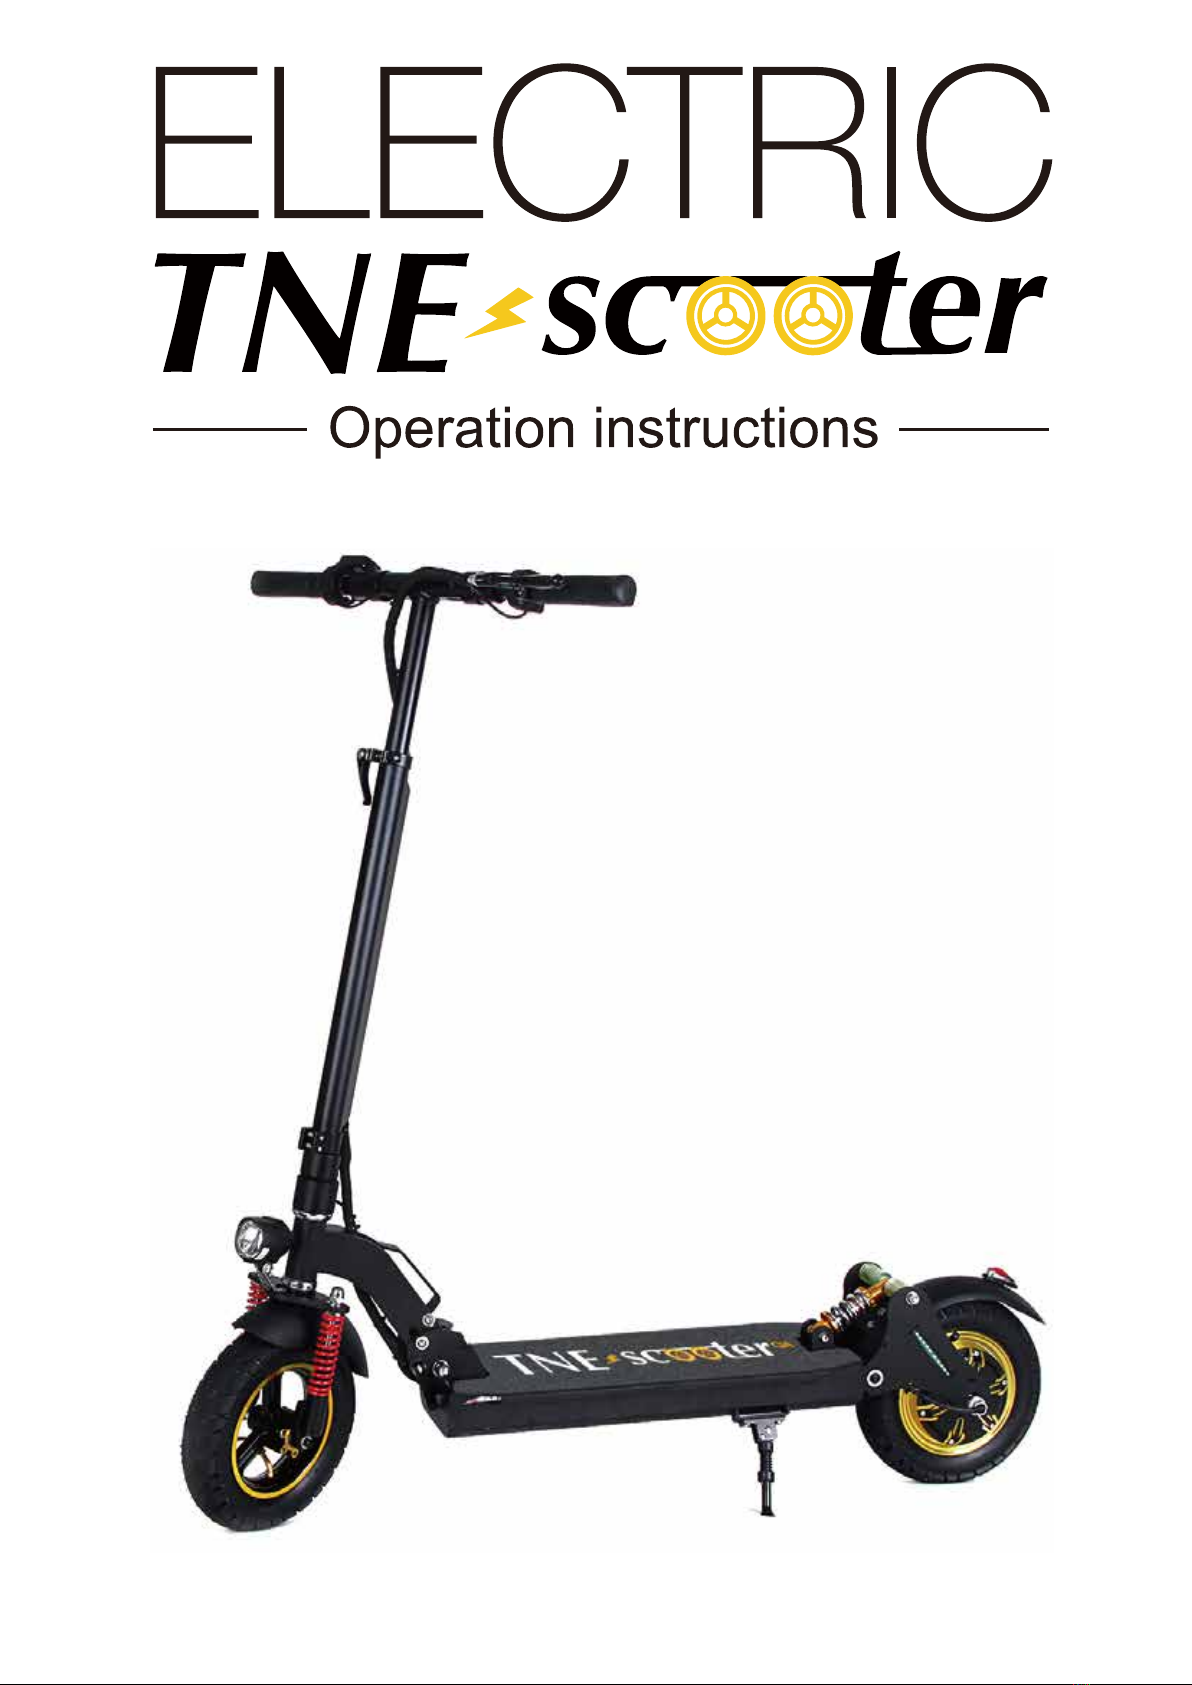
APPEARANCE & SIZE
www.tne-scooter.com www.tne-group.net
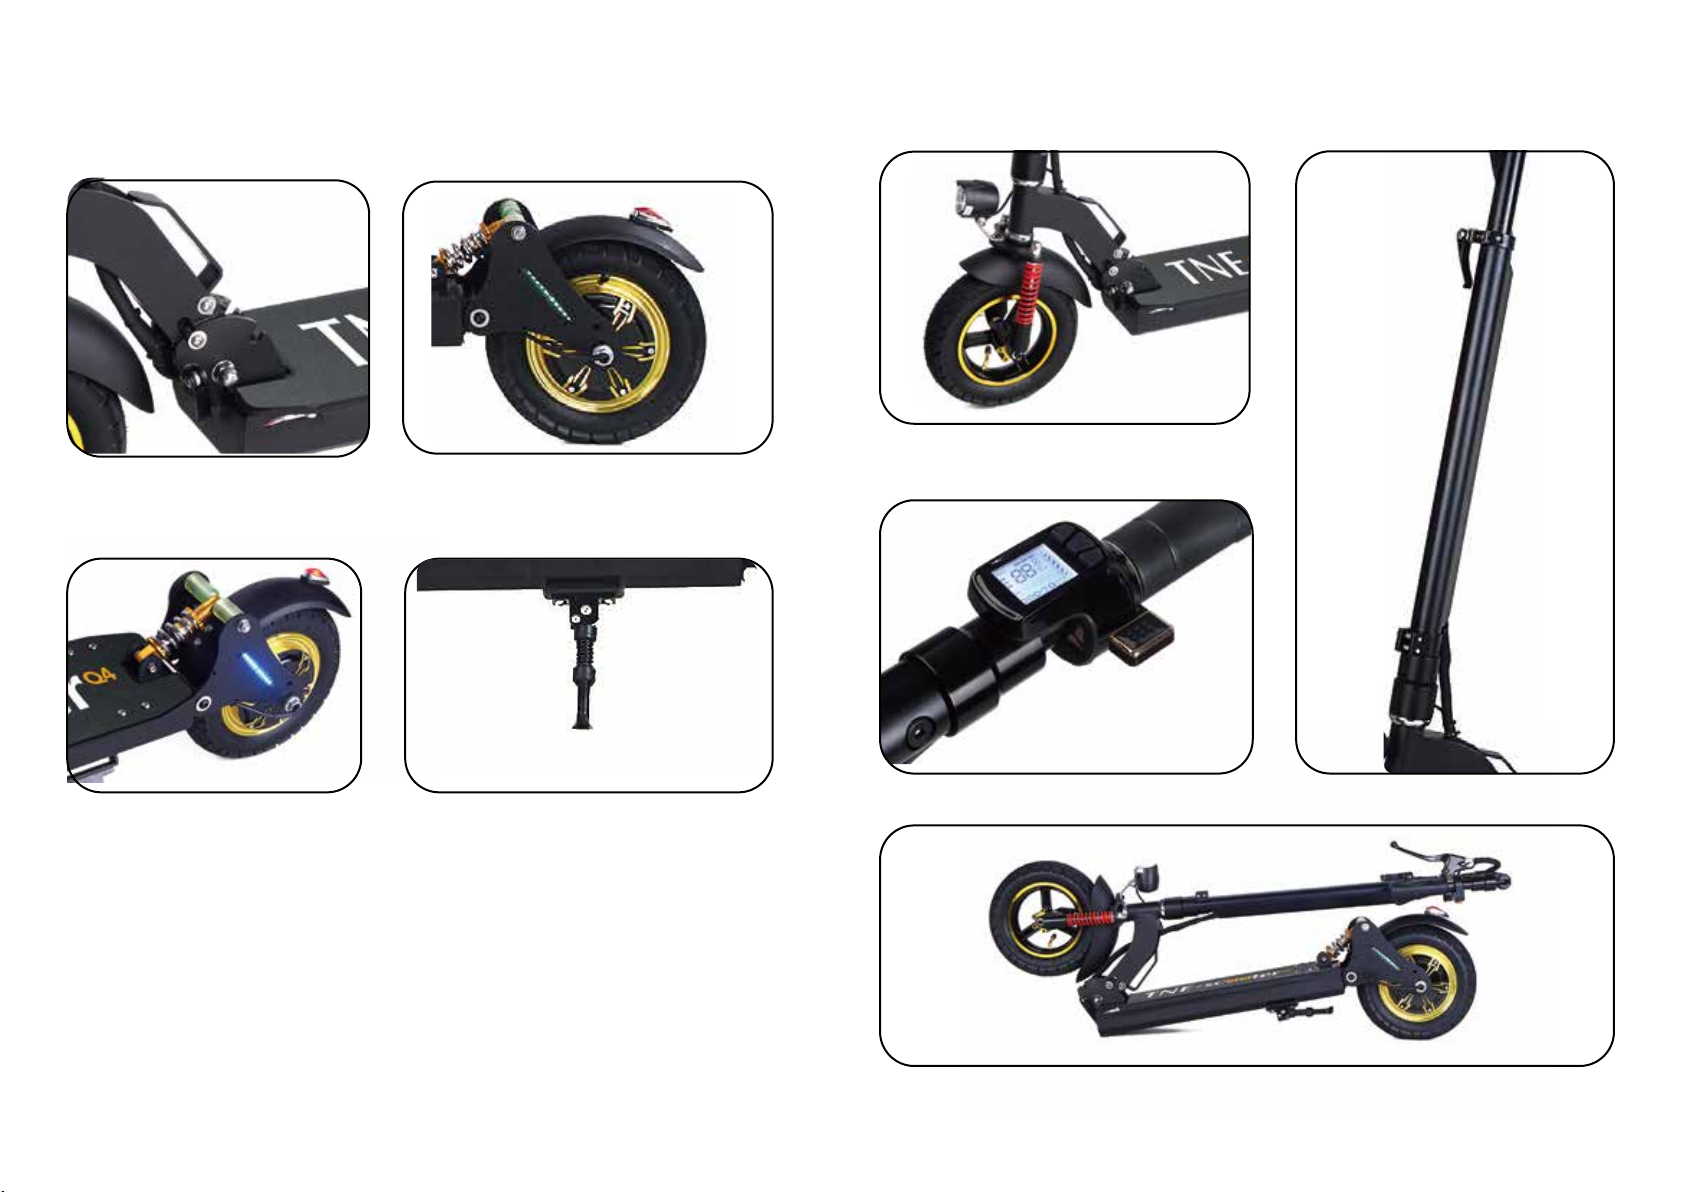
BRAKE HANDLE
SPEED DISPLAY
FRONT SUSPENSION
AIR HOLES
ANTI SLIP
STICKER
QUICK FOLDING
HANDLEBAR GRIP
BRAKE
LIGHT
REAR OIL
SUSPENSION
WARNING LIGHT BACK SIDE LIGHTS
FULLY
ENCLOSED
DRUM
BRAKE
MOTOR
STRONG
KICKSTAND
QUICK FOLDING
RELEASE
NO WELDING
STRUCTURE
HEAD
LIGHT
10 INCH
PNEUMATIC
TIRES
Max
height
120cm
Min
height
102cm
115cm
45cm
58cm
18.5cm
115cm
TNE-SCOOTER Q4-v3
FEATURES
TNE-SCOOTER Q4-v3
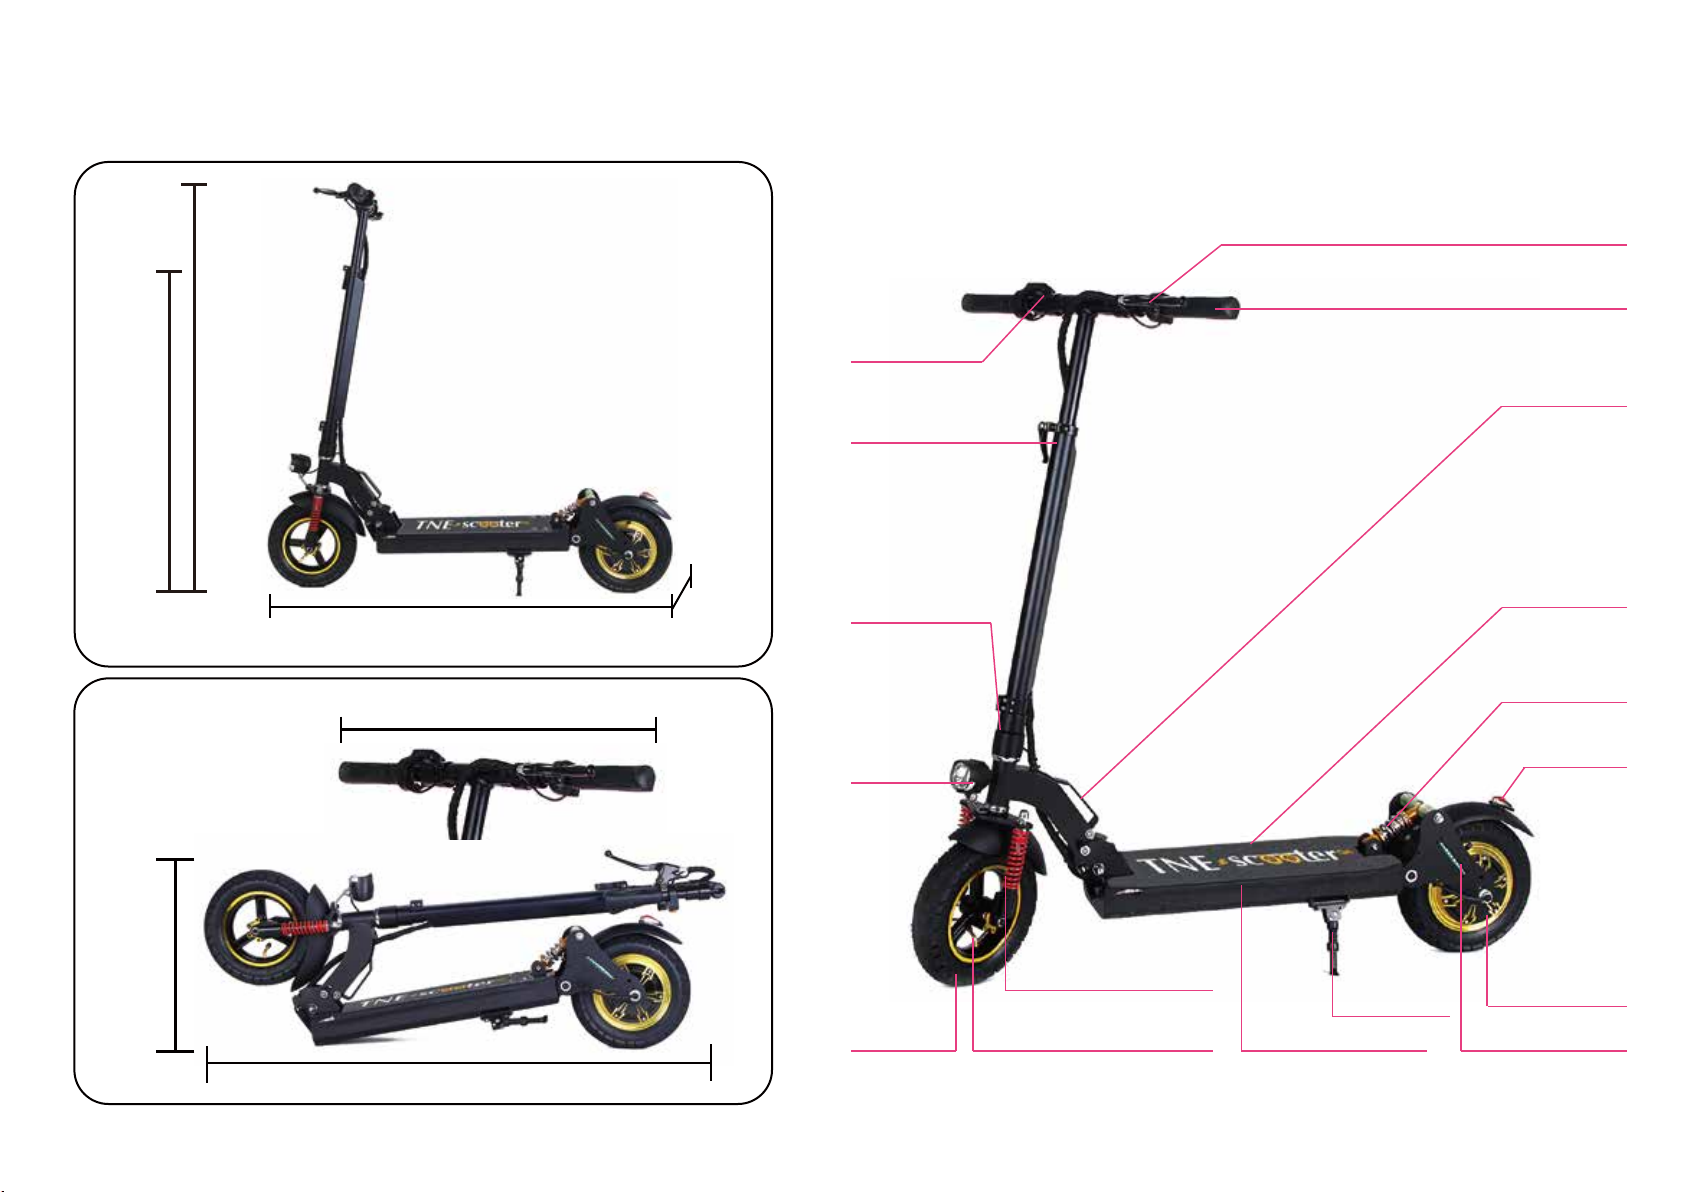
MAIN PARTS
FULLY ENCLOSED DRUM BRAKE MOTOR
LCD INTELLIGENT SPEED METER
QUICK FOLDING SYSTEM
REAR OIL SUSPENSION
& DRUM BRAKE
SCOOTER BRACKET
FRONT WHEEL & OIL SUSPENSION
HEIGHT ADJUSTABLE BAR
QUICK FOLDING SYSTEM
www.tne-scooter.com www.tne-group.net

WARNINGS & GENERAL INFORMATION
WARNINGS
The responsibility for E-SCOOTER maintenance is yours,
and will help reduce risk of injuries.
Therefore, read this manual and follow it’s instructions, they
will help you avoid risk.
GENERAL WARNING
● Alway follow the local lwas and regulations.
● Never ride your scooter in conditions of poor visibility.
● Do not do stunts, wheelies or jumps, they will increase your
Chances of injury and damage your E-SCOOTER.
● Never carry passengers.
PLEASE NOTICE
E-SCOOTER is not liable for incidental damages or consequential
damages due directly or indirectly to the use of this product.
IMPORTANT INFORMATION
This manual was written to help you understand the proper us
and maintenance of E-SCOOTER.
Also, it is important that your first ride with E-SCOOTER will be
in a remote location, without any obstacles.
It is important for you to understand your new E-SCOOTER; its
features and performance, so that you will enjoy the most from
your first and every ride.
E-SCOOTER needs a short period for all moving parts such
as hinges and brakes to adjust themselves into their correct
position.
www.tne-scooter.com www.tne-group.net
3
OPENING & FOLDING TNE-SCOOTER Q4-v3
FOLDING E-SCOOTER
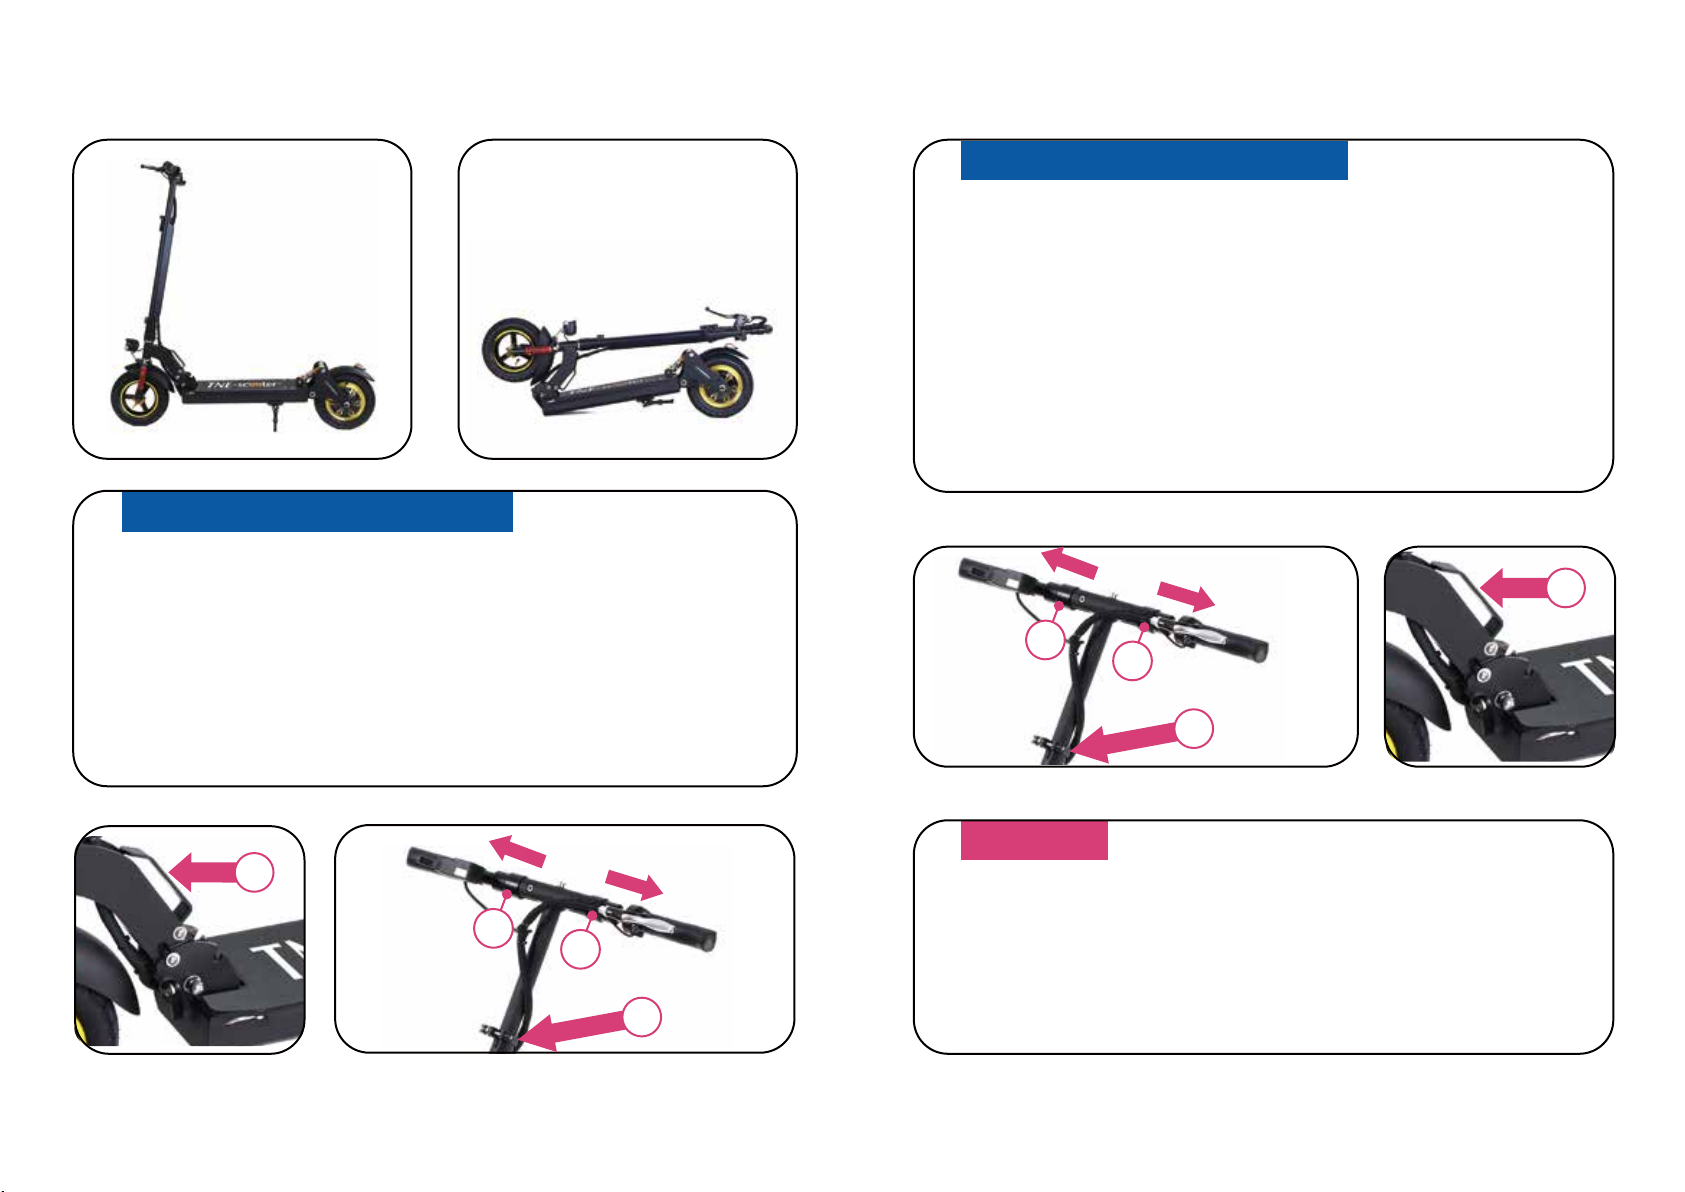
● First, open the snap joint as shown is Fig.1;
● Second, Holding the Fig. 2, and then pull outward;
● Third, holding the handle bar Fig.3, pull outward;
● Finally, pull outward the T-type, and fold the handle.
● First, open the snap joint as shown is Fig.1;
● Second, Holding the Fig. 2, and then pull outward;
● Third, holding the handle bar Fig.3, pull outward;
● Finally, pull outward the T-type, and fold the handle.
OPENING E-SCOOTER
NOTICE
Before driving you must ensure that the folding part is
working well.
22
1
3
www.tne-scooter.com www.tne-group.net
22
1

OPERATION
BATTERY
● Do not operate motor while charging!
● Indicator lights in the throttle are intended only for general knowledge
(full / empty) and does not give a precise indication to the battery
status.
● Do not store E-SCOOTER for long terms (more than two months) with
fully charged battery.
● From time to time Discharge the battery by riding E-SCOOTER in the
red led light position until it slows down and stops.
● Is Broken
● Emits an unusual odor or excessive heat
● Presents any leakage
Avoid contact with substance oozing form the battery.
Keep the battery away form children and pets. Exposure to the battery
voltage can canse death or serious injury.
The use, storage or charging of the E-SCOOTER battery outside
specified limits.
may result in the annulment of the warryanty, battery damage, and
an ineffective battery charging.
DO NOT USE THE BATTERY IF THE BOARD:
CHARGING AND BATTERY
Your E-SCOOTER has an external charger. Connect the charging to
E-SCOOTER charging socket under the footboard, on the right side
at the rear.
Than connect the charge electric cable to an electrical outlet.
Charging Light Red - Battery charging.
Charging Light Green - Charging is complete.
Avoid long periods of time with an uncharged or fully charged battery.
To maximize your E-SCOOTER battery performance, fully charged it
for 9 hours,
once a moth, or after each use of twelve hours.
Unplug E-SCOOTER from the outlet before installing, removing the
battery or performing any maintenance. It is dangerous to work on
E-SCOOER when plugged in to an AC outlet. Electrical shock an cause
serious injury and damage the scooter.
Do not attempt to open the battery. Do not insert anything in the battery
and do not attempt to open it’s case with any tool. Inserting an object
any attempt to open the battery can cause electrical shock, injury, burns
or fire. Any attempt to open the battery case will damage it and cause
release of dangerous toxic substances.
Charge the battery only using tools approved by E-SCOOTER.
Remove the battery and carry E-SCOOTER according to all applicable
local and national requirements.
www.tne-scooter.com www.tne-group.net

OPERATION
DISPLAY
LCD TNE 881 Intelligent speed regulating handle instructions
Special for TNE-SCOOTER
Version Number: 20150930
Item No: TNE 881 - A
WARNINGS
Release speed control before braking!
2.1 Working Voltage: DC24V 36V (Setting of the meter)
48V (According to customers’ requires to customized)
2.2 Mode of connection:
1. Red Line (D+): Enter of the power’s plus
2. Black Line (GND): Power’sminus
3. Blue Line (DS): Controllerelectricdoorlock
4. Yellow Line (SC): Brakesignal
5. Green Line (RX): Received the communication
6. White Line (TX): Sendthecommunication
Working Voltage and Mode of Connection
www.tne-scooter.com www.tne-group.net
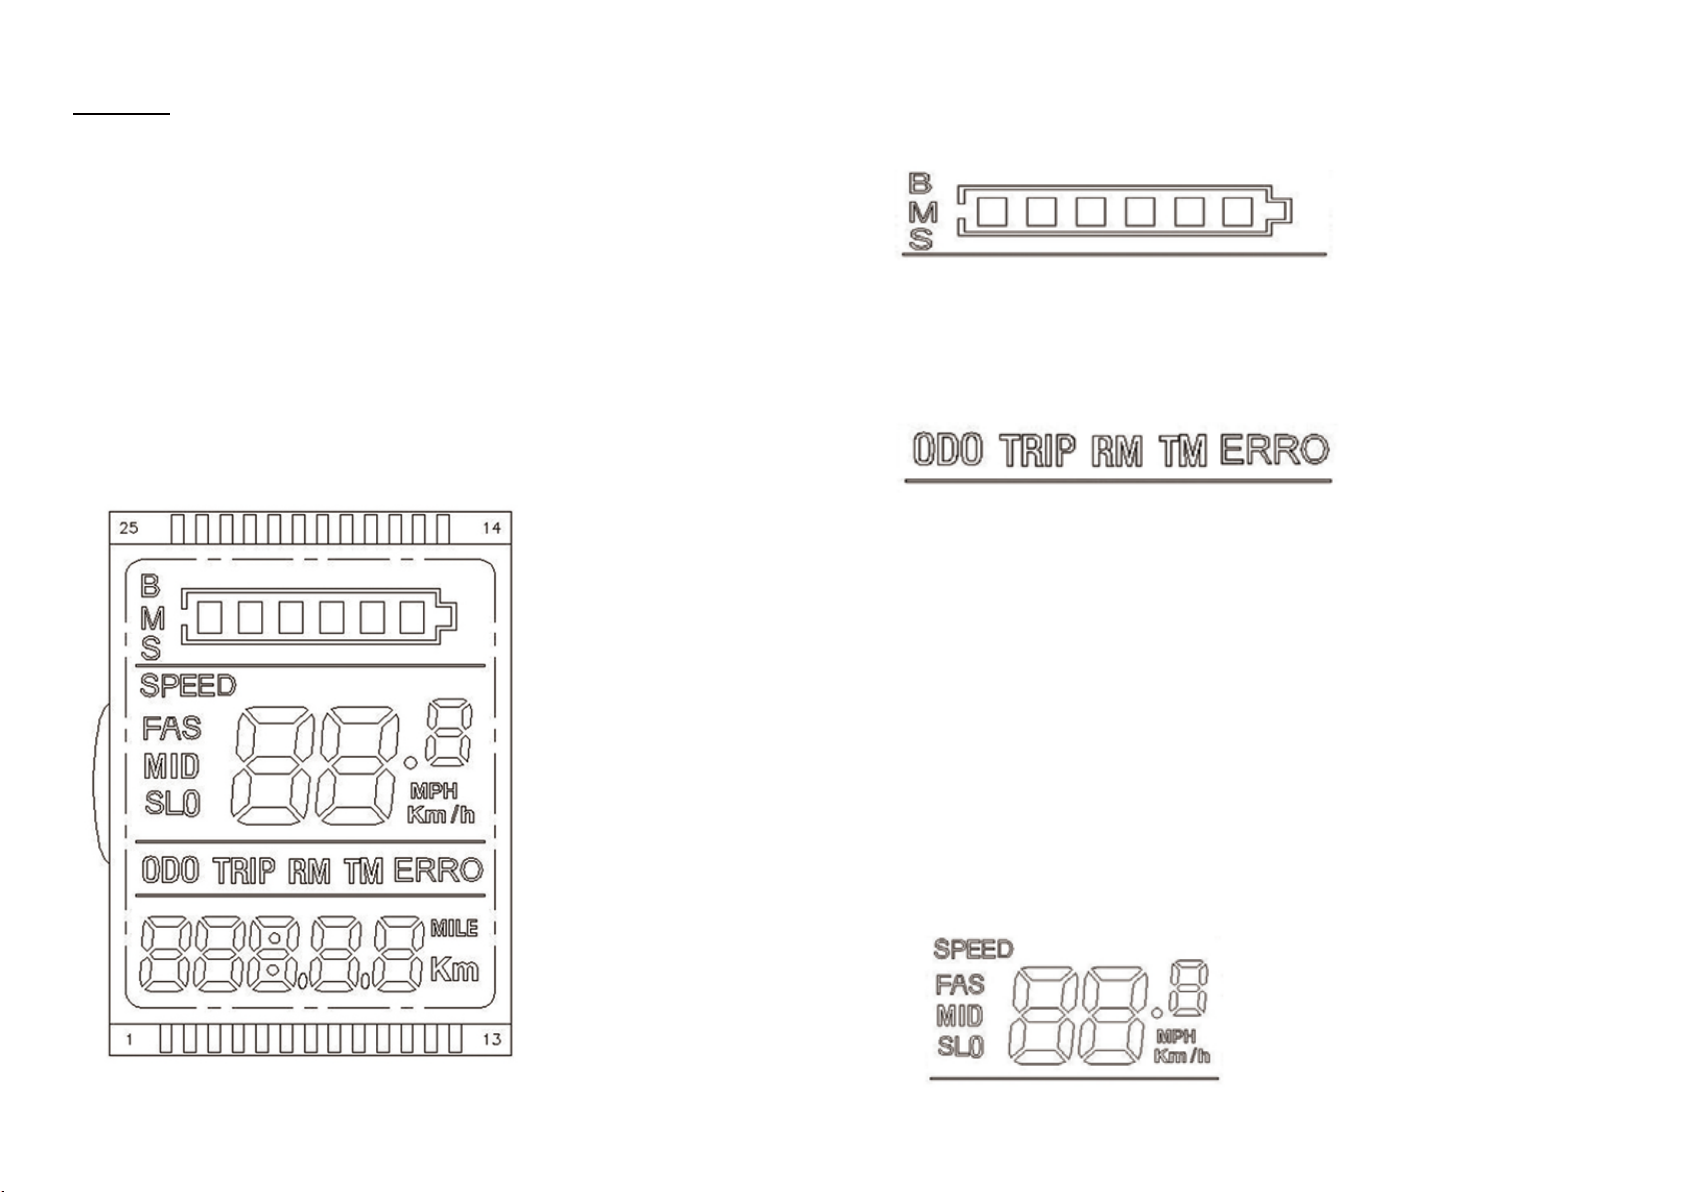
First, Introduce of Display Content
1 Function of Display
Speed display、Battery indicator、Problems prompt、Mileage、
Accumulative mileage
2 Function of Control and SettingPower switch control、Wheel diameter
setting、Automatic dormancy time setting、Backlight brightness setting、
startup mode、 drive mode is set、voltage grade setting、controllerset
current limiting values
3 Communication Protocol: UART
All The Content On The Display Screen(Opened In One Second)
Function
1.Voltage Status Grade POWER
2.Multi function display area
The total mileage of ODO, single mileage TRIP, residual mileage RM
(need batteryprotection board, software support), running time of TIME,
the fault code ERRO
3. The fault status display area ERRO, when ERRO symbols in the
flashing, short press ON/OFF key to adjust the display interface to the
interface ERRO interface under the corresponding figures represent the
specific content of the corresponding fault stateare as follows
ERRO 1:Motor fault
ERRO 2:Turn fault
ERRO 3:Controller failure
ERRO 4: Power brakes
ERRO 5:Under voltage protection
ERRO 6:Communication fault,
the instrument does not close to the output of the controller
ERRO 7:Communication fault,
the controller does not receive the instrument output
www.tne-scooter.com www.tne-group.net
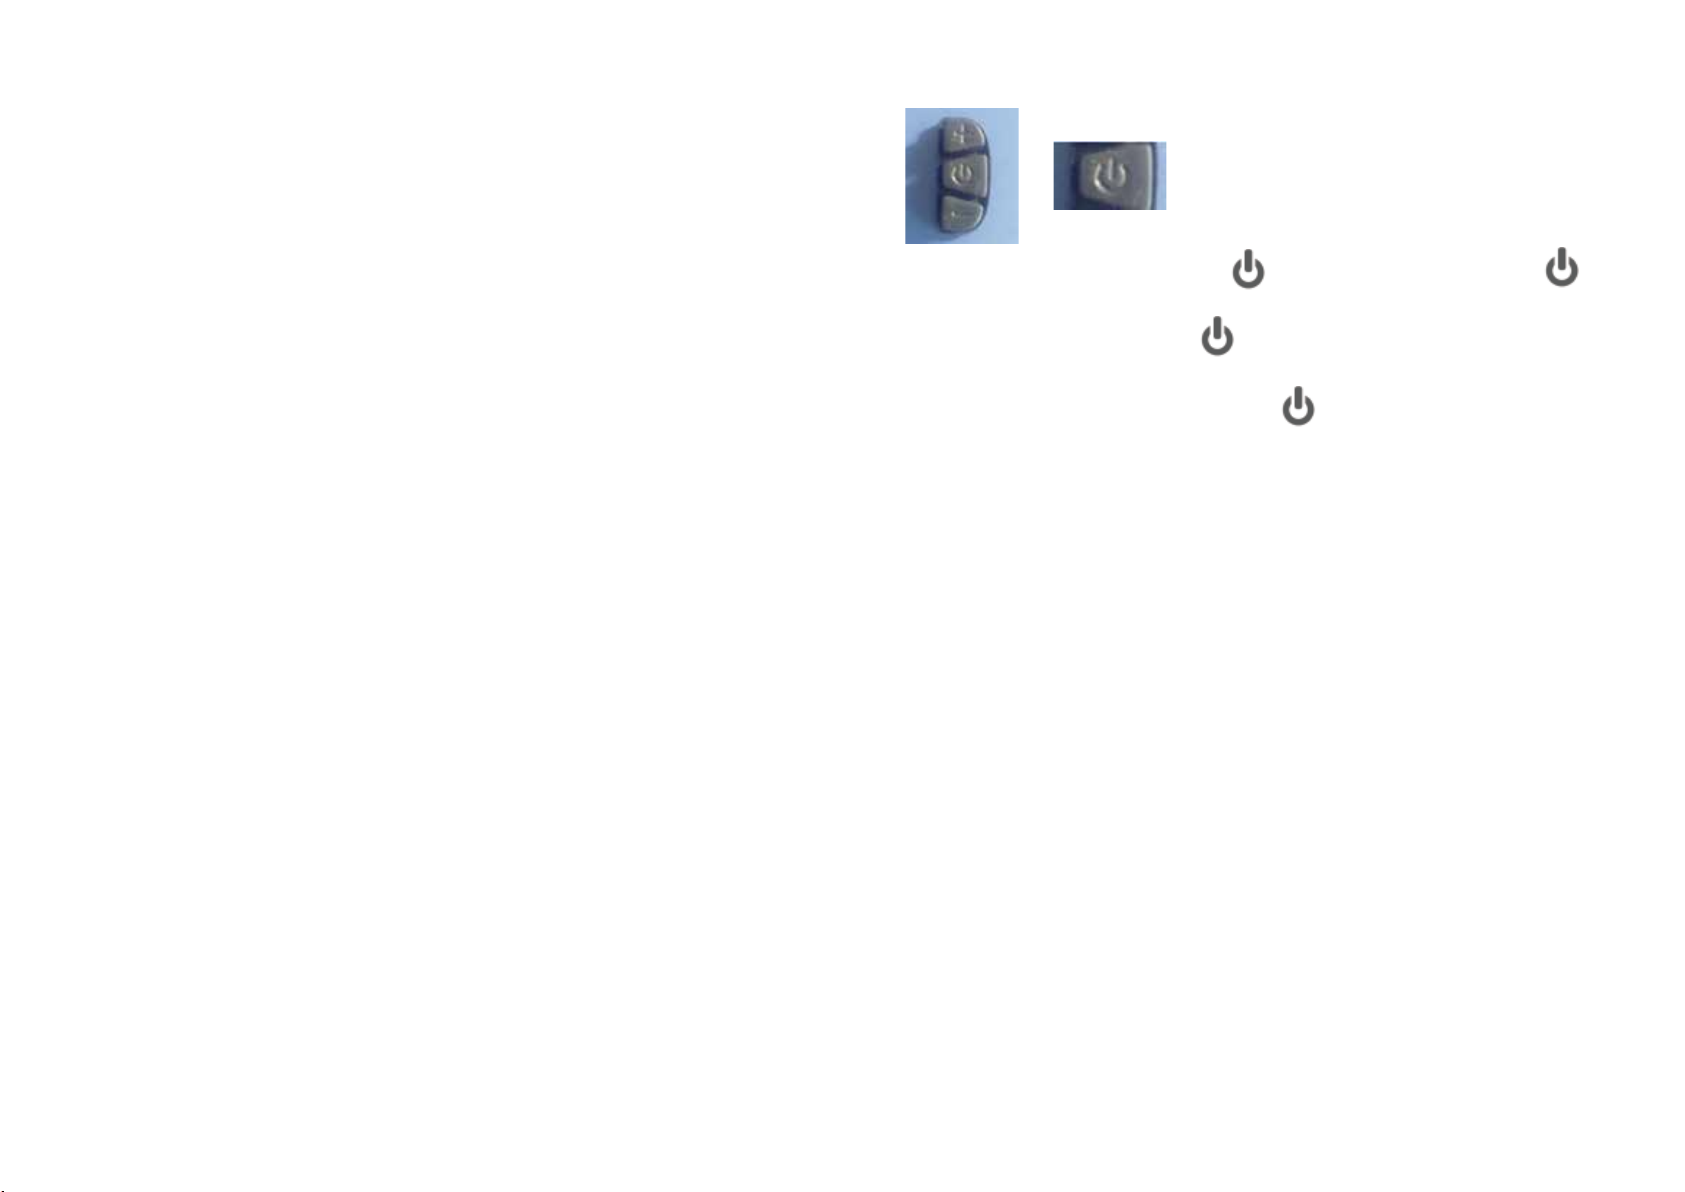
Second, the key function introduction:
Short press + or - key to change speed state,press + key is used to
increase the maximum speed of the vehicle,press - key is used to r
educe the maximum speed of the vehicle,the default speed third gear,
the 1 slowest, 3 fastest。
Parameter numerical modification:
Access parameter is set to meet, transferred to want to adjust the
parameters, through the + key and - key to increase or reduce the
value of parameter, confirm the change after long press the + key
and - key to exit the parameter settings, shut down, restart that modify
the parameters to complete。
4、The turn adjusting motor speed, from top to bottom toggle, motor
speed increase;Loosen the turn speed to zero。
5、If the display have a light function,long press – key to open the light。
4 . Speed display area
Unit MPH, KM/H
Speed signal from the Holzer signal in the motor, the controller send
instrument,
(A single Holzer cycle time,单位: 1MS)
The instrument according to the wheel diameter and signal data(Holzer
also need to set the number of motor magnetic steel),Calculate the
actual speed
5. Parameter setting and definition
P01: The backlight brightness, 1 levels of the dark, the 3 level is the
brightest;
P02: Distance unit, 0:KM; 1:MILE;
P03: Voltage grade: 24V, 36V, 48V, default 36V;
P04: Sleep time:0, Don't sleep; Other figures for the sleep time,
Range: 1-60;Unit minutes;
P06: Wheel diameter:Unit,inch; Precision:0.1;
P07: Speed magnetic steel number: Range:1-100;
P09: Zero start, non-zero start up settings,0:Zero start;1:non-zero start;
P12: Starting torque: Range:0-5,0 The weakest, 5 The strongest;
P14: Controller for limiting value setting default 12A Range:1-20A;(Need
controller software support)
P15: Maximum speed set to slow gear vehicle, fast file does not work;
ODO: ODO reset (Long press – or + button for 5-6 seconds reset)
1、Shut down state, short press key to boot,short press the key,
interface switching between ODO, TRIP, RM, TM, ERRO;
2、The boot state,long press key to shut down;
3、Long press + and - key to enter the mode setting,
in the setting of interface, short press key to switch parameter;
Note: the part of the parameter is set, the shutdown restart to take effect.
PS: Because the company product upgrade products may display content
of the part you get will differ with the instructions, but will not affect your
normal use。
www.tne-scooter.com www.tne-group.net
SAFETY
WARNINGS
Certain countries or regions require safety devices or grea.It is
your responsibility to know the state laws, and follow them.
IMPORTANT INFORMATION
Riding, llike most sports, involves risks of injury and damage. By
choosing to ride E-SCOOTER the responsibility and all inherent
risk is on you. It is crucial that you know, understand and act
according to safety rules.
DO NOT USE THE BATTERY IF THE BOARD:
MECHANICAL SAFETY TESTS:
Air pressure in tires: 40psi to 50psi.
SAFETY GEAR
Helmet: most serious injuries that occur while riding are head injuries.
This could hace been prevented if a helmet had been worn.
You must wear a helmet while riding your E-SCOOTER. The helmet
must be worn according to its instructions.
Before using E-SCOOTER: Perform a visual inspection that all screws
and nuts are tight and in place. Note if anything looks amiss, or is
showing signs of wear. If you are unsure, bring your E-SCOOTER to
theauthorized distributor. Tires and wheels: check the tires for signs of
wear. To do this spin that the wheels are freely rotating from the brakes.
If not, take E-SCOOTER to the authorized distributor.
Before each ride, always check your brakes and mechanical funtion.
TIP
As you accelerate, lean forwards. As you brake, tilt your weight
backwards.
SAFETY GEAR
1. Knowing E-SCOOTER- Get to know E-SCOOTER before drving it.
Test your control over it. Make your turns slowly and cautiously, and
give yourself stopping distance.
2. Your driving capability- to gain control over your scooter, practice your
first ride on E-SCOOTER in an open space with on obstacles to disturb
you.
DRIVING TECHNIQUE:
Foot position- before riding put your foot as close as possilbe to the front
section of the scooter, and your other foot on the ground. Make sure that
your driving route is clear.
To start riding boost yourself forwards (as on non-motorized scooters)
with your foot that is on the ground.
Immediately after press the thumb throttle sownwards, tilt your body
forwards so you shouldn’t fall backwards during acceleration,
E-SCOOTER will be in motion.
Keep on foot behind the other, (it’s more comfortable to place one foot
forward and the other one turned backwards at 70-90, like on skate/
surfboard.) it will help you gain more stability.
www.tne-scooter.com www.tne-group.net
Indice


