Topex Voxi Series Manuale utente

Topex Voxi family
User Manual for Web Interface
VoiBridge / VoxiPlus
Version 1.3

USERMANUAL
Content
1TOPEX WEB INTERFACE description...............................................................................4
2Authentication..........................................................................................................................5
3The Menu Bar description ......................................................................................................6
3.1 The Commit link..............................................................................................................7
3.2 The Logout link................................................................................................................7
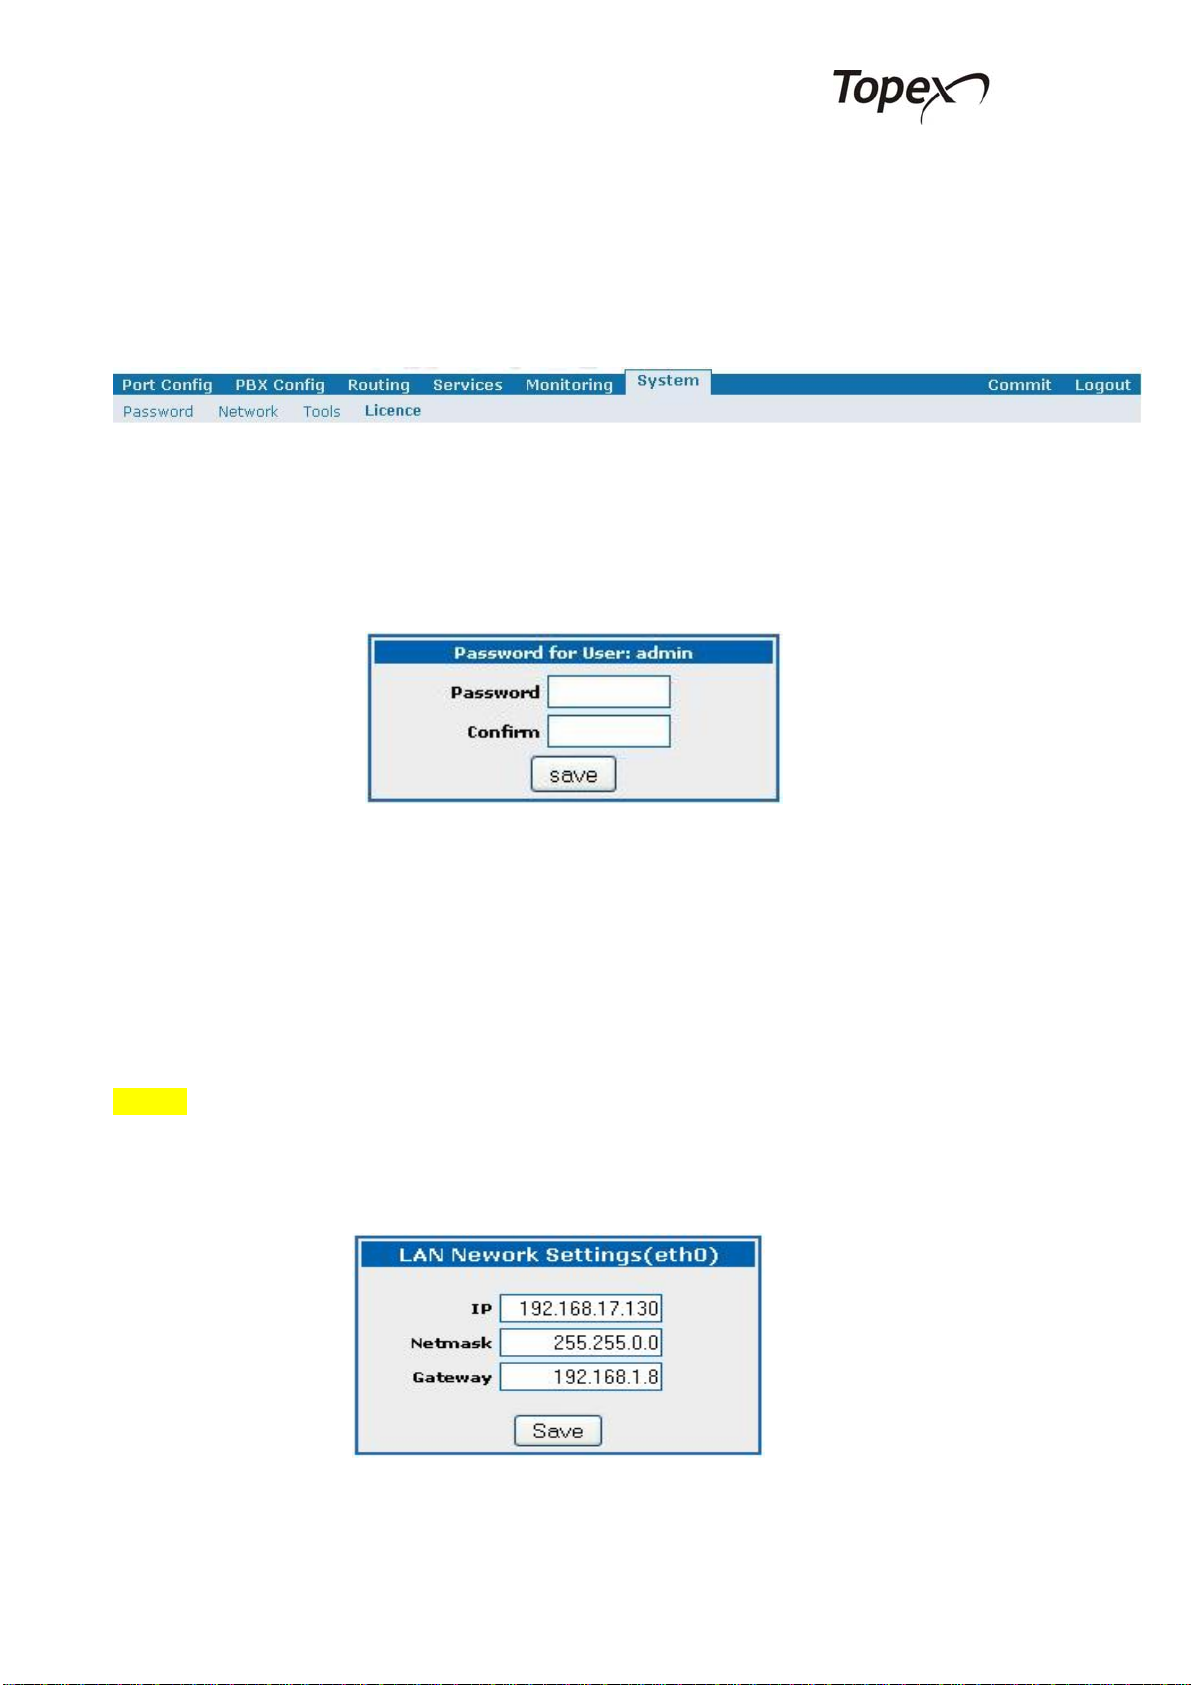
3.3 The System menu.............................................................................................................8
3.3.1 Password ....................................................................................................................8
3.3.2 Network......................................................................................................................8
3.3.3 Tools ..........................................................................................................................9
3.3.3.1 Restore to Default ..............................................................................................9
3.3.3.2 Restore Last Configuration..............................................................................10
3.3.3.3 Download Configuration .................................................................................10
3.3.3.4 Upload Configuration ......................................................................................11
3.3.3.5 Restart System..................................................................................................11
3.3.4 License.....................................................................................................................11
3.4 Port Config......................................................................................................................13
3.4.1 GSM Settings...........................................................................................................13
3.4.2 E1 Settings ...............................................................................................................13
3.5 The Routing menu..........................................................................................................15
3.5.1 General pattern for routing pages.............................................................................15
3.5.2 The routing pages explained individually................................................................19
3.5.2.1 GSM to VoIP ...................................................................................................19
3.5.2.2 VoIP to GSM ...................................................................................................20
3.5.2.3 VoIP to VoIP....................................................................................................21
3.5.2.4 VoIP to E1........................................................................................................22
3.5.2.5 E1 to VoIP........................................................................................................23
3.5.2.6 E1 to E1............................................................................................................25
3.5.2.7 E1 to GSM .......................................................................................................26
3.5.2.8 GSM to E1 .......................................................................................................27
3.5.3 View All Routes.......................................................................................................28
3.6 The PBX Config menu...................................................................................................29
3.6.1 Sip Users..................................................................................................................29
3.6.2 General pattern for SIP Users routing pages............................................................32
3.6.3 The SIP Users routing pages explained individually...............................................32
3.6.3.1 GSM to SIPUSERS..........................................................................................32
3.6.3.2 E1 to SIPUSERS..............................................................................................33
3.6.3.3 VoIP to SIPUSERS..........................................................................................34
3.6.3.4 SIPUSERS to GSM..........................................................................................35
3.6.3.5 SIPUSERS to E1..............................................................................................36
3.6.3.6 SIPUSERS to VoIP..........................................................................................37
3.6.3.7 SIP Users to SIP Users.....................................................................................38
2

Web interface for Voxi family
3.7 Services............................................................................................................................39
3.7.1 Voicemail.................................................................................................................39
3.7.2 Groups......................................................................................................................40
3.7.3 Mail to SMS.............................................................................................................41
3.7.4 Send SMS.................................................................................................................42
3.7.5 IVR (Interactive Voice Response)...........................................................................43
3.7.5.1 IVR Code..........................................................................................................44
3.7.5.2 Clean Hard Disk ..............................................................................................44
3.7.5.3 Record New Message.......................................................................................45
3.7.5.4 Restore Default Messages................................................................................45
3.7.6 SMS to Mail.............................................................................................................46
3.8 Monitoring menu description........................................................................................47
3.8.1 State Monitoring.......................................................................................................47
3.8.2 Current Calls ............................................................................................................49
3.8.3 SIP Online................................................................................................................49
4The “Advanced” menu ..........................................................................................................50
4.1 Directions Name (Class Name) .....................................................................................50
4.2 Directions (Class Settings).............................................................................................52
4.3 IP in (Input Classes).......................................................................................................59
4.4 IP out (Output Classes)..................................................................................................61
4.5 Routes..............................................................................................................................62
4.6 State Monitoring (2).......................................................................................................70
4.7 WebOAM........................................................................................................................70
4.8 Console............................................................................................................................75
5How-to and Examples............................................................................................................76
5.1 Login................................................................................................................................76
5.2 Edit the IP settings of the equipment ...........................................................................76
5.3 Configure the ports........................................................................................................77
5.3.1 How to – E1 port settings.........................................................................................77
5.3.2 How to – GSM port settings.....................................................................................78
5.4 Create a SIP Users .........................................................................................................79
5.5 Define the routes.............................................................................................................80
5.5.1 How To –GSM to Sipusers.......................................................................................80
5.5.2 How To – Sipusers to GSM......................................................................................81
5.5.3 How To – VoIP to Sipusers......................................................................................82
6GLOSSARRY...........................................................................................................................83
Revision B / software version 1.3 (july 2009)
3

USERMANUAL
1 TOPEX WEB INTERFACE description
The WEB interface allows configuring the equipments comprise by Voxi family
(VoiBridge, VoxiPlus), view real-time equipment state; manage services, editing users, etc.
The interface offers the basic configuration tools for your equipment to work properly but
also an advanced menu to use the equipment at full capacity. Use the web interface you have the
possibility to:
•set the network parameters for the equipment,
•manage the configuration files of ,
•change your web access password,
•edit the port configuration
•define routes
•define SIP users (if you have the PBX included in the equipment)
•see online data (ex. current calls)
•monitor the equipment state
•configure the services of equipment
You only need a web browser installed on the computer you intend to connect from. The
access to the WEB interface is done using a standard web browser (which accepts cookies and can
run java script)- Internet Explorer (IE7 and up recommended), Mozilla Firefox, Chrome, Opera
and Konqueror. The web interface is best viewed with Mozilla Firefox and Chrome.
The web interface allows configuring the VoiBridge in a simple and user-friendly way.
From here, the user can configure the cards and ports installed on the equipment, to manage the
SIP Users (if the license allows to), to define routes, to configure PBX services, monitor the
current state of the equipment, communicate with “centrala” (the main application), etc.
4

Web interface for Voxi family
2 Authentication
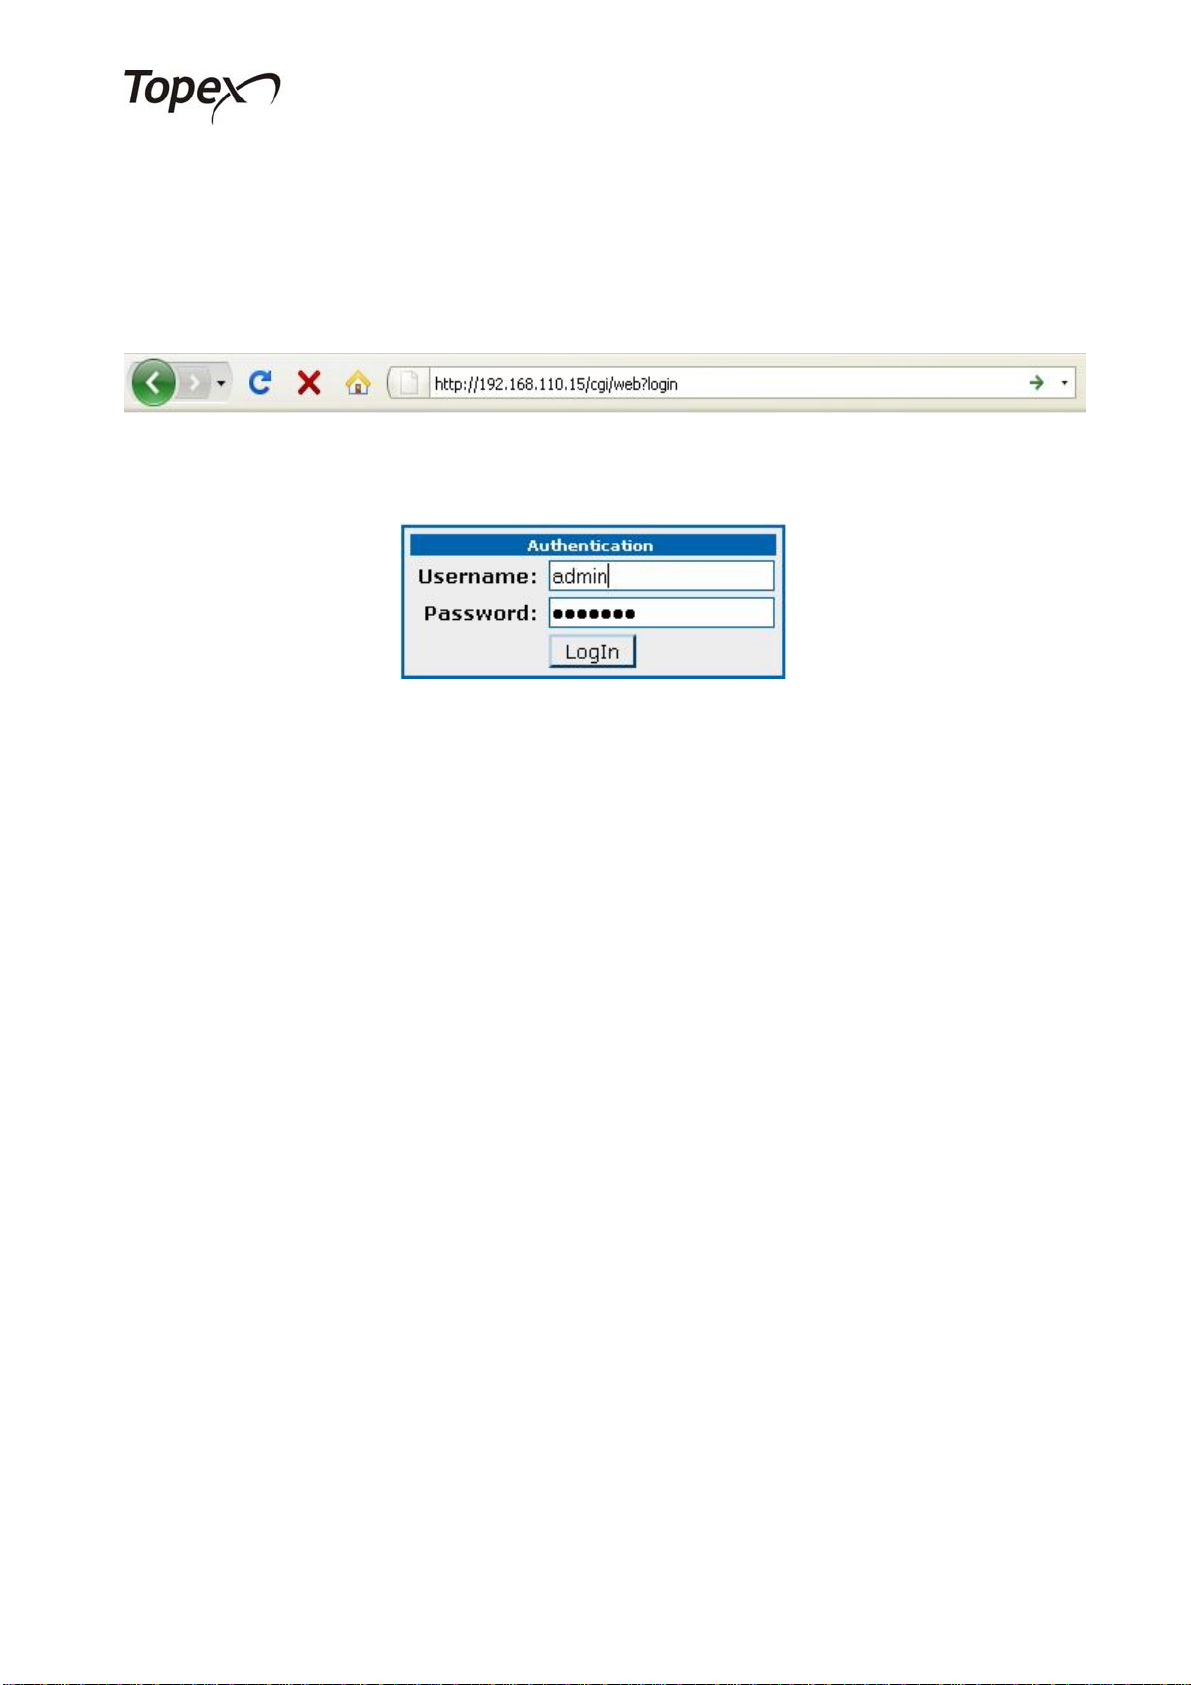
To access the equipment web page from a remote computer, you must type the default IP
address as the URL: http://192.168.110.15 (the complete path as seen in the picture below should
appear after you press the enter key after typing: http://192.168.110.15).
After you access the web browser, the following window will appear and ask you about the
user name and the password:
Logging in means writing the username and it’s password in the corresponding fields. Fill in
these fields and press the “LogIn” button located on the bottom of the little window named
“Authentication”.
There are 2 main users on VoiBridge:
admin - password is 99admin11
advanced - password is 99advanced11
The difference between these users is that the advanced user has access to some more
configuration pages that need in depth knowledge of networking, routing and Topex specific
elements. Generally, there will be no need to log in as advanced user; it will be used only for fine
tuning and very specific things. The “admin” user is able to deliver all basic VoiBridge
functionalities. In this manual the basic menu for the “admin” user will be first described.
Then, after a successful login, you will see the main tabs of the menu.
5

USERMANUAL
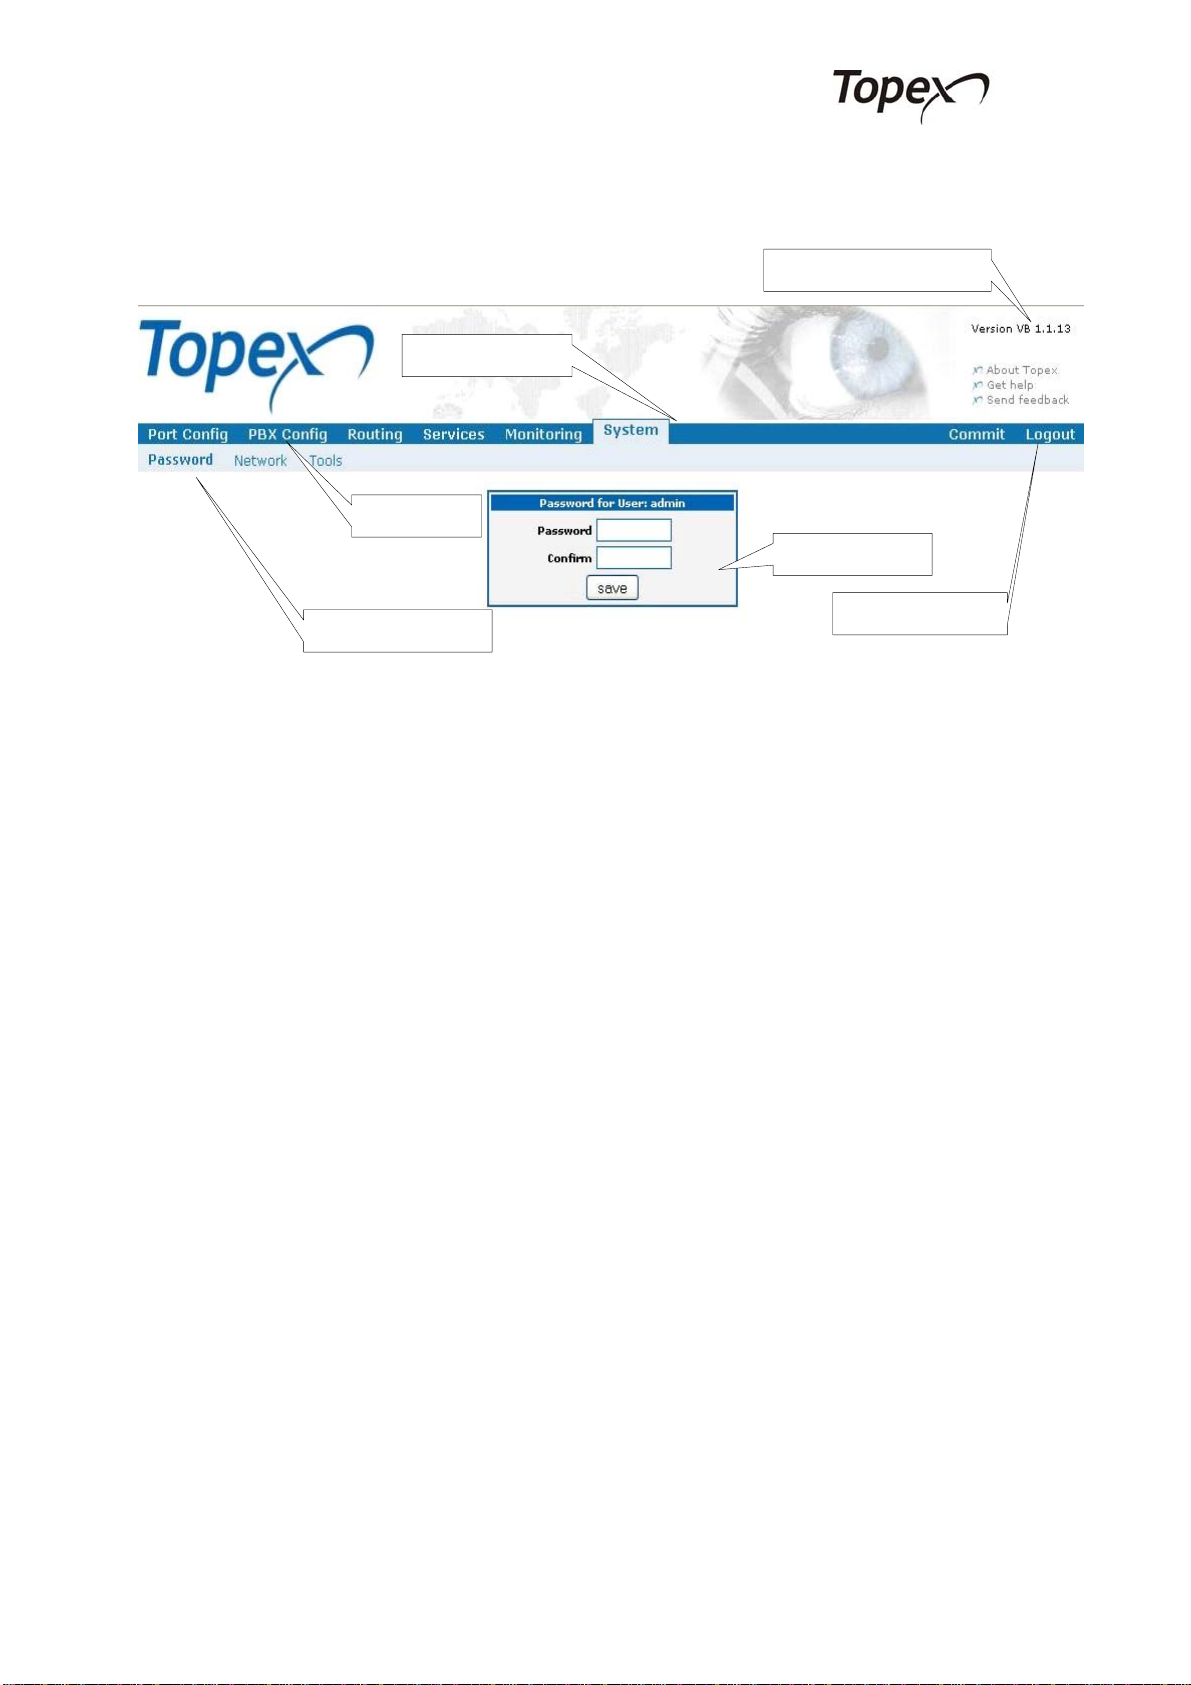
3 The Menu Bar description
the main menu bar
the submenu options
themaintabs
the page content
the one-action links
Web Application Version
Depending on the configuration of your equipment (you should know it either from the
equipment documentation, or you can check the message you receive when authenticating-right
above the authentication window), you can have less of the menu tabs in your interface. You will
have one more tab “ADVANCED” if you log in as the advanced user. Here we will go through an
example of equipment that has included 4GSM ports, 2E1, the VoIP card and the PBX installed).
The different sets of menus will be explained further.
Starting from left to right, we have the following menus:
in the left part: Port Config,
PBX Config,
Routing,
in the right part: Commit
Logout
Services,
Monitoring
System
If the equipment which you purchased doesn’t have the PBX installed, you will have the
same menu bar without the PBX Config tab. In the same way, if the equipment doesn’t have the
GSM modules, you will have it missing from the menu in the Port Config tab. You can see that
clicking the tabs in the left part of the menu bar, opens a submenu with different options. It doesn’t
happen with the tabs in the right part of the menu bar, since they are just one-action buttons. The
links in the right upper corner will help you to get in touch with Topex.
6

Web interface for Voxi family
3.1 The Commit link
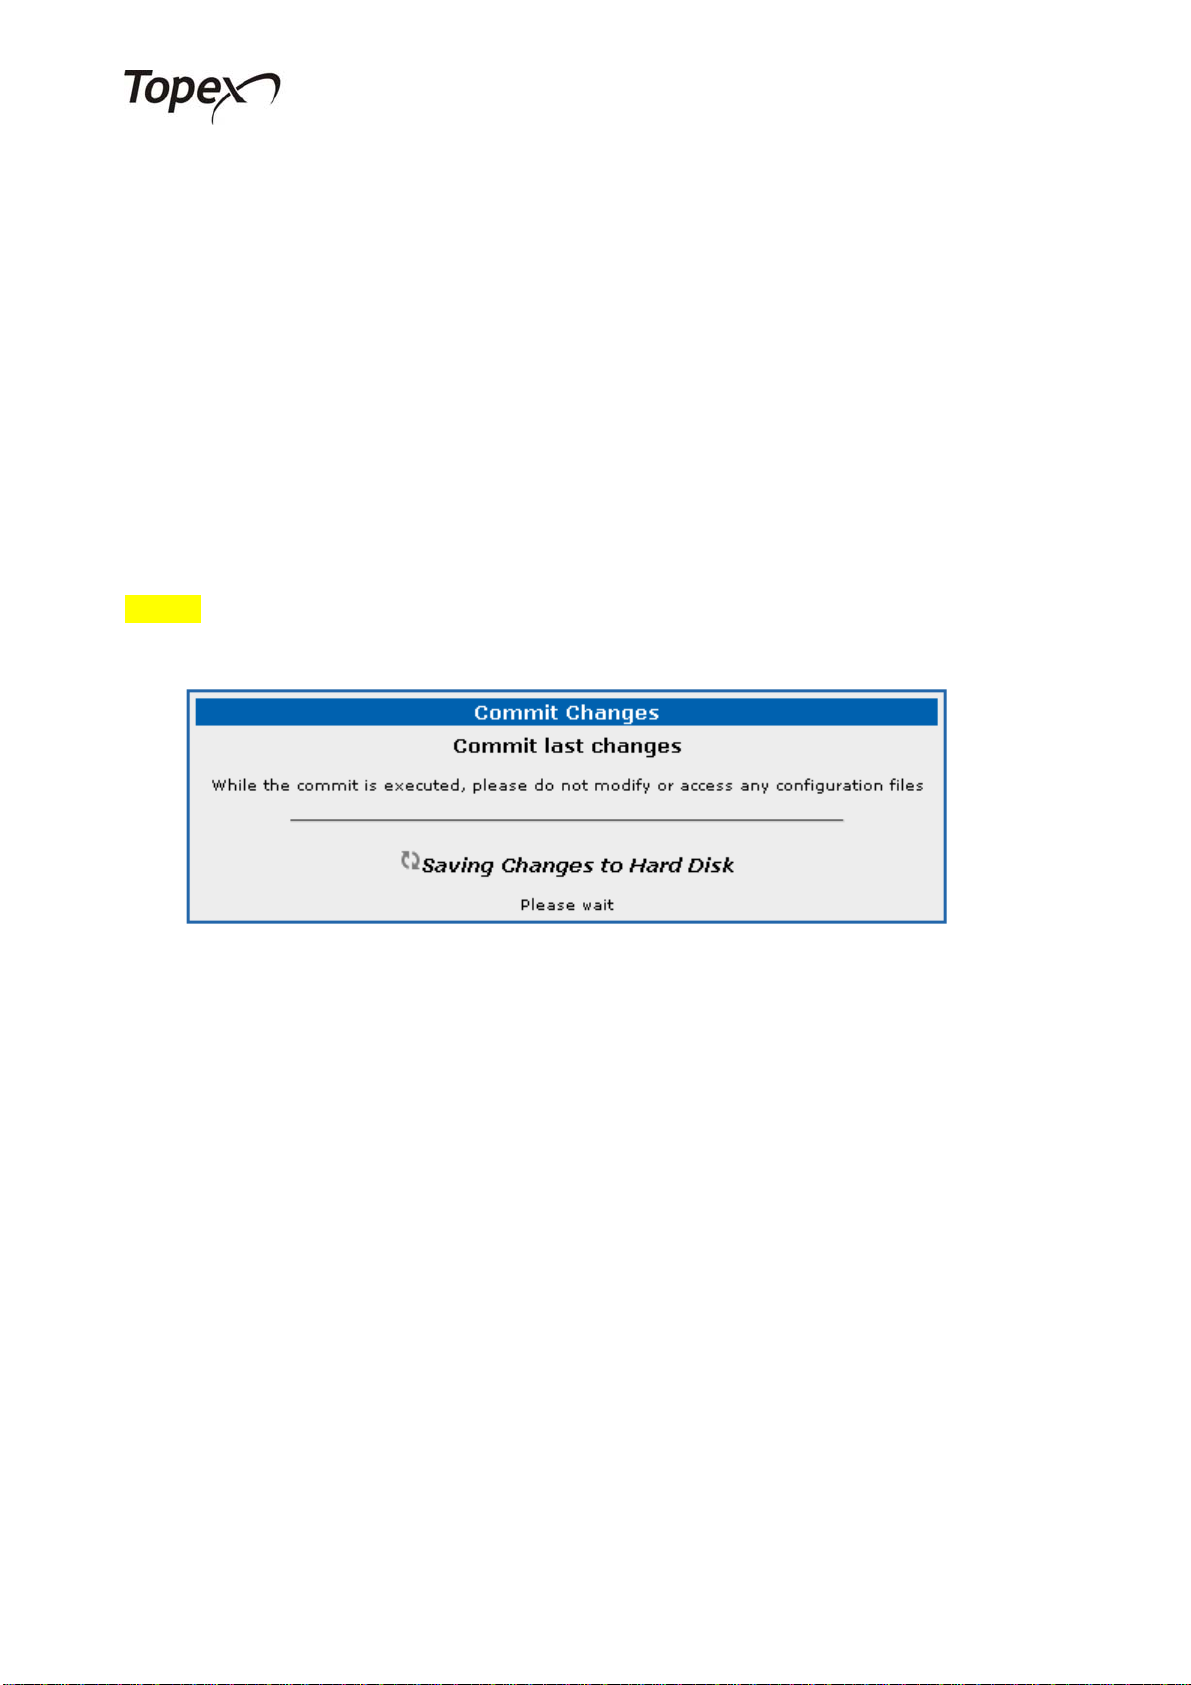
This menu is a one action link, meaning that it doesn’t have a submenu, but executes the
commit action by pressing the link.
When the user makes some changes in equipment configuration, these changes are saved in
a temporary memory. Though the changes take effect right when you make them (some need
approx. 5 sec to take place), these changes will be lost after a reboot.
To prevent the loss of the configuration, the commit function saves the configuration to a
permanent memory that stays after a reboot. So, after creating a configuration that runs as you
want it, press Commit, this will save the current configuration for good.
NOTE! If the device is restarted or powered off without a previous Commit action, all the changes
made after the last commit will be lost.
3.2 The Logout link
Pressing “Logout” logs off the current user and redirects to the authentication page. Logout
after finishing the configuration of the equipment.
7

USERMANUAL
3.3 The System menu
This menu allows configuring your access to the web interface and to the equipment. Here you
can change the IP address of the equipment and your web password, as well as manage the
configuration files.
3.3.1 Password
In order to change the default password for web access, press the Pasword menu. This page
will change the password for the username under which you entered. So, next time when
authenticating, make sure to remember the new password.
3.3.2 Network
Here you can change the equipment network settings: the IP address, the network mask and
the gateway IP address. After you press the “Save” button, you will receive a message about the
device being restarted. Wait until it does and the browser should redirect you to the new IP address
of the device automatically by changing the URL of the page (if you changed the IP address of the
device).
NOTE!When clicking “Save” it will save the new network data and immediately reboot the
VoiBridge. So, if you have unsaved data (meaning that you made some changes, but didn’t press
commit after it), the changes will be completely lost, the device going back to the last committed
state.
8

Web interface for Voxi family
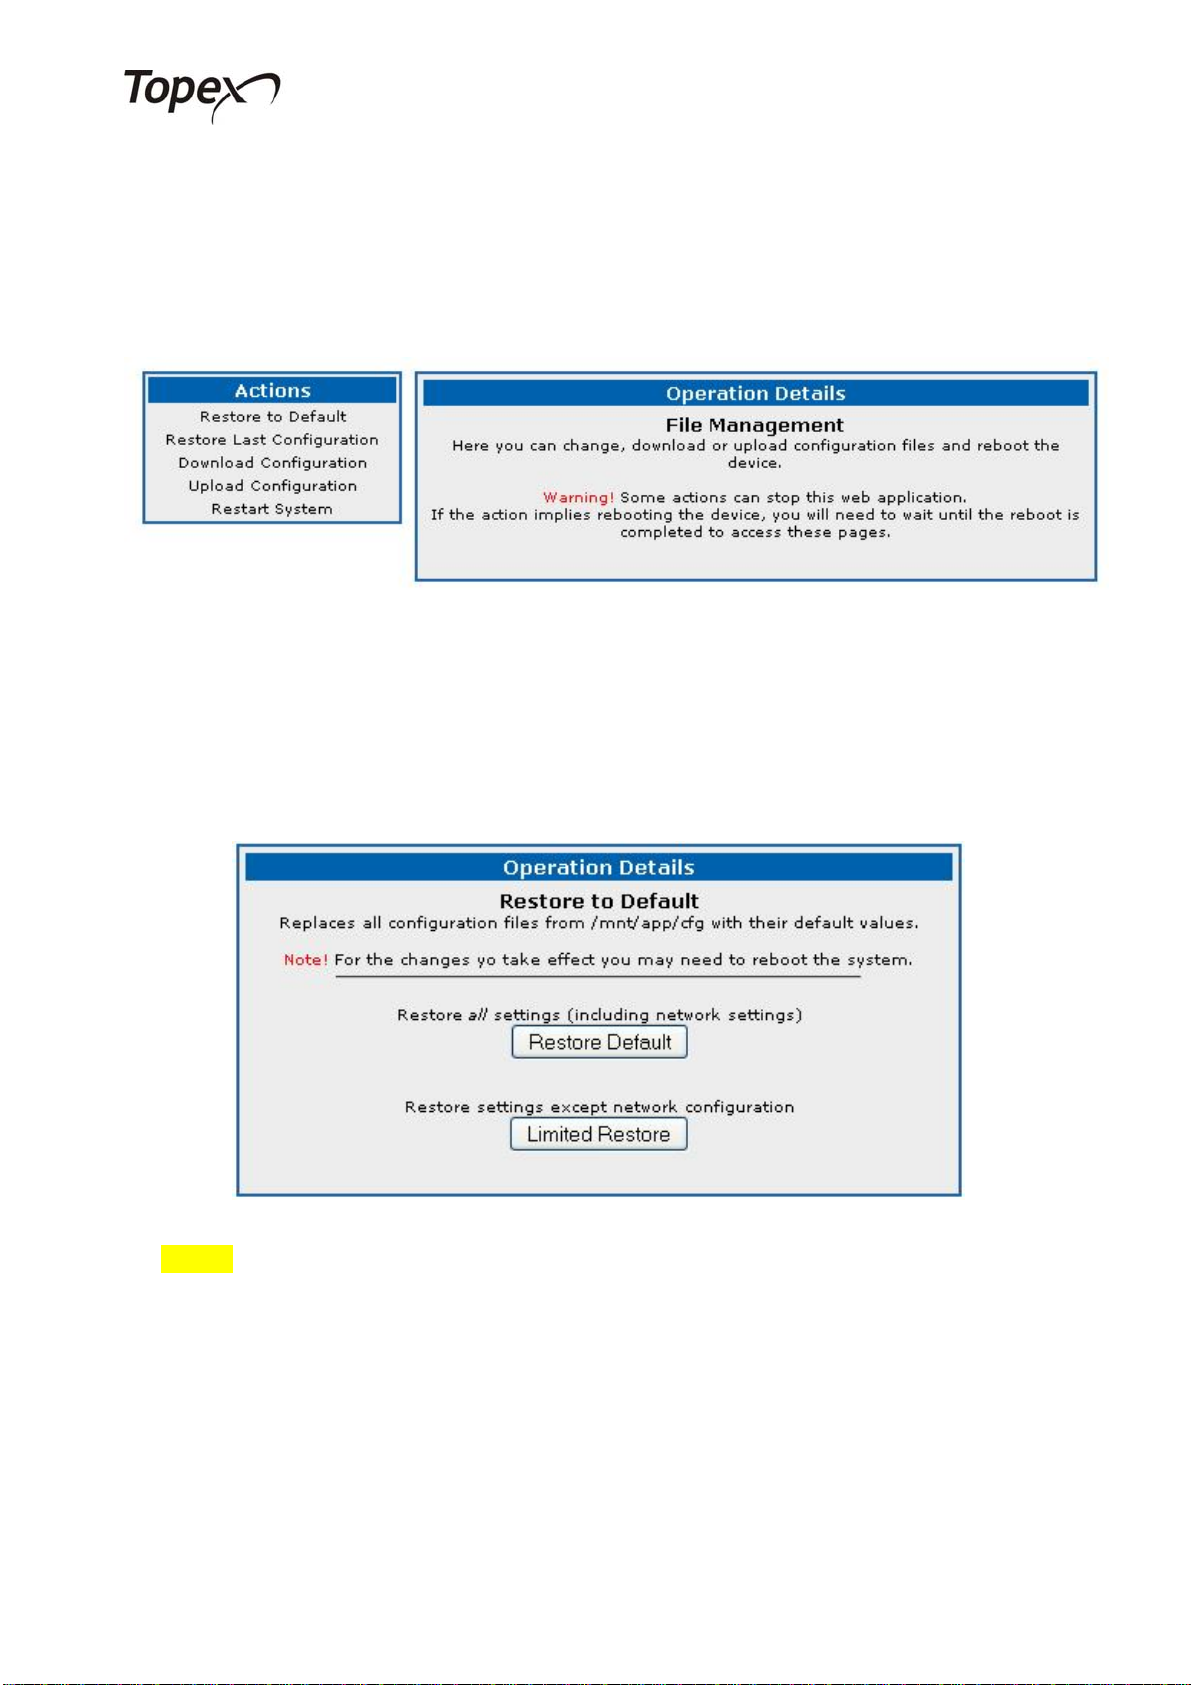
3.3.3 Tools
This page allows you to reboot the device, to restore the configuration to the default values
and to download or upload the configuration files from the equipment. The main options are
shown in the menu to the left: Restore to Default, Restore Last Configuration, Download
Configuration and Restart System.
3.3.3.1 Restore to Default
This option restores the configuration of the equipment to the factory default values. It has 2
options: either restore to the factory defaults, but keep current network settings (click the “Limited
Restore” button), or restore the full configuration to default, including the network settings (click
the “Restore Default” button).
NOTE! If you choose to restore the default configuration and the network settings to default
values, it may force the web application to loose the connection to the equipment. To access the
equipment again, write the new IP address in the web browser address line (change the URL).
9

USERMANUAL
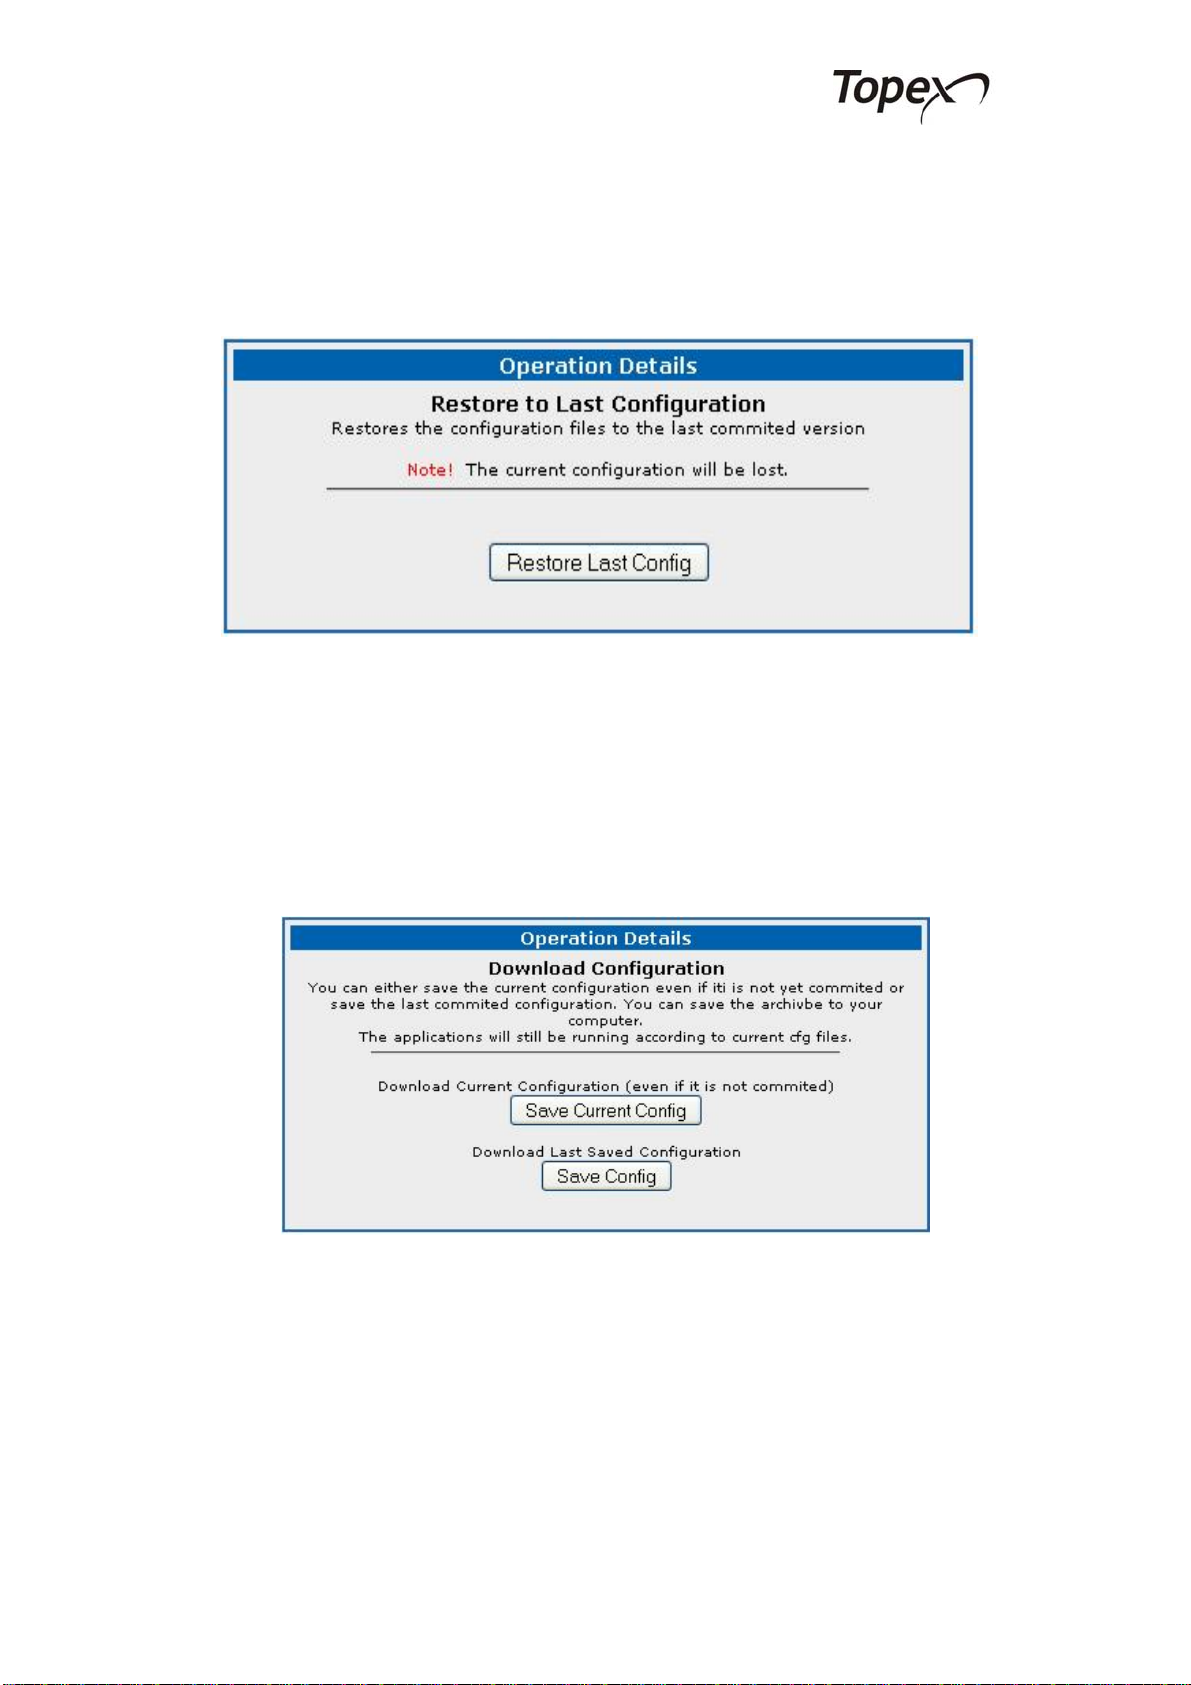
3.3.3.2 Restore Last Configuration
This option restores the equipment state to the last committed configuration (committed
configuration means the state of the configuration files saved by clicking the COMMIT button in
the right part of the menu bar).
3.3.3.3 Download Configuration
This option allows saving the configuration files from the equipment to your computer. You
can choose to download the current configuration (the state of the configuration files to this
moment) by clicking the “Save Current Config” button, or to download the last committed
configuration by clicking the “Save Config” button.
10
Altri manuali per Voxi Series
1
Questo manuale è adatto per i seguenti modelli
2
Indice
Altri manuali Topex Portale
Manuali Portale popolari di altre marche

LST
LST M500RFE-AS Manuale utente

Kinnex
Kinnex Media Gateway Manuale utente

2N Telekomunikace
2N Telekomunikace 2N StarGate Manuale utente

Mitsubishi Heavy Industries
Mitsubishi Heavy Industries Superlink SC-WBGW256 Manuale utente

ZyXEL Communications
ZyXEL Communications ZYWALL2 ET 2WE Manuale utente

Telsey
Telsey CPVA 500 - SIP Manuale utente