trimm trimmOne Manuale utente

User Manual

Contents
trimmOne & trimmOne LITE User Manual 0
Caution 2
Video guide 2
Components 2
Base components 2
Solar charger (optional) 3
Solar speed sensor (optional) 3
Charge 3
Mounting 4
Mounting the mount 4
Mounting the solar charger 5
Solar speed sensor mounting 6
Pairing 7
Download the trimm Cycling Center app 7
Device connection 7
Speed sensor connection 8
Compatible sensors 9
Device description 9
Button function 9
Precautions before riding 10
Precautions after riding 11
Status icon 11
Firmware update 11
Settings 12
Profile settings 12
Data field settings 12
Data field items 13
Device settings 15
Notification settings 16
Backlight settings 17
General settings 17
Language settings 18
Route plan and navigation 19
Smartphone pairing and map function 19
Limit of responsibility for route guidance 20
OpenStreetMap 20
Plan route 21
Create a new route 21
Edit route 22
Edit marker 22
Edit list 23
Bike road options 24
Examples of bike road options 25
Route check and navigation 26
Route guidance with GPX, TCX, FIT 26
Import route 27
Imported route check and navigation 27
Delete route 27
Sync with Komoot 28
Offline map 29
Offline map download 29
History 30
History check 30
Sync with Strava 32
Sync with Strava and automatic upload
settings 32
Strava upload 33
Sync with TrainingPeaks 33
Share history (export to file) 34
Navigation with history 34
Delete history 35
PC version (Web App) 35
Frequently Asked Questions 36
Device 36
trimm Cycling Center App 37
Map and navigation 38
Sensor 38
Service 38
Troubleshooting 39
Device 39
Function 40
Speed sensor 40
Damage 40
Specifications 41
Safety guide 42
Caution 42
Battery warning 42
Handling warning 42
Health warning 43
Navigation warning 43
FCC compliance 43
Software license agreement 43
Map data information 44
Limited warranty 44
trimmOne & trimmOne LITE User Manual
Caution
Please refer to the user manual for precautions and information on the product.
Specifications are subject to change without notice for performance improvement.
Video guide
The link below is the video guide page.
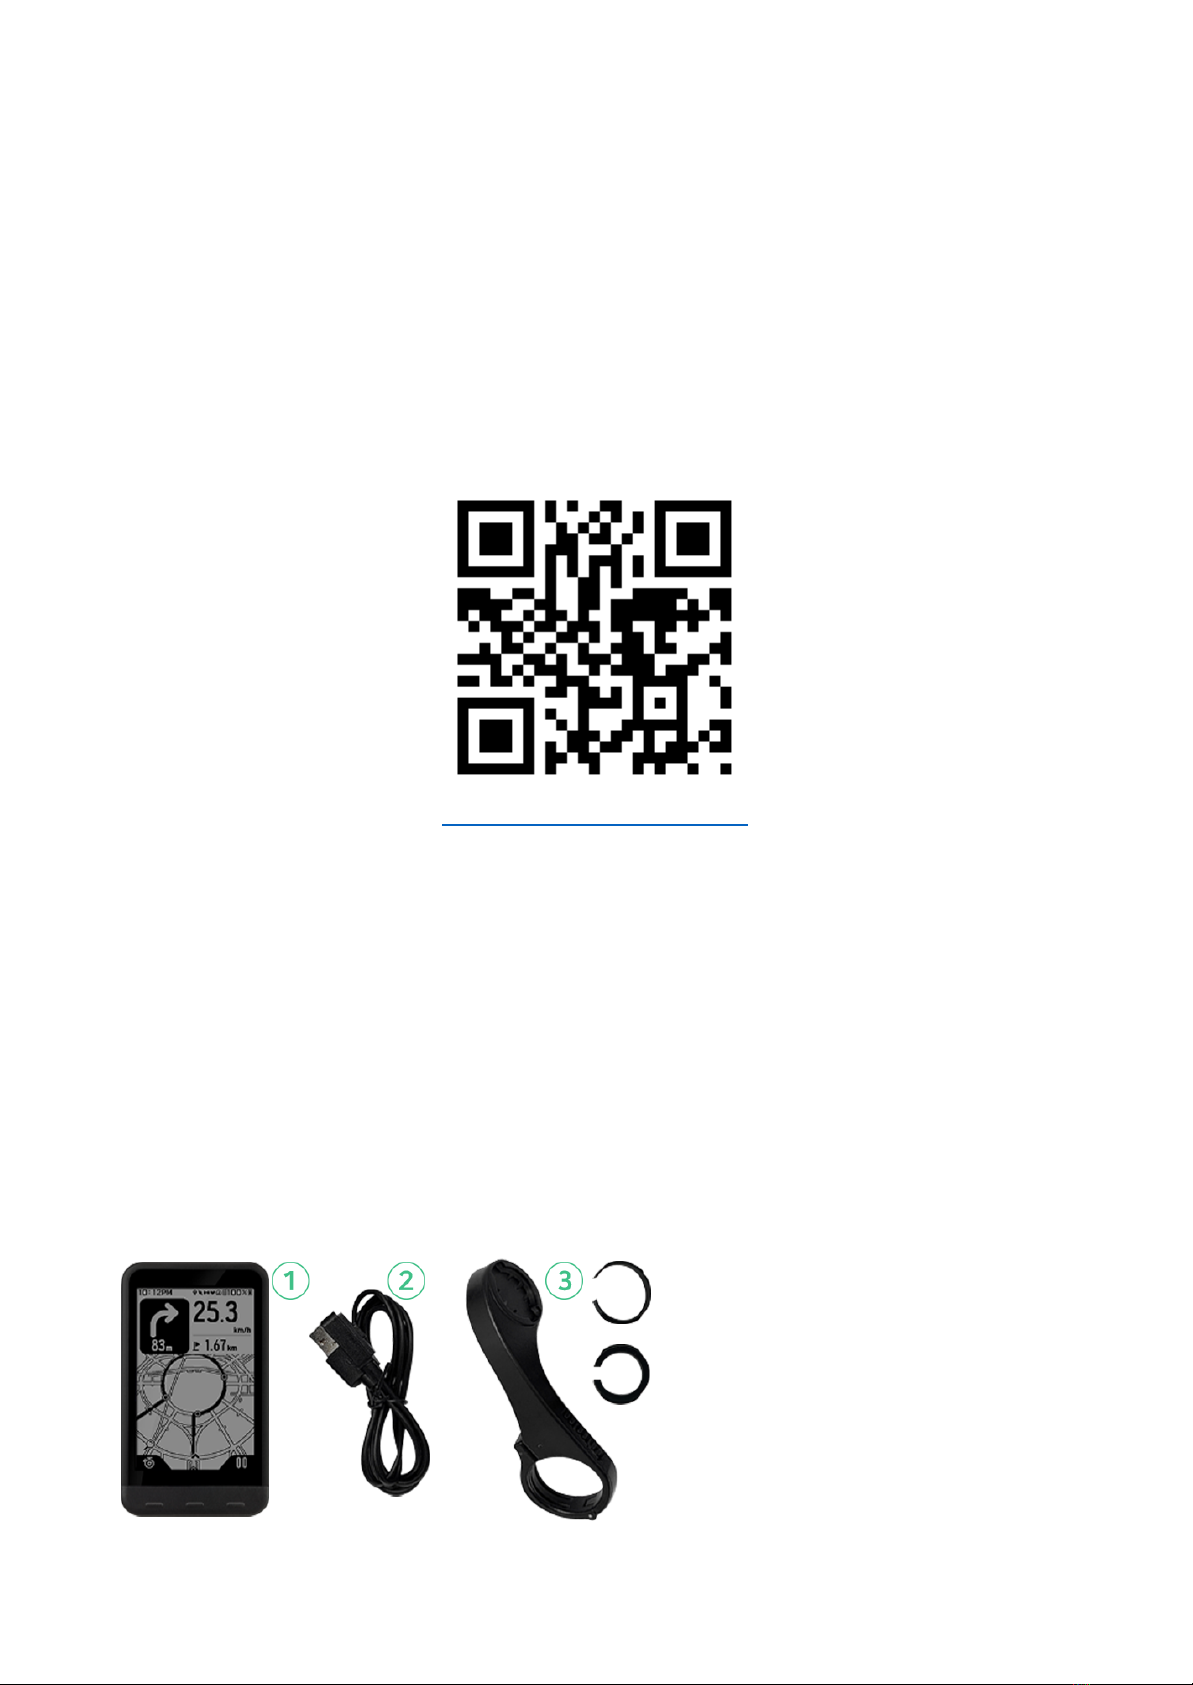
https://trimm.bike/ko/support/guide
Components
If any items are missing, please contact the store you purchased.
• Main unit
• Magnetic charging cable
• Mount and mounting bands
• (Optional) Solar charger and mounting rubber bands
• (Optional) Solar speed sensor and mounting rubber bands
Base components
①Main unit*
②Magnetic charging cable
③Mount (including screws and rubbers)
* Shape and color may vary depending on the
purchased model.
페이지 | 2
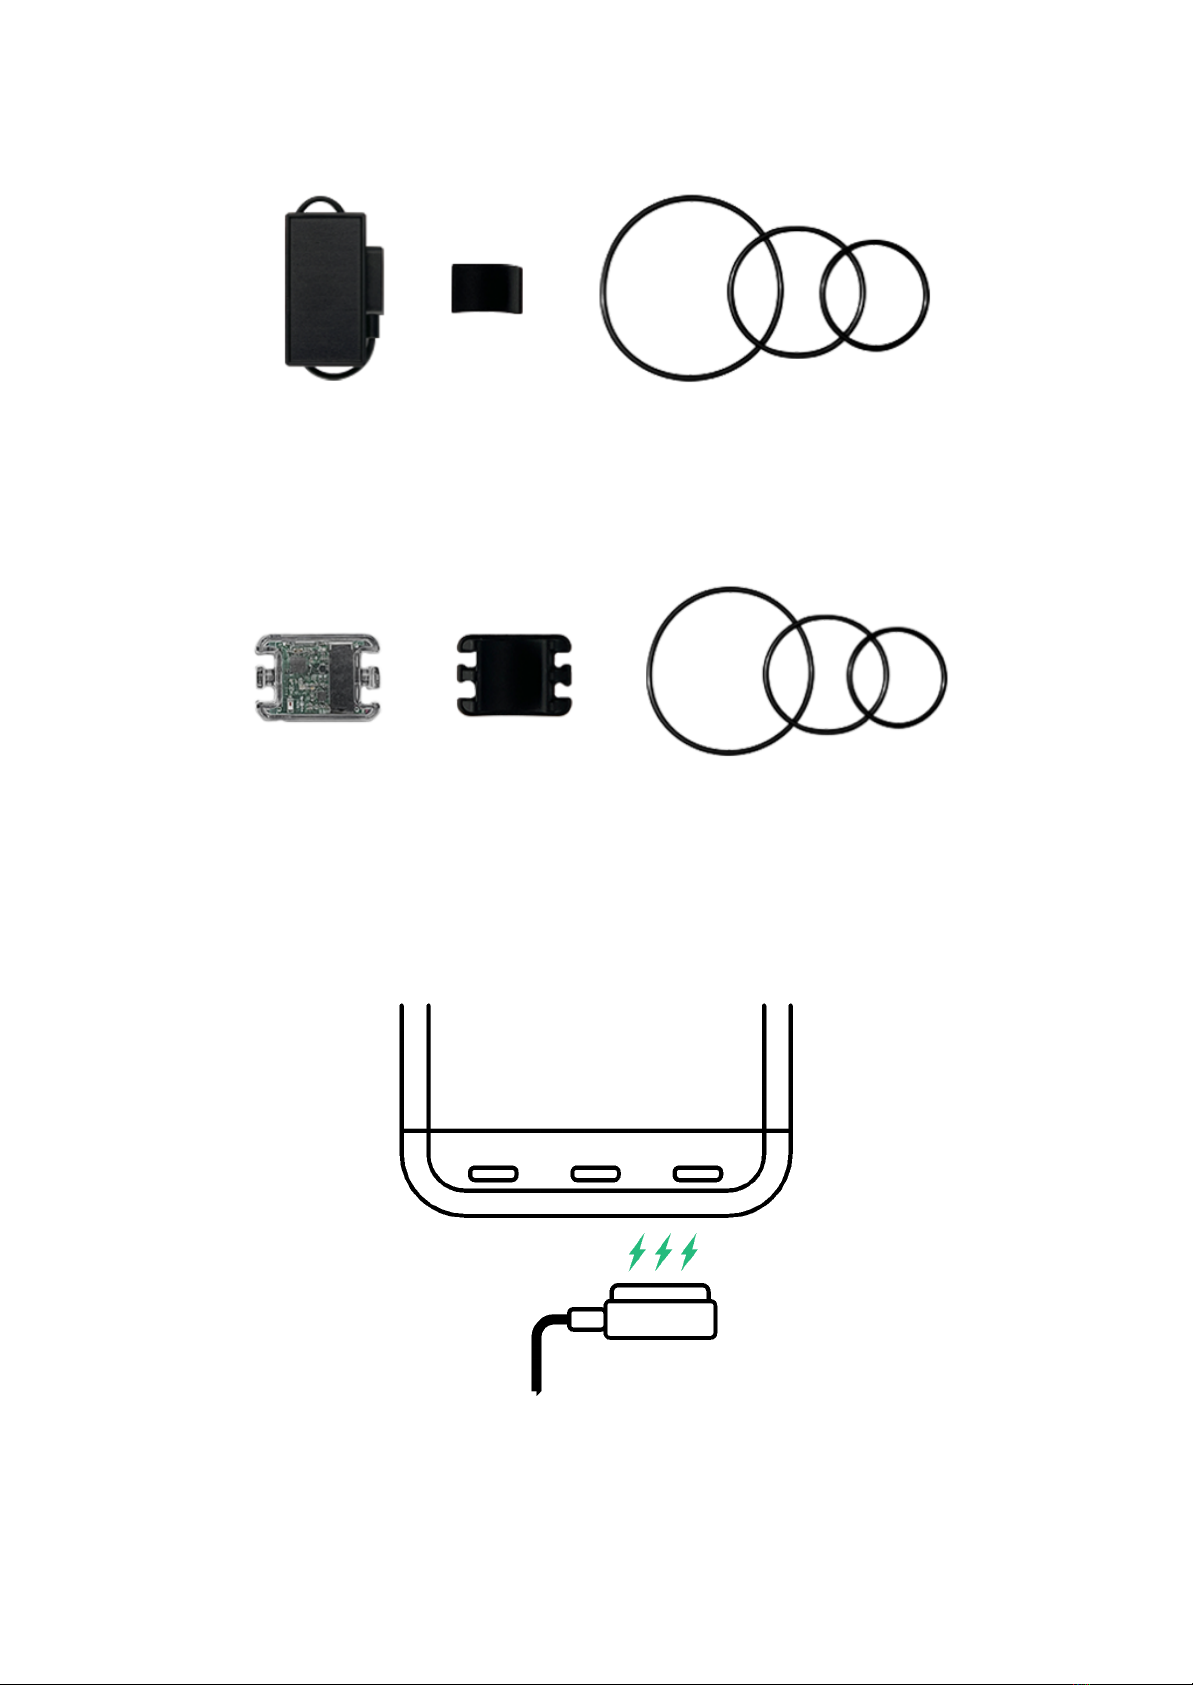
Solar charger (optional)
Solar charger and mounting rubber bands
Solar speed sensor (optional)
Solar speed sensor and mounting rubber bands
Charge
•This product has a magnetic charging cable to improve waterproof performance and convenience.
• Magnets are used to connect the cable so that the charging cable does not come loose.
• When riding with a solar charger connected, it cushions impact to prevent the cable from being disconnected.
•In case of contact with water, wipe the charging piece and dry it completely before use. Any moisture
remaining on the cable may cause corrosion.
페이지 | 3
•This product uses a lithium-ion battery. Excessive impact or bending may damage the battery, causing fire.
Mounting
Mounting the mount
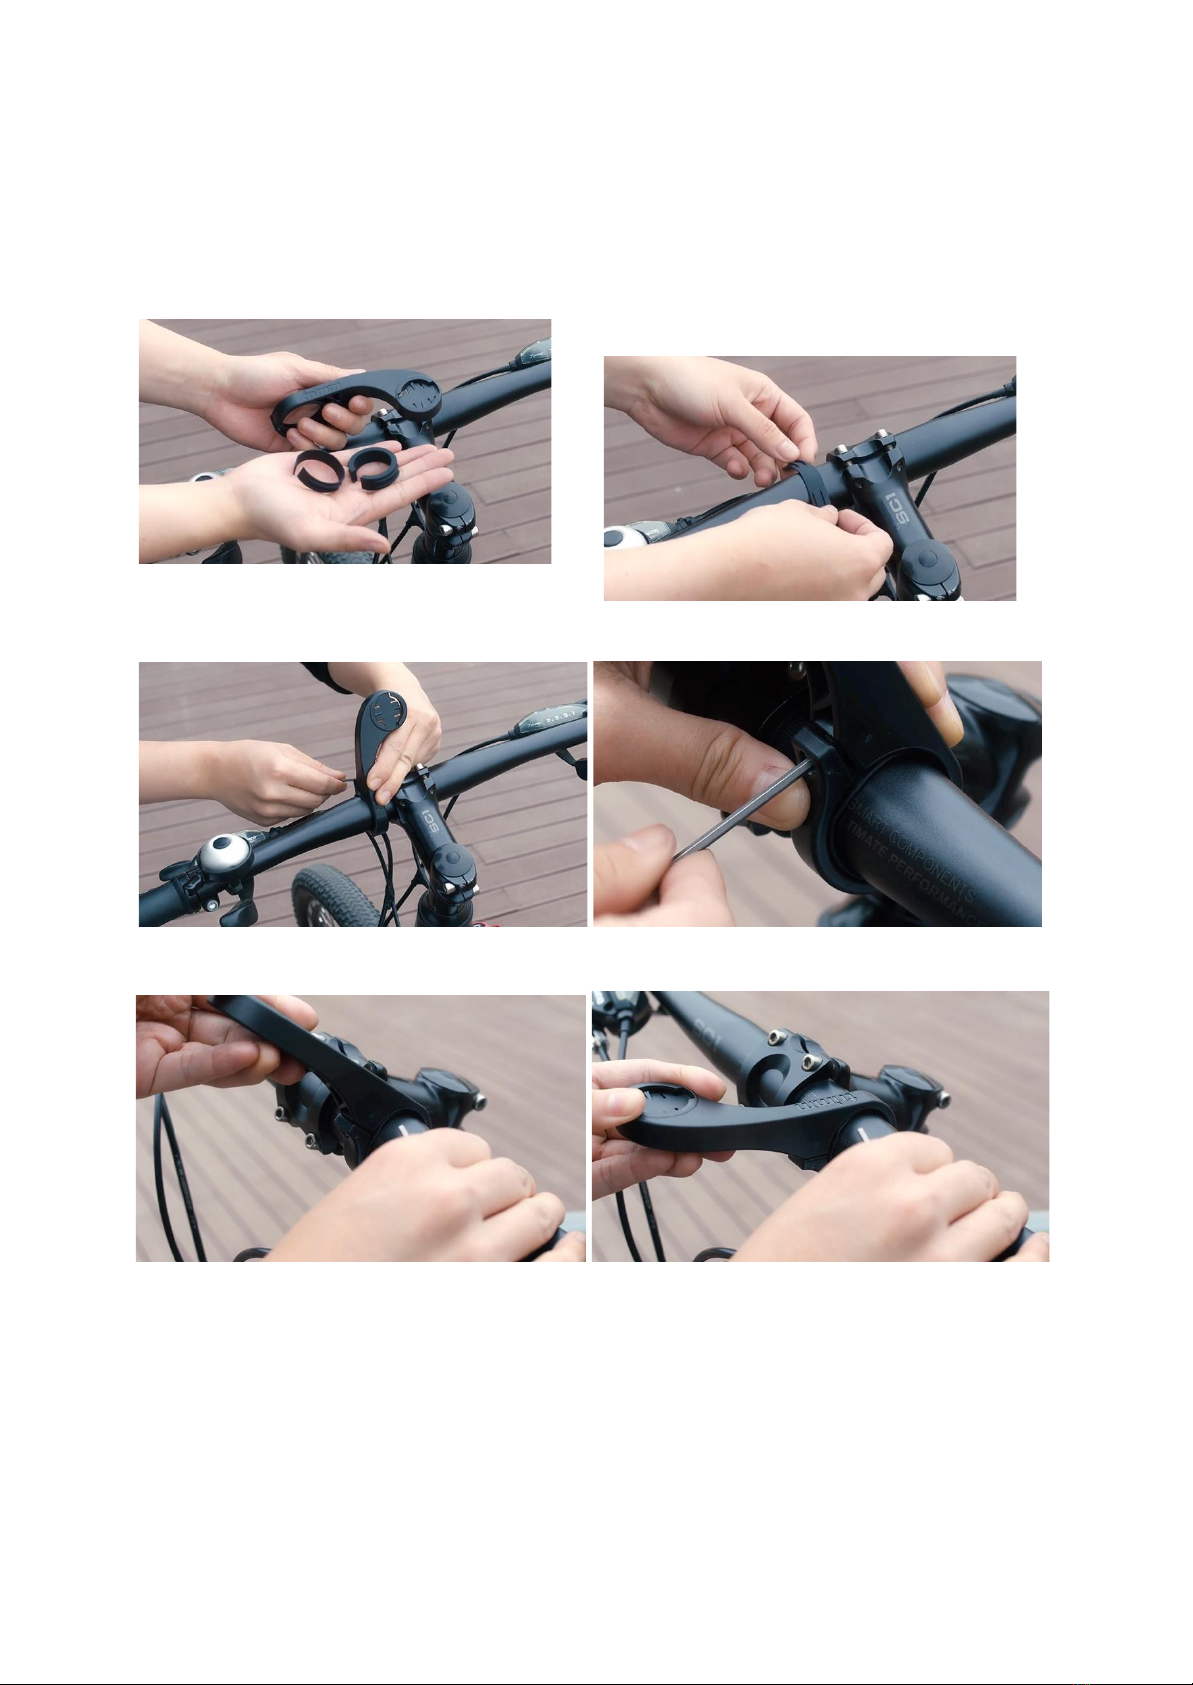
1. Prepare the mount and rubber bands.
2. Select an appropriate size rubber band and place it
on the handle.
3. After fitting the mount to the groove of the rubber band, use a 2.5mm screw and a hexagon wrench to tighten the mount.
4. Check if the mount is properly tightened.
5. After inserting the device into the mount horizontally, turn it 90 degrees to affix it.
페이지 | 4

Mounting the solar charger
trimmOne is the first in the world to utilize a solar charger, so you don't have to worry about battery drain.
1. After inserting the rubber holder into the solar charger, place it on the stem.
2. Select an appropriate size rubber ring and hang it to the hooks on both sides of the solar charger.
페이지 | 5
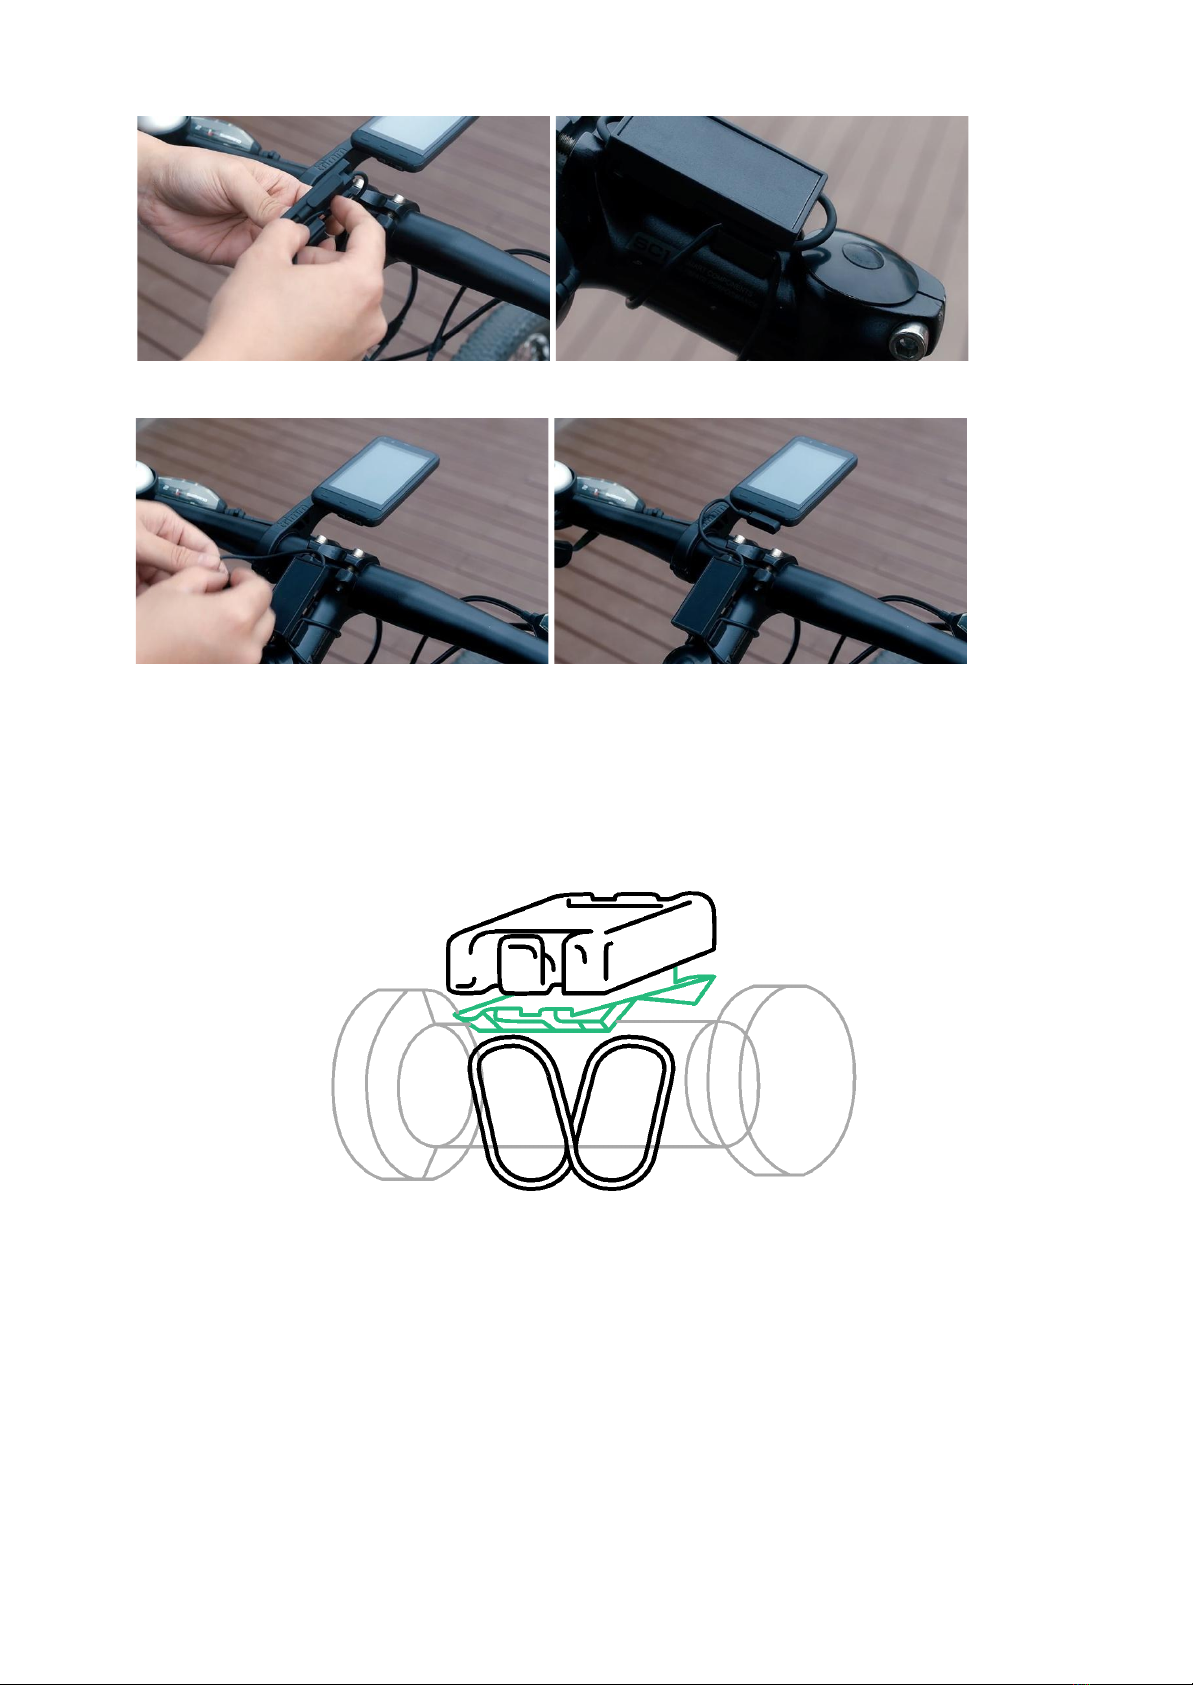
3. Connect the solar charger charging cable to the device.
Solar speed sensor mounting
The solar speed sensor is charged by sunlight while riding, so there is no need to charge the battery. Those who enjoy
indoor riding or night riding, please expose the sensor to the sun at least once every 1~2 weeks.
1. Place the rubber holder on the back of the speed sensor.
페이지 | 6

2. Hang an appropriate size rubber ring on the hook on one side of the speed sensor and place it at the wheel hub.
The sensor may tilt when mounted on an asymmetric hub, but this will not affect its function.
3. With the rubber holder in contact with the wheel hub, attach the rubber ring on the opposite side to affix it.
Pairing
Download the trimm Cycling Center app
Search and download ‘trimm Cycling Center’ in the App Store or Google Play Store.
Simply scan the QR code below to go to the app download page.
페이지 | 7

https://trimm.bike/app
Device connection
1. Start the trimm Cycling Center app.
2. Tap the device pairing icon in the lower right corner.
3. Tap the left and right buttons on the device at the same
time.
4. After verifying the numbers of the device and the app
are the same, confirm the Bluetooth connection.
Speed sensor connection
1. Connect the device and the app.
페이지 | 8

2. Tap the Sensors button at the bottom or the More ▶
Sensors button.
3. Turn it so the speed sensor starts working. The sensor
is also detected when rolling a wheel equipped with a
sensor.
4. Click the scanned sensor to connect and select the wheel size.
The wheel size is marked on the side of the tire. If the wheel size you want is not available, please enter it yourself.
5. When the sensor is connected, the speed sensor icon will be displayed on the status bar at the top of the device.
Compatible sensors
페이지 | 9
Questo manuale è adatto per i seguenti modelli
1
Indice
Altri manuali trimm Accessori per biciclette


