Tylo Combi 7 Manuale utente

Confirm 3X
copper
connectors installed
For use only if you
want to use sauna
control to operate your
light (not dimmable).
Requires separate 120v
supply. (Do NOT take
120v from main 240v
supply.)
240v Supply wire
Standard control cable length is 15 feet.
Longer available for order if required.
We discourage splicing or trying to make your
own longer cable.
Sensor cable is standard 15’. No option. No
need for longer as specified location is close
to heater.
SaunaFin.com
Note: If using outdoors, you may require a WiFi range extender to obtain signal.
COMBI ELITE TROUBLESHOOTING
(prepared by Saunafin)
Control & Elite sensor cable can also
be connected to any of 6, 7, 8, 9

Temperature Sensor Location
Sensor location is very specific and very important for proper function of the sauna heater.
Sensor must be 3” to the front or open side of heater (not in corner), 1” down from ceiling.
Humidity + Temperature Sensor Installation (Combi Elite Only)
SAUNA VENTILATION
Sensor cable wires are very small.Ensure connection is tight and secure
Indoor Sauna: Position the air inlet and outlet vents as far away from one another as possible (diagonally opposite).
Air inlet vent should be low, behind (or close to heater). The outlet vent should be located high on a wall (A), and should
be about 19” sq. It should be directed back into house – it should not be discharged directly to the outside. If outlet wall
is inaccessible, install outlet vent in far corner of ceiling & duct over drop ceiling to area in front of sauna (B).
Outdoor Saunas: Outdoor saunas generally have easy access. Some choose to hold off on vents initially and add later if
it appears to be necessary.)
Do not install inlet and outlet vents on same wall. Bad ventilation can be worse than no ventilation.
SaunaFin.com

MAINTENANCE
To prevent build up of lime-scale and higher salt/mineral levels empty the reservoir after each use. If this is not done, foam
build up may occur which can “trick” water level probe to detect higher than actual water level and risk burning out steam
element.
Annually
Combi water reservoir should be descaled at least once a year using “Tylo De-Scaler” (see full manual).
Clean water level probe using a cloth (see full manual).
Check stone compartment. Remove all stones. Remove all small stones, gravel and lime-scale from rock compartment.
Replace damaged stones with new ones as required.
First Use:
Turn onheater for one hour to “burn off” any new
paint or element oils. The water reservoir does not
need to be operating.
There may be a little smoke initially. This is normal.
Very Important:
Clean rocks before use to remove
dust.
Sauna rocks may only be placed in
center (deep) rock compartment (1).
Never place stones on top of the side
air chambers (2). This will obstruct air
circulation, causing the unit to
overheat and the cut-out switch to
activate.
Cut-out for heater is on left side.
When tripped, stem ispushed out.
(When tripped, control goes blank.
2.
SaunaFin

Error codes
Should an error occur in a device or associated equipment (control panel, temperature sensor, etc.)
an error message will be displayed (see Error list).
e following error codes are used:
No. Error Comments/Troubleshooting
1 Temperature sensor in the
room not connected or faulty.
Is the sensor at the input intact/interrupted? Is it indica-
ting an incorrect value or loose?
2 Temperature sensor in steam
tank not connected or faulty.
Is the sensor at the entrance intact/interrupted? Is it
indicating an incorrect value or loose? e sensor value
is displayed under the water temperature status under
Congure. On operation is not interrupted if an error
occurs. Standby operation not permitted.
3 e relay board has overheated. Wait until the temperature drops to 20 °C; it should be
possible to start it aer that. If the temperature remains
too high the error will recur.
4 e level electrodes in the ste-
am tank are short-circuited.
Check that the electrode pins are touching the electrode
tube or alternatively the cables. Clean the water tank and
level pins.
5 e steam tank overfull level
electrodes are not working.
e top electrode (high) has not detected the water
level within the maximum lling time, or the maximum
lling time for the water tank in Congure is too short
due to low ow. Default value is 6 minutes. Is the inco-
ming water switched on? Is there a loose contact in the
electrode wire connection? Coating on electrode pins
(level electrodes)? Check the value in Congure/Status at
start-up to ensure that the level has changed from low to
mid/high during lling. If the level has not changed then
both level pins (mid/high) are faulty. If the level has only
changed from low to mid, the high pin is faulty.
6 Contact lost with the control
panel..
Are the control panel's RJ10 connections loose? Poor
connection?
7 Contact lost with temperature/
humidity sensor.
Are the temperature/humidity sensor's RJ10 connections
loose? Poor connection?
8 e steam tank has overheated. Temperature in water tank is too high. Check the steam
pipe along its length, and its dimensions. Check whether
NTC in the tank is intact and showing the correct value:
at room temperature/25 °C, this is about: 10 kilo ohm.
9 Real-time clock (RTC) commu-
nication error.
Has the system lost power for a long period? Set the time
and date.

Error codes (continued)
No. Error Comments/Troubleshooting
10 Contact with the add-on board
has been lost.
Check the RJ45 cable between the circuit board and the
add-on board. Is the green LED lit on the add-on board?
Try to start ON operation again to try and restore the
contact. Try replacing the RJ45 cable or add-on board.
12 Steam tank level electrodes are
not working, mid failure.
Check the cable connections between the circuit board
and the mid electrode. Check if the mid electrode pin is
coated with surface coating; if so, clean the electrode pin.
13 Humidity sensor is not wor-
king.
Try restarting the system or replacing the temperature/
humidity sensor that is connected to the RS485 input.
14 Temperature sensor not wor-
king.
Try restarting the system or replacing the temperature/
humidity sensor that is connected to the RS485 input.
15 Contact lost with the relay
board.
Appears when the primary unit has lost contact with
the connected secondary unit. e system will x itself.
Check synchronisation cables and voltage to secondary
units. Aer the error is rectied, the system reboots to
include all secondary units in system operation.
16 Temperature cut-out activated
and must be reset manually.
Combined temperature cut-out/temperature sensor in
sauna is reset via a push button on the sensor.
17 Too many temperature/humidi-
ty sensors connected
Only one temperature and humidity sensor may be con-
nected to the system's RS485 bus.

7
Symptom Possible cause Remedy
Heater is on but does
not create steam. 1. Water level incorrect. Below minimum water
level for safety sensor?
2. Humidity settings not programmed as intended
3. Water reservoir temperature cut-out activated?
4. Heater element in reservoir faulty?
5. If the sauna structure has defi cient ventilation in
conjunction with dry sauna and high sauna tem-
perature (operating with no water in reservoir), the
temperature cut-out can activate because of higher
radiating temperature in the heater.
1. Fill up reservoir.
2. Confirm control setting-review control manual.
3. Reset temperature cut-out. For more information,
see the section on temperature cut-out on fi gure 9
page 15 in full manual. If the steam function does not
work after reset, there is a risk of the reservoir being
damaged.
4. An authorized electrician is required to fi nd the fault.
5. Check for possible defi cient ventilation.
Heater element
in heater stone
compartment does
not warm up.
1.
2. Water reservoir in operation? Only two of the three
heater elements in the stone compartment can
operate at the same time as the tank, otherwise ex-
cessive current is drawn from the electricity supply.
This is not a fault outside normal operation.
3. Some of the heater fuses on the main switchboard
can have tripped out?
4. Resistor coil in the heater element faulty?
5. Internal heater PCB fault?
1.
2. See the instructions supplied with the control panel.
3. Check and replace/reset the fuses in the main switch-
board.
4. An authorised electrician is required to fi nd the fault.
5. An authorised electrician is required to fi nd the fault.
Lights in the sauna
do not come on
when switched on at
the control panel.
1. Light was not connected to the heter. (Requires a
separate 120 volt supply to heater)
2. Internal heater PCB fault?
1. Verify with authorized electrician who performed
installation of heater/lighting.
2. An authorized electrician is required to fi nd the fault.
Heater does not
work, control panel
does not light up.
1. The main power switch is off ?
2. Circuit breaker tripped on main electical panel.
3. Loose contact in cabling between heater and con-
trol panel?
4.
Modular jack is not properly installed at heater
PCB circuit board.
The specific 12VDC output on one of the PCB's
RS485 modular jack to the control panel is faulty
due to short-circuit?
5. Transformer on PCB in heater faulty?
6. Control panel faulty?
1. Turn heater main power switch.
2. Check and replace/reset the fuses in the main switch-
board.
3. Switch off
heater main power switch and connect
each/paired cable to the control panel. Switch on
heater main power switch again. If this does not help,
an authorized electrician is required to fi nd the fault.
4. Requires an authorized electrician to fi nd the fault,
faulty 12VDC output is indicated by LED out next to
the RS485 output. Note: if the fault is in the RJ10
cable to the control panel, do not click into a working
vacant RS485 outlet to avoid causing a fault in that
outlet. RJ10 cable must be replaced/contacts fi tted in
the event of a fault.
5. An authorized electrician is required to fi nd the fault.
6. An authorized electrician is required to fi nd the fault.
The fuses or circuit
breaker in the build-
ing breaker panel
trips as soon as the
heater is turned on.
1. There is a short-circuit at the heater GND. Can be
due to a faulty heater element?
2. Lighting connected to and controlled via the heater
faulty?
3. The heater has not been used for a long period,
causing an insulation fault in the heater element?
4. Heater has had too much water poured on it?
5. Other internal heater fault?
1,2,3,4,5. Do not use the heater, switch off at main heater
main switchboard trip and disconnect heater fuses
on the main switchboard. An authorized electrician is
required to fi nd the fault.
Water reservoir
temperature cut-out
activated
1. Dry boiling, incorrect minimum water level.
2. Foam in the water reservoir. 1. Drain and clean water reservoir.
2. Clean level electrodes.
Heater does not
work, control panel
does not light up
1. Temperature cut-out activated. 1.
Heater works but do
not reach set tempe-
rature.
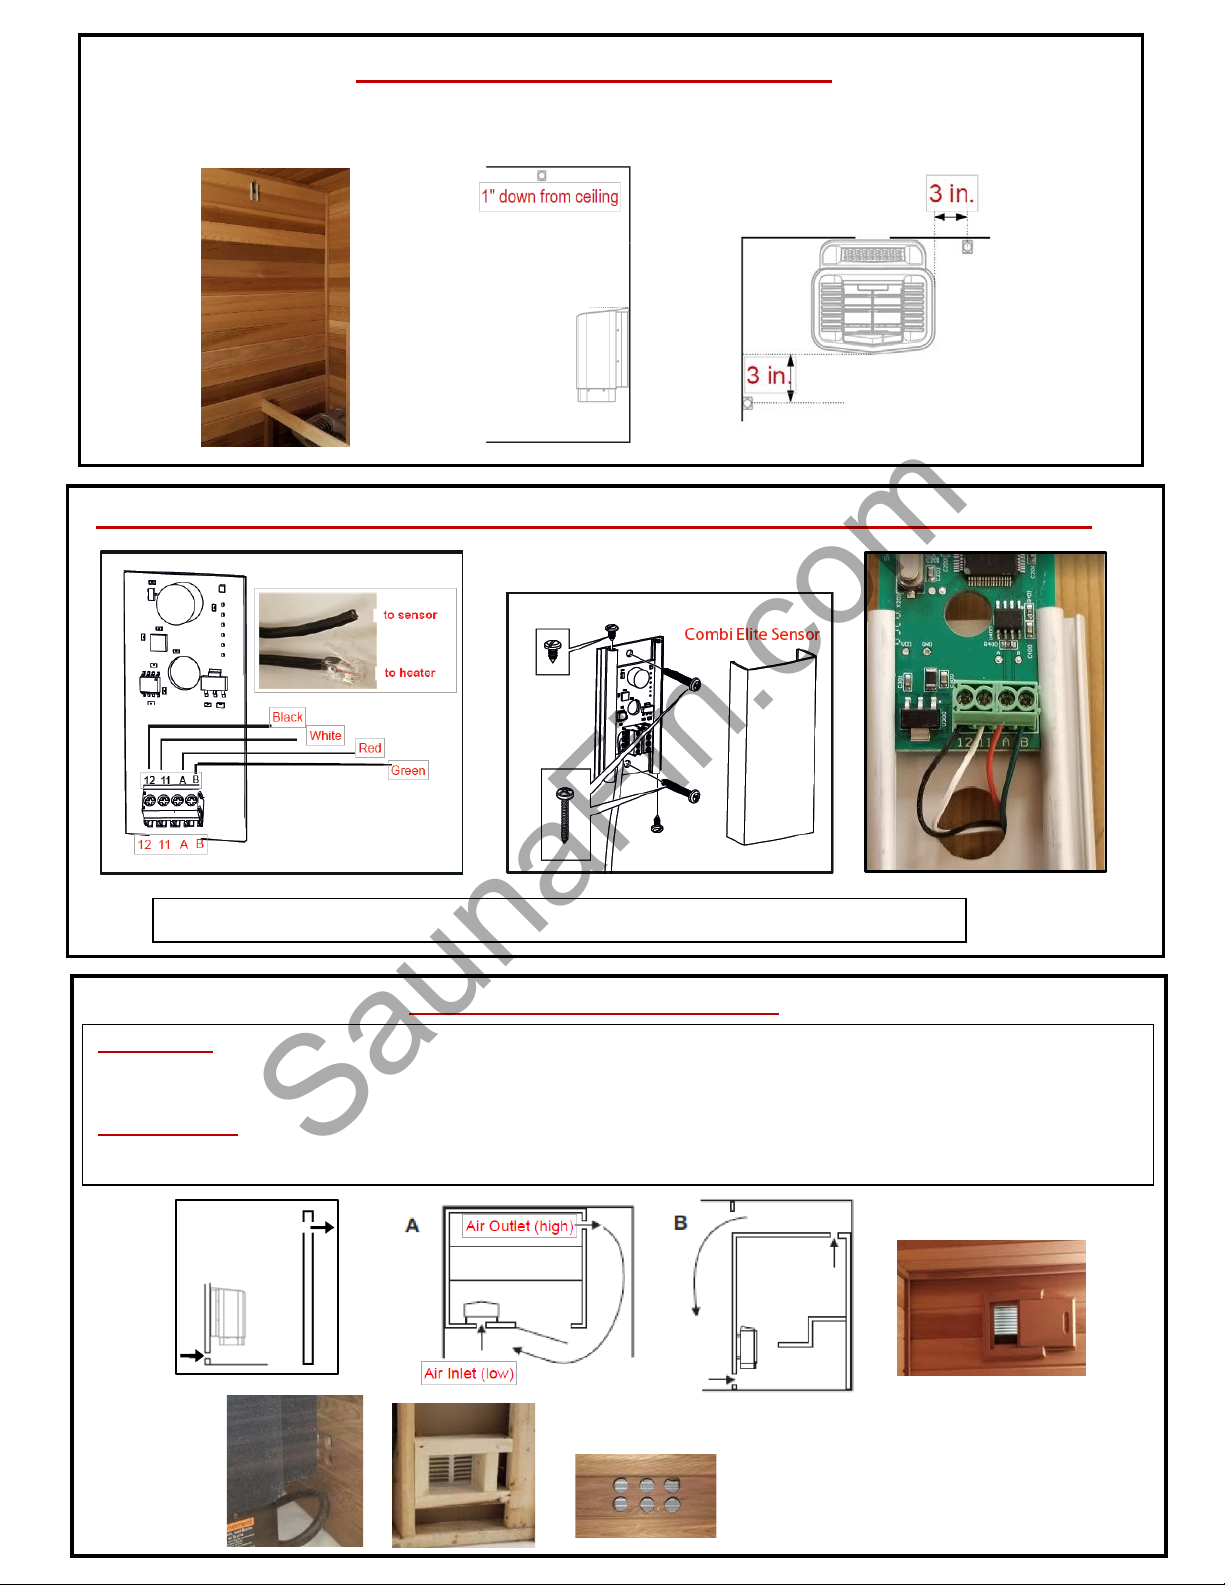
1. Incorrect placement of sensor.
2. Incorrect ventilation.
3. Incorrect heater.
1. Confirm sensor is placed as per instructions.(fig.3)
2. Check ventilation.
3. Check that heaters size is according to recommenda-
tion for the sauna volume.
Troubleshooting the sauna heater
Information!
Contact the dealer during the guarantee period in the event of faults.
See the instructions for the control panel for details of faults not covered in this user guide.
Table 1: Troubleshooting the sauna heater
First time use.
Heater does not
operate
1. Breaker off
2.U-shape copper connectors not installed.
3.Sensor or control cable plugged into wrong jack
1. Turn on Breaker
2.Have electrician confirm proper installation (fig.19) .
3.Have electrician confirm proper installation (fig.19) .
6.GFCI breaker tripped
6.Saunas should not have GFCI breaker. Have electrican
replace with standard breaker
Possible deficient ventilation. Improper ventilation can
cause high limit to trip.(See page 5 in full manual)
Change, rearrange stones, clean stone
compartment. Possible deficient ventilation.
2.
Reset High limit switch.(See page 5 in full manual)
2.
Temperature settings not programmed as intended Confirm control setting-review control manual.
Questo manuale è adatto per i seguenti modelli
1
Indice
Altri manuali Tylo Accessori per la spa


